所謂測試驅動開發,英文全稱Test-Driven Development,簡稱TDD,是一種不同於傳統軟件開發流程的新型的開發方法。就是在明確要開發某個功能後,首先思考如何對這個功能進行測試,並完成測試代碼的編寫,然後編寫相關的代碼滿足這些測試用例。然後循環進行添加其他功能,直到完成全部功能的開發。
Google Mock的設計靈感來源於jMock和EasyMock,它的作用是幫你快速地做出一個接口的仿制品。如果你的設計依賴其它的類,而這些類還沒有完成或非常昂貴(如數據庫);如果你要測試你的模塊與其它模塊是否能正確結合,並想了解其交互過程;那麼Google Mock就能幫助你。
PS: The official Google Mock site is https://code.google.com/p/googlemock/. The version used for building the examples is Google Mock 1.7.0.
一、 環境配置
gmock1.7.0中使用了C++11新標准,所以我們的編譯器需要支持C++11才行,在Linux系統中,即需要安裝GCC4.7/G++4.7,我的測試環境是Ubuntu12.04,默認安裝的是GCC4.6/G++4.6,所以需要在安裝編譯gmock之前首先安裝GCC4.7/G++4.7,這裡也順便把安裝的過程加上,有需要的猿們可以參考:
add-apt-repository ppa:ubuntu-toolchain-r/ apt- apt-get - g++-
安裝成功後我們如果要使用gcc-4.7&g++-4.7來編譯的話,我們就得把gcc改為gcc-4.7,g++同理,改為g++-4.7來進行編譯.如果你想直接使用gcc-4.7而不改變編譯時gcc改為gcc-4.7的話,我們就可以更改一下gcc的軟鏈接:
   /usr/bin/
   -s /usr/bin/- /usr/bin/
   /usr/bin/g++
   -s /usr/bin/g++- /usr/bin/g++
二、gmock安裝
下載好gmock之後,解壓,然後切換到gmock源碼所在目錄,使用如下命令安裝:
同時,你還需要編譯google test,其包含在gmock源碼下的gtest文件夾,切換到gtest文件夾,然後用相同的方式安裝即可。
三、實例
Soundex.h文件:
   Soundex_h
 #include <>

       std:: encode( std::& word)
     std:: zeroPad( std::& word)         word +
SoundexTest.cpp文件:
 #include
 #include


  SoundexEncoding:
     ASSERT_THAT(soundex.encode(), Eq(
     ASSERT_THAT(soundex.encode(), Eq( }
main.cpp文件:
 #include

  main( argc, **     testing::InitGoogleMock(&      }
CMakeLists.txt文件:
  cmake_minimum_required(VERSION
 include_directories($ENV{GMOCK_HOME}/include $ENV{GMOCK_HOME}/gtest/ link_directories($ENV{GMOCK_HOME}/mybuild $ENV{GMOCK_HOME}/gtest/ add_definitions(-std=c++ (CMAKE_CXX_FLAGS
       target_link_libraries(test gtest)
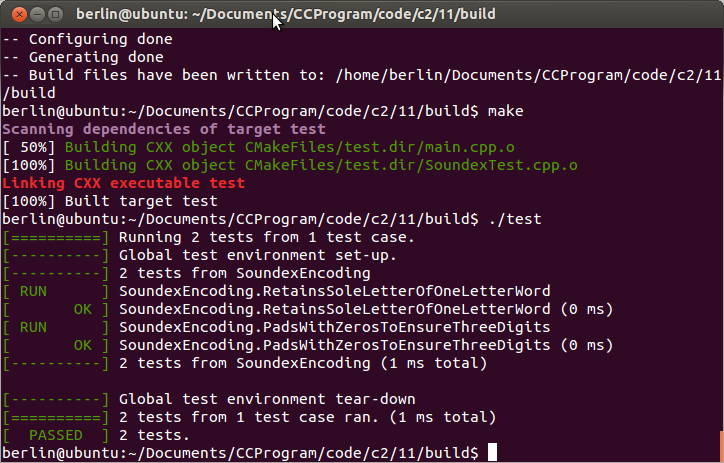
好了,編譯執行吧,執行結果如下:

好了gmock的使用就介紹到這裡,需要深入研究的童鞋可以參考官方文檔。這裡最重要的不是學會使用gmock,而是要在學會使用gmock之後養成TDD開發的好習慣.
Test-driving vs Testing: Using a testing technique, you would seek to exhaustively analyze the specification in question (and possibly the code) and devise tests that exhaustively cover the behavior. TDD is instead a technique for driving the design of the code. In TDD, you write tests to describe the next behavior needed.