POCO C++庫學習和分析 -- 隨機數和數字摘要
在程序設計時,有時候我們需要生成隨機數和數字摘要。在Poco庫中,也提供了上述功能,下面我們一一敘述:
1. 隨機數生成
Poco中生成隨機數的類為Poco::Random類。它根據PRNG(pseudo random number generator )算法設計,采用了一個累加的非線性反饋算法。PRNG算法可以產生0 ~ 2^31之間的隨機數整數。
在接口上Poco::Random提供了一些函數,可以使使用者直接得到其他形式的隨機數。如char, bool, float 和 double 類型。另外Poco庫中還提供了RandomInputStream類,用於Poco::Random類的流操作。
成員函數:
1. void seed(Poco::UInt32 seed)
根據給定的種子值生成隨機數。
2. void seed()
使用任意值(從RandomInputStream類中獲取)生成隨機數。
3. 默認的構造時,Poco::Random類采用當前的時間和日期生成隨機數。如果想要更好的隨機效果,需要顯式的調用seed()方法
4. UInt32 next()
返回0 ~ 2^31之間的隨機整數
5. UInt32 next(UInt32 n)
返回0 ~ n之間的隨機整數
6. char nextChar()
返回隨機Char值
7. bool nextBool()
返回隨機bool值
8. float nextFloat()
返回隨機float值,范圍0 ~ 1
9. double nextDouble()
返回隨機double值,范圍0 ~ 1
下面是關於Random的一個例子:
[cpp]
#include "Poco/Random.h"
#include "Poco/RandomStream.h"
#include <iostream>
using Poco::Random;
using Poco::RandomInputStream;
int main(int argc, char** argv)
{
Random rnd;
rnd.seed();
std::cout << "Random integer: " << rnd.next() << std::endl;
std::cout << "Random digit: " << rnd.next(10) << std::endl;
std::cout << "Random char: " << rnd.nextChar() << std::endl;
std::cout << "Random bool: " << rnd.nextBool() << std::endl;
std::cout << "Random double: " << rnd.nextDouble() << std::endl;
RandomInputStream ri;
std::string rs;
ri >> rs;
return 0;
}
2. 密碼散列
下面這段是Wiki上關於密碼散列的介紹:
A cryptographic hash function is a hash function with certain additional security properties to make it suitable for use as a primitive in various information security applications, such as authentication and message integrity. A hash function takes a long string (or message) of any length as input and produces a fixed length string as output, sometimes termed a message digest or a digital fingerprint. Wikipedia
2.1 概述
密碼散列(cryptographic hash)是將目標文本轉換成具有相同長度的、不可逆的雜湊字符串(或叫做消息摘要)。它有兩個特點:
1、哈希算法往往被設計成生成具有相同長度的文本
2、哈希算法是不可逆的。(因為如果可逆,那麼哈希就是世界上最強悍的壓縮方式——能將任意大小的文件壓縮成固定大小)
密碼散列是一個多對一映射,好的哈希算法應該對於輸入的改變極其敏感。Poco中實現了被廣泛使用的密碼散列函數(cryptographic hash functions), 包括了MD4, MD5
和SHA1。另外還提供了HMACEngine類實現了HMAC功能。HMAC全稱為Hash-based Message Authentication Code,HMAC運算利用哈希算法,以一個密鑰和一個消息為輸入,生成一個消息摘要作為輸出。
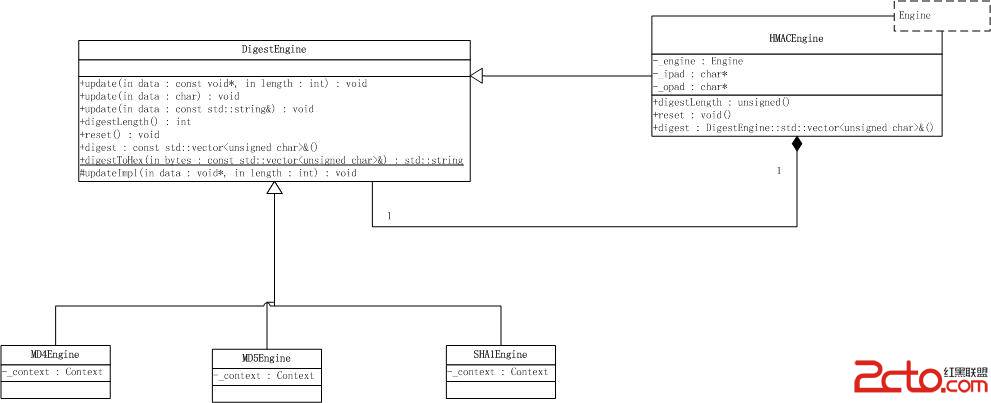
2.2 DigestEngine類
Poco::DigestEngine類為所有的消息摘要類定義了通用接口。
1. unsigned digestLength()
用於獲取不同消息摘要算法生成消息摘要的長度。
2. const Digest& digest()
獲取消息摘要內容
3. update(const void* data, unsigned length)
更新消息摘要內容
讓我們來看一下DigestEngine類的類圖。

下面是Poco中相關類的一些例子:
[cpp]
#include "Poco/HMACEngine.h"
#include "Poco/SHA1Engine.h"
using Poco::DigestEngine;
using Poco::HMACEngine;
using Poco::SHA1Engine;
int main(int argc, char** argv)
{
std::string message1("This is a top-secret message.");
std::string message2("Don't tell anyone!");
std::string passphrase("s3cr3t"); // HMAC needs a passphrase
HMACEngine<SHA1Engine> hmac(passphrase); // we'll compute a HMAC-SHA1
hmac.update(message1);
hmac.update(message2);
const DigestEngine::Digest& digest = hmac.digest();
// finish HMAC computation and obtain digest
std::string digestString(DigestEngine::digestToHex(digest));
// convert to a string of hexadecimal numbers
return 0;
}
2.3 與DigestEngine類相關的流(DigestInputStream/DigestOutputStream)
可以通過Poco::DigestInputStream和Poco::DigestOutputStream類對DigestEngine類進行輸入輸出操作。過程很簡單,只要在在構造Stream時,把相關的DigestEngine類傳入即可。需要注意的是,在向DigestOutputStream類寫入後,要及時調用flush函數,以確保Stream把所有數據都輸入進DigestEngine類。
下面是相關的一個例子:
[cpp]
#include "Poco/DigestStream.h"
#include "Poco/MD5Engine.h"
using Poco::DigestOutputStream;
using Poco::DigestEngine;
using Poco::MD5Engine;
int main(int argc, char** argv)
{
MD5Engine md5;
DigestOutputStream ostr(md5);
ostr << "This is some text";
ostr.flush(); // Ensure everything gets passed to the digest engine
const DigestEngine::Digest& digest = md5.digest(); // obtain result
std::string result = DigestEngine::digestToHex(digest);
return 0;
}