一、引言
在軟件系統中,當創建一個類的實例的過程很昂貴或很復雜,並且我們需要創建多個這樣類的實例時,如果我們用new操作符去創建這樣的類實例,這未免會增加創建類的復雜度和耗費更多的內存空間,因為這樣在內存中分配了多個一樣的類實例對象,然後如果采用工廠模式來創建這樣的系統的話,隨著產品類的不斷增加,導致子類的數量不斷增多,反而增加了系統復雜程度,所以在這裡使用工廠模式來封裝類創建過程並不合適,然而原型模式可以很好地解決這個問題,因為每個類實例都是相同的,當我們需要多個相同的類實例時,沒必要每次都使用new運算符去創建相同的類實例對象,此時我們一般思路就是想——只創建一個類實例對象,如果後面需要更多這樣的實例,可以通過對原來對象拷貝一份來完成創建,這樣在內存中不需要創建多個相同的類實例,從而減少內存的消耗和達到類實例的復用。 然而這個思路正是原型模式的實現方式。下面就具體介紹下設計模式中的原型設計模式。
二、原型模式的詳細介紹
我們來看一個入學考試場景實例
基對象(一般為接口,抽象類):考試題(樣卷)
原型模式的復職克隆:根據需要印刷考卷,這裡的考卷都是復制考試題樣卷
客戶端:學生答卷,同一套試卷,學生做題不可能一模一樣
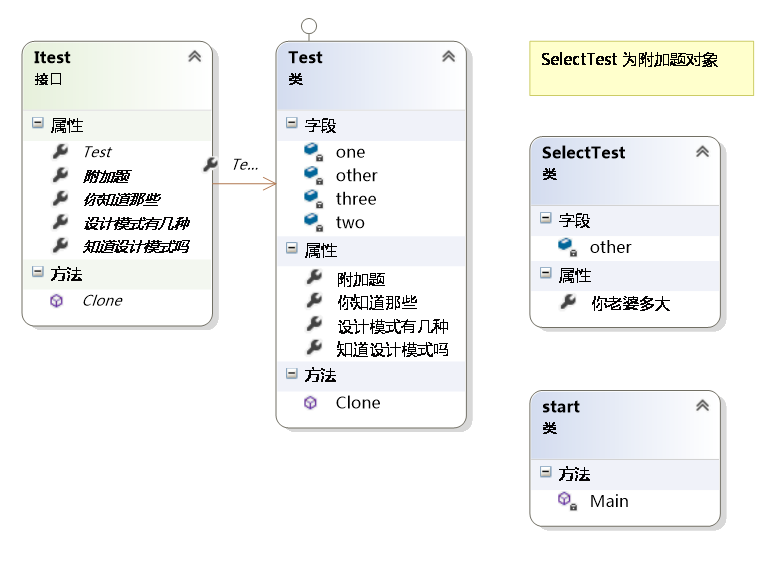
類圖:

接口:試卷樣例代碼
? 1 2 3 4 5 6 7 8 9 10 11 12 13 14 15 16 17 18 19 20 21 22 23 24 25 26 27 28 29 30 31 32 33 34 35 36 37 38 39 40 41 42 43 44 45 46 47 48 49 50 51 52 53 54 55 56 57 58/// <summary>
/// 選答題
/// </summary>
public class SelectTest
{
private string other;
public string 你老婆多大
{
get
{
return this.other;
}
set
{
this.other = value;
}
}
}
/// <summary>
/// 面試題
/// </summary>
public interface Itest
{
Itest Clone();
string 知道設計模式嗎
{
get;
set;
}
string 設計模式有幾種
{
get;
set;
}
string 你知道那些
{
get;
set;
}
SelectTest 附加題
{
get;
set;
}
Test Test
{
get;
set;
}
Test Test1
{
get;
set;
}
}
復制克隆:復印機
? 1 2 3 4 5 6 7 8 9 10 11 12 13 14 15 16 17 18 19 20 21 22 23 24 25 26 27 28 29 30 31 32 33 34 35 36 37 38 39 40 41 42 43 44 45 46 47 48 49 50 51 52 53 54 55 56 57 58 59 60 61 62/// <summary>
/// 繼承Itest接口
/// </summary>
public class Test : Itest
{
private string one;
private string two;
private string three;
private SelectTest other=new SelectTest();
public string 知道設計模式嗎
{
get
{
return this.one;
}
set
{
this.one = value;
}
}
public string 設計模式有幾種
{
get
{
return this.two;
}
set
{
this.two = value;
}
}
public string 你知道那些
{
get
{
return this.three;
}
set
{
this.three = value;
}
}
public SelectTest 附加題
{
get
{
return this.other;
}
set
{
this.other = value;
}
}
#region IColorDemo 成員
public Itest Clone()
{
//克隆當前類
return (Itest)this.MemberwiseClone();
}
#endregion
}
客戶端,發卷做題
? 1 2 3 4 5 6 7 8 9 10 11 12 13 14 15 16 17 18 19 20 21 22 23static void Main()
{
//印刷試卷
Itest test = new Test();
//復制樣本試卷
Itest test1 = test.Clone();
//考生1
test.設計模式有幾種 = "23";
test.附加題.你老婆多大 = "18";
//考生2
test1.設計模式有幾種 = "24";
test1.附加題.你老婆多大 = "20";
//顯示考生答卷內容
Console.WriteLine("test設計模式有幾種:" + test.設計模式有幾種); //23
Console.WriteLine("test附加題.你老婆多大:" + test.附加題.你老婆多大); //20
Console.WriteLine("test1設計模式有幾種:" + test1.設計模式有幾種); //24
Console.WriteLine("test1附加題.你老婆多大:" + test1.附加題.你老婆多大); //20
Console.ReadKey();
}
注意:這裡兩個人答得不一樣,為什麼附加題中,老婆年齡都為20?
這裡涉及到深拷貝,淺拷貝問題,值類型是放在棧上的,拷貝之後,會自會在站上重新add一個,而class屬於引用類型,拷貝之後,棧上重新分配啦一個指針,可指針卻指向同一個位置的資源。淺拷貝,只拷貝值類型,深拷貝,引用類型也拷貝復制。
解決方案:
? 1 2 3 4 5 6 7 8 9 10public Itest Clone()
{
//克隆當前類
Itest itst= (Itest)this.MemberwiseClone();
SelectTest st = new SelectTest();
st.你老婆多大 = this.other.你老婆多大;
itst.附加題 = st;
return itst;
} 使用序列化解決
? 1 2 3 4 5 6 7 8 9 10 11 12 13 14 15 16 17 18 19 20 21 22 23 24 25 26 27 28 29 30 31 32 33 34 35 36 37 38 39 40 41 42 43 44 45 46 47 48 49 50 51 52 53 54 55 56 57 58 59 60 61 62 63 64 65 66 67 68 69 70 71 72 73 74 75 76 77 78 79 80 81 82 83 84 85 86 87 88 89 90 91 92 93 94 95 96 97 98 99 100 101 102 103 104 105 106 107 108 109 110 111 112 113 114 115 116 117 118 119 120 121 122 123 124 125 126 127 128 129 130 131 132 133 134 135 136 137 138 139 140 141 142 143/// <summary>
/// 選答題
/// </summary>
[Serializable]
public class SelectTest
{
private string other;
public string 你老婆多大
{
get
{
return this.other;
}
set
{
this.other = value;
}
}
}
/// <summary>
/// 面試題
/// </summary>
public interface Itest
{
Itest Clone();
string 知道設計模式嗎
{
get;
set;
}
string 設計模式有幾種
{
get;
set;
}
string 你知道那些
{
get;
set;
}
SelectTest 附加題
{
get;
set;
}
}
/// <summary>
/// 繼承Itest接口
/// </summary>
public class Test : Itest
{
private string one;
private string two;
private string three;
private SelectTest other=new SelectTest();
public string 知道設計模式嗎
{
get
{
return this.one;
}
set
{
this.one = value;
}
}
public string 設計模式有幾種
{
get
{
return this.two;
}
set
{
this.two = value;
}
}
public string 你知道那些
{
get
{
return this.three;
}
set
{
this.three = value;
}
}
public SelectTest 附加題
{
get
{
return this.other;
}
set
{
this.other = value;
}
}
public Itest Clone()
{
SerializableHelper SerializableHelper = new 原型模式.SerializableHelper();
string target = SerializableHelper.Serializable(this);
return SerializableHelper.Derializable<Itest>(target);
}
}
public class SerializableHelper
{
public string Serializable(object target)
{
using (MemoryStream stream = new MemoryStream())
{
new BinaryFormatter().Serialize(stream, target);
return Convert.ToBase64String(stream.ToArray());
}
}
public object Derializable(string target)
{
byte[] targetArray = Convert.FromBase64String(target);
using (MemoryStream stream = new MemoryStream(targetArray))
{
return new BinaryFormatter().Deserialize(stream);
}
}
public T Derializable<T>(string target)
{
return (T)Derializable(target);
}
}
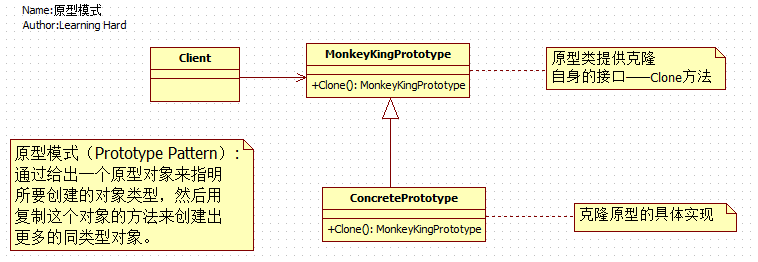
這就是對原型模式的運用。介紹完原型模式的實現代碼之後,下面看下原型模式的類圖,通過類圖來理清原型模式實現中類之間的關系。具體類圖如下:

三、原型模式的優缺點
原型模式的優點有:
原型模式向客戶隱藏了創建新實例的復雜性
原型模式允許動態增加或較少產品類。
原型模式簡化了實例的創建結構,工廠方法模式需要有一個與產品類等級結構相同的等級結構,而原型模式不需要這樣。
產品類不需要事先確定產品的等級結構,因為原型模式適用於任何的等級結構
原型模式的缺點有:
每個類必須配備一個克隆方法
配備克隆方法需要對類的功能進行通盤考慮,這對於全新的類不是很難,但對於已有的類不一定很容易,特別當一個類引用不支持串行化的間接對象,或者引用含有循環結構的時候。
四、.Net中原型模式的實現
在.NET中可以很容易地通過實現ICloneable接口(這個接口就是原型,提供克隆方法,相當於與上面代碼中MonkeyKingPrototype抽象類)中Clone()方法來實現原型模式,如果我們想我們自定義的類具有克隆的功能,首先定義類繼承與ICloneable接口並實現Clone方法。在.Net中實現了原型模式的類如下圖所示(圖中只截取了部分,可以用Reflector反編譯工具進行查看):
