為了更清晰的比較,大家先看上圖。會做網頁的朋友再熟悉不過了,其中的網頁播放器與廣告均為浮動層,我們通過設置播放器div的left、top樣式值來使之在網頁中絕對定位到相對於網頁左上角的(A,B)這個像素坐標位置;並且播放器的z-index值大於廣告的z-index值,因此前者的顯示層次高於後者。
接下來再看下圖:

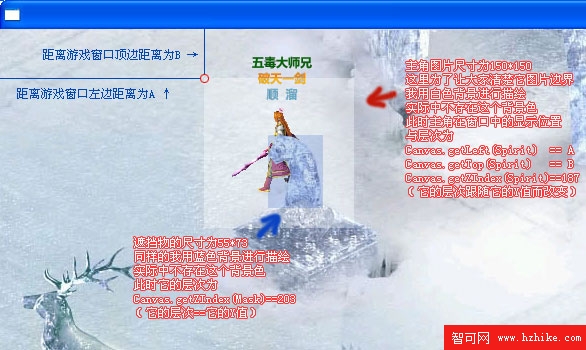
大家可以將主角比做網頁中的廣告,將這頭熊雕像遮擋物比做播放器,然後將游戲窗口的布局畫布Canvas(CarrIEr)比做網頁,這樣再根據圖中的注釋,是否覺得兩者幾乎完全一樣。那麼此時大家肯定會想,為何不用類似left、top、z-index這樣簡單的屬性來替代書寫復雜且不易懂的Canvas.getLeft(…)、Canvas.getTop(…)、Canvas.getZIndex(…)等寫法呢。
4、實現,在清晰的理論思路下屬性訪問器呼之欲出。對,就是它了,接下來我們只需為QXMap地圖控件添加如下3個屬性:
/// <summary>
/// 地圖位於父容器中的Canvas.Left位置
/// </summary>
public double Left {
 get { return (double)this.GetValue(Canvas.LeFTProperty); }
 set { this.SetValue(Canvas.LeFTProperty, value); }
}
/// <summary>
/// 地圖位於父容器中的Canvas.Top位置
/// </summary>
public double Top {
 get { return (double)this.GetValue(Canvas.TopProperty); }
 set { this.SetValue(Canvas.TopProperty, value); }
}
/// <summary>
/// 地圖深度(層次)
/// </summary>
public int ZIndex {
 get { return (int)this.GetValue(Canvas.ZIndexProperty); }
 set { this.SetValue(Canvas.ZIndexProperty, value); }
}
此時我們再回到地表層的初始化方法體中進行相應的替換,結果如下:
private void InitMapSurface() {
 MapSurface.Width = 1750;
 MapSurface.Height = 1440;
 MapSurface.Source = BitmapFrame.Create((new Uri(@"Map\0\0.jpg", UriKind.Relative)));
 MapSurface.Left = -320;
 MapSurface.Top = -200;
 MapSurface.Zindex = -1;
 CarrIEr.Children.Add(MapSurface);
}
比起原先的代碼,改進後的不僅書寫優雅,而且更易於理解,這就是重構的重要手法之一。