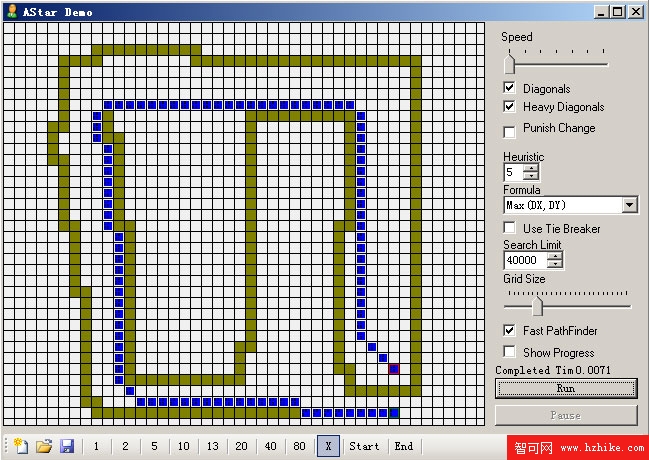
3)A*移動的優化。我已留下接口,根據不同的參數設置,可以啟動不同效率、不同路徑長短、不同精確度的A*尋路,這裡我給大家推薦兩種現成的方案,第一種—程序默認A*尋路方案,此方案找到的路徑最精確,但性能消耗最高;另一種方案可以實現最高效的尋路,但得到的路徑並非最短:
PathFinderFast pathFinderFast = new PathFinderFast(varyObstruction) {
 HeavyDiagonals = false,
 HeuristicEstimate = 100,
};
我在Silverlight引擎中封裝的A*尋路DLL,是根據教程第七節的老外A*改編而成。因此,您完全可以將之作為一個調試器,調試不同的搭配方案,然後將參數賦予pathFinderFast裡:

例如上圖,我通過模擬測試,發現最終找到路徑所消耗的時間為0.0071秒,假如我已對此設置所產生的路徑長度與性能感到滿意,那麼接下來要做的就是將此方案的配置記錄下來: Diagonals = true ; Heavy Diagonals = true ; Henuristic = 5 ; Formula = Max(DX,DY) ; Use TIE Breaker = false ; Search Limit = 40000 ; 尋路對象使用的是FastPathFinder。
OK,最後來在Silverlight引擎中,我就可以這樣來啟動A*尋路:
PathFinderFast pathFinderFast = new PathFinderFast(varyObstruction) {
 Diagonals = true,
 HeavyDiagonals = true,
 HeuristicEstimate = 5,
 Formula = HeuristicFormula.MaxDXDY,
 TIEBreaker = false,
 SearchLimit = 40000,
};
嘿嘿,其實使用A*是可以如此簡單的,不是嗎?
二、主要優化:
1)地圖切片實現了最優化加載方法。即不需要額外做多余判斷,也無需每次對切片容器進行Clear。只需按從0到8的順序對這9個切片重新賦值Source即可,性能真的很優哦:
private void ChangeMapSection() {
……
 countSection = 0;
 for (int x = startSectionX; x <= endSectionX; x++) {
  for (int y = startSectionY; y <= endSectionY; y++) {
    mapSection[countSection].Source =
  Super.GetImage(string.Format("/Image/Map/{0}/Surface/{1}_{2}.jpg", mapCode, x, y));
    Canvas.SetLeft(mapSection[countSection], x * mapSectionWidth);
    Canvas.SetTop(mapSection[countSection], y * mapSectionHeight);
    countSection++;
  }
……
}