很多人第一次接觸到DirectX大都是通過游戲,至於安裝、升級DirectX的原因無非是滿足游戲運行的需要。Direct X其實是微軟公司推出的一個為Windows平台的多媒體API函數庫,它提供標准接口來與顯卡和聲卡、輸入設備等進行交互。如果沒有這組標准API函數庫,那你就需要為每一種顯卡、聲卡的每個組合和每種類型的鍵盤、鼠標和游戲桿編寫不同的代碼。這不又回到了以前的DOS時代。為了解決這個問題,微軟公司推出了DirectX。DirectX從具體的硬件中抽象出來,並且將一組通用指令轉換成硬件的具體命令。這樣開發語言通過調用統一標准的Direct X函數庫就可以操作每一種顯卡、聲卡的每個組合和每種類型的鍵盤、鼠標和游戲桿等多媒體了。
一.Direct X SDK 9.0安裝及類庫介紹:
.Net FrameWork SDK中並沒有包含Direct X SDK,所以為了順利的完成本文後面介紹,
必須先下載、安裝Direct X SDK。具體的下載地址為:http://download.microsoft.com/download/a/c/d/acdfb557-266f-4af4-8673-6ab8009b4ddd/dxsdk_apr2005.exe。此版本是2005四月份推出的英文版。這並不妨礙下面的程序實現。安裝完Direct X後,就會在存在"C:\Windows\Microsoft.Net\Managed DirectX"這樣一個目錄,此目錄中目錄中應該有九個DLL文件和九個XML文件。九個DLL文件大致對應於DirectX中的十個命名空間。編程中就是使用其中的命名空間來提供對輸入設備、聲音、網絡播放、圖形等的支持。Direct X SDK 9.0中的定義的命名空間及其主要的作用具體如表01所示:
命名空間
描述
Microsoft.DirectX
公共類和數學結構
Microsoft.DirectX.Direct3D
3D圖形和助手庫
Microsoft.DirectX.DirectDraw
Direct Draw 圖形API。這是舊式命名空間,現在已經不需要使用它。
Microsoft.DirectX.DirectPlay
用於多玩家游戲的網絡API
Microsoft.DirectX.DirectSound
聲音支持
Microsoft.DirectX.DirectInput
輸入設備支持(例如,鼠標和游戲桿)
Microsoft.DirectX.AudioVideoPlayback
播放視頻和音頻(例如,在電腦上播放各自視頻動畫文件)
Microsoft.DirectX.Diagnostics
疑難解答
Microsoft.DirectX.Security
訪問安全性
Microsoft.DirectX.Security.Permissions
訪問安全權限
表01:Direct X SDK9.0中的定義的命名空間及其主要的作用
Direct X內容十分豐富,下文介紹的只是其中的一個小的應用,即用Visual C#調用Direct X中的SDK來播放視頻文件為例子,程序中只使用了命名空間"Microsoft.DirectX.AudioVideoPlayback"。 Microsoft.DirectX.AudioVideoPlayback命名空間中定義了三個類:"Audio"、"Video"和"TextureRenderEventArgs"。其中前二個類是最常用的,分別用來支持音頻和視頻。Microsoft.DirectX.AudioVideoPlayback命名空間中定義的常用屬性及其具體的作用可參閱表02所示:
屬性
描述
Audio
獲取視頻文件中的音頻對象,可用來後續的音頻播放
Caption
獲取或設置在Form上播放視頻的名稱
CurrentPosition
獲取或設置播放視頻的當前位置
DefaultSize
獲取播放視頻的缺省的視頻大小
Fullscreen
獲取或設置視頻文件是否在全屏模式下播放
IsCursorHidden
獲取播放的視頻時鼠標的狀態:隱藏或顯示
Owner
獲取或設置視頻播放的宿主組件
Paused
獲取當前的播放狀態是否處於暫停狀態
Playing
獲取當前的播放狀態是否處於播放狀態.
SeekingCaps
獲取是否可以搜索性能
Size
RetrIEves and sets the size of the video for playback.
State
獲取當前的播放狀態
Stopped
獲取當前的播放狀態是否處於停止狀態
StopPosition
獲取播放的視頻的停止播放位置
表02:Microsoft.DirectX.AudioVideoPlayback命名空間中定義的常用屬性及其具體的作用
Microsoft.DirectX.AudioVideoPlayback命名空間中定義的常用方法及其具體的作用可參閱表03所示:
方法
描述
HideCursor
隱藏當前播放視頻的鼠標
Open
裝入新的文件到Video對象中
Pause
設置為暫停播放狀態.
Play
設置為播放狀態
SeekCurrentPosition
搜索轉入到制定的播放位置
SeekStopPosition
設置一個新的停止位置
ShowCursor
顯示當前播放視頻的鼠標
Stop
設置為停止播放狀態
Video
初始化一個新的Video實例
表03:Microsoft.DirectX.AudioVideoPlayback命名空間中定義的常用屬性及其具體的作用
了解了以上這些基礎知識後,下面就開始介紹Visual C#調用Direct X播放視頻文件的具體實現方法。
二.本文章的程序設計、調試和運行的環境:
(1).微軟公司視窗2003中文企業版。
(2).Visual Studio .Net 2003企業構建版,.Net FrameWork SDK 1.1版本號4322。
三.Visual C#使用Direct X的實現視頻播放
Visual C#使用Direct X的實現視頻播放難點無非以下幾點:
1. 掌握在Visual C#引入Dirext X函數庫的方法。
2. 設置Direct X視頻播放的宿主組件。
3. 基本的播放命令的設置:播放、停止、暫停等。
下面就是Visual C#使用Direct X的實現視頻播放具體實現步驟:
1. 啟動Visual Studio .Net。
2. 選擇菜單【文件】|【新建】|【項目】後,彈出【新建項目】對話框。
3. 將【項目類型】設置為【Visual C#項目】。
4. 將【模板】設置為【Windows應用程序】。
5. 在【名稱】文本框中輸入【Visual C#中使用DrIEctX實現媒體播放】。
6. 在【位置】的文本框中輸入【E:\VS.NET項目】,然後單擊【確定】按鈕。這樣在"E:\VS.Net項目"目錄中就創建了一個名稱為"Visual C#中使用DriectX實現媒體播放"的文件夾,裡面存放的就是"Visual C#中使用DrIEctX實現媒體播放"項目的所有文件。
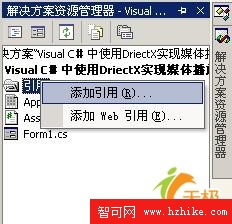
7. 選中【解決方案管理器】|【引用】,單擊鼠標右鍵,選中【添加引用】菜單,具體如圖01所示:

圖01:添加引用
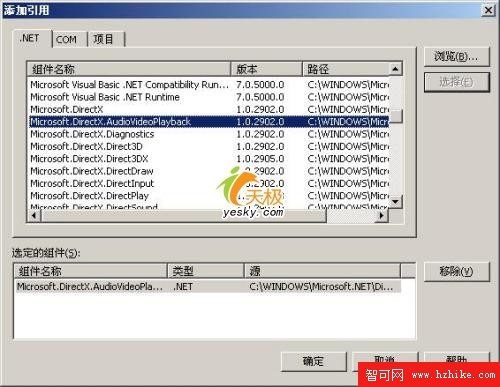
8. 選中【添加引用】菜單後,彈出【添加引用】對話框,按照圖02所示,在【選定的組件】欄目中加入"Microsoft.DirectX.AudioVideoPlayback"後,單擊【確定】按鈕,則引用"Microsoft.DirectX.AudioVideoPlayback"文件成功。這是因為Visual Studio .Net的缺省編譯環境中沒有"Microsoft.DirectX.AudioVideoPlayback.dll"文件,而程序中卻使用到"Microsoft.DirectX.AudioVideoPlayback"命名空間,所以要在編譯環境中引用"Microsoft.DirectX.AudioVideoPlayback"所在的文件。

9. 把Visual Studio .Net的當前窗口切換到【Form1.cs(設計)】窗口,並從【工具箱】中的【Windows窗體組件】選項卡中往設計窗體中拖入下列組件,並執行相應操作:
一個OpenFileDialog組件,用於選擇播放的視頻;一個panel組件,作為視頻播放的宿主組件;四個Button按鈕,分別執行視頻打開、播放、暫停和停止操作。並在這四個組件拖入設計窗口後分別雙擊它們,則系統會在Form1.cs中分別產生這四個組件Click事件對應的處理代碼。
10. 把Visual Studio .Net的當前窗口切換到Form1.cs的代碼編輯窗口,在Form1.cs的首部的引入命名空間的代碼區中,用下列代碼替換Form1.cs中由系統自動產生的引入命名空間代碼:
using System ;
using System.Drawing ;
using System.Collections ;
using System.ComponentModel ;
using System.Windows.Forms ;
using System.Data ;
using Microsoft.DirectX.AudioVideoPlayback ;
//引入視頻播放所要使用的Direct X命名空間
11. 在Form1.cs的class的代碼區中添加下列代碼,下列代碼是創建全局使用的Video實例:
private Video MyVideo = null ;
//創建一個Video實例
12. 以下面代碼替代系統產生的InitializeComponent過程。下面代碼是對加入窗體的組件以及創建的全局變量進行初始化和定義四個Button組件的Click事件和Form1的Load事件:
private void InitializeComponent ( )
{
this.panel1 = new System.Windows.Forms.Panel ( ) ;
this.button1 = new System.Windows.Forms.Button ( ) ;
this.button2 = new System.Windows.Forms.Button ( ) ;
this.button3 = new System.Windows.Forms.Button ( ) ;
this.button4 = new System.Windows.Forms.Button ( ) ;
this.openFileDialog1 = new System.Windows.Forms.OpenFileDialog ( ) ;
this.SuspendLayout ( ) ;
this.panel1.Dock = System.Windows.Forms.DockStyle.Top ;
this.panel1.Location = new System.Drawing.Point ( 0, 0 ) ;
this.panel1.Name = "panel1" ;
this.panel1.Size = new System.Drawing.Size ( 540, 346 ) ;
this.panel1.TabIndex = 0 ;
this.button1.Location = new System.Drawing.Point ( 62, 380 ) ;
this.button1.Name = "button1" ;
this.button1.Size = new System.Drawing.Size ( 80, 38 ) ;
this.button1.TabIndex = 1 ;
this.button1.Text = "打開" ;
this.button1.Click += new System.EventHandler ( this.button1_Click ) ;
this.button2.Location = new System.Drawing.Point ( 165, 380 ) ;
this.button2.Name = "button2" ;
this.button2.Size = new System.Drawing.Size ( 81, 38 ) ;
this.button2.TabIndex = 1 ;
this.button2.Text = "播放" ;
this.button2.Click += new System.EventHandler ( this.button2_Click ) ;
this.button3.Location = new System.Drawing.Point ( 268, 380 ) ;
this.button3.Name = "button3" ;
this.button3.Size = new System.Drawing.Size ( 80, 38 ) ;
this.button3.TabIndex = 1 ;
this.button3.Text = "暫停" ;
this.button3.Click += new System.EventHandler ( this.button3_Click ) ;
this.button4.Location = new System.Drawing.Point ( 371, 380 ) ;
this.button4.Name = "button4" ;
this.button4.Size = new System.Drawing.Size ( 81, 38 ) ;
this.button4.TabIndex = 1 ;
this.button4.Text = "停止" ;
this.button4.Click += new System.EventHandler ( this.button4_Click ) ;
this.openFileDialog1.DefaultExt = "avi" ;
this.openFileDialog1.Filter = "視頻文件|*.avi||" ;
this.openFileDialog1.Title = "請選擇播放的AVI文件" ;
this.AutoScaleBaseSize = new System.Drawing.Size ( 6, 14 ) ;
this.ClIEntSize = new System.Drawing.Size ( 540, 461 ) ;
this.Controls.Add ( this.button1 ) ;
this.Controls.Add ( this.panel1 ) ;
this.Controls.Add ( this.button2 ) ;
this.Controls.Add ( this.button3 ) ;
this.Controls.Add ( this.button4 ) ;
this.FormBorderStyle = System.Windows.Forms.FormBorderStyle.FixedDialog ;
this.MaximizeBox = false ;
this.Name = "Form1" ;
this.Text = "Visual C#中使用DrIEctX實現媒體播放" ;
this.Load += new System.EventHandler ( this.Form1_Load ) ;
this.ResumeLayout ( false ) ;
}
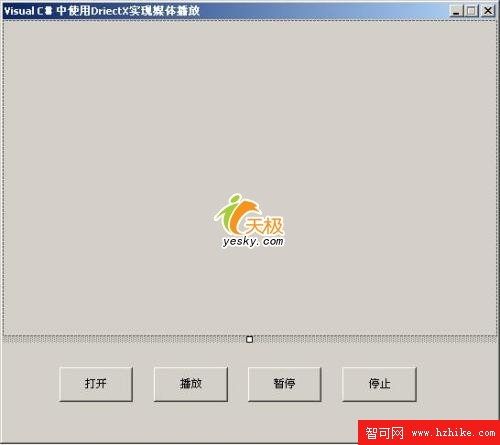
至此【Visual C#中使用DrIEctX實現媒體播放】項目的界面設計和功能實現的前期工作就完成了,設計界面如圖03所示:
 圖03:【Visual C#中使用DrIEctX實現媒體播放】項目的界面設計
13. 用下列代碼替換Form1.cs中的button1組件的Click事件對應的處理代碼,下列代碼的功能是打開選定的視頻文件,並在定義的Panel組件上顯示開始第一幀:
private void button1_Click ( object sender, System.EventArgs e )
{
openFileDialog1.InitialDirectory = Application.StartupPath ;
if ( openFileDialog1.ShowDialog ( ) == DialogResult.OK )
{
// 記錄panel組件的大小
int height = panel1.Height ;
int width = panel1.Width ;
// 如果存在打開的Video文件,釋放它
if ( MyVideo != null )
{
MyVideo.Dispose ( ) ;
}
// 打開一個新的Video文件
MyVideo = new Video ( openFileDialog1.FileName ) ;
// 把Video文件分配給創建的Panel組件
MyVideo.Owner = panel1 ;
// 以記錄的panel組件的大小來重新定義
panel1.Width = width ;
panel1.Height = height ;
// 播放AVI文件的第一幀,主要是為了在panel中顯示
MyVideo.Play ( ) ;
MyVideo.Pause ( ) ;
}
//確定窗體中的各按鈕狀態
if ( MyVideo == null )
{
button2.Enabled = false ;
button3.Enabled = false ;
button4.Enabled = false ;
}
else
{
button2.Enabled = true ;
button3.Enabled = true ;
button4.Enabled = true ;
}
} 14. 用下列代碼替換Form1.cs中的button2組件的Click事件對應的處理代碼,下列代碼的功能播放當前打開的視頻文件:
private void button2_Click ( object sender, System.EventArgs e )
{
if ( MyVideo != null )
{
MyVideo.Play ( ) ;
}
} 15. 用下列代碼替換Form1.cs中的button3組件的Click事件對應的處理代碼,下列代碼的功能暫停播放當前打開的視頻文件:
private void button3_Click ( object sender, System.EventArgs e )
{
if ( MyVideo != null )
{
MyVideo.Pause ( ) ;
}
} 16. 用下列代碼替換Form1.cs中的button4組件的Click事件對應的處理代碼,下列代碼的功能停止播放當前打開的視頻文件:
private void button4_Click ( object sender, System.EventArgs e )
{
if ( MyVideo != null )
{
MyVideo.Stop ( ) ;
}
} 17. 在button4的Click事件之後,添加下列代碼,下列代碼的功能是初始化Form窗體中的button組件:
//初始化窗體中各按鈕的狀態
private void Form1_Load ( object sender, System.EventArgs e )
{
if ( MyVideo == null )
{
button2.Enabled = false ;
button3.Enabled = false ;
button4.Enabled = false ;
}
else
{
button2.Enabled = true ;
button3.Enabled = true ;
button4.Enabled = true ;
}
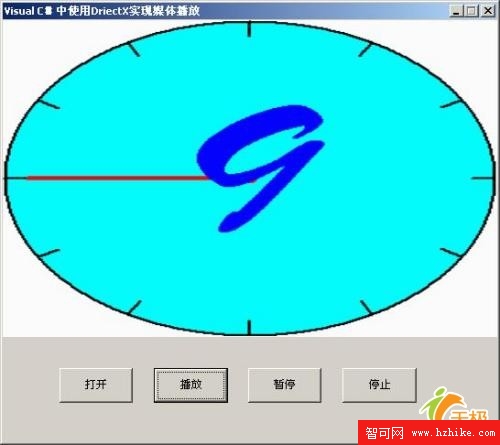
} 18. 至此,在上述步驟都正確完成,並全部保存後,【Visual C#中使用DrIEctX實現媒體播放】項目的全部工作就完成了。此時單擊快捷鍵【F5】運行程序後,圖04是播放視頻文件時得到的程序運行界面:
 圖04:【Visual C#中使用DrIEctX實現媒體播放】項目的運行界面 四.總結:
Direct X的出現的確解決了程序員的很多底層的工作,把面對各種煩雜硬件的工作交給了Direct X了。雖然Direct X從非托管版本發展到現在的托管版本,爭論一直存在,但越來越多的開發商把自己的軟件用托管的Direct X或者結合使用托管和非托管Direct X開發,也從另外一個方面證明了托管的Direct X的生命力。本文結合一個示例具體介紹Visual C#調用非托管Direct X的方法實現視頻播放,這對於托管Direct X來說只是其中的一個小應用。最後希望此篇文章對那些希望了解、掌握在Visual C#調用Direct X編寫游戲程序的朋友有所幫助。


