摘要
絕大多數的電子產品都使用了七段數碼顯示,如果軟件也能模擬出這種效果該有多好?在本文之前,VC知識庫在線雜志曾有兩篇文章介紹過如何實現這種效果,有一篇的實現方法較為簡單,但繪出的數字不夠逼真,而另一篇實現的效果雖然逼真,但必須依賴位圖資源,並且無法設置前景色和背景色等。筆者經過仔細的研究與試驗,終於找到了較好的解決辦法。本文將詳細講述七段數碼顯示的數字時鐘的實現。
關鍵字 七段數碼顯示 數字時鐘
實現原理
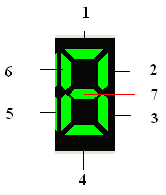
我們知道,時鐘的顯示由時、分、秒及冒號組成,因此我們可以用以下函數來實現:DrawHour,DrawMinute,DrawSecond和Draw2Dot。由於時、分、秒都由兩個數字組成(小於10的前面加0),因此可以再把問題分解,用DrawSingleNunber來畫單個數字。單個數字又該怎麼畫呢?下面看七段數碼的組成,我們用1到7的標號來表示每一段。

由於每個數字都是由這七段拼湊而成,因此我們可以在DrawSingleNumber函數中用switch語句,根據不同的數字去畫不同的段,接下來的工作就是如何去畫這七段了,每一段都是一個具有顏色填充的多邊形。
void CDigitalClock::DrawSingleNumber(int nNum,int nLeft)

{

  switch (nNum)

  {

  case 0:

    DrawSection1(nLeft);

    DrawSection2(nLeft);

    DrawSection3(nLeft);

    DrawSection4(nLeft);

    DrawSection5(nLeft);

    DrawSection6(nLeft);

    break;

  case 1:

    DrawSection2(nLeft);

    DrawSection3(nLeft);

    break;

  case 2:

    DrawSection1(nLeft);

    DrawSection2(nLeft);

    DrawSection4(nLeft);

    DrawSection5(nLeft);

    DrawSection7(nLeft);

    break;

  case 3:

    DrawSection1(nLeft);

    DrawSection2(nLeft);

    DrawSection3(nLeft);

    DrawSection4(nLeft);

    DrawSection7(nLeft);

    break;

  case 4:

    DrawSection2(nLeft);

    DrawSection3(nLeft);

    DrawSection6(nLeft);

    DrawSection7(nLeft);

    break;

  case 5:

    DrawSection1(nLeft);

    DrawSection3(nLeft);

    DrawSection4(nLeft);

    DrawSection6(nLeft);

    DrawSection7(nLeft);

    break;

  case 6:

    DrawSection1(nLeft);

    DrawSection3(nLeft);

    DrawSection4(nLeft);

    DrawSection5(nLeft);

    DrawSection6(nLeft);

    DrawSection7(nLeft);

    break;

  case 7:

    DrawSection1(nLeft);

    DrawSection2(nLeft);

    DrawSection3(nLeft);

    break;

  case 8:

    DrawSection1(nLeft);

    DrawSection2(nLeft);

    DrawSection3(nLeft);

    DrawSection4(nLeft);

    DrawSection5(nLeft);

    DrawSection6(nLeft);

    DrawSection7(nLeft);

    break;

  case 9:

    DrawSection1(nLeft);

    DrawSection3(nLeft);

    DrawSection4(nLeft);

    DrawSection2(nLeft);

    DrawSection6(nLeft);

    DrawSection7(nLeft);

    break;

  default:

    ;

  }

}
要畫出逼真的效果來,必須精確或基本精確去計算出多邊形的每個頂點的坐標,然後用作圖函數MoveTo和LineTo去畫線條,畫線前,可以構造一個畫筆,用指定的顏色去畫。把幾個邊的線條畫好後,發現還需要進行填充,因此再去構造一個區域,使用畫刷進行填充。這樣一來,不僅畫出了立體效果,還可以設置不同的背景色和前景色。以下代碼展示了第一段的繪制過程
void CDigitalClock::DrawSection1(int nLeft)

{

  if (m_memDC.m_hDC!=NULL)

  {

    CPoint point[4];

    point[0].x=nLeft+(int)(0.1*m_nWidth);

    point[0].y=m_nYmargin;

    point[1].x=nLeft+(int)(0.9*m_nWidth);

    point[1].y=m_nYmargin;

    point[2].x=nLeft+(int)(0.7*m_nWidth);

    point[2].y=(int)(0.2*m_nWidth)+m_nYmargin;

    point[3].x=nLeft+(int)(0.3*m_nWidth);

    point[3].y=(int)(0.2*m_nWidth)+m_nYmargin;

    CBrush br(m_crText);

    CRgn rgn;

    rgn.CreatePolygonRgn(point,4,ALTERNATE);

    m_memDC.FillRgn(&rgn,&br);

    br.DeleteObject();

    rgn.DeleteObject();


    m_memDC.MoveTo(point[0]);

    m_memDC.LineTo(point[1]);


    m_memDC.MoveTo(point[1]);

    m_memDC.LineTo(point[2]);


    m_memDC.MoveTo(point[2]);

    m_memDC.LineTo(point[3]);


    m_memDC.MoveTo(point[3]);

    m_memDC.LineTo(point[0]);

  }

}
實現了這些基本元素“段”,就可以畫單個數字了,進而可以在不同的位置畫出時、分、秒。冒號由一個專門的函數Draw2Dot來實現。
void CDigitalClock::Draw2Dot(int nLeft)

{

  if (m_memDC.m_hDC!=NULL)

  {

    CBrush br(m_crText);

    CRect rect;

    rect.SetRect(nLeft+(int)(0.3*m_nWidth),(int)(0.4*m_nWidth)+m_nYmargin,

      nLeft+(int)(0.6*m_nWidth),(int)(0.7*m_nWidth)+m_nYmargin);

    m_memDC.Ellipse(rect);

    CRgn rgn1;

    rgn1.CreateEllipticRgn(rect.left,rect.top,rect.right,rect.bottom);

    m_memDC.FillRgn(&rgn1,&br);

    rect.OffsetRect(0,(int)(0.8*m_nWidth)+m_nYmargin);

    m_memDC.Ellipse(rect);

    CRgn rgn2;

    rgn2.CreateEllipticRgn(rect.left,rect.top,rect.right,rect.bottom);

    m_memDC.FillRgn(&rgn2,&br);

    br.DeleteObject();

    rgn1.DeleteObject();

    rgn2.DeleteObject();

  }

}
結語
要實現七段數碼顯示的效果,關鍵在於計算各個頂點的坐標,經過調試發現,將一個數字的寬度調整為高度的一半時可達到最好的顯示效果。最初設計這個類時,我是在OnPaint裡面調用自定義繪圖函數DrawHour、DrawMinute、DrawSecond以及Draw2Dot,結果發現繪出的時鐘有明顯閃爍,後來采用雙緩沖繪圖的辦法消除了這一現象。
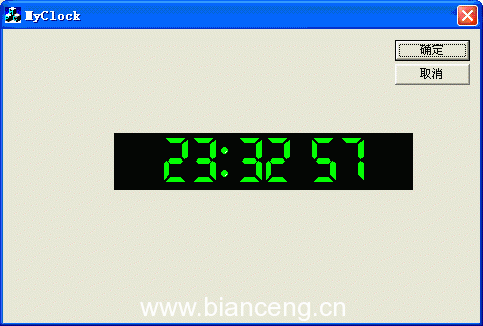
本文實現的數字時鐘從CStatic派生,使用時,只需在界面上放置一個靜態文本控件,然後關聯一個CDigitalClock的控件變量即可。示例代碼在VC6.0+Windows XP下編譯通過。運行效果如下圖:

最後,衷心感謝《電子八段管的仿真控件》的作者kevin cheng和《電子式時鐘》的作者李宏亮以及網友redcheek等人。
QQ: 40475290
Email: [email protected]
本文配套源碼