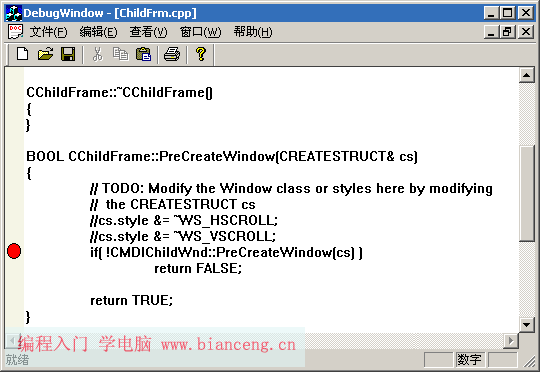
運行效果圖如下:

想做一個跟蹤調試工具,於是到網上找類似VC可設置斷點的EditView,可惜沒找到(呵呵,俺E文不好,沒去國外站點找)。那就自己做一個吧!!
唉!!為了這個小東西俺可是走了不少彎路!!
還好,今天終於做好了,拿出來與大家分享。
1、創建一個工程………………俺不多說了,記住要選CeditView.
2、在OnInitialUpdate()中設置EDIT的Margin,當然留出的空間用來畫斷點或行號等。並得到行高。
SIZE size;

GetTextExtentPoint(GetDC()->GetSafeHdc (),"A",1,&size);

m_LineHeight = size.cy;    //得到行的高度

CEdit& theEdit = GetEditCtrl ();

theEdit.SetMargins (m_LineHeight+6,0);  //設置編輯框的左邊界

theEdit.SetLimitText(10 * 1024);  //設置輸入的最大文本
3、保存斷點的行號我用STL的list。
AddRemoveBP(int point)

{

   IntList::iterator it;

   it = find(lBreakPoint.begin (), lBreakPoint.end (), point);

   if( it != lBreakPoint.end () )   //如果此行為設置了斷點的行則刪除否則添加

     lBreakPoint.erase (it);

   else

     lBreakPoint.push_back (point);

}
4、添加一個用於描畫左邊顯示條的函數
PaintLeft()

{

   CBrush brushb(RGB(245,245,230));

   int m_breakpoint;

   CDC* hdc;

   hdc = GetWindowDC();

   CRect rect;

   GetClientRect(&rect);

   hdc->FillRect (CRect(rect.left+2 ,rect.top+2 ,rect.left + m_LineHeight + 7,rect.Height ()+2),&brushb);//畫底色

   brushb.DeleteObject ();

   CEdit& theEdit = GetEditCtrl ();

   int nFirstVisible = theEdit.GetFirstVisibleLine();  //得到當前顯示的最上端的行號

   CBrush OrigBrush,brushf(RGB(255,0,0));

   CBrush *oldBrush = (CBrush*)hdc->SelectObject (brushf);

   OrigBrush.FromHandle((HBRUSH)oldBrush);

   IntList::iterator it;

   for(it = lBreakPoint.begin(); it != lBreakPoint.end(); it++)

   {

     m_breakpoint = *it;

     if(m_breakpoint > nFirstVisible)

     {

       int point = (m_breakpoint-1 - nFirstVisible)*m_LineHeight +3;  //計算斷點位置


       if(point < (rect.bottom - m_LineHeight+1))

       {

         hdc->Ellipse(rect.left + 5, point, rect.left+ m_LineHeight + 4,point+m_LineHeight);//畫斷點

       }

     }

   }

   hdc->SelectObject (&OrigBrush);

   OrigBrush.DeleteObject();

   brushf.DeleteObject ();

}
5、處理鼠標左鍵單擊,添加刪除斷點。
if(point.x < m_LineHeight+6)

{

     point.x += 20;

     CEdit& theEdit = GetEditCtrl ();

     int n = theEdit.CharFromPos(point);

     AddRemoveBP(HIWORD(n)+1);

}
6、再加一個熱鍵處理得到當前光標所在的行。
CEdit& theEdit = GetEditCtrl ();

int newpoint = theEdit.LineFromChar (-1) + 1;

AddRemoveBP(newpoint);
7、在一些必要的消息處理後面調用PaintLeft。OK!大功告成!!(^%$#@#@$#$$%……呵呵,俺想起小寶…………)