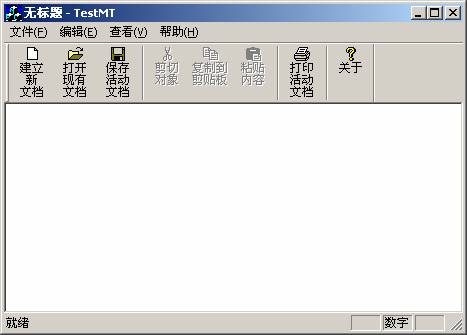
界面顯示效果如圖一:

圖一 例子程序運行畫面
CToolBar不支持多行文字,本文將通過一個定制的MFC/C++類 CMTToolBar 實現在工具條中顯示多行文字。其思路是先把文字變成位圖,再替換原來的工具條位圖,達到顯示多行文字的效果。這個類中最主要的一個成員函數是ShowText(UINT nIDResource),其定義如下:
// 顯示工具條文字
BOOL CMTToolBar::ShowText(UINT nIDResource)
{
  // determine location of the bitmap in resource fork
  HINSTANCE hInst = AfxFindResourceHandle(MAKEINTRESOURCE(nIDResource), RT_TOOLBAR);
  HRSRC hRsrc = ::FindResource(hInst, MAKEINTRESOURCE(nIDResource), RT_TOOLBAR);
  if (hRsrc == NULL)
    return FALSE;
  HGLOBAL hGlobal = LoadResource(hInst, hRsrc);
  if (hGlobal == NULL)
    return FALSE;
  CToolBarData* pData = (CToolBarData*)LockResource(hGlobal);
  if (pData == NULL)
    return FALSE;
  ASSERT(pData->wVersion == 1);
  // 得到單個按鈕的圖像大小
  CSize sizeImage(pData->wWidth, pData->wHeight);
  // release the resource
  UnlockResource(hGlobal);
  FreeResource(hGlobal);

  // 得到 CToolBarCtrl
  CToolBarCtrl& bar = GetToolBarCtrl();
  // 得到 ToolBarCtrl的DC
  CDC *pdcCtrl = bar.GetDC();
  CDC dcDst;    // 目標DC , 用於生成新位圖
  dcDst.CreateCompatibleDC(pdcCtrl);

  // 新建字體
  LOGFONT logFont;
  ZeroMemory(&logFont,sizeof(logFont));
  logFont.lfWidth = 6;
  logFont.lfHeight = 12;
  logFont.lfCharSet = GB2312_CHARSET;
  strcpy(logFont.lfFaceName, "宋體" );
  CFont fntNew;
  fntNew.CreateFontIndirect(&logFont);
  CFont *pfntOld = dcDst.SelectObject(&fntNew);
  // 新單個按鈕的圖片大小
  CSize sizeNewImage(sizeImage.cx, 0);
  // 創建字符串數組
  const int nCount = bar.GetButtonCount();
  CStringArray *pstrArray = new CStringArray[nCount];
  int nLines = 0;      // 文字行數
  int  nIndex = 0;
  int nCharHeight = 0;  // 單個字符高度
  TBBUTTON  tb;
  int nBtnCount = 0;    // 按鈕個數(除去分隔條)
  for (int i = 0; i < nCount; ++ i)
  {
    ZeroMemory(&tb, sizeof(TBBUTTON));
    bar.GetButton(i, &tb);
    // 如果是分隔條
    if ((tb.fsStyle & TBSTYLE_SEP) == TBSTYLE_SEP)
    {
      continue;
    }
    CString strT;
    strT.LoadString(tb.idCommand);
    int nPos = strT.Find(_T(''n'')) + 1;
    while(nPos > 0)
    {
      int nPos2 = strT.Find(_T(''n''), nPos);
      int nIndex;
      if(nPos2>nPos)
      {
        nIndex = pstrArray[nBtnCount].Add( strT.Mid(nPos, nPos2-nPos) );
        nPos = nPos2 + 1;
      }
      else if(strT.GetLength() > nPos)
      {
        nIndex = pstrArray[nBtnCount].Add( strT.Mid(nPos) );
        nPos = -1;
      }
      nLines = max(nLines, nIndex+1);
      CSize size = dcDst.GetTextExtent(pstrArray[nBtnCount][nIndex]);
      nCharHeight = max(size.cy, nCharHeight);
      sizeNewImage.cx = max(size.cx, sizeNewImage.cx);
    }
    nBtnCount ++;
  }
  // 換算成實際像素
  sizeNewImage.cy = nLines*nCharHeight;
  // 讀取工具條位圖資源
  CBitmap    bmpToolBar;
  BITMAP    bmBitmap;
  if (!bmpToolBar.Attach(LoadImage(AfxGetInstanceHandle(),
                 MAKEINTRESOURCE(nIDResource),
                 IMAGE_BITMAP, 0, 0,
                 LR_DEFAULTSIZE|LR_CREATEDIBSECTION
                 |LR_LOADMAP3DCOLORS )) ||
                 !bmpToolBar.GetBitmap(&bmBitmap))
    return FALSE;
  // 取得位圖總寬高
  int nWidth = bmBitmap.bmWidth;
  int nHeight = bmBitmap.bmHeight;
  // 新位圖的總寬高
  int nWidthNew = sizeNewImage.cx * nBtnCount;
  sizeNewImage.cy += nHeight;
  int nHeightNew = sizeNewImage.cy;
  CDC dcSrc;  // 源DC
  dcSrc.CreateCompatibleDC(pdcCtrl);
  CBitmap *pbmpOldSrc = dcSrc.SelectObject(&bmpToolBar);
  CBitmap bmpDst;  // 新位圖
  bmpDst.CreateCompatibleBitmap(&dcSrc, nWidthNew, nHeightNew);
  CBitmap *pbmpOldDst = dcDst.SelectObject(&bmpDst);
  // 先填充背景色
  dcDst.FillSolidRect(CRect(0, 0, nWidthNew, nHeightNew), ::GetSysColor(COLOR_BTNFACE));
  dcDst.SetBkMode(TRANSPARENT);  // 設置透明背景方式
  int nStartX = (sizeNewImage.cx-sizeImage.cx)/2;  // 計算開始橫坐標,用於居中處理
  // 開始制作工具條位圖
  for( i = 0; i < nBtnCount; ++ i)
  {
    dcDst.BitBlt(i*sizeNewImage.cx+nStartX, 0, sizeImage.cx, sizeImage.cy,
           &dcSrc, i*sizeImage.cx, 0, SRCCOPY);
    int j;
    for(j = 0; j < pstrArray[i].GetSize(); j ++)
    {
      CSize size = dcDst.GetTextExtent(pstrArray[i][j]);
      int nStratX = (sizeNewImage.cx-size.cx)/2;
      dcDst.TextOut(i*sizeNewImage.cx+nStratX, sizeImage.cy+j*nCharHeight, pstrArray[i][j]);
    }
  }
  // 恢復DC並釋放資源
  dcSrc.SelectObject(pbmpOldSrc);
  dcDst.SelectObject(pbmpOldDst);
  dcDst.SelectObject(pfntOld);
  bar.ReleaseDC(pdcCtrl);
  delete [] pstrArray;
  // 重新設置大小
  SetSizes(sizeNewImage + CSize(7,7), sizeNewImage);

  // 替換工具條位圖
  //SetBitmap((HBITMAP)bmpDst.Detach());
  AddReplaceBitmap((HBITMAP)bmpDst.Detach());
  return TRUE;
}
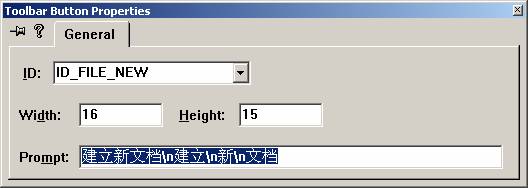
使用的時候只需要簡單在工具條資源裡添加文字,每行用n分開,如圖二所示:

圖二 在工具條資源裡添加文字
再用CMTToolBar替換原CToolBar類。調用一下BOOL CMTToolBar::ShowText(UINT nIDResource) 就成了。
nIDResource是工具條資源id。
本文示例代碼或素材下載