為了解決單機處理的瓶頸,增強軟件的可用性,我們需要將軟件部署在多台服務器上啟用多個二級子域名以頻道化的方式,根據業務功能將網站分布部署在獨立的服務器上,或通過負載均衡技術(如:DNS輪詢、Radware、F5、LVS等)讓多個頻道共享一組服務器。當我們將網站程序分部到多台服務器上後,由於Session受實現原理的局限,無法跨服務器同步更新Session,使得登錄狀態難以通過Session共享。
我們使用MemCache+Cookie方案來解決分布式系統共享登錄狀態的問題。
Memcache服務器本身就是一個Socket服務端,內部數據采用鍵值對的形式存儲在服務器的內存中,本質就是一個大型的哈希表。數據的刪除采用惰性刪除機制。雖然Memcache並沒有提供集群功能,但是通過客戶端的驅動程序很容易就可以實現Memcache的集群配置。
先簡單介紹一下Memcache的用法
1. 下載安裝Memcache(Windows平台)
(1)將程序解壓到磁盤任意位置
(2)進入cmd窗口,運行Memcached.exe -d install安裝服務,安裝後打開服務窗口查看服務是否安裝成功。

(3)直接在服務管理中啟動服務,或者使用cmd命令 net start "Memcache Server"
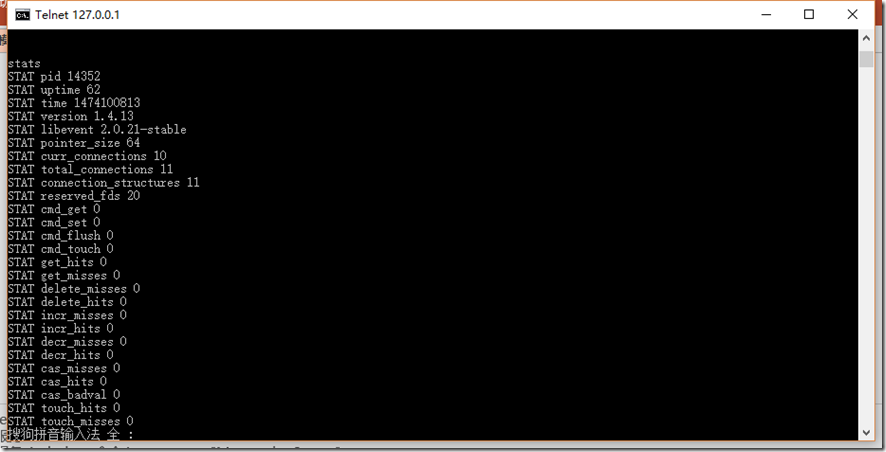
(4)使用Telnet連接到Memcache控制台,驗證服務是否正常 telnet 127.0.0.1 11211
使用stats指令查看當前Memcache服務器狀態

2. 程序中的用法
(1)在程序中添加 Memcached.ClientLibrary.dll 的引用
(2)C#中操作Memcache的代碼示例
String[] serverlist = { "192.168.1.100:11211",
"192.168.1.101:11211" };
// initialize the pool for memcache servers
SockIOPool pool = SockIOPool.GetInstance("test");
pool.SetServers(serverlist);
pool.Initialize();
mc = new MemcacheClient();
mc.PoolName = "test";
mc.EnableCompression = false;
pool.Shutdown();//關閉連接池
下面我們做方案的具體實現
1. 首先在Common層中引入Memcached.ClientLibrary.dll,並封裝Memcache的幫助類,MemcacheHelper
using Memcached.ClientLibrary;
using System;

namespace PMS.Common
{
 public class MemcacheHelper
 {
 private static readonly MemcachedClient Mc = null;

 static MemcacheHelper()
 {
 //最好放在配置文件中
 string[] serverlist = { "127.0.0.1:11211", "10.0.0.132:11211" };

 //初始化池
 var pool = SockIOPool.GetInstance();
 pool.SetServers(serverlist);

 pool.InitConnections = 3;
 pool.MinConnections = 3;
 pool.MaxConnections = 5;

 pool.SocketConnectTimeout = 1000;
 pool.SocketTimeout = 3000;

 pool.MaintenanceSleep = 30;
 pool.Failover = true;

 pool.Nagle = false;
 pool.Initialize();

 // 獲得客戶端實例
 Mc = new MemcachedClient {EnableCompression = false};
 }
 /// <summary>
 /// 存儲數據
 /// </summary>
 /// <param name="key"></param>
 /// <param name="value"></param>
 /// <returns></returns>
 public static bool Set(string key,object value)
 {
 return Mc.Set(key, value);
 }
 public static bool Set(string key, object value,DateTime time)
 {
 return Mc.Set(key, value,time);
 }
 /// <summary>
 /// 獲取數據
 /// </summary>
 /// <param name="key"></param>
 /// <returns></returns>
 public static object Get(string key)
 {
 return Mc.Get(key);
 }
 /// <summary>
 /// 刪除
 /// </summary>
 /// <param name="key"></param>
 /// <returns></returns>
 public static bool Delete(string key)
 {
 return Mc.KeyExists(key) && Mc.Delete(key);
 }
 }
}
2. 改變用戶登錄方法UserLogin,用戶登錄成功後生成GUID,將此GUID存入Cookie並以GUID為鍵將登錄用戶信息序列化存入Memcache服務器。
public ActionResult UserLogin()
{
 #region 驗證碼校驗
 var validateCode = Session["validateCode"] != null ? Session["validateCode"].ToString() : string.Empty;
 if (string.IsNullOrEmpty(validateCode))
 return Content("no:驗證碼錯誤!!");
 Session["validateCode"] = null;
 var txtCode = Request["ValidateCode"];
 if (!validateCode.Equals(txtCode, StringComparison.InvariantCultureIgnoreCase))
 return Content("no:驗證碼錯誤!!");
 #endregion

 var userName = Request["UserName"];
 var userPwd = Request["PassWord"];
 //查詢用戶是否存在
 var user = UserService.LoadEntities(u => u.UserName == userName && u.PassWord == userPwd).FirstOrDefault();
 if (user == null) return Content("no:登錄失敗");

 //產生一個GUID值作為Memache的鍵.
 var sessionId = Guid.NewGuid().ToString();
 //將登錄用戶信息存儲到Memcache中。
 MemcacheHelper.Set(sessionId, SerializeHelper.SerializeToString(user), DateTime.Now.AddMinutes(20));
 //將Memcache的key以Cookie的形式返回給浏覽器。
 Response.Cookies["sessionId"].Value = sessionId;
 return Content("ok:登錄成功");
}
3. 改變登錄校驗控制器FilterController的OnActionExecuting方法,使其校驗方式改為從Memcache服務器中讀取Cookie中值為鍵的對象:
protected override void OnActionExecuting(ActionExecutingContext filterContext)
{
 base.OnActionExecuting(filterContext);
 //if (Session["user"] == null)
 if (Request.Cookies["sessionId"] != null)
 {
 var sessionId = Request.Cookies["sessionId"].Value;
 //根據該值查Memcache.
 var obj = MemcacheHelper.Get(sessionId);
 if (obj == null)
 {
 filterContext.Result = Redirect("/Login/Index");
 return;
 }
 var user = SerializeHelper.DeserializeToObject<User>(obj.ToString());
 LoginUser = user;
 //模擬出滑動過期時間.
 MemcacheHelper.Set(sessionId, obj, DateTime.Now.AddMinutes(20));
 }
 else
 filterContext.Result = Redirect("/Login/Index");
}
以上就是本文的全部內容,希望對大家的學習有所幫助,也希望大家多多支持腳本之家。