一、添加文章
1、KindEditor富文本編輯器
到官方網站http://kindeditor.net/down.php下載最新版本,解壓後把代碼復制到項目的Scripts文件夾下。
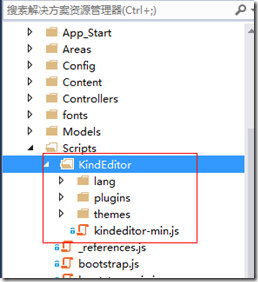
2、添加界面的顯示。
在ArticleController中添加Add 方法
/// <summary>
  /// 添加文章
  /// </summary>
  /// <returns>視圖頁面</returns>
  public ActionResult Add()
  {
   return View();
  }
右鍵添加Article的強類型視圖,代碼如下
@section scripts{
 <script type="text/javascript" src="~/Scripts/KindEditor/kindeditor-min.js"></script>
 <script type="text/javascript">
  //編輯框
  KindEditor.ready(function (K) {
   window.editor = K.create('#Content', {
    height: '500px'
   });
  });
 </script>
}

@model Ninesky.Models.Article
@using (Html.BeginForm())
{ @Html.AntiForgeryToken()
 <div class="form-horizontal" role="form">
  <h4>添加文章</h4>
  <hr />
  @Html.ValidationSummary(true)
  <div class="form-group">
   <label class="control-label col-sm-2" for="CommonModel_CategoryID">欄目</label>
   <div class="col-sm-10">
    <input id="CommonModel_CategoryID" name="CommonModel.CategoryID" data-options="url:'@Url.Action("JsonTree", "Category", new { model="Article" })'" class="easyui-combotree" style="height: 34px; width: 280px;" />
      @Html.ValidationMessageFor(model => model.CommonModel.CategoryID)</div>
  </div>
  <div class="form-group">
   @Html.LabelFor(model => model.CommonModel.Title, new { @class = "control-label col-sm-2" })
   <div class="col-sm-10">
    @Html.TextBoxFor(model => model.CommonModel.Title, new { @class = "form-control" })
    @Html.ValidationMessageFor(model => model.CommonModel.Title)
   </div>
  </div>


  <div class="form-group">
   @Html.LabelFor(model => model.Author, new { @class = "control-label col-sm-2" })
   <div class="col-sm-10">
    @Html.TextBoxFor(model => model.Author, new { @class = "form-control" })
    @Html.ValidationMessageFor(model => model.Author)
   </div>
  </div>

  <div class="form-group">
   @Html.LabelFor(model => model.Source, new { @class = "control-label col-sm-2" })
   <div class="col-sm-10">
    @Html.TextBoxFor(model => model.Source, new { @class = "form-control" })
    @Html.ValidationMessageFor(model => model.Source)
   </div>
  </div>

  <div class="form-group">
   @Html.LabelFor(model => model.Intro, new { @class = "control-label col-sm-2" })
   <div class="col-sm-10">
    @Html.TextAreaFor(model => model.Intro, new { @class = "form-control" })
    @Html.ValidationMessageFor(model => model.Intro)
   </div>
  </div>

  <div class="form-group">
   @Html.LabelFor(model => model.Content, new { @class = "control-label col-sm-2" })
   <div class="col-sm-10">
    @Html.EditorFor(model => model.Content)
    @Html.ValidationMessageFor(model => model.Content)
   </div>
  </div>

  <div class="form-group">
   @Html.LabelFor(model => model.CommonModel.DefaultPicUrl, new { @class = "control-label col-sm-2" })
   <div class="col-sm-10">
    <img id="imgpreview" class="thumbnail" src="" />
    @Html.HiddenFor(model => model.CommonModel.DefaultPicUrl)
    <a id="btn_picselect" class="easyui-linkbutton">選擇…</a>
    @Html.ValidationMessageFor(model => model.CommonModel.DefaultPicUrl)
   </div>
  </div>

  <div class="form-group">
   <div class="col-sm-offset-2 col-sm-10">
    <input type="submit" value="添加" class="btn btn-default" />
   </div>
  </div>
 </div>
}
效果如圖
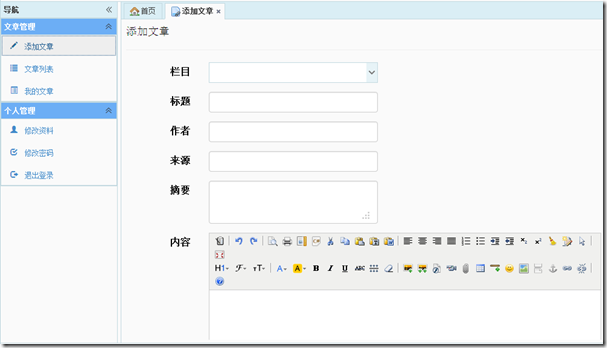
3、後台接受的處理。
[ValidateInput(false)]
  [HttpPost]
  [ValidateAntiForgeryToken]
  public ActionResult Add(Article article)
  {
   if(ModelState.IsValid)
   {
    //設置固定值
    article.CommonModel.Hits = 0;
    article.CommonModel.Inputer = User.Identity.Name;
    article.CommonModel.Model = "Article";
    article.CommonModel.ReleaseDate = System.DateTime.Now;
    article.CommonModel.Status = 99;
    article = articleService.Add(article);
    if (article.ArticleID > 0)
    {
     return View("AddSucess", article);
    }
   }
   return View(article);
  }
在做架構的時候DAL、BLL的base類裡有Add方法,我們可以直接使用ArticleService.Add方法添加到數據庫
添加文章功能就實現了,但是不能上傳附件,不能選擇首頁圖片,不能刪除多余的附件。下面就來實現附件功能。
二、附件上傳
目標可以上傳附件(圖片,文件等),文件保存到上傳目錄中,且數據庫中保存相應記錄,可以浏覽文件列表,未使用的附件可以刪除記錄。
一、添加附件
在AttachmentController添加Upload()方法,方法方法把文件寫入磁盤中把附件的記錄也保存到數據庫中,中間會用到讀取配置文件,見《.Net MVC 網站中配置文件的讀寫》。
/// <summary>
  /// 上傳附件
  /// </summary>
  /// <returns></returns>
  public ActionResult Upload()
  {
   var _uploadConfig = System.Web.Configuration.WebConfigurationManager.OpenWebConfiguration("~").GetSection("UploadConfig") as Ninesky.Models.Config.UploadConfig;
   //文件最大限制
   int _maxSize = _uploadConfig.MaxSize;
   //保存路徑
   string _savePath;
   //文件路徑
   string _fileParth = "~/" + _uploadConfig.Path + "/";
   //文件名
   string _fileName;
   //擴展名
   string _fileExt;
   //文件類型
   string _dirName;
   //允許上傳的類型
   Hashtable extTable = new Hashtable();
   extTable.Add("image", _uploadConfig.ImageExt);
   extTable.Add("flash", _uploadConfig.FileExt);
   extTable.Add("media", _uploadConfig.MediaExt);
   extTable.Add("file", _uploadConfig.FileExt);
   //上傳的文件
   HttpPostedFileBase _postFile = Request.Files["imgFile"];
   if (_postFile == null) return Json(new { error = '1', message = "請選擇文件" });
   _fileName = _postFile.FileName;
   _fileExt = Path.GetExtension(_fileName).ToLower();
   //文件類型
   _dirName = Request.QueryString["dir"];
   if (string.IsNullOrEmpty(_dirName))
   {
    _dirName = "image";
   }
   if (!extTable.ContainsKey(_dirName)) return Json(new { error = 1, message = "目錄類型不存在" });
   //文件大小
   if (_postFile.InputStream == null || _postFile.InputStream.Length > _maxSize) return Json(new { error = 1, message = "文件大小超過限制" });
   //檢查擴展名
   if (string.IsNullOrEmpty(_fileExt) || Array.IndexOf(((string)extTable[_dirName]).Split(','), _fileExt.Substring(1).ToLower()) == -1) return Json(new { error = 1, message = "不允許上傳此類型的文件。 \n只允許" + ((String)extTable[_dirName]) + "格式。" });
   _fileParth += _dirName + "/" + DateTime.Now.ToString("yyyy-MM") + "/";
   _savePath = Server.MapPath(_fileParth);
   //檢查上傳目錄
   if (!Directory.Exists(_savePath)) Directory.CreateDirectory(_savePath);
   string _newFileName = DateTime.Now.ToString("yyyyMMdd_hhmmss") + _fileExt;
    _savePath += _newFileName;
    _fileParth += _newFileName;
   //保存文件
   _postFile.SaveAs(_savePath);
   //保存數據庫記錄
   attachmentService.Add(new Attachment() { Extension = _fileExt.Substring(1), FileParth = _fileParth, Owner = User.Identity.Name, UploadDate = DateTime.Now, Type = _dirName });
   return Json(new { error = 0, url = Url.Content(_fileParth) });
  }
二、查詢附件列表
打開InterfaceAttachmentService接口,添加兩個方法,都進行了注釋比較容易理解,直接上代碼。
/// <summary>
  /// 查找附件列表
  /// </summary>
  /// <param name="modelID">公共模型ID</param>
  /// <param name="owner">所有者</param>
  /// <param name="type">類型</param>
  /// <returns></returns>
  IQueryable<Models.Attachment> FindList(Nullable<int> modelID, string owner, string type);
  /// <summary>
  /// 查找附件列表
  /// </summary>
  /// <param name="modelID">公共模型ID</param>
  /// <param name="owner">所有者</param>
  /// <param name="type">所有者</param>
  /// <param name="withModelIDNull">包含ModelID為Null的</param>
  /// <returns></returns>
  IQueryable<Models.Attachment> FindList(int modelID, string owner, string type,bool withModelIDNull);
AttachmentService中寫現實代碼
public IQueryable<Models.Attachment> FindList(Nullable<int> modelID, string owner, string type)
  {
   var _attachemts = CurrentRepository.Entities.Where(a => a.ModelID == modelID);
   if (!string.IsNullOrEmpty(owner)) _attachemts = _attachemts.Where(a => a.Owner == owner);
   if (!string.IsNullOrEmpty(type)) _attachemts = _attachemts.Where(a => a.Type == type);
   return _attachemts;
  }

  public IQueryable<Models.Attachment> FindList(int modelID, string owner, string type, bool withModelIDNull)
  {
   var _attachemts = CurrentRepository.Entities;
   if (withModelIDNull) _attachemts = _attachemts.Where(a => a.ModelID == modelID || a.ModelID == null);
   else _attachemts = _attachemts.Where(a => a.ModelID == modelID);
   if (!string.IsNullOrEmpty(owner)) _attachemts = _attachemts.Where(a => a.Owner == owner);
   if (!string.IsNullOrEmpty(type)) _attachemts = _attachemts.Where(a => a.Type == type);
   return _attachemts;
  }
由於KindEditor文件管理需要從服務器獲取json格式文件列表,在Ninesky.Web.Areas.Member.Models中單獨給列表格式寫個視圖模型。AttachmentManagerViewModel
namespace Ninesky.Web.Areas.Member.Models
{
 /// <summary>
 /// KindEditor文件管理中文件視圖模型
 /// <remarks>
 /// 創建:2014.03.09
 /// </remarks>
 /// </summary>
 public class AttachmentManagerViewModel
 {
  public bool is_dir{get;set;}
  public bool has_file {get;set;}
  public int filesize {get;set;}
  public bool is_photo{get;set;}
  public string filetype{get;set;}
  public string filename{get;set;}
  public string datetime { get; set; }
 }
}
在AttachmentController添加返回文件列表的方法FileManagerJson。方法供KindEditor的文件管理器調用
/// <summary>
  /// 附件管理列表
  /// </summary>
  /// <param name="id">公共模型ID</param>
  /// <param name="dir">目錄(類型)</param>
  /// <returns></returns>
  public ActionResult FileManagerJson(int? id ,string dir)
  {
   Models.AttachmentManagerViewModel _attachmentViewModel;
   IQueryable<Attachment> _attachments;
   //id為null,表示是公共模型id為null,此時查詢數據庫中沒有跟模型對應起來的附件列表(以上傳,但上傳的文章……還未保存)
   if (id == null) _attachments = attachmentService.FindList(null, User.Identity.Name, dir);
   //id不為null,返回指定模型id和id為null(新上傳的)附件了列表
   else _attachments = attachmentService.FindList((int)id, User.Identity.Name, dir, true);
   //循環構造AttachmentManagerViewModel
   var _attachmentList = new List<Models.AttachmentManagerViewModel>(_attachments.Count());
   foreach(var _attachment in _attachments)
   {
    _attachmentViewModel = new Models.AttachmentManagerViewModel() { datetime = _attachment.UploadDate.ToString("yyyy-MM-dd HH:mm:ss"), filetype = _attachment.Extension, has_file = false, is_dir = false, is_photo = _attachment.Type.ToLower() == "image" ? true : false, filename = Url.Content(_attachment.FileParth) };
    FileInfo _fileInfo = new FileInfo(Server.MapPath(_attachment.FileParth));
    _attachmentViewModel.filesize = (int)_fileInfo.Length;
    _attachmentList.Add(_attachmentViewModel);
   }
   return Json(new { moveup_dir_path = "", current_dir_path = "", current_url = "", total_count = _attachmentList.Count, file_list = _attachmentList },JsonRequestBehavior.AllowGet);
  }
3、為圖片創建縮略圖
把創建縮略圖的方法寫著Common項目中
在Ninesky.Common的Picture類中添加方法
using System;
using System.Collections.Generic;
using System.Linq;
using System.Text;
using System.Threading.Tasks;
using System.Drawing;
using System.Drawing.Drawing2D;
using System.Security.Cryptography;

namespace Ninesky.Common
{
 /// <summary>
 /// 圖片相關
 /// <remarks>
 /// 創建:2014.02.11
 /// </remarks>
 /// </summary>
 public class Picture
 {
  /// <summary>
  /// 創建縮略圖
  /// </summary>
  /// <param name="originalPicture">原圖地址</param>
  /// <param name="thumbnail">縮略圖地址</param>
  /// <param name="width">寬</param>
  /// <param name="height">高</param>
  /// <returns>是否成功</returns>
  public static bool CreateThumbnail(string originalPicture, string thumbnail, int width, int height)
  {
   //原圖
   Image _original = Image.FromFile(originalPicture);
   // 原圖使用區域
   RectangleF _originalArea = new RectangleF();
   //寬高比
   float _ratio = (float)width/height;
   if(_ratio > ((float)_original.Width/_original.Height))
   {
    _originalArea.X =0;
    _originalArea.Width = _original.Width;
    _originalArea.Height = _originalArea.Width / _ratio;
    _originalArea.Y = (_original.Height - _originalArea.Height) / 2;
   }
   else
   {
    _originalArea.Y = 0;
    _originalArea.Height = _original.Height;
    _originalArea.Width = _originalArea.Height * _ratio;
    _originalArea.X = (_original.Width - _originalArea.Width) / 2;
   }
   Bitmap _bitmap = new Bitmap(width, height);
   Graphics _graphics = Graphics.FromImage(_bitmap);
   //設置圖片質量
   _graphics.InterpolationMode = InterpolationMode.High;
   _graphics.SmoothingMode = SmoothingMode.HighQuality;
   //繪制圖片
   _graphics.Clear(Color.Transparent);
   _graphics.DrawImage(_original, new RectangleF(0, 0, _bitmap.Width, _bitmap.Height), _originalArea, GraphicsUnit.Pixel);
   //保存
   _bitmap.Save(thumbnail);
   _graphics.Dispose();
   _original.Dispose();
   _bitmap.Dispose();
   return true;
  }
 }
}
在AttachmentController添加生成縮略圖的action
/// <summary>
  /// 創建縮略圖
  /// </summary>
  /// <param name="originalPicture">原圖地址</param>
  /// <returns>縮略圖地址。生成失敗返回null</returns>
  public ActionResult CreateThumbnail(string originalPicture)
  {
   //原圖為縮略圖直接返回其地址
   if (originalPicture.IndexOf("_s") > 0) return Json(originalPicture);
   //縮略圖地址
   string _thumbnail = originalPicture.Insert(originalPicture.LastIndexOf('.'), "_s");
   //創建縮略圖
   if (Common.Picture.CreateThumbnail(Server.MapPath(originalPicture), Server.MapPath(_thumbnail), 160, 120))
   {
    //記錄保存在數據庫中
    attachmentService.Add(new Attachment(){ Extension= _thumbnail.Substring(_thumbnail.LastIndexOf('.')+1), FileParth="~"+_thumbnail, Owner= User.Identity.Name, Type="image", UploadDate= DateTime.Now});
    return Json(_thumbnail);
   }
   return Json(null);
  }
三、整合
添加和上傳附件都做好了,現在把他們整合到一起,我們就可以上傳附件了。
打開Add視圖,在創建KindEditor位置添加腳本

現在打開浏覽器就可以上傳和管理附件了
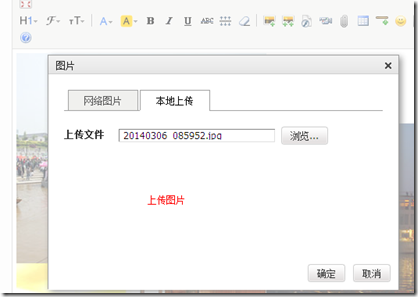
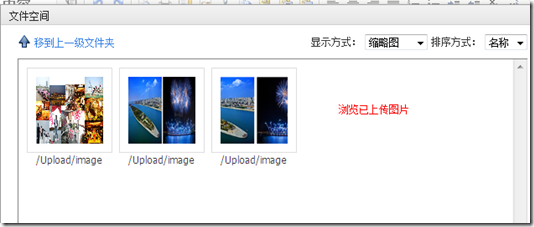
添加文章的最後一個字段是文章的默認首頁圖片,我希望點擊選擇按鈕,可以在已上傳中選擇圖片,並創建縮略圖。
那麼在Add視圖裡再彈出一個文件空間讓用戶選擇已上傳的文件,用戶選擇後講選擇的地址發送到服務器創建縮略圖,並返回縮略圖地址,然後將地址復制給隱藏表單,CommonModel_DefaultPicUrl,同事復制個<img />的src屬性用來顯示圖片。Js代碼如下:
//首頁圖片
   var editor2 = K.editor({
    fileManagerJson: '@Url.Action("FileManagerJson", "Attachment")'
   });
   K('#btn_picselect').click(function () {
    editor2.loadPlugin('filemanager', function () {
     editor2.plugin.filemanagerDialog({
      viewType: 'VIEW',
      dirName: 'image',
      clickFn: function (url, title) {
       var url;
       $.ajax({
        type: "post",
        url: "@Url.Action("CreateThumbnail", "Attachment")",
        data: { originalPicture: url },
        async: false,
        success: function (data) {
         if (data == null) alert("生成縮略圖失敗!");
         else {
          K('#CommonModel_DefaultPicUrl').val(data);
          K('#imgpreview').attr("src", data);
         }
         editor2.hideDialog();
        }
       });
      }
     });
    });
   });
看下效果
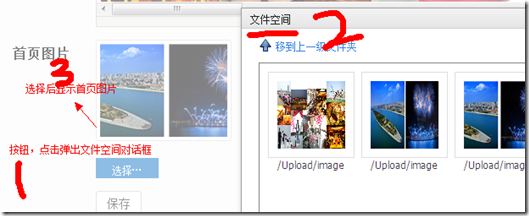
在保存文章的action中刪除未使用的附件
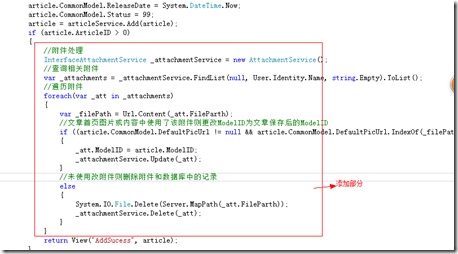
完整的Add方法代碼
[ValidateInput(false)]
  [HttpPost]
  [ValidateAntiForgeryToken]
  public ActionResult Add(Article article)
  {
   if(ModelState.IsValid)
   {
    //設置固定值
    article.CommonModel.Hits = 0;
    article.CommonModel.Inputer = User.Identity.Name;
    article.CommonModel.Model = "Article";
    article.CommonModel.ReleaseDate = System.DateTime.Now;
    article.CommonModel.Status = 99;
    article = articleService.Add(article);
    if (article.ArticleID > 0)
    {
     //附件處理
     InterfaceAttachmentService _attachmentService = new AttachmentService();
     //查詢相關附件
     var _attachments = _attachmentService.FindList(null, User.Identity.Name, string.Empty).ToList();
     //遍歷附件
     foreach(var _att in _attachments)
     {
      var _filePath = Url.Content(_att.FileParth);
      //文章首頁圖片或內容中使用了該附件則更改ModelID為文章保存後的ModelID
      if ((article.CommonModel.DefaultPicUrl != null && article.CommonModel.DefaultPicUrl.IndexOf(_filePath) >= 0) || article.Content.IndexOf(_filePath) > 0)
      {
       _att.ModelID = article.ModelID;
       _attachmentService.Update(_att);
      }
      //未使用改附件則刪除附件和數據庫中的記錄
      else
      {
       System.IO.File.Delete(Server.MapPath(_att.FileParth));
       _attachmentService.Delete(_att);
      }
     }
     return View("AddSucess", article);
    }
   }
   return View(article);
  }
單純添加文章比較簡單,復雜點在上傳附件,浏覽新添加的附件,刪除文章中未使用的附件及生成縮略圖上。KindEditor還支持批量上傳附件,由於批量上傳使用的swfupload,在提交時flash沒傳輸cookie到服務器,無法驗證用戶導致上傳失敗,暫時無法使用批量上傳,希望這篇文章可以對大家的學習有所幫助,大家可以結合小編之前發的文章進行學習,相信一定會有所收獲。