一、創建ClaimsIdentity
ClaimsIdentity(委托基於聲明的標識)是在ASP.NET Identity身份認證系統的登錄時要用到,我們在UserService中來生成它。
1、打開IBLL項目InterfaceUserService接口,添加接口方法ClaimsIdentity CreateIdentity(User user, string authenticationType);
2、打開BLL項目的UserService類,添加CreateIdentity方法的實現代碼
public ClaimsIdentity CreateIdentity(User user, string authenticationType)
 {
 ClaimsIdentity _identity = new ClaimsIdentity(DefaultAuthenticationTypes.ApplicationCookie);
 _identity.AddClaim(new Claim(ClaimTypes.Name, user.UserName));
 _identity.AddClaim(new Claim(ClaimTypes.NameIdentifier, user.UserID.ToString()));
 _identity.AddClaim(new Claim("http://schemas.microsoft.com/accesscontrolservice/2010/07/claims/identityprovider", "ASP.NET Identity"));
 _identity.AddClaim(new Claim("DisplayName", user.DisplayName));
 return _identity;
 }
二、獲取AuthenticationManager(認證管理器)
打開Ninesky.Web項目 Member區域的UserController,添加AuthenticationManager屬性,在HttpContext.GetOwinContext()中獲取這個屬性。
#region 屬性
 private IAuthenticationManager AuthenticationManager { get { return HttpContext.GetOwinContext().Authentication; } }
 #endregion
三、創建登錄視圖模型
Member區域的模型文件夾添加視圖模型
using System.ComponentModel.DataAnnotations;

namespace Ninesky.Web.Areas.Member.Models
{
 /// <summary>
 /// 登錄模型
 /// <remarks>
 /// 創建:2014.02.16
 /// </remarks>
 /// </summary>
 public class LoginViewModel
 {
 /// <summary>
 /// 用戶名
 /// </summary>
 [Required(ErrorMessage = "必填")]
 [StringLength(20, MinimumLength = 4, ErrorMessage = "{2}到{1}個字符")]
 [Display(Name = "用戶名")]
 public string UserName { get; set; }

 /// <summary>
 /// 密碼
 /// </summary>
 [Required(ErrorMessage = "必填")]
 [Display(Name = "密碼")]
 [StringLength(20, MinimumLength = 6, ErrorMessage = "{2}到{1}個字符")]
 [DataType(DataType.Password)]
 public string Password { get; set; }

 /// <summary>
 /// 記住我
 /// </summary>
 [Display(Name = "記住我")]
 public bool RememberMe { get; set; }
 }
}
四、創建登錄頁面
在UserCcontroller中添加(string returnUrl) action
/// <summary>
 /// 用戶登錄
 /// </summary>
 /// <param name="returnUrl">返回Url</param>
 /// <returns></returns>
 public ActionResult Login(string returnUrl)
 {
 return View();
 }
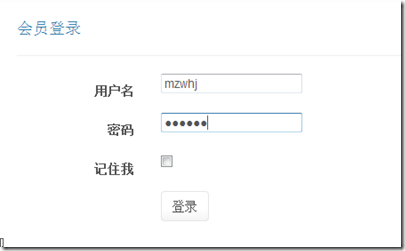
右鍵添加強類型視圖,模型為LoginViewModel
@model Ninesky.Web.Areas.Member.Models.LoginViewModel

@{
 ViewBag.Title = "會員登錄";
}

@using (Html.BeginForm())
{
 @Html.AntiForgeryToken()

 <div class="form-horizontal">
 <h4>會員登錄</h4>
 <hr />
 @Html.ValidationSummary(true)

 <div class="form-group">
 @Html.LabelFor(model => model.UserName, new { @class = "control-label col-md-2" })
 <div class="col-md-10">
 @Html.EditorFor(model => model.UserName)
 @Html.ValidationMessageFor(model => model.UserName)
 </div>
 </div>

 <div class="form-group">
 @Html.LabelFor(model => model.Password, new { @class = "control-label col-md-2" })
 <div class="col-md-10">
 @Html.EditorFor(model => model.Password)
 @Html.ValidationMessageFor(model => model.Password)
 </div>
 </div>

 <div class="form-group">
 @Html.LabelFor(model => model.RememberMe, new { @class = "control-label col-md-2" })
 <div class="col-md-10">
 @Html.EditorFor(model => model.RememberMe)
 @Html.ValidationMessageFor(model => model.RememberMe)
 </div>
 </div>

 <div class="form-group">
 <div class="col-md-offset-2 col-md-10">
 <input type="submit" value="登錄" class="btn btn-default" />
 </div>
 </div>
 </div>
}

@section Scripts {
 @Scripts.Render("~/bundles/jqueryval")
}
效果

五、創建用戶登錄處理action
在UserCcontroller中添加 httppost類型的 Login action中先用ModelState.IsValid看模型驗證是否通過,沒通過直接返回,通過則檢查用戶密碼是否正確。用戶名密碼正確用CreateIdentity方法創建標識,然後用SignOut方法清空Cookies,然後用SignIn登錄。
[ValidateAntiForgeryToken]
 [HttpPost]
 public ActionResult Login(LoginViewModel loginViewModel)
 {
 if(ModelState.IsValid)
 {
 var _user = userService.Find(loginViewModel.UserName);
 if (_user == null) ModelState.AddModelError("UserName", "用戶名不存在");
 else if (_user.Password == Common.Security.Sha256(loginViewModel.Password))
 {
 var _identity = userService.CreateIdentity(_user, DefaultAuthenticationTypes.ApplicationCookie);
 AuthenticationManager.SignOut(DefaultAuthenticationTypes.ApplicationCookie);
 AuthenticationManager.SignIn(new AuthenticationProperties() { IsPersistent = loginViewModel.RememberMe }, _identity);
 return RedirectToAction("Index", "Home");
 }
 else ModelState.AddModelError("Password", "密碼錯誤");
 }
 return View();
 }
六、修改用戶注冊代碼
讓用戶注冊成功後直接登錄

七、注銷
在UserCcontroller中添加在Logout action
/// <summary>
 /// 登出
 /// </summary>
 /// <returns></returns>
 public ActionResult Logout()
 {
 AuthenticationManager.SignOut(DefaultAuthenticationTypes.ApplicationCookie);
 return Redirect(Url.Content("~/"));
 }
本文已被整理到了《ASP.NET MVC網站開發教程》,歡迎大家學習閱讀,更多內容還可以參考ASP.NET MVC5網站開發專題學習。
本文主要是用到了ClaimsIdentity(基於聲明的標識)、AuthenticationManager的SignOut、SignIn方法。希望對大家實現用戶注冊和注銷有所幫助。