我們知道,無論是ASP.NET1.x,2.0,甚至是以後的版本,ASP.NET最終Render到Client端通過浏覽器浏覽的都是一樣:一個單純的HTML。Client通過Submit Form的方式將填入Form的數據提交給Server進行處理。我們現在來看看ASP.NET整個Postback程序處理的過程。
首先我們通過一個Sample來看ASP.NET如何處理一個通過Click一個Button引起的Postback。下面是Web Page的HTML:
復制代碼 代碼如下:
<%@ Page Language="C#" AutoEventWireup="true" CodeFile="Default.aspx.cs" Inherits="_Default" %>
<!DOCTYPE html PUBLIC "-//W3C//DTD XHTML 1.0 Transitional//EN" "http://www.w3.org/TR/xhtml1/DTD/xhtml1-transitional.dtd">
<html xmlns="http://www.w3.org/1999/xhtml">
<head runat="server">
<title>Test Page</title>
</head>
<body>
<form id="form1" runat="server">
<div>
<asp:Label runat="server" ID="LabelMessage" ForeColor="red"></asp:Label>
</div>
<div>
<asp:Button runat="server" ID="Button1" Text="Button1" OnClick="Button1_Click" OnCommand="Button_Command" CommandArgument="Button1" />
<asp:Button runat="server" ID="Button2" Text="Button2" OnClick="Button2_Click" OnCommand="Button_Command" CommandArgument="Button2" UseSubmitBehavior="false" />
<asp:Button runat="server" ID="Button3" Text="Button3" OnClick="Button3_Click" OnCommand="Button_Command" CommandArgument="Button3" UseSubmitBehavior="false" />
</div>
</form>
</body>
</html>
很簡單,定義了3個Button,分別注冊了他們的兩個Event:Click和Command。3個Button的Command Event Hander是一樣的:Button_Command,通過指定的CommandArgument來讓Event Handler判斷到底是哪個Button觸發了Command Event。
下面是Code Behind:
復制代碼 代碼如下:
using System;
using System.Data;
using System.Configuration;
using System.Web;
using System.Web.Security;
using System.Web.UI;
using System.Web.UI.WebControls;
using System.Web.UI.WebControls.WebParts;
using System.Web.UI.HtmlControls;
public partial class _Default : System.Web.UI.Page
{
protected void Page_Load(object sender, EventArgs e)
{
}
protected void Button1_Click(object sender, EventArgs e)
{
string message = string.Format("The {0} event of {1} is fired", "Click", "Button1");
this.LabelMessage.Text = message;
}
protected void Button2_Click(object sender, EventArgs e)
{
string message = string.Format("The {0} event of {1} is fired", "Click", "Button2");
this.LabelMessage.Text = message;
}
protected void Button3_Click(object sender, EventArgs e)
{
string message = string.Format("The {0} event of {1} is fired", "Click", "Button3");
this.LabelMessage.Text = message;
}
protected void Button_Command(object sender, CommandEventArgs e)
{
string message = string.Format("The {0} event of {1} is fired", "Command", e.CommandArgument);
this.LabelMessage.Text += "; " + message;
}
}
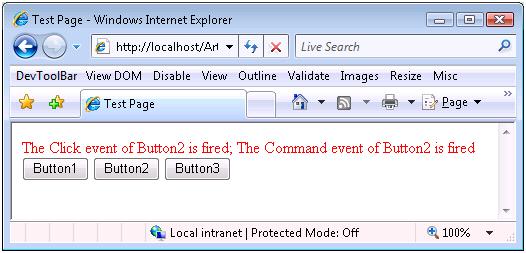
我們來運行這個Page,並Click某個按鈕(比如Button2):

我們通過最上方的Message可以看出,Button2的Click Event和Command先後觸發。
這篇Blog的主旨就是從方法調用的角度講述整個程序運行的過程:從HTML 被Render到Client端,到用戶Click某個按鈕,輸入被Postback到Server端,並觸發兩個Event,執行Event Handler打印出相關的Message。
首先我們來看看ASP.NET設計的Page Render到Client端的HTML是什麼樣子:
復制代碼 代碼如下:
<!DOCTYPE html PUBLIC "-//W3C//DTD XHTML 1.0 Transitional//EN" "http://www.w3.org/TR/xhtml1/DTD/xhtml1-transitional.dtd">
<html xmlns="http://www.w3.org/1999/xhtml">
<head>
<title>
Test Page
</title>
</head>
<body>
<form name="form1" method="post" action="Default.aspx" id="form1">
<div>
<input type="hidden" name="__EVENTTARGET" id="__EVENTTARGET" value="" />
<input type="hidden" name="__EVENTARGUMENT" id="__EVENTARGUMENT" value="" />
<input type="hidden" name="__VIEWSTATE" id="__VIEWSTATE" value="/wEPDwUKMTA0NDQ2OTE5OWRk281L4eAk7iZT10hzg+BeOyoUWBQ=" />
</div>
<script type="text/javascript">
<!--
var theForm = document.forms['form1'];
if (!theForm) {
theForm = document.form1;
}
function __doPostBack(eventTarget, eventArgument) {
if (!theForm.onsubmit || (theForm.onsubmit() != false)) {
theForm.__EVENTTARGET.value = eventTarget;
theForm.__EVENTARGUMENT.value = eventArgument;
theForm.submit();
}
}
// -->
</script>
<div>
<span id="LabelMessage" style="color:Red;"></span>
</div>
<div>
<input type="submit" name="Button1" value="Button1" id="Button1" />
<input type="button" name="Button2" value="Button2" onclick="javascript:__doPostBack('Button2','')" id="Button2" />
<input type="button" name="Button3" value="Button3" onclick="javascript:__doPostBack('Button3','')" id="Button3" />
</div>
</form>
</body>
</html>
當前1/2頁
12下一頁閱讀全文
