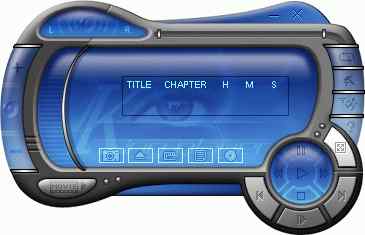
作不規則窗體涉及到API的調用和大量的編程,是件很復雜的事情。下面我們可以使用Borland C# Builder輕松的實現一個不規則窗體,以下面用一個示例來講述其制作過程。
一.准備不規則窗體位圖
二.窗體的設置
三.代碼的完成
一.准備不規則窗體位圖
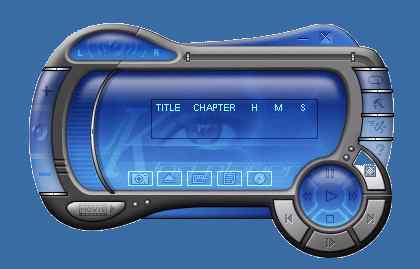
為了方便起見,我們隨便找幾個別的軟件用的Skin。
這裡使用金山影霸 2003的安裝目錄下的skins\ocean\KingDVD_Disable.BMP
當然完全可以使用畫圖工具,制作一個有形狀的位圖,背景使用一種特別的顏色,如白色。這個顏色會在後面用得上。
[ 相關貼圖 ]

二.窗體的設置
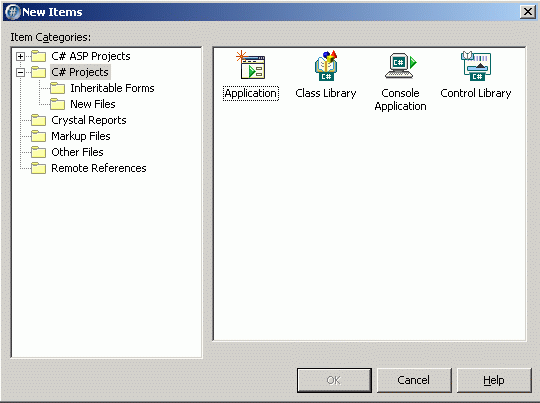
1.新建C# Application
[ 相關貼圖 ]

2.選中新建的窗體,設置其相應屬性:
(1).將 FormBorderStyle 屬性設置為 None。
(2).將窗體的 BackgroundImage 屬性設置為先前面的位圖文件。
(3).將 TransparencyKey 屬性設置為位圖文件的背景色,本例中為白色。(此屬性告訴應用程序窗體中的哪些部分需要設置為透明。 )
(4).加一個picturebox1,就是一關閉位圖,點擊時關閉應用程序。
(5).加一個contextMenu1,添加一菜單項“退出”,將winform的contextMenu設為contextMenu1。
按F9運行你的程序,就可以看到你的不規則窗體了。
[ 相關貼圖 ]

三.實現代碼
前面做的窗口還不能移動。加入下面的代碼使其能移動起來,帖出完整的示例代碼:
using System;
using System.Drawing;
using System.Collections;
using System.ComponentModel;
using System.Windows.Forms;
using System.Data;
namespace SForm
{
/// <summary>
/// Summary description for WinForm.
/// </summary>
public class WinForm : System.Windows.Forms.Form
{
/// <summary>
/// Required designer variable.
/// </summary>
private System.ComponentModel.Container components = null;
private System.Windows.Forms.ContextMenu contextMenu1;
private System.Windows.Forms.MenuItem menuItem1;
private Point mouseOffset; //記錄鼠標指針的坐標
private bool isMouseDown = false;
private System.Windows.Forms.PictureBox pictureBox1; //記錄鼠標按鍵是否按下
public WinForm()
{
//
// Required for Windows Form Designer support
//
InitializeComponent();
//
// TODO: Add any constructor code after InitializeComponent call
//
}
/// <summary>
/// Clean up any resources being used.
/// </summary>
protected override void Dispose (bool disposing)
{
if (disposing)
{
if (components != null)
{
components.Dispose();
}
}
base.Dispose(disposing);
}
#region Windows Form Designer generated code
/// <summary>
/// Required method for Designer support - do not modify
/// the contents of this method with the code editor.
/// </summary>
private void InitializeComponent()
{
System.Resources.ResourceManager resources = new System.Resources.ResourceManager(typeof(WinForm));
this.contextMenu1 = new System.Windows.Forms.ContextMenu();
this.menuItem1 = new System.Windows.Forms.MenuItem();
this.pictureBox1 = new System.Windows.Forms.PictureBox();
this.SuspendLayout();
//
// contextMenu1
//
this.contextMenu1.MenuItems.AddRange(new System.Windows.Forms.MenuItem[] {
this.menuItem1});
//
// menuItem1
//
this.menuItem1.Index = 0;
this.menuItem1.Text = "退出";
this.menuItem1.Click += new System.EventHandler(this.menuItem1_Click);
//
// pictureBox1
//
this.pictureBox1.Image = ((System.Drawing.Image)(resources.GetObject("pictureBox1.Image")));
this.pictureBox1.Location = new System.Drawing.Point(290, 8);
this.pictureBox1.Name = "pictureBox1";
this.pictureBox1.Size = new System.Drawing.Size(14, 13);
this.pictureBox1.SizeMode = System.Windows.Forms.PictureBoxSizeMode.AutoSize;
this.pictureBox1.TabIndex = 0;
this.pictureBox1.TabStop = false;
this.pictureBox1.Click += new System.EventHandler(this.pictureBox1_Click);
//
// WinForm
//
this.AutoScaleBaseSize = new System.Drawing.Size(6, 14);
this.BackgroundImage = ((System.Drawing.Image)(resources.GetObject("$this.BackgroundImage")));
this.ClientSize = new System.Drawing.Size(365, 235);
this.ContextMenu = this.contextMenu1;
this.Controls.Add(this.pictureBox1);
this.FormBorderStyle = System.Windows.Forms.FormBorderStyle.None;
this.MaximizeBox = false;
this.MinimizeBox = false;
this.Name = "WinForm";
this.Text = "WinForm";
this.TransparencyKey = System.Drawing.Color.White;
this.MouseDown += new System.Windows.Forms.MouseEventHandler(this.WinForm_MouseDown);
this.MouseUp += new System.Windows.Forms.MouseEventHandler(this.WinForm_MouseUp);
this.MouseMove += new System.Windows.Forms.MouseEventHandler(this.WinForm_MouseMove);
this.ResumeLayout(false);
}
#endregion
/// <summary>
/// The main entry point for the application.
/// </summary>
[STAThread]
static void Main()
{
Application.Run(new WinForm());
}
private void menuItem1_Click(object sender, System.EventArgs e)
{
this.Close();
}
private void WinForm_MouseMove(object sender, System.Windows.Forms.MouseEventArgs e)
{
if (isMouseDown)
{
Point mousePos = Control.MousePosition;
mousePos.Offset(mouseOffset.X, mouseOffset.Y);
Location = mousePos;
}
}
private void WinForm_MouseDown(object sender, System.Windows.Forms.MouseEventArgs e)
{
int xOffset;
int yOffset;
if (e.Button == MouseButtons.Left)
{
xOffset = -e.X - SystemInformation.FrameBorderSize.Width;
yOffset = -e.Y - SystemInformation.CaptionHeight -
SystemInformation.FrameBorderSize.Height;
mouseOffset = new Point(xOffset, yOffset);
isMouseDown = true;
}
}
private void WinForm_MouseUp(object sender, System.Windows.Forms.MouseEventArgs e)
{
// 修改鼠標狀態isMouseDown的值
// 確保只有鼠標左鍵按下並移動時,才移動窗體
if (e.Button == MouseButtons.Left)
{
isMouseDown = false;
}
}
private void pictureBox1_Click(object sender, System.EventArgs e)
{
this.Close();
}
}
}
注:如果監視器的顏色深度設置大於 24 位,TransparencyKey 設置成白色,窗體的非透明部分還是會顯示出來,不知道為什麼。