.net Thrift 之旅 (一) Windows 安裝及 HelloWorld,thrifthelloworld
1.下載Thrift
http://apache.fayea.com/apache-mirror/thrift/0.9.2/thrift-0.9.2.tar.gz
2.下載編譯器並解壓
http://www.apache.org/dyn/closer.cgi?path=/thrift/0.9.2/thrift-0.9.2.exe
3.設置編譯器的路徑為環境變量
我的thrift-0.9.2.exe 放在C:/Windows路徑下,所以設置環境變量中的 path:為 C:\Windows;
4.編寫一個 test.thrift 文件
namespace java com.javabloger.gen.code

struct User {
    1: i32 ID
    2: string Name
  }


service UserService {
    User GetUserByID(1:i32 userID)
    list<User> GetAllUser()
}
5.根據thrift自動生成Csharp代碼
cmd中路徑指定到test.Thrift的路徑, 執行命令 thrift --gen csharp test.thrift
就會自動生成gen-csharp文件夾,裡面有2個文件 User.cs 和 UserService.cs
6.新建工程
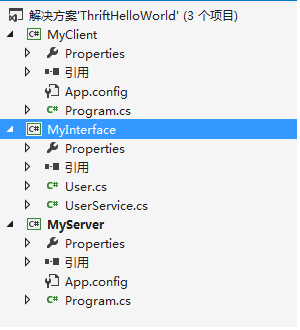
MyInterface中加入剛自動生成的文件
MyServer

![]()
class Program
{
static void Main(string[] args)
{
TServerSocket serverTransport = new TServerSocket(8899, 0, false);
UserService.Processor processor = new UserService.Processor(new MyUserService());
TServer server = new TSimpleServer(processor, serverTransport);
Console.WriteLine("Starting server on port 8899 ...");
server.Serve();
}
}
public class MyUserService : UserService.Iface
{
public User GetUserByID(int userID)
{
return new User() { ID = 1, Name = "wangxm" };
}
public List<User> GetAllUser()
{
List<User> users = new List<User>(){
new User() { ID = 1, Name = "wangxm" },
new User() { ID = 2, Name = "xxxx" }
};
return users;
}
}
View Code
MyClient
![]()
static void Main(string[] args)
{
TTransport transport = new TSocket("localhost", 8899);
TProtocol protocol = new TBinaryProtocol(transport);
UserService.Client client = new UserService.Client(protocol);
transport.Open();
var users = client.GetAllUser();
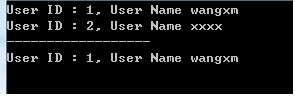
users.ForEach(u => Console.WriteLine(string.Format("User ID : {0}, User Name {1}", u.ID, u.Name)));
var user = client.GetUserByID(1);
Console.WriteLine("------------------");
Console.WriteLine(string.Format("User ID : {0}, User Name {1}", user.ID, user.Name));
Console.ReadLine();
}
View Code
7:運行結果如下