WinForm實現的圖片拖拽與縮放功能示例。本站提示廣大學習愛好者:(WinForm實現的圖片拖拽與縮放功能示例)文章只能為提供參考,不一定能成為您想要的結果。以下是WinForm實現的圖片拖拽與縮放功能示例正文
作者:何問起
這篇文章主要介紹了WinForm實現的圖片拖拽與縮放功能,結合具體實例形式分析了WinForm鼠標事件響應及圖片元素動態操作相關實現技巧,需要的朋友可以參考下本文實例講述了WinForm實現的圖片拖拽與縮放功能。分享給大家供大家參考,具體如下:
最近做項目的時候遇到上傳施工平面布置圖,查看,因為圖片比較大,一般的顯示器分辨率無法顯示全,然後還需要放大看清楚圖片裡面的文字內容,所以需要用到圖片的拖拽與縮放功能。這裡整理下具體操作。
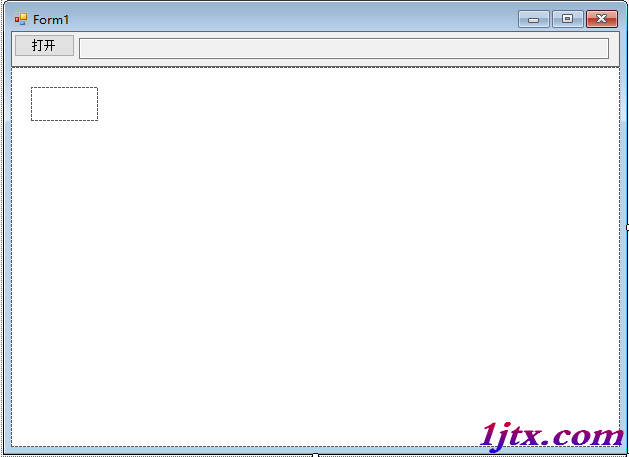
首先新建一個窗體,拖一個panel控件到窗體中,然後在拖一個pictureobx控件到panel中,然後在添加個上傳圖片的按鈕:

具體代碼:
using System;
using System.Collections.Generic;
using System.ComponentModel;
using System.Data;
using System.Drawing;
using System.Linq;
using System.Text;
using System.Threading.Tasks;
using System.Windows.Forms;
using System.Reflection;
namespace 圖像平移縮放
{
  public partial class Form1 : Form
  {
    Bitmap myBmp;
    Point mouseDownPoint = new Point(); //記錄拖拽過程鼠標位置
    bool isMove = false;  //判斷鼠標在picturebox上移動時,是否處於拖拽過程(鼠標左鍵是否按下)
    int zoomStep = 20;   //縮放步長
    public Form1()
    {
      InitializeComponent();
    }
    //圖片上傳
    private void button1_Click(object sender, EventArgs e)
    {
      string filename = "";
      OpenFileDialog dlg = new OpenFileDialog();
      dlg.Filter = "Tiff文件|*.tif|Bmp文件|*.bmp|Erdas img文件|*.img|EVNI文件|*.hdr|jpeg文件|*.jpg|raw文件|*.raw|vrt文件|*.vrt|所有文件|*.*";
      dlg.FilterIndex = 8;
      if (dlg.ShowDialog() == DialogResult.OK)
      {
        filename = dlg.FileName;
      }
      if (filename == "")
      {
        return;
      }
      myBmp = new Bitmap(filename);
      if (myBmp == null)
      {
        MessageBox.Show("讀取失敗");
        return;
      }
      textBox1.Text = filename;
      pictureBox1.Image = myBmp;
      pictureBox1.SizeMode = PictureBoxSizeMode.Zoom; //設置picturebox為縮放模式
      pictureBox1.Width = myBmp.Width;
      pictureBox1.Height = myBmp.Height;
    }
    //鼠標按下功能
    private void pictureBox1_MouseDown(object sender, MouseEventArgs e)
    {
      if (e.Button == MouseButtons.Left)
      {
        mouseDownPoint.X = Cursor.Position.X;
        mouseDownPoint.Y = Cursor.Position.Y;
        isMove = true;
        pictureBox1.Focus();
      }
    }
    //鼠標松開功能
    private void pictureBox1_MouseUp(object sender, MouseEventArgs e)
    {
      if (e.Button == MouseButtons.Left)
      {
        isMove = false;
      }
    }
    //鼠標移動功能
    private void pictureBox1_MouseMove(object sender, MouseEventArgs e)
    {
      pictureBox1.Focus();
      if (isMove)
      {
        int x, y;
        int moveX, moveY;
        moveX = Cursor.Position.X - mouseDownPoint.X;
        moveY = Cursor.Position.Y - mouseDownPoint.Y;
        x = pictureBox1.Location.X + moveX;
        y = pictureBox1.Location.Y + moveY;
        pictureBox1.Location = new Point(x, y);
        mouseDownPoint.X = Cursor.Position.X;
        mouseDownPoint.Y = Cursor.Position.Y;
      }
    }
    //鼠標滾輪滾動功能
    private void pictureBox1_MouseWheel(object sender, MouseEventArgs e)
    {
      int x = e.Location.X;
      int y = e.Location.Y;
      int ow = pictureBox1.Width;
      int oh = pictureBox1.Height;
      int VX, VY;
      if (e.Delta > 0)
      {
        pictureBox1.Width += zoomStep;
        pictureBox1.Height += zoomStep;
        PropertyInfo pInfo = pictureBox1.GetType().GetProperty("ImageRectangle", BindingFlags.Instance |
          BindingFlags.NonPublic);
        Rectangle rect = (Rectangle)pInfo.GetValue(pictureBox1, null);
        pictureBox1.Width = rect.Width;
        pictureBox1.Height = rect.Height;
      }
      if (e.Delta < 0)
      {
        if (pictureBox1.Width < myBmp.Width / 10)
          return;
        pictureBox1.Width -= zoomStep;
        pictureBox1.Height -= zoomStep;
        PropertyInfo pInfo = pictureBox1.GetType().GetProperty("ImageRectangle", BindingFlags.Instance |
          BindingFlags.NonPublic);
        Rectangle rect = (Rectangle)pInfo.GetValue(pictureBox1, null);
        pictureBox1.Width = rect.Width;
        pictureBox1.Height = rect.Height;
      }
      VX = (int)((double)x * (ow - pictureBox1.Width) / ow);
      VY = (int)((double)y * (oh - pictureBox1.Height) / oh);
      pictureBox1.Location = new Point(pictureBox1.Location.X + VX, pictureBox1.Location.Y + VY);
    }
    private void panel2_MouseDown(object sender, MouseEventArgs e)
    {
      if (e.Button == MouseButtons.Left)
      {
        mouseDownPoint.X = Cursor.Position.X;
        mouseDownPoint.Y = Cursor.Position.Y;
        isMove = true;
      }
    }
    private void panel2_MouseUp(object sender, MouseEventArgs e)
    {
      if (e.Button == MouseButtons.Left)
      {
        isMove = false;
      }
    }
    private void panel2_MouseMove(object sender, MouseEventArgs e)
    {
      panel2.Focus();
      if (isMove)
      {
        int x, y;
        int moveX, moveY;
        moveX = Cursor.Position.X - mouseDownPoint.X;
        moveY = Cursor.Position.Y - mouseDownPoint.Y;
        x = pictureBox1.Location.X + moveX;
        y = pictureBox1.Location.Y + moveY;
        pictureBox1.Location = new Point(x, y);
        mouseDownPoint.X = Cursor.Position.X;
        mouseDownPoint.Y = Cursor.Position.Y;
      }
    }
  }
}
這裡需要注意一點,類裡面用到了一個 pictureBox1_MouseWheel 時間,這個是picturebox控件沒有的時間,所以需要手動去添加這個事件,可以直接在form1的設計類中添加
//
// pictureBox1
//
this.pictureBox1.BackColor = System.Drawing.Color.White;
this.pictureBox1.Location = new System.Drawing.Point(20, 20);
this.pictureBox1.Margin = new System.Windows.Forms.Padding(2, 2, 2, 2);
this.pictureBox1.Name = "pictureBox1";
this.pictureBox1.Size = new System.Drawing.Size(67, 34);
this.pictureBox1.TabIndex = 0;
this.pictureBox1.TabStop = false;
this.pictureBox1.MouseDown += new System.Windows.Forms.MouseEventHandler(this.pictureBox1_MouseDown);
this.pictureBox1.MouseMove += new System.Windows.Forms.MouseEventHandler(this.pictureBox1_MouseMove);
this.pictureBox1.MouseUp += new System.Windows.Forms.MouseEventHandler(this.pictureBox1_MouseUp);
this.pictureBox1.MouseWheel += new System.Windows.Forms.MouseEventHandler(this.pictureBox1_MouseWheel);
這樣就能直接運行成功了
更多關於C#相關內容感興趣的讀者可查看本站專題:《WinForm控件用法總結》、《C#窗體操作技巧匯總》、《C#數據結構與算法教程》、《C#常見控件用法教程》、《C#面向對象程序設計入門教程》及《C#程序設計之線程使用技巧總結》
希望本文所述對大家C#程序設計有所幫助。