 <!--[endif]-->
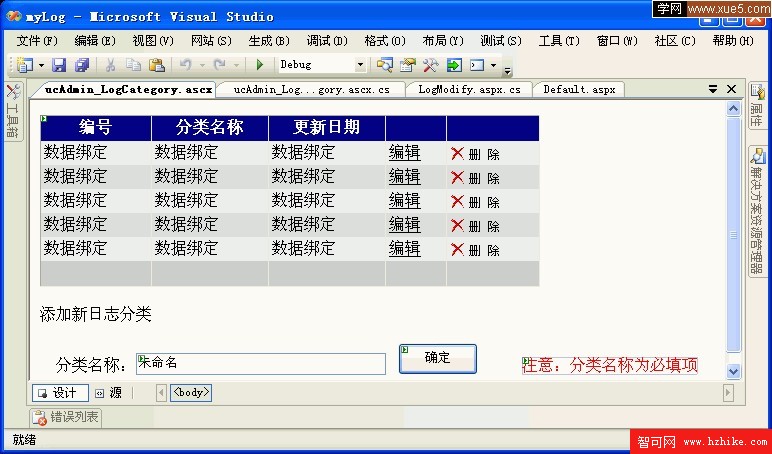
圖1-1 管理日志分類用戶控件布局
如圖1-1所示,在綁定顯示日志分類數據時這裡使用的ASP.Net中的GridView控件,而不是Repeater控件。GridView控件又稱網格視圖控件,該控件可以呈現多列、完全模板化的表格,在其功能上比Repeater控件更加強大。通過使用GridVIEw控件,用戶可以顯示、編輯和刪除多種不同的數據源(例如數據庫、XML文件和公開數據的業務對象)中的數據。
使用GridVIEw來可以完成以下操作:
<!--[if !supportLists]-->l <!--[endif]-->通過數據源控件自動綁定和顯示數據
<!--[if !supportLists]-->l <!--[endif]-->通過數據源控件對數據進行選擇、排序、分頁、編輯和刪除
<!--[if !supportLists]-->l <!--[endif]-->指定自定義列和樣式
<!--[if !supportLists]-->l <!--[endif]-->利用模板創建自定義用戶界面(UI)元素
<!--[if !supportLists]-->l <!--[endif]-->通過處理事件將自己的代碼添加到GridVIEw控件的功能中
GridView控件支持BoundField、ButtonField、HyperLinkField、CommandField、和TemplateField等多種綁定列類型,最常用的是BoundField和CommandFIEld。
BoundFIEld類型顯示綁定到數據源的一個字段的列,顯示的結果為純文本形式:在綁定該列類型的數據時,需要用到與該數據有關的屬性。該列類型的常用重要屬性如下:
<!--[if !supportLists]-->l <!--[endif]-->DataFIEld 數據源中綁定數據列的字段名稱
<!--[if !supportLists]-->l <!--[endif]-->DataFormatString 顯示列數據的格式
<!--[if !supportLists]-->l <!--[endif]-->HeaderText 該列的標題
<!--[if !supportLists]-->l <!--[endif]-->FooterText 該列的腳注部分
<!--[if !supportLists]-->l <!--[endif]-->ReadOnly 標識該列是否要編輯
<!--[if !supportLists]-->l <!--[endif]-->SortExpression 該列的排序表達式
CommandField類型顯示GridVIEw中內置各種編輯功能按鈕。如“編輯”、“刪除”等,默認情況下它們以LinkButton的形式表現出來。該列類型常用重要屬性如下所示:
<!--[if !supportLists]-->l <!--[endif]-->ButtonType 設置按鈕的類型
<!--[if !supportLists]-->l <!--[endif]-->CancleText 取消按鈕的顯示文本
<!--[if !supportLists]-->l <!--[endif]-->DeleteText 刪除按鈕的顯示文本
<!--[if !supportLists]-->l <!--[endif]-->EditText 編輯按鈕的顯示文本
<!--[if !supportLists]-->l <!--[endif]-->ShowEditButton 是否顯示編輯按鈕
<!--[if !supportLists]-->l <!--[endif]-->ShowCancleButton 是否顯示取消按鈕
<!--[if !supportLists]-->l <!--[endif]-->ShowDeleteButton 是否顯示刪除按鈕
圖1-1所示布局中的添加日志分類使用了一個文本框控件、一個按鈕和一個驗證控件。
1.查看日志分類
查看日志分類也就是從infosort表中讀取數據並綁定到GridView控件顯示,這首先需要了解GridVIEw控件的布局,其代碼如下:
<ASP:GridView ID="GridVIEw1" runat="server" BackColor="White" BorderColor="#999999"
Border BorderWidth="1px" CellPadding="3" GridLines="Vertical"
OnRowCancelingEdit="GridVIEw1_RowCancelingEdit"
OnRowDeleting="GridView1_RowDeleting" OnRowEditing="GridVIEw1_RowEditing"
OnRowUpdating="GridVIEw1_RowUpdating" ShowFooter="True"
Width="500px" AutoGenerateColumns="False" EnableVIEwState="False" >
<FooterStyle BackColor="#CCCCCC" ForeColor="Black" />
<RowStyle BackColor="#EEEEEE" ForeColor="Black" />
<SelectedRowStyle BackColor="#
<PagerStyle BackColor="#999999" ForeColor="Black" HorizontalAlign="Center" />
<HeaderStyle BackColor="#000084" Font-Bold="True" ForeColor="White" />
<AlternatingRowStyle BackColor="Gainsboro" />
<Columns>
<ASP:BoundField DataFIEld="id" HeaderText="編號" ReadOnly="True" />
<ASP:BoundField DataFIEld="sortName" HeaderText="分類名稱" />
<ASP:BoundField DataFIEld="sortdate" HeaderText="更新日期" ReadOnly="True" />
<ASP:CommandFIEld ShowEditButton="True" />
<ASP:CommandFIEld ButtonType="Image" DeleteImageUrl="~/images/a_delete.gif" ShowDeleteButton="True" />
</Columns>
</ASP:GridVIEw>
上述代碼中<Columns>和</Columns>標記這間的為布局外觀上顯示的列,其中的第一行指定一個顯示“編號”的列,列使用的數據為綁定的id列,最後一個ReadOnly屬性設置該列為只讀。
認識了布局後下面來編寫代碼,GridVIEw控件的綁定方法與Repeater控件相同,代碼如下:
protected void Page_Load(object sender, EventArgs e)
{
gbind();
}
void gbind()
{
dbconfig dbconn = new dbconfig();
GridVIEw1.DataSource = dbconn.CreateSource("select * from infosort");
GridVIEw1.DataBind();
dbconn.Clear();
}
這裡要注意,在代碼中第一次使用了數據庫通用類中的CreateSource()方法。
2.修改日志類別
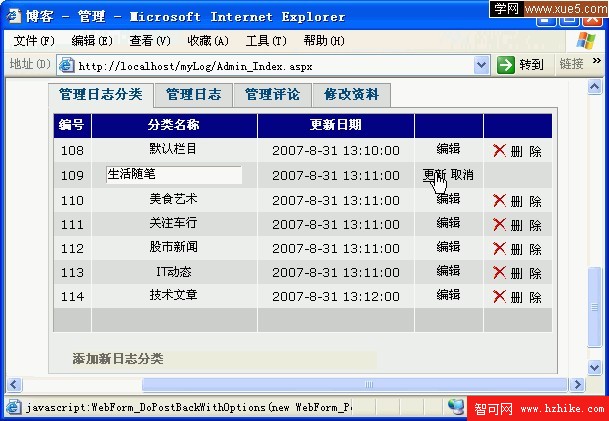
執行上述代碼,然後在某行中單擊“編輯”鏈接,則該行中可編輯的單元格都會以文本框的形式呈現。此時,在文本框中對數據進行修改,再單擊“更新”鏈接保存修改,若單擊“取消”鏈接則退出編輯狀態,如圖1-16所示。
 <!--[endif]-->
圖1-16 修改日志分類
GridView控件的“編輯”、“更新”和“取消”鏈接取決於控件的OnRowCancelingEdit、OnRowEditing和OnRowUpdating屬性,我們在上面的布局代碼中會發現它們。它們的屬性值分別對應後台的一個方法,而且都是使用GridVIEw的事件模型機制。
“編輯”鏈接對應的GridVIEw1_RowEditing()方法代碼如下:
protected void GridView1_RowEditing(object sender, GridVIEwEditEventArgs e)
{
GridVIEw1.EditIndex = e.NewEditIndex;
gbind(); //重新綁定控件的數據源
}
代碼中的EditIndex屬性可以設置或獲取要編輯行的索引,這裡指定編輯的行為單擊的所在行,使其處於編輯狀態,這個屬性很重要,在後面將會多次用到。
“取消”鏈接對應的GridVIEw1_RowCancelingEdit()方法代碼如下:
protected void GridView1_RowCancelingEdit(object sender, GridVIEwCancelEditEventArgs e)
{
GridVIEw1.EditIndex = -1;
gbind(); //重新綁定控件的數據源
}
最重要的是“更新”鏈接對應的GridVIEw1_RowUpdating()方法的代碼,如下所示:
protected void GridView1_RowUpdating(object sender, GridVIEwUpdateEventArgs e)
{
GridVIEw1.EditIndex = e.RowIndex;
//獲取要更新的行
GridViewRow gvr = this.GridVIEw1.Rows[e.RowIndex];
//獲取行中新的分類名稱
TextBox txt = (TextBox)gvr.Cells[1].Controls[0];
//獲取更新的分類編號
string updateid = gvr.Cells[0].Text;
string strsql = "Update infosort set sortName='" + txt.Text.Trim() + "',sortDate='" + DateTime.Now.ToString() + "' where id=" + updateid;
dbconfig dbconn = new dbconfig();
dbconn.ExecuteNonQuery(strsql);
dbconn.Clear();
Response.Redirect("Admin_Index.ASPx");
}
在更新infosort表中sortName字段的同時更新了sortDate為當前日期,最後再轉向到系統管理首頁。
3.刪除日志類別
“刪除”鏈接對應於GridView控件的OnRowDeleting屬性,即GridVIEw1_RowDeleting()方法,執行過程為獲取所在行的分類編號,再執行語句並返回,如下所示:
protected void GridView1_RowDeleting(object sender, GridVIEwDeleteEventArgs e)
{
GridViewRow gvr = (GridViewRow)GridVIEw1.Controls[0].Controls[e.RowIndex + 1];
string delid = gvr.Cells[0].Text;
dbconfig dbconn = new dbconfig();
dbconn.ExecuteNonQuery("delete from infosort where id=" + delid);
dbconn.Clear();
Response.Redirect("Admin_Index.ASPx");
}
4.添加日志分類
添加日志分類在圖1-1布局中的最下方,只需要在文本框中輸入一個名稱再單擊“確定”按鈕來完成。代碼的編寫需要在“確定”按鈕的單擊事件中,按鈕的名稱為btnOK,其單擊代碼如下所示:
protected void btnOk_Click(object sender, EventArgs e)
{
dbconfig dbconn = new dbconfig();
string strsql="insert into infosort(sortName) values('"+txtLog.Text.Trim()+"')";
dbconn.ExecuteNonQuery(strsql);
dbconn.Clear();
Response.Redirect("Admin_Index.ASPx");
}