在開始之前,我不得不說明我已經安裝了VS 2010 RC1,並使用它將老版本轉換為ASP.Net 4.0
大多數情況下,當你接收到來自用戶從form表單post來的信息後,你的驗證代碼往往會檢查相應的值是否存在,數據類型是否正確以及數據的范圍是否正確。至少,你應該保證每當一個函數接受用戶輸入時,就應該執行相應的驗證邏輯。這意味著有些時候在整個程序中的不同位置,你會對同一個或者相似的值進行多次驗證。比如說你想限制用戶的姓氏不大於20個字符,那這樣的驗證需要在程序的好幾個部分實現。直到Jan Vennegoor of Hesselink的出現(荷蘭球隊的一名球員,目前為doomed Hull City FC效力),在他的薪水還沒有隨著他服役的球隊被降級以前,他來到你的網站想購買一個價值50,000英鎊的耳環,他以他22個字符長度的姓氏注冊,但他發現他的姓氏不在允許的范圍之內時,他很氣憤的離開你的網站並且給web master留下不滿的評論。很明顯,你可不想讓類似的情況出現,所以你不得不在你的程序中找到所有驗證姓氏長度的相關代碼,並一一修正以便能接受更長的姓氏……
如果將驗證代碼放到一個集中的地方時,那類似上面所說的改變會不會變得更簡單些?Model中的DataAnnotations正是為此而來,在MVC2.0中,這一特性被包含在內。
DataAnnotations作為.net Framework的一部分已經有一段時間了,但是MVC2.0中增加了ModelMetaData類,這是儲存MetaData的容器,默認會使用同樣也是新增類的DataAnnotationsMetaDataProvider類。因為傳入的值會由Action方法接受model binding作為匹配傳入參數和action的參數而介入,在MVC2.0中,默認的model binder使用DataAnnotationsMetaDataProvider來獲取metadata中model binder嘗試匹配的對象,如果驗證用的metadata存在,則其會通過對對象的屬性和傳入的值比較來進驗證,這類meta由你通過使用標簽 (Attribute)修飾屬性來實現。
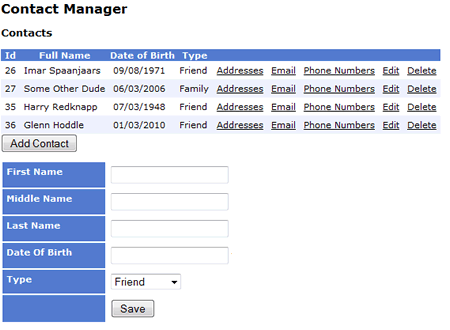
下面例子中我通過原程序中添加聯系人這一過程來描述使用DataAnnotatioins的方法,這裡我們使用自定義ViewModel,名為:ContactPersonViewModel。通過Contact.Add()這個action方法來添加聯系人,代碼如下:
using System;

using System.Collections.Generic;

using System.Web.Mvc;

using System.ComponentModel;


namespace ContactManagerMVC.Views.ViewModels

{

  public class ContactPersonViewModel

  {

   public int Id { get; set; }

   public string FirstName { get; set; }

   public string MiddleName { get; set; }

   public string LastName { get; set; }

   public DateTime DateOfBirth { get; set; }

   public IEnumerable<SelectListItem> Type { get; set; }

  }

}
下面,我在為屬性添加一些標簽(Attribute):
using System;

using System.Collections.Generic;

using System.Web.Mvc;

using System.ComponentModel.DataAnnotations;

using ContactManagerMVC.Attributes;

using System.ComponentModel;


namespace ContactManagerMVC.Views.ViewModels

{

  public class ContactPersonViewModel

  {

   public int Id { get; set; }

   [Required(ErrorMessage = "Please provide a First Name!")]

   [StringLength(25, ErrorMessage = "First name must be less than 25 characters!")]

   [DisplayName("First Name")]

   public string FirstName { get; set; }


   [DisplayName("Middle Name")]

   public string MiddleName { get; set; }


   [Required(ErrorMessage = "Please provide a Last Name!")]

   [StringLength(25, ErrorMessage = "Last name must be less than 25 characters!")]

   [DisplayName("Last Name")]

   public string LastName { get; set; }


   [Required(ErrorMessage = "You must provide a Date Of Birth!")]

   [BeforeTodaysDate(ErrorMessage = "You can't add someone who hasn't been born yet!")]

   [DisplayName("Date Of Birth")]

   public DateTime? DateOfBirth { get; set; }


   public IEnumerable<SelectListItem> Type { get; set; }

  }

}
上面標簽的絕大多數標簽都是在System.ComponentModel.Annotations命名空間內,只有RequiredAttribute 標簽不在此命名空間內,這個標簽聲明此值必須是一個有效值,並且包含ErrorMessage屬性。這個屬性可以讓你傳入自定義錯誤信息。 StringLengthAttribute標簽指定了屬性可以接受的最小值和最大值范圍。當和RequiredAttribute標簽結合使用時,只需要設置可以接受的最大值。DisplayNameAttribute用於設置屬性如何顯示.
上面標簽中BeforeTodaysDateAttribute標簽並不是.net Framework所提供,這是一個自定義標簽,用於檢測日期是否比當前的日期要早,你可以看到ErrorMessage值被設置。這個標簽用於防止任何被添加到聯系人列表的聯系人還未出生-.-!!,下面是這個標簽的代碼:
using System.ComponentModel.DataAnnotations;

using System;


namespace ContactManagerMVC.Attributes

{

  public class BeforeTodaysDateAttribute : ValidationAttribute

  {

   public override bool IsValid(object value)

   {

    if (value == null)

    {

     return true;

    }

    DateTime result;

    if (DateTime.TryParse(value.ToString(), out result))

    {

     if (result < DateTime.Now)

     {

      return true;

     }

    }

    return false;

   }

  }

}
很簡單是吧,這個類繼承了ValidationAttribute並重寫了IsValid()虛方法,如果未提供值,或是值小於當前日期(DateTime.Now),則返回True.
利用標簽(Attribute)的方式讓在一個集中的地方應用驗證規則變得簡單,現在,只要ContactPersonViewModel在程序中被用到了,則驗證規則同時也會被應用到。這常常如此(http://www.asp.net/learn/mvc/tutorial-39-cs.aspx),但現在DefaultModelBinder內的DataAnnotations被支持,下面來看新版本的Add Partial View:
<%@ Control Language="C#" Inherits="System.Web.Mvc.ViewUserControl<ContactPersonViewModel>" %>


<script type="text/javascript">

  $(function() {

  $('#DateOfBirth').datepicker({ dateFormat: 'yy/mm/dd' });

  });

  $('#save').click(function () {

    $.ajax({

      type: "POST",

      url: $("#AddContact").attr('action'),

      data: $("#AddContact").serialize(),

      dataType: "text/plain",

      success: function (response) {

        if (response == "Saved") {

          window.location = "/";

        }else {

          $("#details").html(response);

        }

      }

    });

  });

</script>


<% using (Html.BeginForm("Add", "Contact", FormMethod.Post, new { id = "AddContact" }))

   {%>

    <table>

     <tr>

       <td class="LabelCell"><%= Html.LabelFor(m => m.FirstName)%> </td>

       <td><%= Html.TextBox(m => m.FirstName)%>

       <%= Html.ValidationMessageFor(m => m.FirstName)%></td>

     </tr>

     <tr>

       <td class="LabelCell"><%= Html.LabelFor(m => m.MiddleName)%> </td>

       <td><%= Html.TextBox(m => m.MiddleName)%></td>

     </tr>

     <tr>

       <td class="LabelCell"><%= Html.LabelFor(m => m.LastName)%> </td>

       <td><%= Html.TextBox(m => m.LastName)%>

       <%= Html.ValidationMessageFor(m => m.LastName)%></td>

     </tr>

     <tr>

       <td class="LabelCell"><%= Html.LabelFor(m => m.DateOfBirth)%> </td>

       <td><%= Html.TextBox(m => m.DateOfBirth)%>

       <%= Html.ValidationMessageFor(m => m.DateOfBirth)%></td>

     </tr>

     <tr>

      <td class="LabelCell"><%= Html.LabelFor(m => m.Type)%></td>

      <td><%= Html.DropDownList("Type")%>

      </td>

     </tr>

     <tr>

      <td class="LabelCell"></td>

      <td><input type="button" name="save" id="save" value="Save" /></td>

     </tr>

    </table>

<% } %>

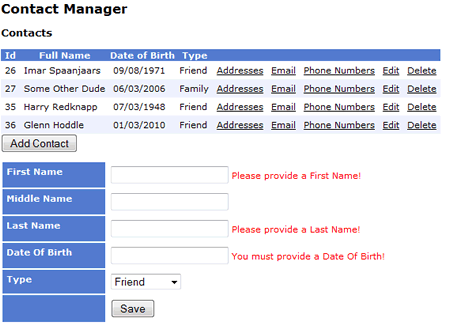
可以看出,這裡使用新的強類型Html Helper. 對前面項目修改的兩處是利用了jQuery代碼。第一處是添加聯系人的Partial View是通過AJax提交,如果驗證失敗,則添加的form會再次被顯示,如果驗證通過,新的聯系人被添加到列表中,頁面會刷新繼而顯示更新後包含新聯系人的列表。下面來看如果不輸入任何日期時點擊Save按鈕的效果:

由於下面幾種原因,原來的Action方法需要被修正。首先修改action方法使其接受ContactPersonViewModel而不是 ContactPerson作為參數,這是因為相關的驗證規則應用於ContactPersonViewModel,如果不將參數類型改變,那model binder依然能將傳入的值和ContactPerson的屬性相匹配,但所有的驗證規則就不復存在了。第二個改變是檢查ModelState的 IsValid屬性是否有效,否則整個驗證就變得毫無意義.
[AcceptVerbs(HttpVerbs.Post)]

public ActionResult Add([Bind(Exclude = "Id, Type")]ContactPersonViewModel person)

{


  if (ModelState.IsValid)

  {

    var p = new ContactPerson

    {

      FirstName = person.FirstName,

      MiddleName = person.MiddleName,

      LastName = person.LastName,

      Type = Request.Form["Type"].ParseEnum<PersonType>()

    };

    if (person.DateOfBirth != null)

      p.DateOfBirth = (DateTime)person.DateOfBirth;

    ContactPersonManager.Save(p);

    return Content("Saved");

  }

  var personTypes = Enum.GetValues(typeof(PersonType))

  .Cast<PersonType>()

  .Select(p => new

  {

    ID = p,

    Name = p.ToString()

  });

  person.Type = new SelectList(personTypes, "ID", "Name");

  return PartialView(person);

}
在model綁定過程中,我去掉了id和Type屬性,因為在把聯系人添加到數據庫以前並不會存在id屬性,而去掉Type屬性是因為在 ViewModel中它的類型是SelectList,但在BLL層中ContactPerson對象中卻是枚舉類型,如果ModelState的 IsValid屬性為True(注:既驗證通過),則ViewModel的屬性會和ContactPerson對象的屬性進行匹配,如果IsValid不為True,數據會回傳到View中顯示驗證失敗的相關信息。
上面代碼中我們注意到了Request.Form[“Type”]這個string類型的ParseEnum<T>擴展方法,這也是為什麼我去掉Type屬性,只有這樣它才會被轉換為適當的類型。擴展方法的原型(在我的Google Analytics 文中)如下:
public static T ParseEnum<T>(this string token)

{

   return (T)Enum.Parse(typeof(T), token);

}
edit這個action方法也是如此,除了對DateOfBirth進行編輯那部分:
<tr>

  <td class="LabelCell"><%= Html.LabelFor(m => m.DateOfBirth)%> </td>

  <td><%= Html.EditorFor(m => m.DateOfBirth)%>

    <%= Html.ValidationMessageFor(m => m.DateOfBirth)%></td>

</tr>
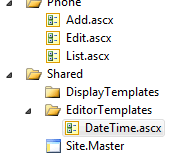
這裡我並沒有使用TextBoxFor<T>擴展方法,而是使用了EditorFor<T>方法,默認情況下,DateTime類型都以hh:mm:ss這樣的方式顯示,但我並不喜歡這種格式,所以我創建了一個格式化顯示時間日期的模板,在 View/Shared目錄下,我添加了一個名為EditorTemplates(這也是MVC中應有命名方式,因為MVC會自動搜索這個位置)並在此目錄下添加一個名為DateTime的Partial View,這也是MVC的慣例,如圖:

而DateTime.ascx的代碼如下:
<%@ Control Language="C#" Inherits="System.Web.Mvc.ViewUserControl<System.DateTime?>" %>

<%= Html.TextBox("", Model.HasValue ? Model.Value.ToShortDateString() : string.Empty) %>
雖然只有短短兩行代碼,但是可以讓時間日期如果為空時,什麼都不顯示,而如果時間存在,則以ShortDate的格式顯示。
總結
本篇文章研究了ASP.Net MVC 2.0中利用DataAnnotations來進行驗證,現在這已經是.net framework的一部分。文中還簡單的接觸了新版本中的一些特性,包括強類型的HTML Helper以及模板。本篇文章的代碼使用VS 2010RC1創建的,所以代碼不能在VWD 和 VS的環境中調試。
聯系人程序在添加了額外的驗證功能後進一步升級,但離完成還遙遙無期,在未來的文章中,我會繼續更新這個程序。