在上一篇文章,我介紹了如何編寫模態對話框屬性編輯器,這篇文章我將介紹如何編寫下拉式屬性編 輯器。下拉式(DropDown)屬性編輯器和模態對話框屬性編輯器的不同之處就是,當你點擊屬性值修改的 時候,模態對話框編輯器是彈出一個模態對話框,而下拉式屬性編輯器卻是在緊貼著屬性值的地方顯示一 個下拉的控件。不知道大家注意到了沒有,這裡我說的是顯示一個下拉的控件,而這個控件也是需要你去 開發的,接下來我還是以Scope屬性為例,介紹一下具體的實現。
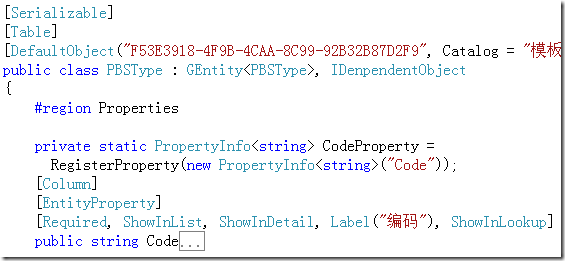
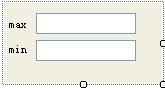
首先我們要創建一個用於編輯屬性的控件,在本系列文章的開始,我們介紹了自定義控件有三種類型 :復合控件,擴展控件,自定義控件。在本例中我們制作一個復合控件(Compsite control),復合控件 的開發比較簡單,不在本系列文章的講解范圍,我簡單做個介紹,在Solution 浏覽器裡右鍵點擊 CustomControlSample工程選擇Add->User Control…,輸入文件名ScopeEditorControl.cs。我們做的 這個復合控件上一篇文章介紹的模態對話框所包含子控件基本一樣,除了用於確認和取消的按鈕,如下圖 :
由於我們取消了用於確認和取消的按鈕,並且是一個下拉的編輯器控件,在出現下面三種情況的時候 下拉的編輯器控件會關閉:用戶敲了回車,用戶敲了ESC鍵,用戶點擊了編輯器以外的地方。當下拉編輯 器控件關閉的時候我們就需要更新屬性的值。下邊是這個控件的代碼:
using System;

using System.Collections.Generic;

using System.ComponentModel;

using System.Drawing;

using System.Data;

using System.Text;

using System.Windows.Forms;


namespace CustomControlSample

{

    public partial class ScopeEditorControl : UserControl

    {

        private Scope _oldScope;

        private Scope _newScope;

        private Boolean canceling;


        public ScopeEditorControl(Scope scope)

        {

            _oldScope = scope;

            _newScope = scope;

            InitializeComponent();

        }


        public Scope Scope

        {

            get

            {

                return _newScope;

            }

        }


        private void textBox1_Validating(object sender, CancelEventArgs e)

        {

            try

            {

                Int32.Parse(textBox1.Text);


            }

            catch (FormatException)

            {

                e.Cancel = true;

                MessageBox.Show("無效的值", "驗證錯誤", MessageBoxButtons.OK,

MessageBoxIcon.Error);

            }

        }


        private void textBox2_Validating(object sender, CancelEventArgs e)

        {

            try

            {

                Int32.Parse(textBox2.Text);

            }

            catch (FormatException)

            {

                e.Cancel = true;

                MessageBox.Show("無效的值", "驗證錯誤", MessageBoxButtons.OK,

MessageBoxIcon.Error);

            }

        }


        protected override bool ProcessDialogKey(Keys keyData)

        {

            if (keyData == Keys.Escape)

            {

                _oldScope = _newScope;

                canceling = true;

            }

            return base.ProcessDialogKey(keyData);

        }
        private void ScopeEditorControl_Leave(object sender, EventArgs e)

        {

            if (!canceling)

            {

                _newScope.Max = Convert.ToInt32(textBox1.Text);

                _newScope.Min = Convert.ToInt32(textBox2.Text);

            }

        }
        private void ScopeEditorControl_Load(object sender, EventArgs e)

        {

            textBox1.Text = _oldScope.Max.ToString();

            textBox2.Text = _oldScope.Min.ToString();

        }


    }

}
和模態對話框編輯器一樣,開發環境並不會直接調用我們的編輯器控件,而是用過UITypeEditor類的 派生來實現編輯器的調用,所以我們必須實現一個下拉式編輯器。代碼如下:
using System;

using System.ComponentModel;

using System.Drawing.Design;

using System.Windows.Forms.Design;

using System.Windows.Forms;

namespace CustomControlSample

{

    public class ScopeDropDownEditor : UITypeEditor

    {

        public override UITypeEditorEditStyle GetEditStyle(ITypeDescriptorContext

context)

        {

            if (context != null && context.Instance != null)

            {

                return UITypeEditorEditStyle.DropDown;

            }


            return base.GetEditStyle(context);

        }
        public override object EditValue(ITypeDescriptorContext context,

IServiceProvider provider, object value)

        {

            IWindowsFormsEditorService editorService = null;
            if (context != null && context.Instance != null &&

provider != null)

            {

                editorService = (IWindowsFormsEditorService)

provider.GetService(typeof(IWindowsFormsEditorService));

                if (editorService != null)

                {

                    MyListControl control = (MyListControl)

context.Instance;

                    ScopeEditorControl editorControl = new

ScopeEditorControl(control.Scope);

                    editorService.DropDownControl(editorControl);

                    value = editorControl.Scope;

                    return value;

                }

            }

            return value;

        }
    }

}
看過上一篇文章的朋友應該對這段代碼很熟悉,是的,這兩個編輯器的代碼只有幾行不同之處,在 GetEditStyle方法中,我們返回的是UITypeEditorEditStyle.DropDown,而不是 UITypeEditorEditStyle.Modal,表明我們的編輯器是一個下拉式的編輯器。在EditValue中的不同之處是 ,我們使用DropDownControl方法來顯示編輯器。編輯器制作完畢,我們把Scope以前的編輯器替換成下拉 式編輯器,如下:
[Browsable(true)]

        [Editor(typeof(ScopeDropDownEditor), typeof(UITypeEditor))]

        public Scope Scope

        {

            get

            {

                return _scope;

            }

            set

            {

                _scope = value;

            }

        }
現在build CustomControlSample工程,然後切換到測試工程查看Scope屬性。當我們點擊屬性的值, 在屬性值的後邊出現了一個按鈕:
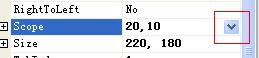
當點擊這個按鈕的時候,下拉的屬性編輯器出現了:
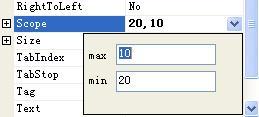
好了,屬性的編輯到這裡就講完了。