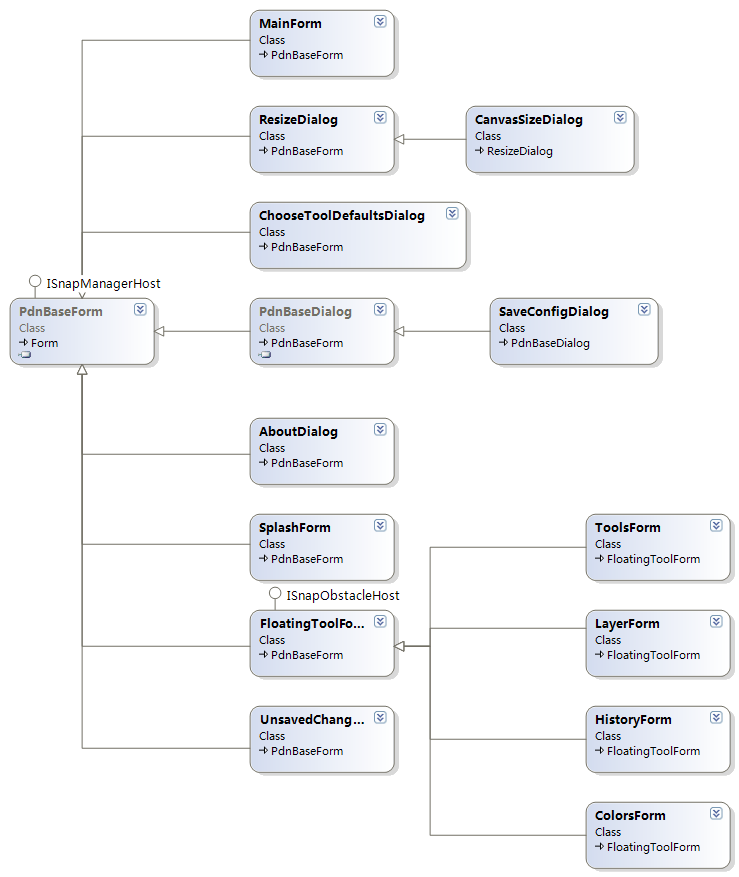
近1個月沒有更新了,不能再懶了,繼續更新PDN的學習筆記!本節將說明PDN中窗體的繼承關系,實 現過程等。

如上圖所示,在PDN中,所有窗體都繼承自PdnBaseForm類,該類繼承自Form類與ISnapManagerHost接 口,該接口定義了SnapManager的get方法,SnapManager是管理界面窗口“粘靠”效果的,該實現方法之 後文章中講述。
現在快速地過一下各個窗體的作用及特點。
BaseForm:
所有PDN裡窗體的基類,主要提供常用窗體方法及注冊、卸載熱鍵。
1、RegisterFormHotKey(Keys,Function<bool,Keys>):注冊熱鍵
PDN擁有設置、處理、卸載熱鍵的功能,這方便了濾鏡開發者的開發。RegisterFormHotKey方法參數 中,有個Function<bool,Keys>。該參數是一個泛型委托,該委托的類型有三種,說明實現該委托 的方法可有多種重載形式。而且該委托的實例,必須實現IComponent和IHotKeyTarget接口,也就是說, 該委托必須由一個窗體發出。在BaseForm中,hotkeyRegistrar是熱鍵注冊字典,保存了所有已注冊的鍵 及委托。接下來的事情就簡單了,重寫ProcessCmdKey方法,處理窗體的鍵盤事件,並從字典中找到該鍵 所對應的委托,執行之。
窗體熱鍵注冊
1    /**//// <summary>

2    /// 注冊窗體范圍的熱鍵,以及當熱鍵摁下的委托。

3    /// 該委托的發起方必須是一個控件,不論是窗體還是窗體還是基本控件,都必須相應該熱 鍵,而且這些窗體都必須繼承自PdnBaseForm

4    /// </summary>

5    public static void RegisterFormHotKey(Keys keys, Function<bool, Keys> callback)

6    {

7      IComponent targetAsComponent = callback.Target as IComponent;

8      IHotKeyTarget targetAsHotKeyTarget = callback.Target as IHotKeyTarget;

9

10      if (targetAsComponent == null && targetAsHotKeyTarget == null)

11      {

12        //檢查委托是否由窗體發出

13        throw new ArgumentException("target instance must implement IComponent or IHotKeyTarget", "callback");

14      }

15

16      if (hotkeyRegistrar == null)

17      {

18        //初始化熱鍵字典

19        hotkeyRegistrar = new Dictionary<Keys, Function<bool, Keys>>();

20      }

21

22      Function<bool, Keys> theDelegate = null;

23

24      if (hotkeyRegistrar.ContainsKey(keys))

25      {

26        如已注冊熱鍵,替換熱鍵委托

27        theDelegate = hotkeyRegistrar[keys];

28        theDelegate += callback;

29        hotkeyRegistrar[keys] = theDelegate;

30      }

31      else

32      {

33        //把熱鍵和委托添加到字典中

34        theDelegate = new Function<bool, Keys>(callback);

35        hotkeyRegistrar.Add(keys, theDelegate);

36      }

37

38      if (targetAsComponent != null)

39      {

40        targetAsComponent.Disposed += TargetAsComponent_Disposed;

41      }

42      else

43      {

44        targetAsHotKeyTarget.Disposed += TargetAsHotKeyTarget_Disposed;

45      }

46    }
2、UnregisterFormHotKey(Keys,Function<bool,Keys>):卸載熱鍵。
該方法就簡單多了,把鍵值從字典中刪除就好了。
MainForm:
這個窗體就是我們運行PDN時看見的窗體了,該窗體提供了所有PDN運行時所支持的窗體功能,包括: 浮動工具窗口、浮動窗口透明漸變效果、文件拖放自動打開功能等等,我們這裡快速浏覽幾個比較重要 的地方:
AppWorkspace:該變量就是我們所稱的“畫布”。
FloaterOpacctiyTimer:該計時器變量控制浮動工具窗口的透明漸變效果:
浮動窗口透明效果實現
1    private void FloaterOpacityTimer_Tick(object sender, System.EventArgs e)

2    {

3      if (this.WindowState == FormWindowState.Minimized ||

4        this.floaters == null ||

5        !PdnBaseForm.EnableOpacity ||

6        this.appWorkspace.ActiveDocumentWorkspace == null)

7        {

8          return;

9        }

10

11      // 以下是我們希望浮動工具窗口出現的:

12      // 1. 如果鼠標在浮動窗口中,那麼它將變為完全不透明

13      // 2. 如果鼠標處於浮動窗口外,那麼它將變為半透明

14      // 3. 無論如何,如果浮動窗口處於主窗體外(這種情況出現於將主窗體不使用最大 化,並移動,使浮動窗口“離開”主窗體),那麼它將變為不透明

15      Rectangle screenDocRect;

16

17      try

18      {

19        screenDocRect = this.appWorkspace.ActiveDocumentWorkspace.VisibleDocumentBounds;

20      }

21      catch (ObjectDisposedException)

22      {

23        return; // do nothing, we are probably in the process of shutting down the app

24      }

25      for (int i = 0; i < floaters.Length; ++i)

26      {

27        FloatingToolForm ftf = floaters[i];

28        //獲取畫布與浮動窗口的交集矩形

29        Rectangle intersect = Rectangle.Intersect(screenDocRect, ftf.Bounds);

30        double opacity = -1.0;

31        try

32        {

33          if (intersect.Width == 0 ||

34            intersect.Height == 0 ||

35            (ftf.Bounds.Contains(Control.MousePosition) &&

36              !appWorkspace.ActiveDocumentWorkspace.IsMouseCaptured()) ||

37            Utility.DoesControlHaveMouseCaptured(ftf))

38          {

39            //透明度設置最大為1.0,步增0.125

40            opacity = Math.Min(1.0, ftf.Opacity + 0.125);

41          }

42          else

43          {

44            //透明度設置最小為0.75,步減0.0625

45            opacity = Math.Max(0.75, ftf.Opacity - 0.0625);

46          }

47          if (opacity != ftf.Opacity)

48          {

49            ftf.Opacity = opacity;

50          }

51        }

52        catch (System.ComponentModel.Win32Exception)

53        {

54          // 我們不處理這個異常,因為當我們把透明度設為0.7時,Chris Strahl的 電腦報出"the parameter is incorrect"的異常

55          // NVIDIA的GeForce Go顯卡真TM XX?

56        }

57      }

58    }

59
接下來的其他窗體還算中規中矩,沒有什麼特別需要注意的地方,唯一要說的,就是浮動窗體的“粘 靠”效果了。該效果的實現下章節詳細講述。