本演練將展示如何通過自定義字段渲染控件關聯一個RenderingTemplate來定制mobile頁面上的字段渲染。下面的樣例展示了如何定制通知列表項的標題字段在mobile的顯示項目,新建項目和編輯項目頁面中的渲染。根據3類頁面的不同,定制化的內容也不一樣:
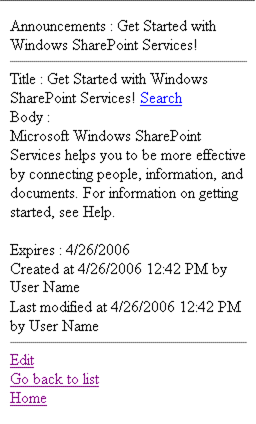
顯示窗體— 添加了一個搜索鏈接,使得用戶可以導航到MSN新聞搜索結果頁面。
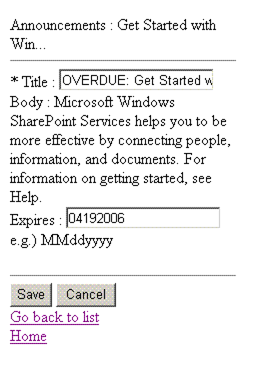
編輯窗體— 當到期日期一欄的值小於當前日期時添加了默認文本。
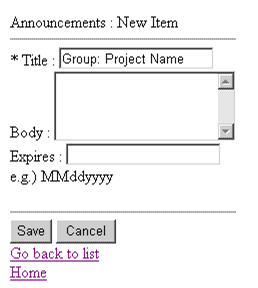
新建窗體— 添加了默認文本來為用戶展示待輸入的值的特定格式。
必要要求
完成了前面的關於定制Mobile顯示頁面中列表項標題的演練。
准備自定義字段渲染控件的開發環境
在 Visual Studio裡,選擇Tools菜單下的External Tools 。
在External Tools 對話框中,點擊Add 並在Title處輸入 Get Assembly Public Key。
通過浏覽到sn.exe來填寫 Command 文本框。他通常放在 C:\Program Files\Microsoft Visual Studio 8\SDK\v2.0\Bin\sn.exe.
在 Arguments 文本框中,輸入如下內容(區分大小寫) -Tp "$(TargetPath)"。
啟用 Use Output window 選擇框。
點擊 OK。新的命令就添加到了 Tools 菜單。
新建自定義字段項目
在 Visual Studio中,選擇File菜單下的 New Project 。
在 New Project 對話框中,Project types選擇 Visual C# , Templates選擇 Class Library ,並在Name 中輸入ItemTitleFIEld 。點擊 OK。
在Solution Explorer中右擊 References 結點,點 Add Reference,然後按住 CTRL 鍵,在 Add Reference 對話框的.NET標簽下選擇 System.Web,System.Web.Mobile ,和 Microsoft SharePoint Services 。點擊 OK。
在Solution Explorer中右擊項目名稱並選擇 PropertIEs。
在Properties 對話框中的Application標簽下,輸入MyCompany.SharePoint.MobileControls.ItemTitleField 作為 Assembly name 以及 MyCompany.SharePoint.MobileControls 作為 Default namespace。將其中的 MyCompany 替換成您公司的名稱。在整個演練中,都把MyCompany 替換成您公司的名稱。
打開 Signing 標簽並選擇 Sign the assembly。
在Choose a strong name key file下拉列表框中選取<New...> 。
在 Create Strong Name Key 對話框中,Key file name輸入 ItemTitleField.snk ,並確保 Protect ... 選擇框沒有選中。點 OK。打開 Build Events 標簽,在 Post-build event command line框中輸入下面的內容。該代碼確保了每次您編譯該項目時,項目文件的最新版本會被拷貝到相應的位置,並且重啟 Windows SharePoint Services 3.0 以便裝載最新版本的組件文件。
cd "$(ProjectDir)"

"%programfiles%\microsoft visual studio 8\sdk\v2.0\bin\gacutil" /i "$(TargetPath)" /nologo /f

%systemroot%\system32\iisapp.vbs /a "SharePoint_App_Pool" /r

xcopy *.ascx "C:\Program Files\Common Files\Microsoft Shared\web server extensions\12\TEMPLATE\CONTROLTEMPLATES\" /y
將其中的 SharePoint_App_Pool 替換成實際的分配給您的 Windows SharePoint Services Web 應用程序的IIS應用程序池名稱。通常該名稱與宿主應用程序的IIS網站名稱相同;比如, "SharePoint - 80"。(如果名稱中不含有空格的話引號可以省略)
點擊標簽上任何其他可用的控件,這樣Visual Studio 會檢測到變化並在標簽文字後顯示一個星號。
點擊工具欄上的 Save all files 按鈕。
在 Solution Explorer裡,將 Class1.cs重命名為ItemTitleFIEld.cs。
創建渲染控件
如果ItemTitleField.cs文件沒有打開的話將其打開,然後添加下列using 語句:
using System.Web.UI.MobileControls;

using Microsoft.SharePoint;

using Microsoft.SharePoint.MobileControls;
將命名空間改成 MyCompany.SharePoint.MobileControls。
將整個 Class1 的定義替換為如下代碼:
public class ItemTitleField : SPMobileBaseTextField

{

}// end ItemTitleField class
請注意,您新建的類繼承自SPMobileBaseTextField。
添加下面的代碼來覆寫 CreateControlForDisplay 方法:
protected override MobileControl CreateControlForDisplay()

{

    string title = Convert.ToString(this.ItemFieldValue);

    if (!String.IsNullOrEmpty(title))

    {

       this.LabelControl.BreakAfter = false;

       this.LabelControl.Text = title + " ";

       this.LinkControl.BreakAfter = false;

       this.LinkControl.Text = "Search";

       this.LinkControl.NavigateUrl = "http://search.MSN.com/results.aspx?q=" + title.Replace(' ', '+');

       Panel panel = new Panel();

       panel.BreakAfter = false;

       panel.Controls.Add(this.LabelControl);

       panel.Controls.Add(this.LinkControl);

       return panel;

    }

    return null;

}
請注意,該方法開頭是獲取當前列表項的Title字段當前值。該當前值存放在ItemFIEldValue中。
添加下面的內容來覆寫 CreateControlForNew 方法:
protected override MobileControl CreateControlForNew()

{

    MobileControl myNewControl = null;

    if (this.Field != null)

    {

       string text = "Group: Project Name";

       if (!this.Page.IsPostBack)

       {

          this.TextBoxControl.Text = text;

       }

       myNewControl = this.TextBoxControl;

    }

    return myNewControl;

}
添加下面的內容來覆寫 CreateControlForEdit方法:
protected override MobileControl CreateControlForEdit()

{

    MobileControl myEditControl = null;

    if (this.Item != null && this.Field != null)

    {

       if (this.NeedEllipsisRendering)

       {

          myEditControl = this.CreateControlForDisplay();

       }

       else

       {

          if (!this.Page.IsPostBack)

          {

             string strEdit = this.Field.GetFieldValueForEdit(this.ItemFieldValue);

             string overDue = "OVERDUE: ";

             SPListItem item = this.ListItem;

             if (item["Expires"] != null)

             {

                System.DateTime date = (DateTime)item["Expires"];

                if (date.CompareTo(System.DateTime.Today) < 0)

                {

                   this.TextBoxControl.Text = overDue + strEdit;

                }

                else

                {

                   this.TextBoxControl.Text = strEdit;

                }

             }

          }

          myEditControl = this.TextBoxControl;

       }

    }

    return myEditControl;

}
選擇Build 菜單中的Build 。您的演練還未完成,但是您需要在這裡先編譯一下該組件以便生成一個公鑰令牌(Public Key Token)。
創建渲染模板
在Solution Explorer裡,右擊項目名稱,ItemTitleFIEld,然後選擇Add,New Item。
在Categories 中選擇 Visual C# Project Items,並在Templates窗口中選Text File。
在 Name 框中,輸入 AnnouncementsItemTitleField.ascx 然後點 Add。 (不要將文件放在項目的子文件夾中,否則之前您創建的 Post-build命令會找不到該文件)
在剛才創建的 AnnouncementsItemTitleField.ascx 文件中添加下列標記:
<%@ Control Language="C#" %>

<%@ Assembly Name="Microsoft.SharePoint, Version=12.0.0.0, Culture=neutral, PublicKeyToken=71e9bce111e9429c" %>

<%@ Register TagPrefix="mobile" Namespace="System.Web.UI.MobileControls" Assembly="System.Web.Mobile, Version=1.0.3300.0, Culture=neutral, PublicKeyToken=b03f5f7f11d50a3a" %>

<%@ Register TagPrefix="SharePoint" Namespace="Microsoft.SharePoint.WebControls" Assembly="Microsoft.SharePoint, Version=12.0.0.0, Culture=neutral, PublicKeyToken=71e9bce111e9429c" %>

<%@ Register TagPrefix="SPMobile" Namespace="Microsoft.SharePoint.MobileControls" Assembly="Microsoft.SharePoint, Version=12.0.0.0, Culture=neutral, PublicKeyToken=71e9bce111e9429c" %>

<%@ Register TagPrefix="CustomMobile" Namespace="MyCompany.SharePoint.MobileControls" Assembly="MyCompany.SharePoint.MobileControls.ItemTitleField, Version=1.0.0.0, Culture=neutral, PublicKeyToken=Token" %>

<%@ Import Namespace="Microsoft.SharePoint" %>

<SharePoint:RenderingTemplate RunAt="Server" ID="MobileCustomListField_Announcements_Text_Title" >

     <Template>

       <CustomMobile:ItemTitleField RunAt="Server" />

     </Template>

</SharePoint:RenderingTemplate>
MyCompany 都替換成您公司的名稱。
Token 替換成實際的公鑰令牌,您可以通過點擊Tools 菜單下的Get Assembly Public Key 來得到。該密鑰令牌將顯示在輸出窗口的最後一行。只需使用密鑰的 token即可,而不是整個密鑰。
請注意,該文件與在上一個演練中的文件很類似。不同之處在:
(1)上一個演練的這一行
<mobile:Label Text="Title fIEld in Announcements List" RunAt="Server" />
在本例中被替換成:
<CustomMobile:ItemTitleField RunAt="Server" />
這樣,渲染模板將調用您在這個演練中前面創建的字段渲染控件。
(2)一個新的Register 指向用來注冊 “CustomMobile” 標簽前綴。
保存並關閉該文件。
選擇Build 菜單的Rebuild。
測試渲染控件
用您的mobile設備或模擬器導航到您的Web應用程序中的一個包含通知列表的網站。導航到通知列表。點擊新建項目鏈接。您將看到類似下面的界面:
圖1. 在新建窗體中為標題字段指定默認文字

新建一個列表項並指定一個過去的日期作為過期日期。點擊保存。您將會回到列表視圖頁面。點擊新建的列表項下面的顯示鏈接。您將看到如下界面。注意標題後面添加的 Search 鏈接。
圖2. 搜索鏈接添加到顯示窗體

點擊編輯鏈接。您將看到如下界面。注意在當前標題前增加了“過期(OVERDUE)”的文字信息。
圖3. 在編輯窗體中的標題字段文字的條件渲染
