雖說目前.Net Micro Framework已經支持文件系統(FAT16/FAT32),但在遠 程還無法直接訪問,從某種意義上講,無法和PC交互的存儲介質顯得有些雞肋。 我做SideShow相關開發的時候,為了向該文件系統拷貝文件,實現了 UsbMassStorage功能,把設備當優盤來用,但這樣做,等於獨占了USB口,並且設 備和PC的連接也必須為USB,對僅擁有串口或網口的設備是無效的。做過WinCE或 Windows Mobile開發的人都知道,VS2008開發工具提供了些遠程工具,諸如遠程 文件查看器、遠程注冊表編輯器、遠程堆查看器和遠程放大等等。受此啟發,所 以才有了MF的遠程文件查看器。
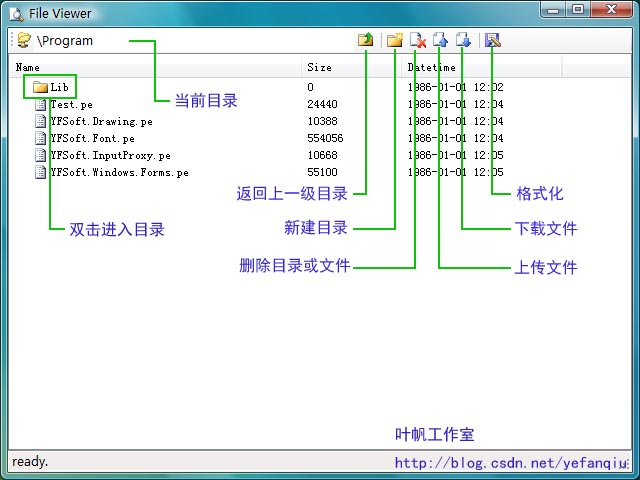
該遠程文件查看器,仍然作為MFDeploy的插件存在(如何做插件?請參見《玩 轉.Net MF–01》),最終的操作主界面如下:

該功能的實現要比《讓PC成為MF的鼠標鍵盤》還要復雜,需要修改和添加的代 碼較多,下面我們一一進行講解。
實現思路 :考慮到MFDeploy已經實現了讀寫Flash的功能,所以最初的思路是 想在PC端實現FAT文件系統(我曾實現過基於硬盤的FAT16系統),但是要支持 FAT16/FAT32兩種模式,還是非常復雜的,並且效率也很難保證;FTP是一種遠程 訪問文件系統的常用辦法,但這是基於TCP/IP上的協議,對USB和串口並不適合, 所以考慮在PC端實現一個中間層,做一個類似串口/USB轉TCP的模塊,這樣實現的 好處是FTP客戶端是現成的,不用再專門開發相關操作界面,但是FTP是基於兩個 TCP連接,實現起來有些難度;最終還是結合FTP的特點,實現了FTP的相關指令, 如PWD、CD、CDUP、MKD和DELE指令等等,美中不足的是操作界面要自己開發。
一、信道建立
在《讓PC成為MF的鼠標鍵盤》中,鼠標和按鍵信息的傳遞,我們是借用了 MFDeploy設備訪問內存的通道,雖然簡單,但極不正規,有點山寨的味道。所以 徹底一點,我們自己另外新建一個訪問通道。
MFDeploy和設備交互(包括VS2008部署和調試設備),都是基於WireProtocol 協議,該協議是上位機MFDeploy或VS2008程序在診斷、部署、調試.Net Micro Framework設備及相關應用程序時的通信協議。該協議與具體的硬件鏈路無關,目 前支持的物理連接有串口、網口、USB等。
該協議為點對點協議,協議中沒有設備地址的概念,在同一時間同一物理通道 僅能調試一台設備。協議格式分兩部分,幀頭和負荷(Payload)(一幀命令可以 不包含Payload)。詳細介紹請參見我寫的文章《Micro Framework WireProtocol 協議介紹》。
(1)、Native Code代碼
i 、在TinyCLR_Debugging.h頭文件CLR_DBG_Commands結構體中添加如下代碼 (57行),定義一個信道(我們的名稱為Custom,意思是以後新擴充的基於通信 交互的功能,就可以使用該信道,不僅僅是給遠程文件查看器使用):
static const UINT32 c_Monitor_Custom = 0x0000000F;
ii 、依然在TinyCLR_Debugging.h頭文件CLR_DBG_Commands結構體中添加如下 代碼(194行),定義我們的數據幀的通信結構(對WireProtocol協議來說就是 Payload部分的數據結構):
struct Monitor_Custom


     {


         UINT32 m_command;


         UINT32 m_length;


         UINT8 m_data[ 1 ];


     };
iii 、在TinyCLR_Debugging.h的CLR_DBG_Debugger結構體中添加如下項(980 行),聲明相關信息到來時,將執行的函數:
static bool Monitor_Custom ( WP_Message* msg, void* owner );
iv 、為在Debugger_full.cpp文件中c_Debugger_Lookup_Request數組新添一 個條目(83行),聲明我們的命令:
DEFINE_CMD2(Custom)
v 、在Debugger.cpp中添加Monitor_Custom函數的具體實現:
extern bool Monitor_Custom_Process(UINT8* data,int  length,UINT8* retData,int *retLength);


bool CLR_DBG_Debugger::Monitor_Custom( WP_Message* msg, void*  owner )


{


     NATIVE_PROFILE_CLR_DEBUGGER();


     bool fRet;


     CLR_DBG_Debugger        * dbg =  (CLR_DBG_Debugger*)owner;


     CLR_DBG_Commands::Monitor_Custom* cmd =  (CLR_DBG_Commands::Monitor_Custom*)msg->m_payload;


      UINT8 retData[1024];


      int    retLength=0;


     fRet = Monitor_Custom_Process(cmd->m_data,cmd- >m_length,retData,&retLength);


     //lcd_printf("R:%d L:%d\r\n",fRet,retLength);


      if(retLength==0)


      {


        dbg->m_messaging->ReplyToCommand( msg,  fRet, false);


      }


      else


      {


         dbg->m_messaging->ReplyToCommand( msg,  fRet, false,retData,retLength);


      }


     return fRet;


}
具體的功能實現在函數Monitor_Custom_Process中實現,它如果為空,則什麼 事也不做(當你不需要該功能時,為了節省程序空間,你就可以這麼做)。
(2)、修改Microsoft.SPOT.Debugger.dll
i 、在WireProtocol.cs文件的Commands類中添加如下代碼(119行),和 NativeCode的代碼保持一致:
public const uint c_Monitor_Custom = 0x0000000F;
ii 、仍在WireProtocol.cs文件的Commands類添加Monitor_Custom類的聲明 (385行):
public class Monitor_Custom


         {


             public uint m_command = 0;


             public uint m_length = 0;


             public byte[] m_data = null;


             public void PrepareForSend(uint  command, byte[] data, int offset, int length)


             {


                 m_command = command;


                 m_length = (uint) length;


                 m_data = new byte [length];


                 Array.Copy(data, offset,  m_data, 0, length);


             }


             public class Reply :  IConverter


             {


                 public byte[] m_data =  null;


                 public void  PrepareForDeserialize(int size, byte[] data, Converter converter)


                 {


                     m_data = new byte [size];


                 }


             }


       }
iii、在WireProtocol.cs文件的ResolveCommandToPayload的函數中添加如下 項,聲明返回數據的結構(1470行)。
case c_Monitor_Custom: return new Monitor_Custom.Reply ();
iv、仍是在WireProtocol.cs文件的ResolveCommandToPayload的函數中添加如 下項,聲明執行類(1537行)。
case c_Monitor_Custom: return new Monitor_Custom ();
v、最關鍵的一步,消息發送接口的實現,在Engine.cs文件的Engine類中添加 如下代碼(2323行):
public WireProtocol.IncomingMessage CustomCommand(uint  command, byte[] buf, int offset, int length)

         {

             WireProtocol.Commands.Monitor_Custom cmd =  new WireProtocol.Commands.Monitor_Custom();

             cmd.PrepareForSend(command, buf, offset,  length);

             return SyncMessage (WireProtocol.Commands.c_Monitor_Custom, 0, cmd);

  }
以上代碼僅僅擴展了一個信道,實際上什麼事也沒干(路修好了,還沒有車在 跑)。
二、功能實現
(1)、Native Code代碼
在\DviceCode\Pal新建CustomProcess目錄,我們將完成類FTP服務端的實現。
新建CustomProcess.cpp文件,文件起始先做如下聲明:
#define Custom_Command_MouseKey  0x00

#define Custom_Command_FileSystem 0x01


#define FileSystem_Start      0x00

#define FileSystem_End       0x01

#define FileSystem_FORMAT     0x02

#define FileSystem_PWD       0x03

#define FileSystem_DIR_FindOpen   0x04

#define FileSystem_DIR_FindNext  0x05

#define FileSystem_DIR_FindClose 0x06

#define FileSystem_CD       0x07

#define FileSystem_CDUP      0x08

#define FileSystem_MKD      0x09

#define FileSystem_DELE     0x0A

#define FileSystem_UPLOAD    0x0B

#define FileSystem_DOWNLOAD   0x0C
Monitor_Custom_Process函數的實現如下:
bool Monitor_Custom_Process(UINT8* inData,int  inLength,UINT8* outData,int *outLength)

{

     *outLength=0;

     if(inLength==0) return true;


       bool ret=true;

     switch(inData[0])

     {

        case Custom_Command_MouseKey:

           if(inLength == 9)

            {

              UINT32 data1=(inData[1]<<24) |  (inData[2]<<16) | (inData[3] <<8) | inData[4];

                 UINT32 data2=(inData[5]<<24)  | (inData[6]<<16) | (inData[7] <<8) | inData [8];

              VI_GenerateEvent(data1,data2);

            }

           break;

          case Custom_Command_FileSystem:

            ret = FileSystem_Process(inData [1],&inData[2],inLength-2,outData,outLength);

            break;

     }


     return ret;

}
你看,我們順便也把鼠標和鍵盤的信道也合並到這裡來了。
FileSystem_Process就是具體實現類FTP服務端功能的函數。
bool FileSystem_Process(UINT8 command,UINT8* inData,int  inLength,UINT8* outData,int *outLength)

{

    static WCHAR current_dir[256];              // 當前工作目錄

     static WCHAR current_file[256];              //當前操作文件

     static UINT32 findHandle=NULL;


     static FileSystemVolume* volume = NULL;

     static STREAM_DRIVER_INTERFACE* streamDriver=NULL;


    //debug_printf("[%x:%d]\r\n",command,inLength);

    if( volume == NULL && command !=  FileSystem_Start) return false;


     HRESULT ret=S_OK;

    *outLength=0;

     switch(command)

     {

        case FileSystem_Start:

         volume = FileSystemVolumeList::GetFirstVolume ();

           streamDriver = volume->m_streamDriver;

          memcpy(current_dir, L"\\", 2);

          current_dir[1]=0;

         break;

        case FileSystem_End:

         volume->FlushAll();

          volume = NULL;

          streamDriver = NULL;

         break;

        case FileSystem_FORMAT:

         volume->Format(0);

          volume->FlushAll();

         break;

        case FileSystem_PWD:

          *outLength = MF_wcslen(current_dir)*2;

           memcpy(outData,current_dir, *outLength);

         break;

         case FileSystem_DIR_FindOpen:

         case FileSystem_DIR_FindNext:

       case FileSystem_DIR_FindClose:

         case FileSystem_CDUP:

case FileSystem_MKD:

case FileSystem_DELE:

case FileSystem_UPLOAD:

         case FileSystem_DOWNLOAD:

         //略

         break;

     }

     return true;

}
在TinyCLR.proj文件中添加如下項,以啟用我們新實現的功能。
<ItemGroup>

     <RequiredProjects Include="$(SPOCLIENT)\DeviceCode\PAL\CustomProcess\dotNetMF.proj" />

     <DriverLibs Include="CustomProcess.$(LIB_EXT)" />

  </ItemGroup>
編譯下載,這時候,我們的設備已經可支持文件系統遠程訪問了。下一步我們 將實現上位機的相關代碼。
(2)、遠程文件查看器插件
新建FileViewerHandle插件類。
public class FileViewerHandle : MFPlugInMenuItem

      {

         public override string Name { get { return  "File Viewer"; } }

         public override void OnAction(IMFDeployForm  form, MFDevice device)

         {

             if (form == null || device == null)  return;

             (new frmFileViewer(form,  device)).ShowDialog();

         }

}
核心函數Send的代碼如下,該函數與設備進行通信:
private bool Send(byte command, byte[] bytInput, out  byte[] bytOutput)

       {

             byte[] bytTemp;

             bytOutput = null;

             if (bytInput != null)

             {

                 bytTemp = new byte [bytInput.Length + 2];

                 Array.Copy(bytInput, 0, bytTemp,  2, bytInput.Length);

             }

             else

             {

                 bytTemp = new byte[2];

             }

             bytTemp[0] =  Custom_Command_FileSystem;

             bytTemp[1] = command;

             _WP.IncomingMessage reply =  engine.CustomCommand(_WP.Commands.c_Monitor_Custom, bytTemp, 0,  bytTemp.Length);


             if (! _WP.IncomingMessage.IsPositiveAcknowledge(reply)) return false;

             _WP.Commands.Monitor_Custom.Reply  CustomReply = reply.Payload as  _WP.Commands.Monitor_Custom.Reply;

             if (CustomReply != null) bytOutput =  CustomReply.m_data;

             return true;

     }
限於篇幅,下面僅截取幾個命令操作的片段
private void tsbUP_Click(object sender, EventArgs e)

         {

             ShowInfo("ready.");

             byte[] outData;

             if (Send(FileSystem_CDUP, out outData))

             {

                 txtDir.Text =  System.Text.Encoding.Unicode.GetString(outData);

             }

             else

             {

                 ShowInfo("up failed!",  InfoType.Error);

             }

             list();

         }

         private void tsbNew_Click(object sender,  EventArgs e)

         {

             ShowInfo("ready.");

             frmInputBox fb = new frmInputBox("Input  directory", "");

             if (fb.ShowDialog() == DialogResult.OK)

             {

                 string strInfo = fb.Info;

                 byte[] inData =  System.Text.Encoding.Unicode.GetBytes(BuildPath(strInfo));

                 if (!Send(FileSystem_MKD, inData))  ShowInfo("mkd failed!", InfoType.Error);

                 list();

             }

         }

         private void tsbDelete_Click(object sender,  EventArgs e)

         {

             ShowInfo("ready.");

             if (lvFile.SelectedItems.Count == 0)  return;

             if (MessageBox.Show("Really implement  operation for Delete?", this.Text,  MessageBoxButtons.OKCancel,MessageBoxIcon.Question) ==  DialogResult.OK)

             {

                 byte[] inData =  System.Text.Encoding.Unicode.GetBytes(BuildPath(lvFile.SelectedItems [0].Text));

                 if (!Send(FileSystem_DELE,  inData)) ShowInfo("dele failed!", InfoType.Error);

                 lstFile.Remove(lvFile.SelectedItems [0].Text);

                 list();

             }

       }
實現.Net MF的遠程文件查看器意義深遠,我們不僅可以向文件系統拷貝我們 的圖片、字體等資源,更有意義的事,我們可以把.Net MF應用的程序,作為可執 行文件拷貝到文件系統,然後讓TinyCLR去加載執行。甚而.Net MF的系統庫也可 以放入文件系統,根據需要,我們可以非源碼級別的裁剪系統的大小。