眾所周知,在Asp.net WebAPI中,認證是通過AuthenticationFilter過濾器實現的,我們通常的做法是自定義AuthenticationFilter,實現認證邏輯,認證通過,繼續管道處理,認證失敗,直接返回認證失敗結果,類似如下:
public async Task AuthenticateAsync(HttpAuthenticationContext context, CancellationToken cancellationToken)
        {
            var principal = await this.AuthenticateAsync(context.Request);
            if (principal == null)
            {
                context.Request.Headers.GetCookies().Clear();
                context.ErrorResult = new AuthenticationFailureResult("未授權請求", context.Request);
            }
            else
            {
                context.Principal = principal;
            }
        }
但在.net core中,AuthenticationFilter已經不復存在,取而代之的是認證中間件。至於理由,我想應該是微軟覺得Authentication並非業務緊密相關的,放在管道中間件中更合適。那麼,話說回來,在.net core中,我們應該怎麼實現認證呢?如大家所願,微軟已經為我們提供了認證中間件。這裡以CookieAuthenticationMiddleware中間件為例,來介紹認證的實現。
1、引用Microsoft.AspNetCore.Authentication.Cookies包。項目實踐中引用的是"Microsoft.AspNetCore.Authentication.Cookies": "1.1.0"。
2、Startup中注冊及配置認證、授權服務:
服務注冊:
services.AddMvc(options =>
            {
                //添加模型綁定過濾器
                options.Filters.Add(typeof(ModelValidateActionFilter));

                //添加授權過濾器,以便強制執行Authentication跳轉及屏蔽邏輯
                //var policy = new AuthorizationPolicyBuilder().RequireAuthenticatedUser().Build();
                var policy = new AuthorizationPolicyBuilder().AddRequirements(new AuthenticationRequirement()).Build();
                options.Filters.Add(new AuthorizeFilter(policy));
            });

            //services.AddAuthorization(options =>
            //{
            //    options.AddPolicy("RequireAuthentication", policy => policy.AddRequirements(new AuthenticationRequirement()));
            //});
大家注意,上面代碼中有兩處注釋掉的地方。第一處注釋,RequireAuthenticatedUser()是.net core預定義的授權驗證,代表通過授權驗證的最低要求是提供經過認證的Identity。Demo中,我的要求也是這個,只要是經過基本認證的用戶即可,那為什麼Demo中沒有使用呢?因為這裡是個坑!實際實踐中,我發現,采用注釋中的做法,無論如何,調用總是返回401,迫不得已,download認證及授權源碼,發現該處邏輯是這樣的:
var user = context.User;
            var userIsAnonymous =
                user?.Identity == null ||
                !user.Identities.Any(i => i.IsAuthenticated);
            if (!userIsAnonymous)
            {
                context.Succeed(requirement);
            }
加入斷點猛調,發現IsAuthenticated永遠是false!!!迫不得已,反編譯查看源碼,發現ClaimsIdentity的IsAuthenticated屬性是這樣定義的:

WTF!!!坑爹麼這是!!!.net framework中, 記得 這裡的邏輯是,只要Name非空,就返回true,到了.net core中成了這樣,你說坑不坑。。。
那怎麼辦?總不能放棄吧?我想,大家第一想法應該是繼承ClaimsIdentity自定義一個Identity,尤其是看到屬性上那個virtual的時候,我也不例外。可繼承後, 發現認證框架那兒依然不認,還是一直返回false,可能是我哪裡用的不對吧。所以,Startup中第一處注釋出現了。最終解決方案是自定義AuthenticationRequirement及處理器,實現要求的驗證,如下:
public class AuthenticationRequirement : AuthorizationHandler<AuthenticationRequirement>, IAuthorizationRequirement
    {
        protected override Task HandleRequirementAsync(AuthorizationHandlerContext context, AuthenticationRequirement requirement)
        {
            var user = context.User;
            var userIsAnonymous =
                user?.Identity == null
                || string.IsNullOrWhiteSpace(user.Identity.Name);
            if (!userIsAnonymous)
            {
                context.Succeed(requirement);
            }
            return TaskCache.CompletedTask;
        }
    }
上述代碼紅色的部分便是相對默認實現變化的部分。
startup中第二部分注釋,是注冊授權策略的,注冊方法也是官網文檔中給出的注冊方法。那為什麼這裡又沒有采用呢?因為,如果按注釋中的方法配置,我需要在每個希望認證的控制器或方法上都用Authorize標記,甚至還需要在特性上配置角色或策略,而這裡我的預設是全局認證,所以,直接以全局過濾器的形式添加到了MVC處理管道中。讀到這裡,細心的讀者應該有疑問了,你一個簡單的認證,跟授權毛線關系啊,注冊授權過濾器作甚!我也覺得沒關系啊,這是net core認證的第二個坑,那就是,在.net core或者微軟看來,認證僅僅提供Principal的生成、序列化、反序列化及重新生成Principal,它的職責確實也包括了返回401、403等各種認證失敗信息,但這部分不會主動觸發,必須有處理管道中其他邏輯去觸發。我仔細閱讀了官網文檔,得出的大致結論是,.net core大概認為,認證是個多樣化的過程,不光有我們目前看到的或需要的某一種認證,實際需求中很可能會多種認證並存,我們的API也可能會同時允許多種認證方式通過,所以某一種認證失敗就直接返回401或403是錯誤的。這是實踐當中第二個坑!那話說回來,添加了授權,就可以觸發這個過程,這個是看源碼發現的,具體流程就是,如果授權失敗,過濾器會返回一個challengeResult,這個Result最終會跑到認證中間件中的對應Challenge方法,在.net core源碼中表現如下:
public async Task ChallengeAsync(ChallengeContext context)
        {
            ChallengeCalled = true;
            var handled = false;
            if (ShouldHandleScheme(context.AuthenticationScheme, Options.AutomaticChallenge))
            {
                switch (context.Behavior)
                {
                    case ChallengeBehavior.Automatic:
                        // If there is a principal already, invoke the forbidden code path
                        var result = await HandleAuthenticateOnceSafeAsync();
                        if (result?.Ticket?.Principal != null)
                        {
                            goto case ChallengeBehavior.Forbidden;
                        }
                        goto case ChallengeBehavior.Unauthorized;
                    case ChallengeBehavior.Unauthorized:
                        handled = await HandleUnauthorizedAsync(context);
                        Logger.AuthenticationSchemeChallenged(Options.AuthenticationScheme);
                        break;
                    case ChallengeBehavior.Forbidden:
                        handled = await HandleForbiddenAsync(context);
                        Logger.AuthenticationSchemeForbidden(Options.AuthenticationScheme);
                        break;
                }
                context.Accept();
            }

            if (!handled && PriorHandler != null)
            {
                await PriorHandler.ChallengeAsync(context);
            }
        }
以其中HandleForbiddenAsync為例,具體又如下:
/// <summary>
        /// Override this method to deal with a challenge that is forbidden.
        /// </summary>
        /// <param name="context"></param>
        protected virtual Task<bool> HandleForbiddenAsync(ChallengeContext context)
        {
            Response.StatusCode = 403;
            return Task.FromResult(true);
        }
這樣,經由授權流程觸發Challenge,Challenge返回相應驗證結果到API調用方。
注冊完了認證及授權所需相關服務,接下來注冊中間件,如下:
app.UseCookieAuthentication(new CookieAuthenticationOptions
            {
                AuthenticationScheme = "GuoKun",
                AutomaticAuthenticate = true,
                AutomaticChallenge = true,
                DataProtectionProvider = DataProtectionProvider.Create(new DirectoryInfo(env.ContentRootPath))
            });

app.UseMvc();
注意UseCookieAuthentication要放在UseMvc前面。大家注意其中紅色部分,這裡為什麼要自己手動創建DataProtectionProvider呢?因為這裡是要做服務集群的,如果單機或單服務實例情況下,采用默認DataProtection機制就可以了。代碼中手動指定目錄創建,與默認實現的區別就是,默認實現會生成一個與當前機器及應用相關的key進行數據加解密,而手動指定目錄創建provider,會在指定的目錄下生成一個key的xml文件。這樣,服務集群部署時候,加解密key一樣,加解密得到的報文也是一致的。別問我怎麼知道的,踩過坑,使勁兒調試,外加看官網文檔,淚流滿面。。。
3、添加控制器模擬登陸及認證授權
[Route("api/[controller]")]
    public class AccountController : Controller
    {
        [AllowAnonymous]
        [HttpPost("login")]
        public async Task Login([FromBody]User user)
        {
            IEnumerable<Claim> claims = new List<Claim>()
                {
                    new Claim(ClaimTypes.Name, user.UID)
                };

            await HttpContext.Authentication.SignInAsync("GuoKun",
                new ClaimsPrincipal(new ClaimsIdentity(claims)));
        }

        [HttpGet("serverresponse")]
        public ContentResult ServerResponse()
        {
            return this.Content($"來自{((Microsoft.AspNetCore.Server.Kestrel.Internal.Http.ConnectionContext)this.HttpContext.Features).LocalEndPoint.ToString()}的響應:{this.User.Identity.Name ?? "匿名"},您好");
        }
    }
因為授權現在是全局的,所以在登陸方法上用AllowAnonymous標記,跳過認證及授權。
在ServerResponse方法中,返回當前服務實例綁定的IP及端口號。由於本Demo是采用ANCM寄宿在IIS中的,所以具體服務實例綁定的端口是動態的。
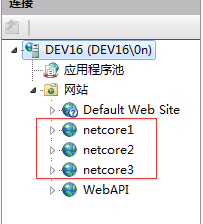
4、部署。具體在IIS中的部署如下:

三個站點的端口分別為9001,9002,9003,具體運行時,ANCM會將IIS的請求代理到KestrlServer。
5、Nginx負載均衡配置:
upstream guokun    {
        server localhost:9001;
        server localhost:9002;
        server localhost:9003;
    }

    server {
        listen       9000;
        server_name  localhost;

        #charset koi8-r;

        #access_log  logs/host.access.log  main;

        location / {
            root   html;
            index  index.html index.htm;
            proxy_pass http://guokun;
        }
這個比較簡單,不廢話。
6、運行效果:
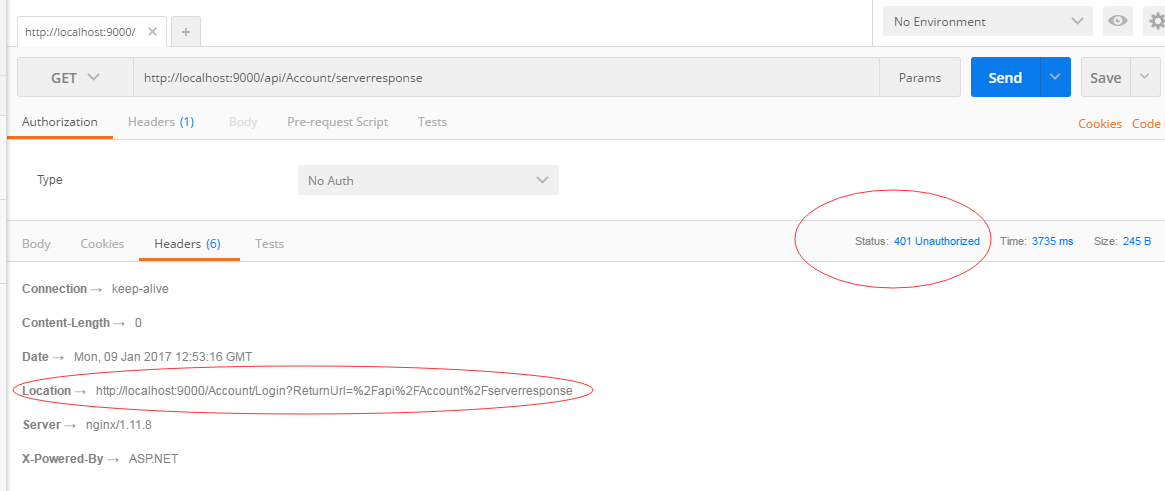
這裡采用Postman模擬請求。當未調用登錄API,直接請求api/Account/serverresponse時,如下:

可以看到,直接401了,而且,響應標頭中,有個Location,這個是challenge中默認實現的,告訴我們需要去登錄認證,認證完了會跳轉到當前請求資源url(在MVC中尤其有用)。
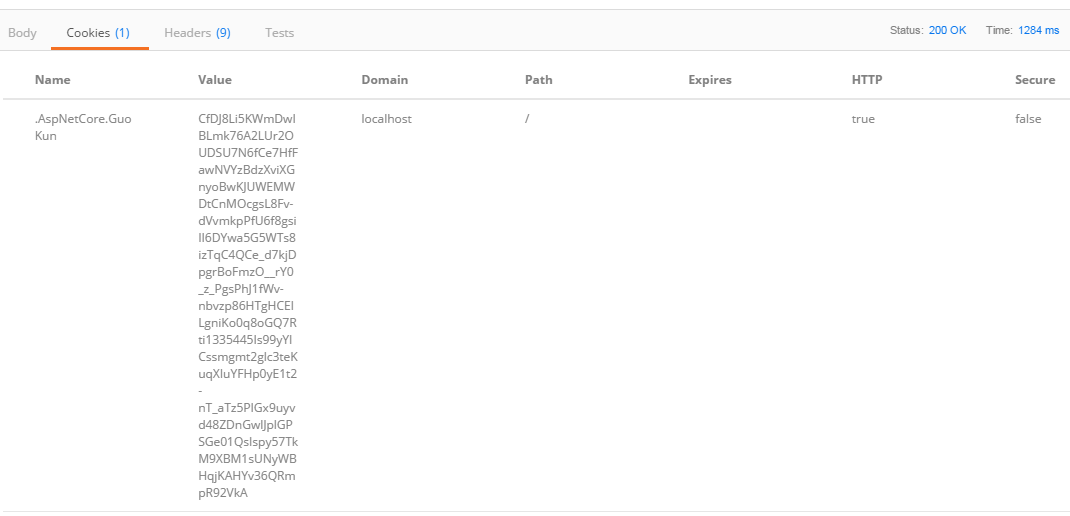
接下來,登錄:


我們可以看到,登錄成功,而且,服務端返回了加密及序列化後的憑證。接下來,我們再請求api/Account/serverresponse:

看到沒,請求成功。那麼多請求幾次,分別得到如下結果:


可以看見,請求已經被負載到了不同的服務實例。
有人會問,為什麼不部署在多台不同服務器上啊,搞一台機器在那兒模擬。哥沒那麼多錢整那麼多台機器啊,而且,裝虛擬機,配置撐不了,望大神勿噴勿吐槽。
如此,一個簡易的基於asp.net core,帶認證,具有集群負載的後端,便實現了。
補充說明:
之前,由於網絡原因,ClaimsIdentity部分沒有下載源碼,而是直接反編譯的方式查看,導致得出ClaimsIdentity.IsAuthenticated總是返回false的結論,在此更正,並特別感謝Savorboard大神的特別指正。經過翻閱Github上源碼,該屬性是這樣定義的:
/// <summary>
        /// Gets a value that indicates if the user has been authenticated.
        /// </summary>
        public virtual bool IsAuthenticated
        {
            get { return !string.IsNullOrEmpty(_authenticationType); }
        }
之前一直返回false,則是由於登錄成功構建ClaimsIdentity時沒有指定AuthenticationType。弄清楚了這個,那麼對應授權策略的注冊,就可以采用如下方式了:
 services.AddMvc(options =>
            {
                //添加模型綁定過濾器
                options.Filters.Add(typeof(ModelValidateActionFilter));

                //添加授權過濾器,以便強制執行Authentication跳轉及屏蔽邏輯
                var policy = new AuthorizationPolicyBuilder().RequireAuthenticatedUser().Build();
                //var policy = new AuthorizationPolicyBuilder().AddRequirements(new AuthenticationRequirement()).Build();
                options.Filters.Add(new AuthorizeFilter(policy));
            });
相應地,在登錄成功後,構建ClaimsIdentity時指定其AuthenticationType:
await HttpContext.Authentication.SignInAsync("GuoKun",
                new ClaimsPrincipal(new ClaimsIdentity(claims, "GuoKun")));