這個屬性我們平時可能並不怎麼用.先來看下MSDN上的解釋:

解釋的非常專業,然而我並沒有看懂.
說說我的理解吧:把這個屬性設置為false,看起來沒有變化,但操作上已經把他完全忽視了,不觸發事件,可以直接點到它下面的東西.
這個屬性能方便的解決工作中常見的麻煩,比如下面這個例子:

注意上面那部分.效果很簡單,就是個漸變的效果.但是這個漸變貫穿了兩列,就使得處理起來有點小麻煩.
當然解決方案有很多:
可以寫兩個ListBoxItem的樣式,第一個放頂部有漸變的背景,和右部保持一致,通過樣式選擇器來實現.這顯然比較麻煩.
還可以在大背景下放個漸變,ListBoxItem的上半部分做成透明,這樣相對簡單,但不一定能實現理想的效果.
IsHitTestVisible屬性就很好的解決了這個問題.直接在上層放個border,背景設置成漸變,IsHitTestVisible設置為false.這樣就既能看到漸變效果,又能透過border,直接點到ListBoxItem.設置一個屬性就解決了問題,非常方便.相當於在上面放了個蒙板,但是這個蒙板能看到卻點不到.
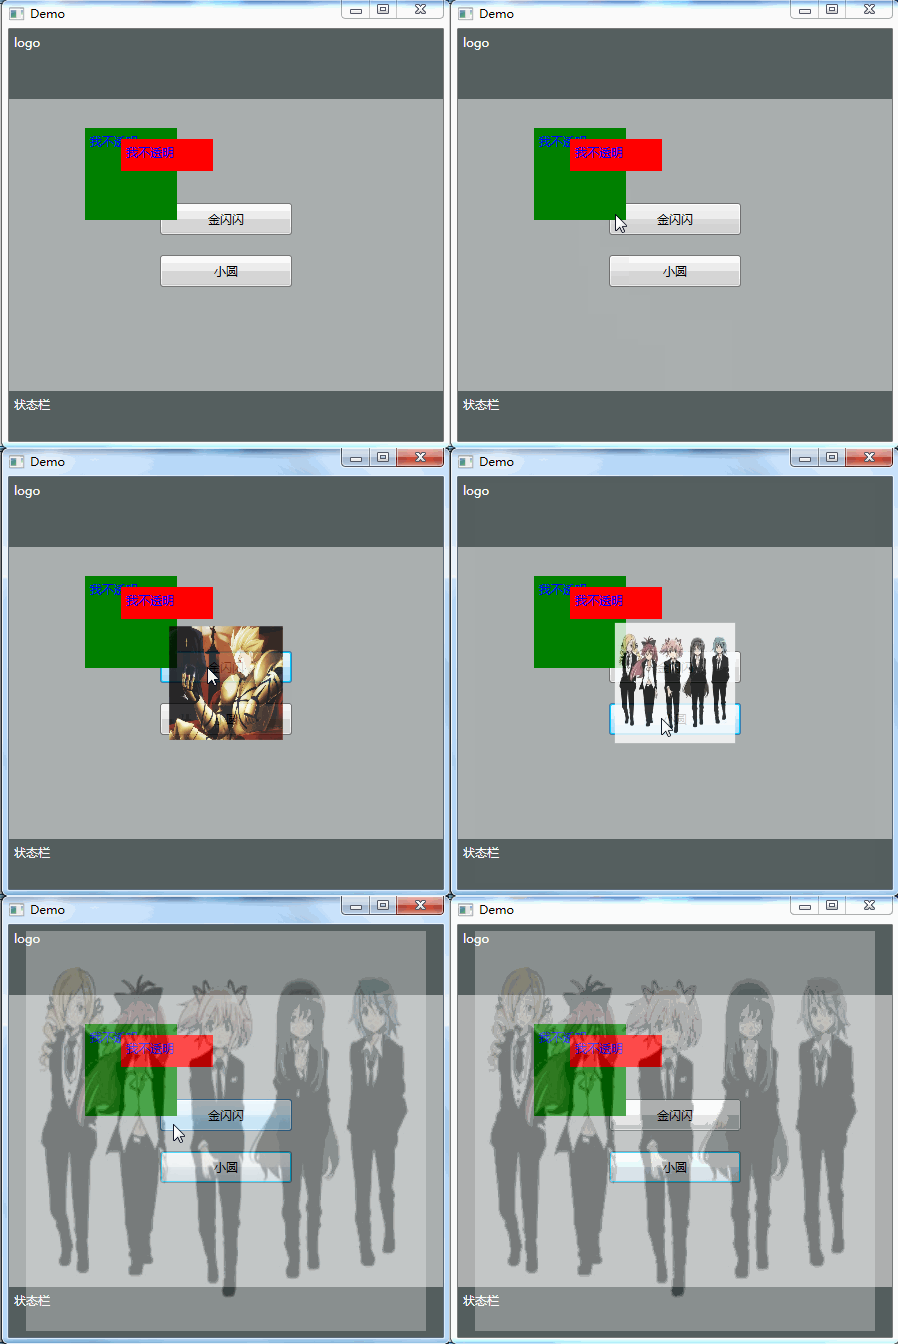
類似的我還想到了一個場景:

這個效果頂層是個圖片,IsHitTestVisible為false,透明為0.3.
並不是圖片是個背景,然後所有控件都是半透明效果.
見代碼:
XMAL:
 1     <Grid>
 2         <Grid>
 3             <Grid.RowDefinitions>
 4                 <RowDefinition Height="70"></RowDefinition>
 5                 <RowDefinition></RowDefinition>
 6                 <RowDefinition Height="50"></RowDefinition>
 7             </Grid.RowDefinitions>
 8             <Border Background="#555F5F">
 9                 <Label Content="logo" Foreground="White"></Label>
10             </Border>
11             <Grid Grid.Row="1" Background="#AAAFAF">
12                 <StackPanel HorizontalAlignment="Center" VerticalAlignment="Center" Button.Click="StackPanel_Click">
13                     <Button Width="132" Height="32" Content="金閃閃" Margin="10"></Button>
14                     <Button Width="132" Height="32" Content="小圓" Margin="10"></Button>
15                 </StackPanel>
16                 <Label Content="我不透明" Background="Green" Foreground="Blue" Width="100" Height="100" Margin="76,29,266,171"></Label>
17                 <Label Content="我不透明" Background="Red" Foreground="Blue" Width="100" Height="40" Margin="112,40,230,220"></Label>
18             </Grid>
19             <Border Grid.Row="2" Background="#555F5F">
20                 <Label Content="狀態欄" Foreground="White"></Label>
21             </Border>
22         </Grid>
23         <Image Name="img" HorizontalAlignment="Center" VerticalAlignment="Center" Width="0" Height="0" Source="/Image/jinshanshan.jpg" Stretch="Fill" Opacity="0.1" IsHitTestVisible="False"></Image>
24     </Grid>
後台:
 1        private void StackPanel_Click(object sender, RoutedEventArgs e)
 2         {
 3             Button btn = (Button)e.OriginalSource;
 4             string content = btn.Content.ToString();
 5             if (content == "金閃閃")
 6             {
 7                 img.Source = new BitmapImage(new Uri(@"/Image/jinshanshan.jpg", UriKind.Relative));
 8             }
 9             if (content == "小圓")
10             {
11                 img.Source = new BitmapImage(new Uri(@"/Image/xiaoyuan.jpg", UriKind.Relative));
12             }
13
14             DoubleAnimation daX = new DoubleAnimation();
15             daX.From = 0;
16             daX.To = 400;
17             daX.FillBehavior = FillBehavior.HoldEnd;
18             Storyboard.SetTarget(daX, img);
19             Storyboard.SetTargetProperty(daX, new PropertyPath(Image.WidthProperty));
20             DoubleAnimation daY = new DoubleAnimation();
21             daY.From = 0;
22             daY.To = 400;
23             daY.FillBehavior = FillBehavior.HoldEnd;
24             Storyboard.SetTarget(daY, img);
25             Storyboard.SetTargetProperty(daY, new PropertyPath(Image.HeightProperty));
26             DoubleAnimation daOp = new DoubleAnimation();
27             daOp.From = 1;
28             daOp.To = 0.3;
29             daOp.FillBehavior = FillBehavior.HoldEnd;
30             Storyboard.SetTarget(daOp, img);
31             Storyboard.SetTargetProperty(daOp, new PropertyPath(Image.OpacityProperty));
32
33             Storyboard sb = new Storyboard();
34             sb.Children.Add(daX);
35             sb.Children.Add(daY);
36             sb.Children.Add(daOp);
37             sb.Begin();
38         }