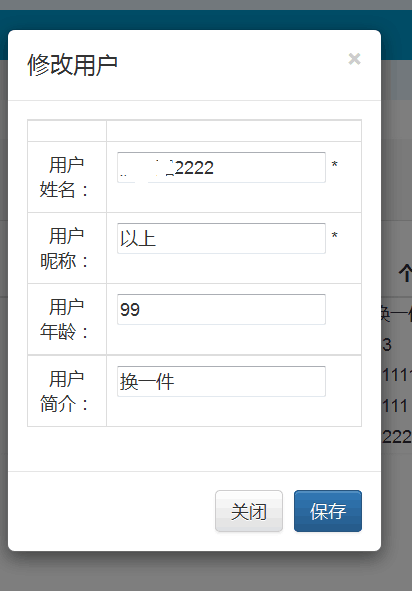
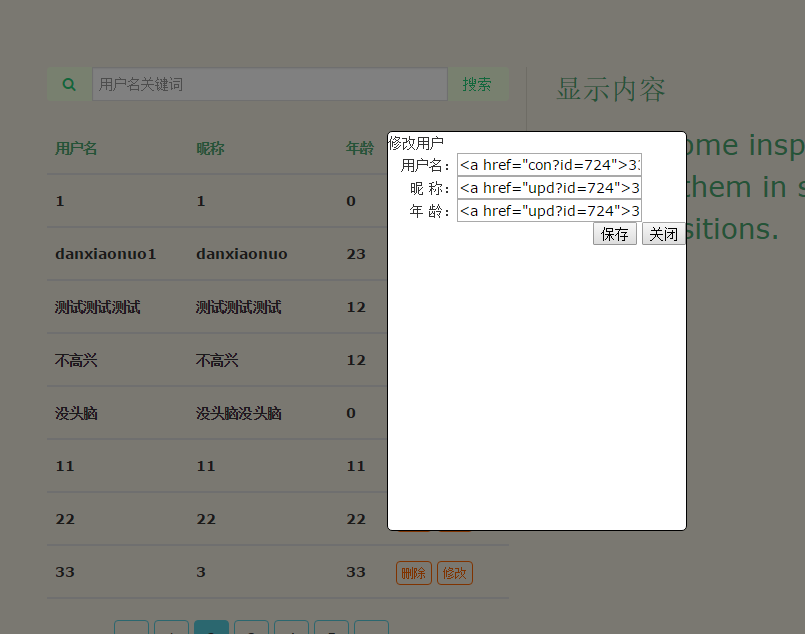
我用的是hibernate+springMvc+maven實現的demo想要點擊首頁列表顯示的數據後面的修改按鈕可以彈出一個彈框,彈框力量有input文本框 ,彈框出現的時候裡面自動有要修改的那一條數據的值
頁面:
<%@ page language="java" import="java.util.*"
    contentType="text/html; charset=UTF-8"%>
<%@ taglib prefix="c" uri="http://java.sun.com/jsp/jstl/core"%>

<%
    String path = request.getContextPath();
    String basePath = request.getScheme() + "://" + request.getServerName() + ":" + request.getServerPort()
            + path + "/";
%>
<!DOCTYPE html>
<html lang="en" class="no-js">
<head>
<base href="<%=basePath%>" />
<meta charset="UTF-8" />
<meta http-equiv="X-UA-Compatible" content="IE=edge,chrome=1">
<meta name="viewport" content="width=device-width, initial-scale=1.0">
<title>Sidebar Transitions</title>
<meta name="description"
    content="Sidebar Transitions: Transition effects for off-canvas views" />
<meta name="keywords"
    content="transition, off-canvas, navigation, effect, 3d, css3, smooth" />
<link rel="stylesheet" type="text/css"
    href="static/test/css/normalize.css" />
<link rel="stylesheet" type="text/css" href="static/test/css/demo.css" />
<!-- 樣式 -->
<link rel="stylesheet" type="text/css"
    href="static/test/css/component.css" />
<link rel="stylesheet" href="static/css/pintuer.css" />
<link rel="stylesheet" href="static/css/admin.css">
<link rel="stylesheet" href="static/css/main.css" type="text/css" />
<script src="static/test/js/modernizr.custom.js"></script>
<style>
#pop {
    width: 300px;
    height: 400px;
    border: solid 1px #000;
    position: fixed;
    left: 50%;
    top: 50%;
    margin-left: -150px;
    margin-top: -200px;
    border: solid 1px #000;
    border-radius: 5px;
    background: #fff;
    display: none;
    z-index: 22
}

#lightbox {
    width: 100%;
    height: 100%;
    position: fixed;
    top: 0;
    left: 0;
    background: #000;
    filter: alpha(opacity = 50);
    opacity: .5;
    display: none
}
</style>
</head>
<body id="7" style="background-image: url('static/images/bj3.jpg');">
    <div id="st-container" class="st-container">
        <!--
                example menus
                these menus will be on top of the push wrapper
            -->


        <nav class="st-menu st-effect-11" id="menu-11">
            <h2 class="icon icon-lab">Column</h2>
            <ul>
                <li><a class="icon icon-group (alias)" href="mian">首頁</a></li>
                <li><a class="icon icon-plus" href="add">增加</a></li>
                <li><a class="icon icon-edit (alias)" href="#">修改</a></li>
                <li><a class="icon icon-thumb-tack" href="#">待定</a></li>
                <li><a class="icon icon-wrench" href="#">測試</a></li>
            </ul>
        </nav>
        <!-- content push wrapper -->
        <div class="st-pusher" id="5">
            <div class="st-content" id="4">
                <!-- this is the wrapper for the content -->
                <div class="st-content-inner" id="3">
                    <header class="codrops-header">
                        <h1 style="color: #48a770">
                            ChenHonest Administrate <span>User information management
                                case</span>
                        </h1>
                    </header>
                    <div class="main clearfix" id="2">
                        <div id="st-trigger-effects" class="column"
                            style="padding-left: 0px; padding-right: 18px;">
                            <form action="vague" method="post">

                                <div class="form-group">
                                    <div class="field">
                                        <div class="input-group">
                                            <span class="addbtn">
                                                <button type="button"
                                                    class="button bg-green-light icon-search"></button>
                                            </span> <input id="vague" type="text" class="input" name="name"
                                                size="50" placeholder="用戶名關鍵詞" /><span class="addbtn">
                                                <button type="submit" class="button bg-green-light">搜索</button>
                                            </span>
                                        </div>
                                    </div>
                                </div>
                            </form>
                            <br>
                            <table class="table table-hover"
                                style="line-height: 35px; color: #48a770;">

                                <tr>
                                    <th width="400">用戶名</th>
                                    <th width="600">昵稱</th>
                                    <th width="200">年齡</th>
                                    <th width="1000">操作</th>
                                </tr>
                                <c:if test="${empty list}">
                                    <tr style="height: 340px;">
                                        <td align="center" colspan=4><h3>未找到內容</h3></td>
                                    </tr>
                                </c:if>
                                <c:forEach var="item" items="${list}">
                                    <tr id="content">

                                        <th width="400"><a href="con?id=${item.id}">${item.name }</a></th>
                                        <th width="600"><a href="upd?id=${item.id}">${item.nice_name }</a></th>
                                        <th width="200"><a href="upd?id=${item.id}">${item.age }</a></th>
                                        <th width="1000"><a
                                            class="button border-dot button-little"
                                            href="delete?id=${item.id}" onclick="return confirm('確認刪除?')">刪除</a>
                                            <a class="button border-dot button-little" href="#"
                                            onclick="return PopLayer(this)">修改</a></th>
                                    </tr>
                                </c:forEach>
                            </table>
                            <br>
                            <div>
                                <ul class="pagination border-mix"
                                    style="width: 441px; padding-right: 120px;">
                                    <li class="disabled"><a href="#">«</a></li>
                                    <li><a href="#">1</a></li>
                                    <li class="active"><a href="#">2</a></li>
                                    <li><a href="#">3</a></li>
                                    <li><a href="#">4</a></li>
                                    <li><a href="#">5</a></li>
                                    <li><a href="#">»</a></li>
                                </ul>
                            </div>
                            <br>
                            <button data-effect="st-effect-11">更多功能</button>
                        </div>
                        <div class="column" style="color: #48a770">
                            <p>顯示內容</p>
                            <p>Here is some inspiration for showing them in style using
                                CSS transitions.</p>
                            <a href="test" class="button border-dot">測試</a>
                        </div>
                    </div>
                </div>


            </div>
        </div>
    </div>
    <script src="static/test/js/classie.js"></script>
    <script src="static/test/js/sidebarEffects.js"></script>


    <div id="lightbox"></div>
    <div id="pop">
        <form>
            <table width="100%" border="0" cellpadding="5" cellspacing="5">
                <tr>
                    <td colspan="2">修改用戶</td>
                </tr>
                <tr>
                    <td align="right">用戶名:</td>
                    <td><input type="text" name="name" /></td>
                </tr>
                <tr>
                    <td align="right">昵 稱:</td>
                    <td><input type="text" name="nickname" /></td>
                </tr>
                <tr>
                    <td align="right">年 齡:</td>
                    <td><input type="text" name="age" /></td>
                </tr>
                <tr>
                    <td colspan="2" align="right"><input type="button" value="保存" />
                        <input type="button" value="關閉" onclick="PopLayer()" /></td>
                </tr>
            </table>
        </form>
    </div>
    <script>
        var pop = document.getElementById('pop'), popf = pop
                .getElementsByTagName('form')[0], lightbox = document
                .getElementById('lightbox')
        function PopLayer(obj) {
            lightbox.style.display = pop.style.display = obj ? 'block' : 'none';
            if (obj) {//點擊修改
                var tr = obj.parentNode.parentNode
                popf.name.value = tr.cells[0].innerHTML
                popf.nickname.value = tr.cells[1].innerHTML
                popf.age.value = tr.cells[2].innerHTML
            }
            return false
        }
    </script>
</body>
</html>
dao層
 /*
 * @(#) usersDaoImpl.java 2015年12月9日
 *
 * Copyright (c) 2015,RongHui Technology. All Rights Reserved.
 * WWW.RHTECH.NET CONFIDENTIAL
 */
package com.ronghui.dao;

import java.util.List;

import javax.annotation.Resource;

import org.hibernate.Query;
import org.hibernate.Session;
import org.hibernate.SessionFactory;
import org.springframework.stereotype.Repository;

import com.ronghui.model.User;


@Repository("usersDao")
public class usersDaoImpl  implements usersDao {

    // extends BaseDaoImpl<UserEntity, Integer>
        @Resource
        protected SessionFactory sessionFactory;


        public Session getSession() {
            return sessionFactory.getCurrentSession();
        }
        public void setSessionFactory(SessionFactory sessionFactory) {
            this.sessionFactory = sessionFactory;
        }


        //顯示
        @Override
        public List<User> listInfo() {
            // TODO Auto-generated method stub
            String hql="from User";
            Query query=(Query)this.getSession().createQuery(hql);
            List<User> list=query.list();
            return list;
        }


        public void update(User user){
            String hql="update User set age=? ,nice_name=? ,name=?, pwd=?,content=? where id=?";
             Query query=this.getSession().createQuery(hql);
             query.setInteger(0, user.getAge());
             query.setString(1, user.getNice_name());
             query.setString(2, user.getName());
             query.setString(3, user.getPwd());
             query.setString(4, user.getPwd());
             query.setInteger(5, user.getId());
             query.executeUpdate();
        }


}
service層沒什麼我就不放了
controller
 /**
 *
 */
package com.ronghui.controller;

import java.util.HashMap;
import java.util.List;
import java.util.Map;

import javax.annotation.Resource;
import javax.servlet.http.HttpServletRequest;

import org.springframework.stereotype.Controller;
import org.springframework.ui.ModelMap;
import org.springframework.web.bind.annotation.RequestMapping;
import org.springframework.web.bind.annotation.RequestMethod;
import org.springframework.web.bind.annotation.ResponseBody;

import com.ronghui.model.User;
import com.ronghui.service.usersService;

@Controller
public class UserController {
    @Resource
    private usersService usersService;
    private String name;


    // list顯示
    @RequestMapping(value = "/mian", method = RequestMethod.GET)
    public String userlogin(ModelMap model) {
        List list = usersService.listInfo();
        model.addAttribute("list", list);
        return "mian";

    }


    @RequestMapping("update")
    public String update(int id, String name, String nice_name, String pwd, int age,String content) {
        User user = new User();
        user.setId(id);
        user.setName(name);
        user.setNice_name(nice_name);
        user.setAge(age);
        user.setPwd(pwd);
        user.setContent(content);
        usersService.update(user);
        return "redirect:mian";
    }
}
修改的方法都是可以實現的 就差大神們幫我加個點擊就有彈框
類似下面圖片的 樣式不重要 只要能實現就可以了 拜托各位大神0.0

  <c:forEach var="item" items="${list}" >
                                    <tr id="content">

                                        <th width="400"><a href="con?id=${item.id}">${item.name }</a></th>
                                        <th width="600"><a href="upd?id=${item.id}">${item.nice_name }</a></th>
                                        <th width="200"><a href="upd?id=${item.id}">${item.age }</a></th>
                                        <th width="1000"><a
                                            class="button border-dot button-little"
                                            href="delete?id=${item.id}" onclick="return confirm('確認刪除?')">刪除</a>
                                            <a
                                            class="button border-dot button-little"
                                            href="#" onclick="return PopLayer(this)" >修改</a>
                                            </th>
                                    </tr>
                                </c:forEach>
然後body前面放這些代碼
<style>
    #pop{width:300px;height:400px;border:solid 1px #000;position:fixed;left:50%;top:50%;margin-left:-150px;margin-top:-200px;border:solid 1px #000;border-radius:5px;background:#fff;display:none;z-index:22}
    #lightbox{width:100%;height:100%;position:fixed;top:0;left:0;background:#000;filter:alpha(opacity=50);opacity:.5;display:none}
</style>
<div id="lightbox"></div>
<div id="pop"><form>
    <table width="100%" border="0" cellpadding="5" cellspacing="5">
        <tr><td colspan="2">修改用戶</td></tr>
        <tr><td align="right">用戶名:</td><td><input type="text" name="name" /></td></tr>
        <tr><td align="right">昵 稱:</td><td><input type="text" name="nickname" /></td></tr>
        <tr><td align="right">年 齡:</td><td><input type="text" name="age" /></td></tr>
        <tr><td colspan="2" align="right"><input type="button" value="保存" /> <input type="button" value="關閉" onclick="PopLayer()" /> </td></tr>
    </table>
</form>
</div>
<script>
    var pop=document.getElementById('pop'),popf=pop.getElementsByTagName('form')[0],lightbox=document.getElementById('lightbox')
    function PopLayer(obj) {
        lightbox.style.display = pop.style.display = obj ? 'block' : 'none';
        if (obj) {//點擊修改
            var tr = obj.parentNode.parentNode
            popf.name.value = tr.cells[0].innerHTML
            popf.nickname.value = tr.cells[1].innerHTML
            popf.age.value = tr.cells[2].innerHTML
        }
        return false
    }
</script>
</body>
還有就是有空多學點js,很簡單的效果


