說明:統計像素值,用柱形圖來統計
cv.calcHist(images,channels,mask,histSize,ranges)
#直方圖
img=cv.imread("E:\\Pec\\cat.jpg",0)
hist=cv.calcHist([img],[0],None,[256],[0,256])
print(hist.shape)
plt.hist(img.ravel(),256)
plt.show()
#彩色圖
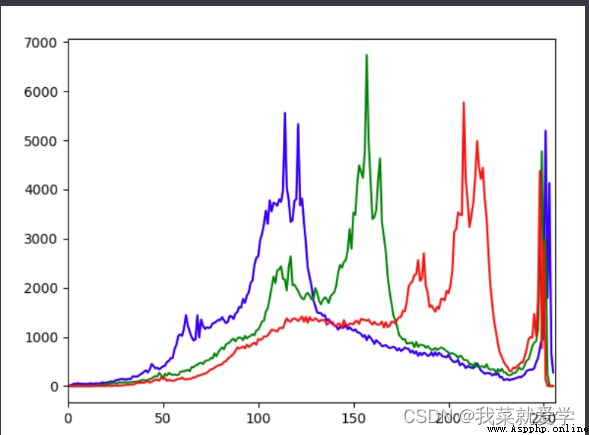
img=cv.imread("E:\\Pec\\cat.jpg")
color=('b','g','r')
for i,col in enumerate(color):
histr=cv.calcHist([img],[i],None,[256],[0,256])
plt.plot(histr,color=col)
plt.xlim([0,256])
plt.show()

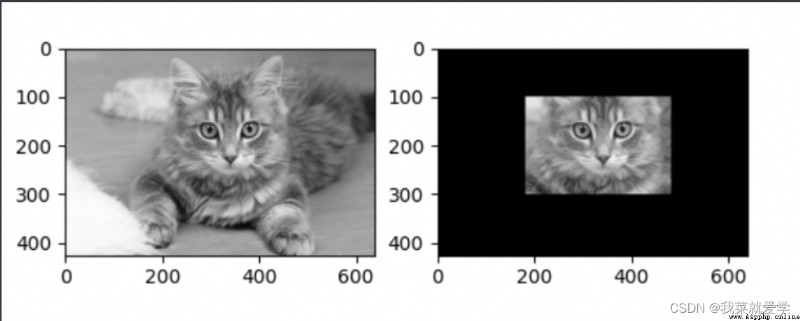
掩碼(mask):只有兩部分,一部分為黑,另一部分為白。
img=cv.imread("E:\\Pec\\cat.jpg",0)
mask_1=np.zeros(img.shape[:2],np.uint8)
print(mask_1.shape)
#選擇一些區域
mask_1[100:300,180:480]=255
#[100:300]表示上下去100位置到300,同理左右去180位置到480
cv_show('mask',mask_1)
masked_img=cv.bitwise_and(img,img,mask=mask_1)#與操作,mask表示要提取的區域
cv_show('masked_img',masked_img)
plt.subplot(221),plt.imshow(img,'gray')
plt.subplot(222),plt.imshow(masked_img,'gray')
plt.show()
#plt.subplot(221) 表示將整個圖像窗口分為2行2列, 當前位置為1.
#plt.subplot(221) 表示第一行的左圖
#plt.subplot(222) 表示將整個圖像窗口分為2行2列, 當前位置為2.
#plt.subplot(222) 第一行的右圖
#plt.plot(圖線名)
#plt.xlim() 顯示的是x軸的作圖范圍
#plt.ylim() 顯示的是y軸的作圖范圍
shape[:2] 取彩色圖片的長和寬
shape[:3]取彩色圖片的長和寬和通道
img.shape[0]:圖像的垂直高度
img.shape[1]:圖像的水平寬度
img.shape[2]:圖像的通道數
矩陣中,[0]代表水平,[1]代表高度。
print(type(img)) #顯示類型
print(img.shape) #顯示尺寸
print(img.shape[0]) #圖片寬度
print(img.shape[1]) #圖片高度
print(img.shape[2]) #圖片通道數
print(img.size) #顯示總像素個數
print(img.max()) #最大像素值
print(img.min()) #最小像素值
print(img.mean()) #像素平均值
print(img.shape[:0])
print(img.shape[:1])#圖片寬度
print(img.shape[:2])#圖片寬度,高度
print(img.shape[:3])#圖片寬度,高度,通道數
說明:圖像的基本運算有很多種,比如兩幅圖像可以相加、相減、相乘、相除、位運算、平方根、對數、絕對值等;圖像也可以放大、縮小、旋轉,還可以截取其中的一部分作為ROI(感興趣區域)進行操作,各個顏色通道還可以分別提取及對各個顏色通道進行各種運算操作。
#bitwise_and、bitwise_or、bitwise_xor、bitwise_not這四個按位操作函數。
void bitwise_and(InputArray src1, InputArray src2,OutputArray dst, InputArray mask=noArray()); //dst = src1 & src2
void bitwise_or(InputArray src1, InputArray src2,OutputArray dst, InputArray mask=noArray()); //dst = src1 | src2
void bitwise_xor(InputArray src1, InputArray src2,OutputArray dst, InputArray mask=noArray()); //dst = src1 ^ src2
void bitwise_not(InputArray src, OutputArray dst,InputArray mask=noArray()); //dst = ~src


img=cv.imread("E:\\Pec\\cat.jpg",0)
hist=cv.calcHist([img],[0],None,[256],[0,256])
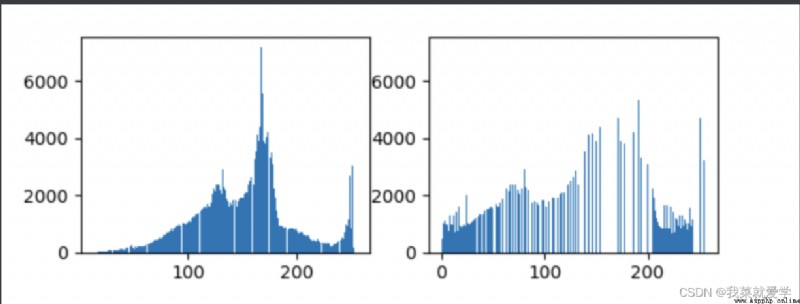
#均衡化
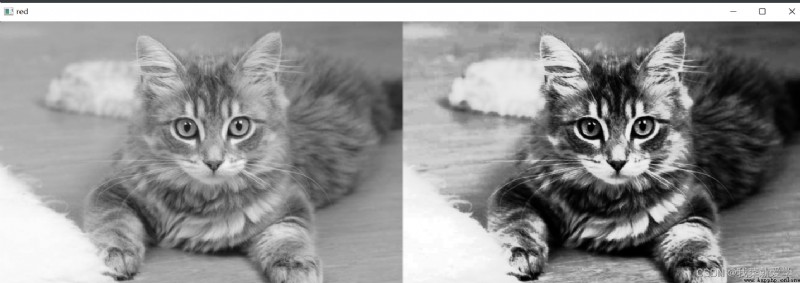
equ=cv.equalizeHist(img)
plt.subplot(221),plt.hist(img.ravel(),256)
plt.subplot(222),plt.hist(equ.ravel(),256)
plt.show()
res=np.hstack((img,equ))
cv_show("red",res)
說明:生活在時間的世界中,早上7:00吃早飯,8:00上班路上,9:00上班,以時間為參照的時域分析。頻域中看來一切都是靜止的,以上帝的視角。不需要了解你什麼時間按照順序干了什麼事,只需要了解你這一天干了什麼就行了
注意:
(1)輸入圖像需要先轉換成np.float32格式
(2)得到的結果中頻域為0的部分會在左上角,通常要轉到中心位置,可以通過shift變換來實現
(3)cv.dft()返回的結果是雙通道的(實部,虛部),通常需要轉換成圖像格式才能展示(0,255)
補充:
(1)numpy.zeros(shape, dtype=float)
shape:創建的新數組的形狀(維度)。dtype:創建新數組的數據類型。(2)numpy.ones(shape, dtype=None, order=‘C’)
img=cv.imread("E:\\Pec\\lida.jpg",0)
img_float32=np.float32(img)#輸入圖像需要先轉換成np.float32格式
#傅裡葉轉換為復數
dft=cv.dft(img_float32,flags=cv.DFT_COMPLEX_OUTPUT)
#將低頻從左上角轉換到中心
dft_shift=np.fft.fftshift(dft)
#得到灰度圖能表示的形式
#cv.dft()返回的結果是雙通道的(實部,虛部),通常需要轉換成圖像格式才能展示(0,255)
magnitude_spectrum=20*np.log(cv.magnitude(dft_shift[:,:,0],dft_shift[:,:,1]))
plt.subplot(121),plt.imshow(img,'gray')
plt.title('Input Image'),plt.xticks([]),plt.yticks([])
plt.subplot(122),plt.imshow(magnitude_spectrum,'gray')
plt.title('Magnitude Spectrum'),plt.xticks([]),plt.yticks([])
plt.show()

#低通濾波器
img=cv.imread("E:\\Pec\\lida.jpg",0)
img_float32=np.float32(img)#輸入圖像需要先轉換成np.float32格式
#傅裡葉轉換為復數
dft=cv.dft(img_float32,flags=cv.DFT_COMPLEX_OUTPUT)
#將低頻從左上角轉換到中心
dft_shift=np.fft.fftshift(dft)
#找到圖像中心位置
rows,cols=img.shape
crow,col=int(rows/2),int(cols/2)
#低通濾波
#生成rows行cols列的2緯矩陣,數據格式為uint8,uint8的范圍[0,255]
mask=np.zeros((rows,cols,2),np.uint8)
mask[crow-30:crow+30,col-30:col+30]=1
#IDFT
fshift=dft_shift*mask
f_ishift=np.fft.ifftshift(fshift)
img_back=cv.idft(f_ishift)
img_back=cv.magnitude(img_back[:,:,0],img_back[:,:,1])
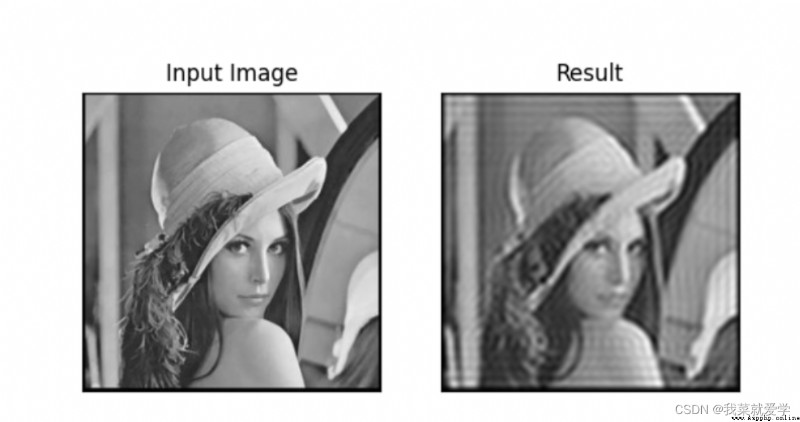
plt.subplot(121),plt.imshow(img,'gray')
plt.title('Input Image'),plt.xticks([]),plt.yticks([])
plt.subplot(122),plt.imshow(img_back,'gray')
plt.title('Result'),plt.xticks([]),plt.yticks([])
plt.show()
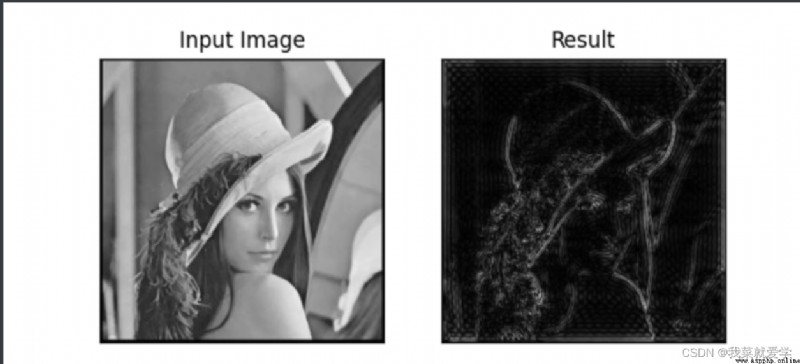
從結果可以看出,圖像的邊緣模糊,但是圖像除邊緣部分的其他地方不模糊
#高通濾波
#生成rows行cols列的2緯矩陣,數據格式為uint8,uint8的范圍[0,255]
mask=np.ones((rows,cols,2),np.uint8)
mask[crow-30:crow+30,col-30:col+30]=0
從結果可以看出,圖像只有邊緣信息保存下來,內容模糊不見了