哈喽!大家好,我是「奇點」,江湖人稱 singularity。剛工作幾年,想和大家一同進步
一位上進心十足的【Java ToB端大廠領域博主】!
喜歡java和python,平時比較懶,能用程序解決的堅決不手動解決
如果有對【java】感興趣的【小可愛】,歡迎關注我️️️感謝各位大可愛小可愛!️️️
————————————————如果覺得本文對你有幫助,歡迎點贊,歡迎關注我,如果有補充歡迎評論交流,我將努力創作更多更好的文章。
前3片python文章將python的基本知識講解完了,詳細學習完之後,我們就能夠寫python代碼了。如果不熟悉的可以看一下我前面的文章,熟悉的可以跟我學習一下進階篇。
對python 0基礎的同學可以看一下我的上篇文章,再來學習這篇文章,大佬可以直接跳過。
0基礎跟我學python(1) https://blog.csdn.net/qq_29235677/article/details/125967844
0基礎跟我學python(2) https://blog.csdn.net/qq_29235677/article/details/126033880
0基礎跟我學python(3) https://blog.csdn.net/qq_29235677/article/details/126096024

我們今天學習一下python的進階篇,學習一下python的CGI編程 和網絡編程
目錄
️ 1.CGI編程
(1)定義
網頁浏覽
(2)CGI架構圖
(3)Web服務器支持及配置
第一個CGI程序
️ 2.網絡編程
(1)socket()函數
參數
️(2)Socket 對象(內建)方法
服務端
創建一個TCP連接的服務端和客戶端
(3)Python內置的urllib模塊
urllib.request
模擬頭部信息
urllib.error
urllib.parse
urllib.robotparser
(4)requests模塊
安裝requests
GET請求
POST請求
CGI(Common Gateway Interface) 是WWW技術中最重要的技術之一,有著不可替代的重要地位。CGI是外部應用程序(CGI程序)與Web服務器之間的接口標准,是在CGI程序和Web服務器之間傳遞信息的過程。CGI規范允許Web服務器執行外部程序,並將它們的輸出發送給Web浏覽器,CGI將Web的一組簡單的靜態超媒體文檔變成一個完整的新的交互式媒體。
Common Gateway Interface,簡稱CGI。在物理上是一段程序,運行在服務器上,提供同客戶端HTML頁面的接口。這樣說大概還不好理解。
那麼我們看一個實際例子:
現在的個人主頁上大部分都有一個留言本。留言本的工作是這樣的:先由用戶在客戶端輸入一些信息,如評論之類的東西。接著用戶按一下“發布或提交”(到目前為止工作都在客戶端),浏覽器把這些信息傳送到服務器的CGI目錄下特定的CGI程序中,於是CGI程序在服務器上按照預定的方法進行處理。在本例中就是把用戶提交的信息存入指定的文件中。然後CGI程序給客戶端發送一個信息,表示請求的任務已經結束。此時用戶在浏覽器裡將看到“留言結束”的字樣。整個過程結束。
CGI 目前由NCSA維護,NCSA定義CGI如下:
CGI(Common Gateway Interface),通用網關接口,它是一段程序,運行在服務器上如:HTTP服務器,提供同客戶端HTML頁面的接口。
絕大多數的CGI程序被用來解釋處理來自表單的輸入信息,並在服務器產生相應的處理,或將相應的信息反饋給浏覽器。CGI程序使網頁具有交互功能。
處理步驟
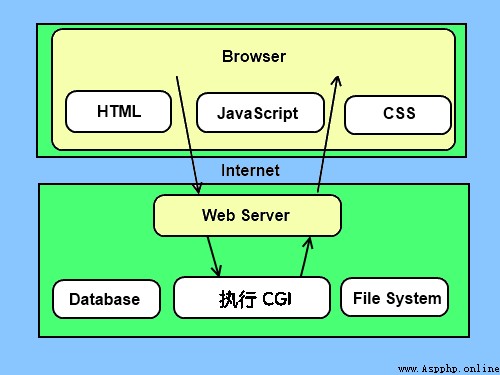
為了更好的了解CGI是如何工作的,我們可以從在網頁上點擊一個鏈接或URL的流程:
CGI程序可以是Python腳本,PERL腳本,SHELL腳本,C或者C++程序等。

在你進行CGI編程前,確保您的Web服務器支持CGI及已經配置了CGI的處理程序。
Apache 支持CGI 配置:
設置好CGI目錄:
ScriptAlias /cgi-bin/ /var/www/cgi-bin/
所有的HTTP服務器執行CGI程序都保存在一個預先配置的目錄。這個目錄被稱為CGI目錄,並按照慣例,它被命名為/var/www/cgi-bin目錄。
CGI文件的擴展名為.cgi,python也可以使用.py擴展名。
默認情況下,Linux服務器配置運行的cgi-bin目錄中為/var/www。
如果你想指定其他運行CGI腳本的目錄,可以修改httpd.conf配置文件,如下所示:
<Directory "/var/www/cgi-bin">
AllowOverride None
Options +ExecCGI
Order allow,deny
Allow from all
</Directory>
在 AddHandler 中添加 .py 後綴,這樣我們就可以訪問 .py 結尾的 python 腳本文件:
AddHandler cgi-script .cgi .pl .py
我們使用Python創建第一個CGI程序,文件名為hello.py,文件位於/var/www/cgi-bin目錄中,內容如下:
print ("Content-type:text/html")
print () # 空行,告訴服務器結束頭部
print ('<html>')
print ('<head>')
print ('<meta charset="utf-8">')
print ('<title>Hello Word - 我的第一個 CGI 程序!</title>')
print ('</head>')
print ('<body>')
print ('<h2>Hello Word! 我是來自菜鳥教程的第一CGI程序</h2>')
print ('</body>')
print ('</html>')
文件保存後修改 hello.py,修改文件權限為 755:
chmod 755 hello.py
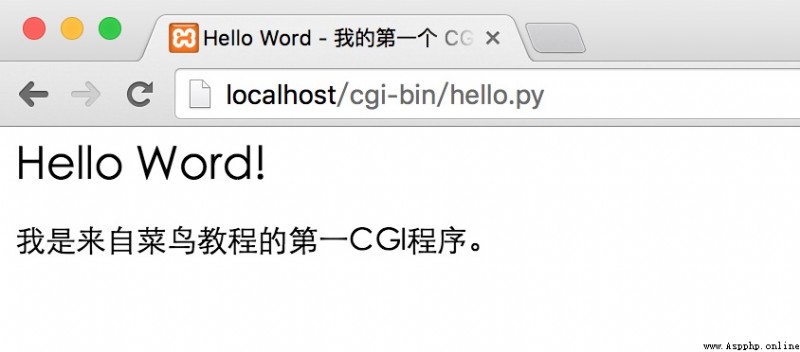
以上程序在浏覽器訪問顯示結果如下:

這個的hello.py腳本是一個簡單的Python腳本,腳本第一行的輸出內容"Content-type:text/html"發送到浏覽器並告知浏覽器顯示的內容類型為"text/html"。
用 print 輸出一個空行用於告訴服務器結束頭部信息。
有過其他語言的編程經驗的話,網絡編程對於大家來說是再熟悉不過的了,同樣python也為我們提供了網絡編程的方式,接下來我們來看看python是怎麼給我們提供網絡編程的,都說python簡單,那我們看看到底有多麼簡單

Python 提供了兩個級別訪問的網絡服務。:
Socket又稱"套接字",應用程序通常通過"套接字"向網絡發出請求或者應答網絡請求,使主機間或者一台計算機上的進程間可以通訊。
Python 中,我們用 socket() 函數來創建套接字,語法格式如下:
socket.socket([family[, type[, proto]]])SOCK_STREAM或SOCK_DGRAM看樣子確實很簡單,提供了很多內置的方法供我們調用,接下來舉個
我們使用 socket 模塊的 socket 函數來創建一個 socket 對象。socket 對象可以通過調用其他函數來設置一個 socket 服務。
現在我們可以通過調用 bind(hostname, port) 函數來指定服務的 port(端口)。
接著,我們調用 socket 對象的 accept 方法。該方法等待客戶端的連接,並返回 connection 對象,表示已連接到客戶端。
完整代碼如下:
服務端:
import socket
server = socket.socket(socket.AF_INET, socket.SOCK_STREAM)
server.bind(("127.0.0.1", 8888))
server.listen(5) # 最大並發
print("服務端已經啟動,等待客戶端連接")
client, address = server.accept() # 創建新的線程
"""
連接的客戶端 (<socket.socket fd=4,
family=AddressFamily.AF_INET, type=SocketKind.SOCK_STREAM,
proto=0,
laddr=('127.0.0.1', 8888),
raddr=('127.0.0.1', 50290)>,('127.0.0.1', 50290))
"""
print("已經建立連接")
data = client.recv(1024)
print("接收到客戶端的數據", data.decode("utf-8"))
print("請輸入回復的內容")
client.send(input().encode("utf-8"))
# print("連接的客戶端", client)
server.close()
客戶端
import socket
client = socket.socket(socket.AF_INET, socket.SOCK_STREAM)
client.connect(("127.0.0.1", 8888))
print("客戶端已經建立連接")
print("客戶端已經建立連接,請輸入要發送的內容")
client.send(input().encode("utf-8"))
data = client.recv(1024)
print("接收到服務端的響應", data.decode("utf-8"))
client.close()
服務端的結果
服務端已經啟動,等待客戶端連接
已經建立連接
接收到客戶端的數據 1
請輸入回復的內容
2
客戶端的結果
客戶端已經建立連接
客戶端已經建立連接,請輸入要發送的內容
1
接收到服務端的響應 2
上面實現的的TCP連接是不是很簡單,接下來說一下UDP的方式
服務端:
import socket
# print(type({"a":"a"}))
# socket.SOCK_DGRAM UDP
# socket.SOCK_STREAM TCP
# 創建服務端
server = socket.socket(socket.AF_INET, socket.SOCK_DGRAM)
server.bind(("127.0.0.1", 8888))
print("UDP服務端啟動...")
"""
常用socket.AF_INET 多個協議層編解碼,消耗cpu,要網卡收到網卡帶寬消耗 ----->跨網傳輸
socket.AF_UNIX不用網卡,在內核完成,也不用不同協議的編碼 節省cpu不受帶寬限制 --->本地
"""
while True:
data, client = server.recvfrom(1024)
print("接收到消息", data.decode("utf-8"))
server.sendto("你好這是服務端".encode("utf-8"), client) # 回復消息
客戶端:
import socket
client = socket.socket(socket.AF_INET, socket.SOCK_DGRAM)
client.sendto(input().encode("utf-8"), ("127.0.0.1", 8888))
data, server = client.recvfrom(1024)
print("收到的消息是", data.decode("utf-8"))
client.close()
客戶端輸入9之後的結果
9
收到的消息是 你好這是服務端
服務端的結果
UDP服務端啟動...
接收到消息 9
Python urllib 庫用於操作網頁 URL,並對網頁的內容進行抓取處理。
本文主要介紹 Python3 的 urllib。
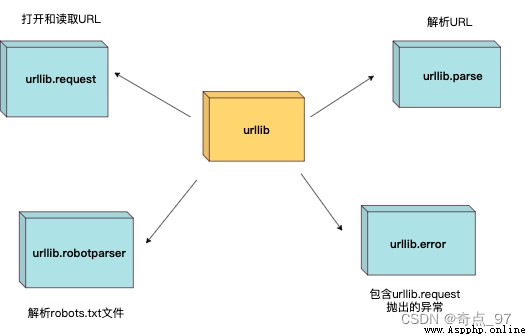
urllib 包 包含以下幾個模塊:

urllib.request 定義了一些打開 URL 的函數和類,包含授權驗證、重定向、浏覽器 cookies等。
urllib.request 可以模擬浏覽器的一個請求發起過程。
我們可以使用 urllib.request 的 urlopen 方法來打開一個 URL,語法格式如下:
urllib.request.urlopen(url, data=None, [timeout, ]*, cafile=None, capath=None, cadefault=False, context=None)from urllib.request import urlopen
myURL = urlopen("https://www.runoob.com/")
print(myURL.read())以上代碼使用 urlopen 打開一個 URL,然後使用 read() 函數獲取網頁的 HTML 實體代碼。
read() 是讀取整個網頁內容,我們可以指定讀取的長度:
from urllib.request import urlopen
myURL = urlopen("https://www.runoob.com/")
print(myURL.read(300))
除了 read() 函數外,還包含以下兩個讀取網頁內容的函數:
readline() - 讀取文件的一行內容
from urllib.request import urlopen
myURL = urlopen("https://www.runoob.com/")
print(myURL.readline()) #讀取一行內容from urllib.request import urlopen
myURL = urlopen("https://www.runoob.com/")
lines = myURL.readlines()
for line in lines:
print(line) 和文件處理的讀法是相似的
我們在對網頁進行抓取時,經常需要判斷網頁是否可以正常訪問,這裡我們就可以使用 getcode() 函數獲取網頁狀態碼,返回 200 說明網頁正常,返回 404 說明網頁不存在:
import urllib.request
myURL1 = urllib.request.urlopen("https://www.runoob.com/")
print(myURL1.getcode()) # 200
try:
myURL2 = urllib.request.urlopen("https://www.runoob.com/no.html")
except urllib.error.HTTPError as e:
if e.code == 404:
print(404) # 404
如果要將抓取的網頁保存到本地,可以使用 Python3 File write() 方法 函數:
from urllib.request import urlopen
myURL = urlopen("https://www.runoob.com/")
f = open("runoob_urllib_test.html", "wb")
content = myURL.read() # 讀取網頁內容
f.write(content)
f.close()
URL 的編碼與解碼可以使用 urllib.request.quote() 與 urllib.request.unquote() 方法:
import urllib.request
encode_url = urllib.request.quote("https://www.runoob.com/") # 編碼
print(encode_url)
unencode_url = urllib.request.unquote(encode_url) # 解碼
print(unencode_url)
https%3A//www.runoob.com/
https://www.runoob.com/
我們抓取網頁一般需要對 headers(網頁頭信息)進行模擬,這時候需要使用到 urllib.request.Request 類:
class urllib.request.Request(url, data=None, headers={}, origin_req_host=None, unverifiable=False, method=None)
import urllib.request
import urllib.parse
url = 'https://www.runoob.com/?s=' # 菜鳥教程搜索頁面
keyword = 'Python 教程'
key_code = urllib.request.quote(keyword) # 對請求進行編碼
url_all = url+key_code
header = {
'User-Agent':'Mozilla/5.0 (X11; Fedora; Linux x86_64) AppleWebKit/537.36 (KHTML, like Gecko) Chrome/58.0.3029.110 Safari/537.36'
} #頭部信息
request = urllib.request.Request(url_all,headers=header)
reponse = urllib.request.urlopen(request).read()
fh = open("./urllib_test_runoob_search.html","wb") # 將文件寫入到當前目錄中
fh.write(reponse)
fh.close()
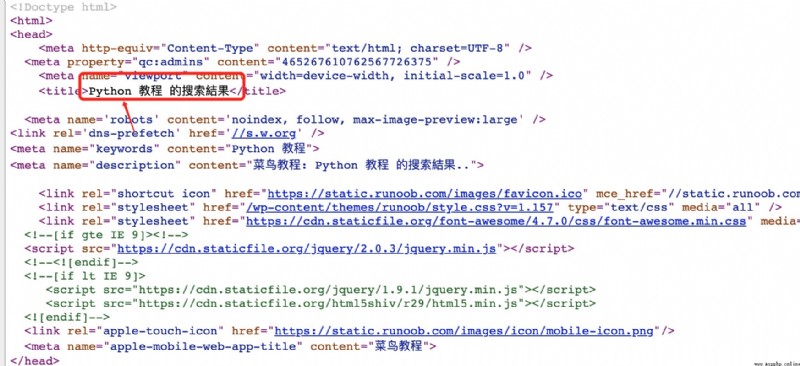
打開 urllib_test_runoob_search.html 文件(可以使用浏覽器打開),內容如下:

表單 POST 傳遞數據,我們先創建一個表單,代碼如下,我這裡使用了 PHP 代碼來獲取表單的數據:
<!DOCTYPE html>
<html>
<head>
<meta charset="utf-8">
<title>菜鳥教程(runoob.com) urllib POST 測試</title>
</head>
<body>
<form action="" method="post" name="myForm">
Name: <input type="text" name="name"><br>
Tag: <input type="text" name="tag"><br>
<input type="submit" value="提交">
</form>
<hr>
<?php
// 使用 PHP 來獲取表單提交的數據,你可以換成其他的
if(isset($_POST['name']) && $_POST['tag'] ) {
echo $_POST["name"] . ', ' . $_POST['tag'];
}
?>
</body>
</html>
import urllib.request
import urllib.parse
url = 'https://www.runoob.com/try/py3/py3_urllib_test.php' # 提交到表單頁面
data = {'name':'RUNOOB', 'tag' : '菜鳥教程'} # 提交數據
header = {
'User-Agent':'Mozilla/5.0 (X11; Fedora; Linux x86_64) AppleWebKit/537.36 (KHTML, like Gecko) Chrome/58.0.3029.110 Safari/537.36'
} #頭部信息
data = urllib.parse.urlencode(data).encode('utf8') # 對參數進行編碼,解碼使用 urllib.parse.urldecode
request=urllib.request.Request(url, data, header) # 請求處理
reponse=urllib.request.urlopen(request).read() # 讀取結果
fh = open("./urllib_test_post_runoob.html","wb") # 將文件寫入到當前目錄中
fh.write(reponse)
fh.close()
urllib.error 模塊為 urllib.request 所引發的異常定義了異常類,基礎異常類是 URLError。
urllib.error 包含了兩個方法,URLError 和 HTTPError。
URLError 是 OSError 的一個子類,用於處理程序在遇到問題時會引發此異常(或其派生的異常),包含的屬性 reason 為引發異常的原因。
HTTPError 是 URLError 的一個子類,用於處理特殊 HTTP 錯誤例如作為認證請求的時候,包含的屬性 code 為 HTTP 的狀態碼, reason 為引發異常的原因,headers 為導致 HTTPError 的特定 HTTP 請求的 HTTP 響應頭。
對不存在的網頁抓取並處理異常:
import urllib.request
import urllib.error
myURL1 = urllib.request.urlopen("https://www.runoob.com/")
print(myURL1.getcode()) # 200
try:
myURL2 = urllib.request.urlopen("https://www.runoob.com/no.html")
except urllib.error.HTTPError as e:
if e.code == 404:
print(404) # 404
urllib.parse 用於解析 URL,格式如下:
urllib.parse.urlparse(urlstring, scheme='', allow_fragments=True)urlstring 為 字符串的 url 地址,scheme 為協議類型,
allow_fragments 參數為 false,則無法識別片段標識符。相反,它們被解析為路徑,參數或查詢組件的一部分,並 fragment 在返回值中設置為空字符串。
from urllib.parse import urlparse
o = urlparse("https://www.runoob.com/?s=python+%E6%95%99%E7%A8%8B")
print(o)
ParseResult(scheme='https', netloc='www.runoob.com', path='/', params='', query='s=python+%E6%95%99%E7%A8%8B', fragment='')
從結果可以看出,內容是一個元組,包含 6 個字符串:協議,位置,路徑,參數,查詢,判斷。
我們可以直接讀取協議內容:
from urllib.parse import urlparse
o = urlparse("https://www.runoob.com/?s=python+%E6%95%99%E7%A8%8B")
print(o.scheme)
https
完整內容
屬性
索引
值
值(如果不存在)
scheme
0
URL協議
scheme 參數
netloc
1
網絡位置部分
空字符串
path
2
分層路徑
空字符串
params
3
最後路徑元素的參數
空字符串
query
4
查詢組件
空字符串
fragment
5
片段識別
空字符串
username
用戶名
None
password
密碼
None
hostname
主機名(小寫)
None
port
端口號為整數(如果存在)
None
urllib.robotparser 用於解析 robots.txt 文件。
robots.txt(統一小寫)是一種存放於網站根目錄下的 robots 協議,它通常用於告訴搜索引擎對網站的抓取規則。
urllib.robotparser 提供了 RobotFileParser 類,語法如下:
class urllib.robotparser.RobotFileParser(url='')
這個類提供了一些可以讀取、解析 robots.txt 文件的方法:
set_url(url) - 設置 robots.txt 文件的 URL。
read() - 讀取 robots.txt URL 並將其輸入解析器。
parse(lines) - 解析行參數。
can_fetch(useragent, url) - 如果允許 useragent 按照被解析 robots.txt 文件中的規則來獲取 url 則返回 True。
mtime() -返回最近一次獲取 robots.txt 文件的時間。 這適用於需要定期檢查 robots.txt 文件更新情況的長時間運行的網頁爬蟲。
modified() - 將最近一次獲取 robots.txt 文件的時間設置為當前時間。
crawl_delay(useragent) -為指定的 useragent 從 robots.txt 返回 Crawl-delay 形參。 如果此形參不存在或不適用於指定的 useragent 或者此形參的 robots.txt 條目存在語法錯誤,則返回 None。
request_rate(useragent) -以 named tuple RequestRate(requests, seconds) 的形式從 robots.txt 返回 Request-rate 形參的內容。 如果此形參不存在或不適用於指定的 useragent 或者此形參的 robots.txt 條目存在語法錯誤,則返回 None。
site_maps() - 以 list() 的形式從 robots.txt 返回 Sitemap 形參的內容。 如果此形參不存在或者此形參的 robots.txt 條目存在語法錯誤,則返回 None。
>>> import urllib.robotparser
>>> rp = urllib.robotparser.RobotFileParser()
>>> rp.set_url("http://www.musi-cal.com/robots.txt")
>>> rp.read()
>>> rrate = rp.request_rate("*")
>>> rrate.requests
3
>>> rrate.seconds
20
>>> rp.crawl_delay("*")
6
>>> rp.can_fetch("*", "http://www.musi-cal.com/cgi-bin/search?city=San+Francisco")
False
>>> rp.can_fetch("*", "http://www.musi-cal.com/")
True我們已經講解了Python內置的urllib模塊,用於訪問網絡資源。但是,它用起來比較麻煩,而且,缺少很多實用的高級功能。
更好的方案是使用requests。它是一個Python第三方庫,處理URL資源特別方便。
如果安裝了Anaconda,requests就已經可用了。否則,需要在命令行下通過pip安裝:
pip install requests如果遇到Permission denied安裝失敗,請加上sudo重試。
import requests
res = requests.get('http://www.baidu.com/')
res.encoding = 'utf-8'
print(res.status_code)
print(res.text)
200
<!DOCTYPE html>
<!--STATUS OK--><html> <head><meta http-equiv=content-type content=text/html;charset=utf-8><meta http-equiv=X-UA-Compatible content=IE=Edge><meta content=always name=referrer><link rel=stylesheet type=text/css href=http://s1.bdstatic.com/r/www/cache/bdorz/baidu.min.css><title>百度一下,你就知道</title></head> <body link=#0000cc> <div id=wrapper> <div id=head> <div class=head_wrapper> <div class=s_form> <div class=s_form_wrapper> <div id=lg> <img hidefocus=true src=//www.baidu.com/img/bd_logo1.png width=270 height=129> </div> <form id=form name=f action=//www.baidu.com/s class=fm> <input type=hidden name=bdorz_come value=1> <input type=hidden name=ie value=utf-8> <input type=hidden name=f value=8> <input type=hidden name=rsv_bp value=1> <input type=hidden name=rsv_idx value=1> <input type=hidden name=tn value=baidu><span class="bg s_ipt_wr"><input id=kw name=wd class=s_ipt value maxlength=255 autocomplete=off autofocus></span><span class="bg s_btn_wr"><input type=submit id=su value=百度一下 class="bg s_btn"></span> </form> </div> </div> <div id=u1> <a href=http://news.baidu.com name=tj_trnews class=mnav>新聞</a> <a href=http://www.hao123.com name=tj_trhao123 class=mnav>hao123</a> <a href=http://map.baidu.com name=tj_trmap class=mnav>地圖</a> <a href=http://v.baidu.com name=tj_trvideo class=mnav>視頻</a> <a href=http://tieba.baidu.com name=tj_trtieba class=mnav>貼吧</a> <noscript> <a href=http://www.baidu.com/bdorz/login.gif?login&tpl=mn&u=http%3A%2F%2Fwww.baidu.com%2f%3fbdorz_come%3d1 name=tj_login class=lb>登錄</a> </noscript> <script>document.write('<a href="http://www.baidu.com/bdorz/login.gif?login&tpl=mn&u='+ encodeURIComponent(window.location.href+ (window.location.search === "" ? "?" : "&")+ "bdorz_come=1")+ '" name="tj_login" class="lb">登錄</a>');</script> <a href=https://www.baidu.com/more/ name=tj_briicon class=bri >更多產品</a> </div> </div> </div> <div id=ftCon> <div id=ftConw> <p id=lh> <a href=http://home.baidu.com>關於百度</a> <a href=http://ir.baidu.com>About Baidu</a> </p> <p id=cp>©2017 Baidu <a href=http://www.baidu.com/duty/>使用百度前必讀</a> <a href=http://jianyi.baidu.com/ class=cp-feedback>意見反饋</a> 京ICP證030173號 <img src=//www.baidu.com/img/gs.gif> </p> </div> </div> </div> </body> </html>
對於帶參數的URL,傳入一個dict作為params參數:
r = requests.get('https://www.douban.com/search', params={'q': 'python', 'cat': '1001'})無論響應是文本還是二進制內容,我們都可以用content屬性獲得bytes對象:
b'<!DOCTYPE html>\r\n<!--STATUS OK--><html> <head><meta http-equiv=content-type content=text/html;charset=utf-8><meta http-equiv=X-UA-Compatible content=IE=Edge><meta content=always name=referrer><link rel=stylesheet type=text/css href=http://s1.bdstatic.com/r/www/cache/bdorz/baidu.min.css><title>\xe7\x99\xbe\xe5\xba\xa6\xe4\xb8\x80\xe4\xb8\x8b\xef\xbc\x8c\xe4\xbd\xa0\xe5\xb0\xb1\xe7\x9f\xa5\xe9\x81\x93</title></head> <body link=#0000cc> <div id=wrapper> <div id=head> <div class=head_wrapper> <div class=s_form> <div class=s_form_wrapper> <div id=lg> <img hidefocus=true src=//www.baidu.com/img/bd_logo1.png width=270 height=129> </div> <form id=form name=f action=//www.baidu.com/s class=fm> <input type=hidden name=bdorz_come value=1> <input type=hidden name=ie value=utf-8> <input type=hidden name=f value=8> <input type=hidden name=rsv_bp value=1> <input type=hidden name=rsv_idx value=1> <input type=hidden name=tn value=baidu><span class="bg s_ipt_wr"><input id=kw name=wd class=s_ipt value maxlength=255 autocomplete=off autofocus></span><span class="bg s_btn_wr"><input type=submit id=su value=\xe7\x99\xbe\xe5\xba\xa6\xe4\xb8\x80\xe4\xb8\x8b class="bg s_btn"></span> </form> </div> </div> <div id=u1> <a href=http://news.baidu.com name=tj_trnews class=mnav>\xe6\x96\xb0\xe9\x97\xbb</a> <a href=http://www.hao123.com name=tj_trhao123 class=mnav>hao123</a> <a href=http://map.baidu.com name=tj_trmap class=mnav>\xe5\x9c\xb0\xe5\x9b\xbe</a> <a href=http://v.baidu.com name=tj_trvideo class=mnav>\xe8\xa7\x86\xe9\xa2\x91</a> <a href=http://tieba.baidu.com name=tj_trtieba class=mnav>\xe8\xb4\xb4\xe5\x90\xa7</a> <noscript> <a href=http://www.baidu.com/bdorz/login.gif?login&tpl=mn&u=http%3A%2F%2Fwww.baidu.com%2f%3fbdorz_come%3d1 name=tj_login class=lb>\xe7\x99\xbb\xe5\xbd\x95</a> </noscript> <script>document.write(\'<a href="http://www.baidu.com/bdorz/login.gif?login&tpl=mn&u=\'+ encodeURIComponent(window.location.href+ (window.location.search === "" ? "?" : "&")+ "bdorz_come=1")+ \'" name="tj_login" class="lb">\xe7\x99\xbb\xe5\xbd\x95</a>\');</script> <a href=https://www.baidu.com/more/ name=tj_briicon class=bri >\xe6\x9b\xb4\xe5\xa4\x9a\xe4\xba\xa7\xe5\x93\x81</a> </div> </div> </div> <div id=ftCon> <div id=ftConw> <p id=lh> <a href=http://home.baidu.com>\xe5\x85\xb3\xe4\xba\x8e\xe7\x99\xbe\xe5\xba\xa6</a> <a href=http://ir.baidu.com>About Baidu</a> </p> <p id=cp>©2017 Baidu <a href=http://www.baidu.com/duty/>\xe4\xbd\xbf\xe7\x94\xa8\xe7\x99\xbe\xe5\xba\xa6\xe5\x89\x8d\xe5\xbf\x85\xe8\xaf\xbb</a> <a href=http://jianyi.baidu.com/ class=cp-feedback>\xe6\x84\x8f\xe8\xa7\x81\xe5\x8f\x8d\xe9\xa6\x88</a> \xe4\xba\xacICP\xe8\xaf\x81030173\xe5\x8f\xb7 <img src=//www.baidu.com/img/gs.gif> </p> </div> </div> </div> </body> </html>\r\n'
requests的方便之處還在於,對於特定類型的響應,例如JSON,可以直接獲取:
r = requests.get('https://query.yahooapis.com/v1/public/yql?q=select%20*%20from%20weather.forecast%20where%20woeid%20%3D%202151330&format=json')需要傳入HTTP Header時,我們傳入一個dict作為headers參數:
r = requests.get('https://www.douban.com/', headers={'User-Agent': 'Mozilla/5.0 (iPhone; CPU iPhone OS 11_0 like Mac OS X) AppleWebKit'})要發送POST請求,只需要把get()方法變成post(),然後傳入data參數作為POST請求的數據:
r = requests.post('https://accounts.douban.com/login', data={'form_email': '[email protected]', 'form_password': '123456'})requests默認使用application/x-www-form-urlencoded對POST數據編碼。如果要傳遞JSON數據,可以直接傳入json參數:
params = {'key': 'value'}
r = requests.post(url, json=params) # 內部自動序列化為JSON類似的,上傳文件需要更復雜的編碼格式,但是requests把它簡化成files參數
upload_files = {'file': open('report.xls', 'rb')}
r = requests.post(url, files=upload_files)在讀取文件時,注意務必使用'rb'即二進制模式讀取,這樣獲取的bytes長度才是文件的長度。
把post()方法替換為put(),delete()等,就可以以PUT或DELETE方式請求資源。
除了能輕松獲取響應內容外,requests對獲取HTTP響應的其他信息也非常簡單。例如,獲取響應頭:
r.headersContent-Type': 'text/html; charset=utf-8', 'Transfer-Encoding': 'chunked', 'Content-Encoding': 'gzip', ...}
r.headers['Content-Type']'text/html; charset=utf-8'
requests對Cookie做了特殊處理,使得我們不必解析Cookie就可以輕松獲取指定的Cookie:
r.cookies['ts']結果
'example_cookie_12345' 要在請求中傳入Cookie,只需准備一個dict傳入cookies參數:
cs = {'token': '12345', 'status': 'working'}
r = requests.get(url, cookies=cs)
最後,要指定超時,傳入以秒為單位的timeout參數:
r = requests.get(url, timeout=2.5) # 2.5秒後超時
用requests獲取URL資源,就是這麼簡單!短短兩行代碼就完成了get/post請求,真實太方便了,不得不說python對基本功能的封裝真實做的太好了。程序員能解放自己干點別的東西了
————————————————
如果覺得本文對你有幫助,歡迎點贊,歡迎關注我,如果有補充歡迎評論交流,我將努力創作更多更好的文章。