自動抓取互聯網上的有價值的信息,
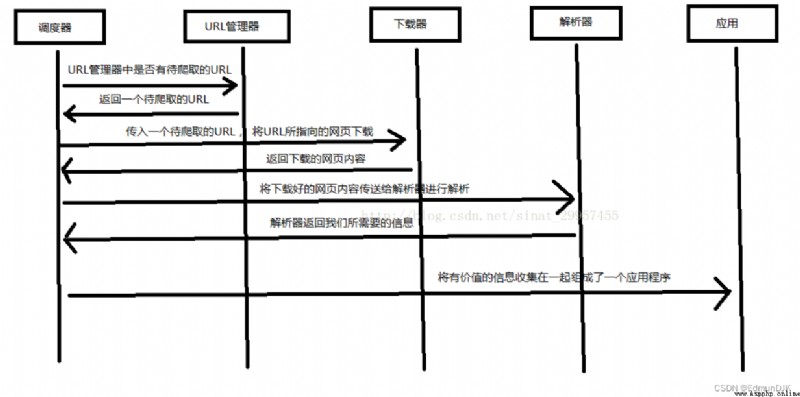
調度器、URL 管理器、下載器、解析器、應用程序
調度器 #相當於一台電腦的CPU,主要負責調度URL管理器、下載器、解析器之間的協調工作。
URL管理器 #包括待爬取的URL地址和已爬取的URL地址,防止重復抓取URL和循環抓取URL,實現URL管理器主要用三種方式,通過內存、數據 庫、緩存數據庫來實現
網頁下載器 #通過傳入一個URL地址來下載網頁,將網頁轉換成一個字符串,網頁下載器有urllib2(Python官方基礎模塊)包括需要登錄、 代理、和cookie,requests(第三方包)
解析器 #(html.parser,beautifulsoup,lxml)將一個網頁字符串進行解析,按要求提取出有用信息,可根據DOM樹的解析方式來解析
應用程序 #從網頁中提取的有用數據組成的一個應用。
pip install requests
import requests
'''查看庫中內容'''
print(dir(requests))
apparent_encoding #編碼方式
encoding #解碼 r.text 的編碼方式
headers #返回響應頭,字典格式
history #返回包含請求歷史的響應對象列表(url)
links #返回響應的解析頭鏈接
reason #響應狀態的描述,比如 "OK"
request #返回請求此響應的請求對象
url #返回響應的 URL
status_code #返回http的狀態碼,比如404和200(200是OK,404是Not Found)
close() #關閉與服務器的連接
content #返回響應的內容,以字節為單位
cookies #返回一個 CookieJar 對象,包含了從服務器發回的 cookie
elapsed #返回一個 timedelta 對象,包含了從發送請求到響應到達之間經過的時間量,可以用於測試響應速度。 比如 r.elapsed.microseconds 表示響應到達需要多少微秒。
is_permanent_redirect #如果響應是永久重定向的 url,則返回 True,否則返回 False
is_redirect #如果響應被重定向,則返回 True,否則返回 False
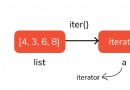
iter_content() #迭代響應
iter_lines() #迭代響應的行
json() #返回結果的JSON對象(結果需要以JSON格式編寫的,否則會引發錯誤) http://www.baidu.com/ajax/demo.json
next #返回重定向鏈中下一個請求的 PreparedRequest 對象
ok #檢查 "status_code" 的值,如果小於400,則返回 True,如果不小於 400,則返回 False
raise_for_status() #如果發生錯誤,方法返回一個 HTTPError 對象
text #返回響應的內容,unicode 類型數據
示例:
import requests
#發送請求
a = requests.get('http://www.baidu.com')
print(a.text)
#返回http的狀態碼
print(a.status_code)
delete(url, args) #發送 DELETE 請求到指定 url
get(url, params, args) #發送 GET 請求到指定 url
head(url, args) #發送 HEAD 請求到指定 url
patch(url, data, args) #發送 PATCH 請求到指定 url
post(url, data, json, args) #發送 POST 請求到指定 url
'''post() 方法可以發送 POST 請求到指定 url,一般格式如下:'''
requests.post(url, data={
key: value}, json={
key: value}, args)
put(url, data, args) #發送 PUT 請求到指定 url
request(method, url, args) #向指定的 url 發送指定的請求方法
示例:
a = requests.request('get','http://www.baidu.com/')
a = requests.post('http://www.baidu.com/xxxxx/1.txt')
requests.get(url)
requests.put(url)
requests.delete(url)
requests.head(url)
requests.options(url)
import requests
info = {
'frame':'信息'}
#設置請求頭
headers = {
"User-Agent": "Mozilla/5.0 (Windows NT 10.0; Win64; x64) AppleWebKit/537.36 (KHTML, like Gecko) Chrome/54.0.2840.99 Safari/537.36"}
# params 接收一個字典或者字符串的查詢參數,字典類型自動轉換為url編碼,不需要urlencode()
response = requests.get("https://www.baidu.com/", params = info, headers = headers)
# 查看響應狀態碼
print (response.status_code)
# 查看響應頭部字符編碼
print (response.encoding)
# 查看完整url地址
print (response.url)
# 查看響應內容,response.text 返回的是Unicode格式的數據
print(response.text)
requests.Request #表示的是請求對象 用於准備一個請求發送到服務器
requests.Response #表示的是響應對象 包含服務器對http請求的響應
requests.Session #表示的是請求會話 提供cookie持久性、連接池(創建和管理一個連接的緩沖池的技術)和配置
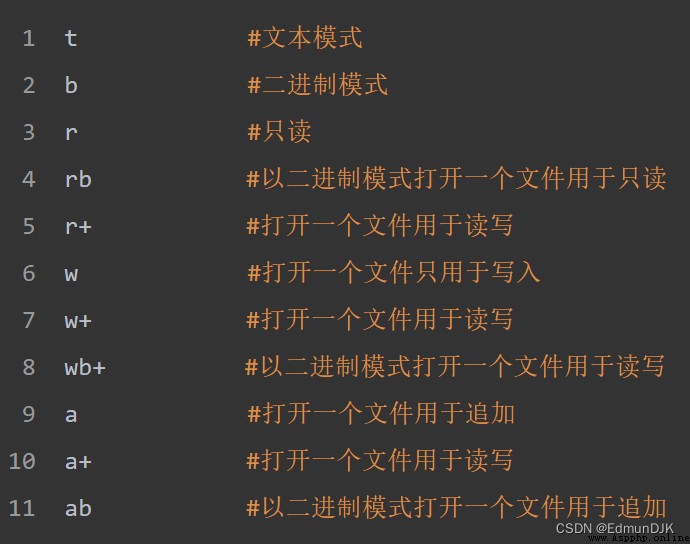
寫入已有文件
如需寫入已有的文件,必須向 open() 函數添加參數:
"a" - 追加 - 會追加到文件的末尾
"w" - 寫入 - 會覆蓋任何已有的內容
創建新文件
如需在 Python 中創建新文件,請使用 open() 方法,並使用以下參數之一:
"x" - 創建 - 將創建一個文件,如果文件存在則返回錯誤
"a" - 追加 - 如果指定的文件不存在,將創建一個文件
"w" - 寫入 - 如果指定的文件不存在,將創建一個文件
示例:(利用爬蟲進行文件寫入)
import requests
f = open("C:/Users/九澤/Desktop/demo.txt", "w",encoding='utf-8')
headers = {
"User-Agent": "Mozilla/5.0 (Windows NT 10.0; Win64; x64) AppleWebKit/537.36 (KHTML, like Gecko) Chrome/54.0.2840.99 Safari/537.36"}
response = requests.get("https://www.baidu.com/",headers = headers)
f.write(response.content.decode('utf-8'))
os 模塊提供了非常豐富的方法用來處理文件和目錄
菜鳥教程地址=========>>>>>>https://www.runoob.com/
由菜鳥教程提供
https://www.runoob.com/python/os-file-methods.html
示例:
import requests
import os
url="xxxxxxxxxxxxxxxxxxxxxxxxx"
compile="C:/Users/九澤/Desktop/imgs/"
path=compile + url.split('/')[-1]
try:
if not os.path.exists(compile):
os.mkdir(compile)
if not os.path.exists(path):
headers={

'User-Agent': 'Mozilla/5.0 (Macintosh; Intel Mac OS X 10_11_4) AppleWebKit/537.36 '
'(KHTML, like Gecko) Chrome/52.0.2743.116 Safari/537.36'
}
rr=requests.get(url=url,headers=headers)
with open(path,'wb') as f:
f.write(rr.content)
f.close()
print('文件保存成功!')
else:
print('文件已存在!!')
except:
print("爬取失敗!!!")
用來提取 xml 和 HTML 中的數據
獲取源碼中的 title 標簽內容
title.name #獲取標簽名
title.string #獲取string類型字符
title.parent.string #獲取父標簽頁
**示例:**獲取 html 的 p 標簽
import requests
from bs4 import BeautifulSoup
r = requests.get("http://www.baidu.com")
n = r.content
m = BeautifulSoup(n,"html.parser")
for i in m.find_all("p"): # find_all() 獲取源碼中所有的某一規定標簽內容
with open('C:/Users/九澤/Desktop/imgs/2.txt','w+',encoding='utf-8') as f:
f.write(str(i))
f.close()
**示例:**利用正則表達式輸出 p 標簽
import requests
import re
from bs4 import BeautifulSoup
r = requests.get("http://www.baidu.com")
n = r.content
m = BeautifulSoup(n,"html.parser")
for tag in m.find_all(re.compile("^p")):
with open('C:/Users/九澤/Desktop/imgs/1.txt','w+',encoding='utf-8') as f:
f.write(str(tag))
f.close()
print('爬取成功!')
#-*-coding:utf-8 -*-
import requests
import re
import time
headers ={

'User-Agent': 'Mozilla/5.0 (Macintosh; Intel Mac OS X 10_11_4) AppleWebKit/537.36 '
'(KHTML, like Gecko) Chrome/52.0.2743.116 Safari/537.36'
}
f=open('C:/Users/九澤/Desktop/imgs/dpcq.txt','a+')
def get_info(url):
res = requests.get(url,headers=headers)
if(res.status_code==200):
contents=re.findall('<p>(.*?)<p>',res.content.decode('utf-8'),re.S) #re.S 將特殊字符進行輸入
for content in contents:
f.write(content + '\n')
else:
pass
if __name__ =='__main__':
urls=['http://www.doupoxs.com/doupocangqiong/{}.html'.format(str(i)) for i in range(1,200)]
for url in urls:
get_info(url)
time.sleep(1)
f.close()
import requests
from bs4 import BeautifulSoup
r=requests.get("http://www.baidu.com")
m=r.content
n= BeautifulSoup(m,"html.parser")
print(n)
#!/usr/bin/python
# -*- coding: UTF-8 -*-
import re
from bs4 import BeautifulSoup
html_doc = """ <html><head><title>The Dormouse's story</title></head> <body> <p class="title"><b>The Dormouse's story</b></p> <p class="story">Once upon a time there were three little sisters; and their names were <a href="http://example.com/elsie" class="sister" id="link1">Elsie</a>, <a href="http://example.com/lacie" class="sister" id="link2">Lacie</a> and <a href="http://example.com/tillie" class="sister" id="link3">Tillie</a>; and they lived at the bottom of a well.</p> <p class="story">...</p> """
#創建一個BeautifulSoup解析對象
soup = BeautifulSoup(html_doc,"html.parser",from_encoding="utf-8")
#獲取所有的鏈接
links = soup.find_all('a')
print "所有的鏈接"
for link in links:
print link.name,link['href'],link.get_text()
print "獲取特定的URL地址"
link_node = soup.find('a',href="http://example.com/elsie")
print link_node.name,link_node['href'],link_node['class'],link_node.get_text()
print "正則表達式匹配"
link_node = soup.find('a',href=re.compile(r"ti"))
print link_node.name,link_node['href'],link_node['class'],link_node.get_text()
print "獲取P段落的文字"
p_node = soup.find('p',class_='story')
print p_node.name,p_node['class'],p_node.get_text()
urllib 庫用於操作網頁 URL,並對網頁的內容進行抓取處理
語法:
urllib.request.urlopen(url, data=None, [timeout, ]*, cafile=None, capath=None, cadefault=False, context=None)
 url: #url 地址。
data: #發送到服務器的其他數據對象,默認為 None。
timeout: #設置訪問超時時間。
cafile 和 capath: #cafile 為 CA 證書, capath 為 CA 證書的路徑,使用 HTTPS 需要用到。
cadefault: #已經被棄用。
context: #ssl.SSLContext類型,用來指定 SSL 設置
urllib.robotparser #解析robots.txt文件
urllib.request #打開/讀取url
urllib.parse #解析url
urllib.error #包含 urllib.request 拋出的異常。
readline() #讀取文件的一行內容
readlines() #讀取文件的全部內容,它會把讀取的內容賦值給一個列表變量
示例:
from urllib import request
file = request.urlopen('http://www.baidu.com')
data = file.read()
f= open('C:/Users/九澤/Desktop/2.html','wb')
f.write(data)
f.close()
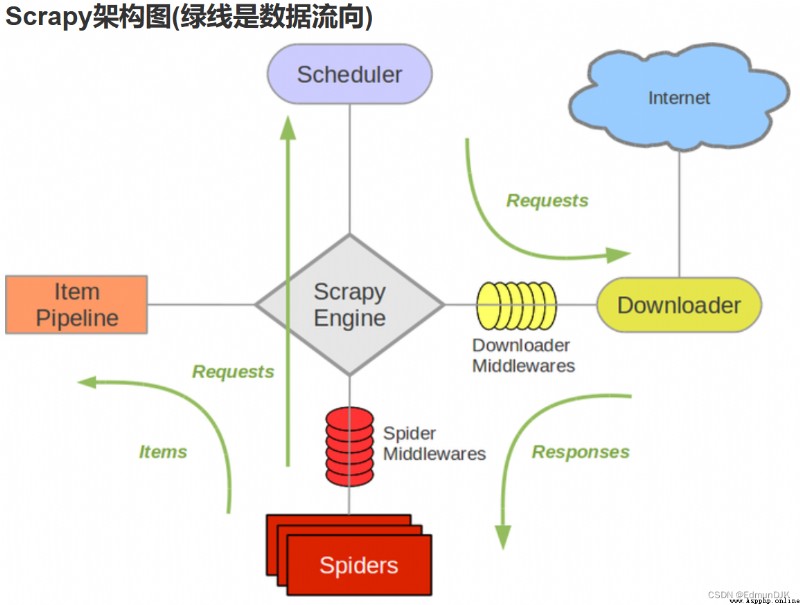
Scrapy 是用 Python 實現的一個為了爬取網站數據、提取結構性數據而編寫的應用框架。
Scrapy 常應用在包括數據挖掘,信息處理或存儲歷史數據等一系列的程序中。
通常我們可以很簡單的通過 Scrapy 框架實現一個爬蟲,抓取指定網站的內容或圖片。
引擎 #負責Spider、ItemPipeline、Downloader、Scheduler中間的通訊,信號、數據傳遞等
調度器 #負責接受引擎發送過來的Request請求,並按照一定的方式進行整理排列,入隊,當引擎需要時,交還給引擎
下載器 #負責下載引擎發送的所有Requests請求,並將其獲取到的Responses交還給引擎,由引擎交給Spider來處理
爬蟲 #負責處理所有Responses,從中分析提取數據,獲取Item字段需要的數據,並將需要跟進的URL提交給引擎,再次進入調度器
管道 #負責處理Spider中獲取到的Item,並進行進行後期處理(詳細分析、過濾、存儲等)的地方
中間件 #一個可以自定擴展和操作引擎和Spider中間通信的功能組件
下載中間件 #你可以當作是一個可以自定義擴展下載功能的組件
制作Scrapy的步驟:
新建項目 (scrapy startproject xxx):新建一個新的爬蟲項目
明確目標 (編寫items.py):明確你想要抓取的目標
制作爬蟲 (spiders/xxspider.py):制作爬蟲開始爬取網頁
存儲內容 (pipelines.py):設計管道存儲爬取內容
scrapy startproject mySpider #創建名為mySpider的新項目
scrapy genspider mySpider
mySpider/
scrapy.cfg
mySpider/
__init__.py
items.py
pipelines.py
settings.py
spiders/
__init__.py
...
scrapy.cfg: #項目的配置文件。
mySpider/: #項目的Python模塊,將會從這裡引用代碼。
mySpider/items.py: #項目的目標文件。
mySpider/pipelines.py: #項目的管道文件。
mySpider/settings.py: #項目的設置文件。
mySpider/spiders/: #存儲爬蟲代碼目錄。
打開 mySpider 目錄下的 items.py
Item 定義結構化數據字段,用來保存爬取到的數據,有點像 Python 中的 dict,但是提供了一些額外的保護減少錯誤。
可以通過創建一個 scrapy.Item 類, 並且定義類型為 scrapy.Field 的類屬性來定義一個 Item(可以理解成類似於 ORM 的映射關系)。
接下來,創建一個 ItcastItem 類,和構建 item 模型(model)
import scrapy
class ItcastItem(scrapy.Item):
name = scrapy.Field()
title = scrapy.Field()
info = scrapy.Field()
在當前目錄下輸入命令,將在 mySpider/spider 目錄下創建一個名為 itcast 的爬蟲,並指定爬取域的范圍:
scrapy genspider itcast "itcast.cn"
打開 mySpider/spider目錄裡的 itcast.py,默認增加了下列代碼:
import scrapy
class ItcastSpider(scrapy.Spider):
name = "itcast"
allowed_domains = ["www.itcast.cn"]
start_urls = (
'http://www.itcast.cn/channel/teacher.shtml',
)
def parse(self, response):
pass
將start_urls的值修改為需要爬取的第一個url:
start_urls = ("http://www.itcast.cn/channel/teacher.shtml",)
修改parse()方法:
 def parse(self, response):
filename = "teacher.html"
open(filename, 'w').write(response.body)
然後運行,在mySpider目錄下執行:
scrapy crawl itcast
指定保存內容的編碼格式
import sys
reload(sys)
sys.setdefaultencoding("utf-8")
爬取整個網頁完畢,接下來的就是的取過程了,首先觀察頁面源碼:
<div class="li_txt">
<h3> xxx </h3>
<h4> xxxxx </h4>
<p> xxxxxxxx </p>
xpath 方法,我們只需要輸入的 xpath 規則就可以定位到相應 html 標簽節點:
參數:
/html/head/title: 選擇HTML文檔中 <head> 標簽內的 <title> 元素
/html/head/title/text(): 選擇上面提到的 <title> 元素的文字
//td: 選擇所有的 <td> 元素
//div[@class="mine"]: 選擇所有具有 class="mine" 屬性的 div 元素
修改 itcast.py 文件代碼如下:
# -*- coding: utf-8 -*-
import scrapy
class Opp2Spider(scrapy.Spider):
name = 'itcast'
allowed_domains = ['www.itcast.cn']
start_urls = ['http://www.itcast.cn/channel/teacher.shtml']
def parse(self, response):
# 獲取網站標題
context = response.xpath('/html/head/title/text()')
# 提取網站標題
title = context.extract_first()
print(title)
pass
執行以下命令:
scrapy crawl itcast
在 mySpider/items.py 裡定義了一個 ItcastItem 類。 這裡引入進來:
from mySpider.items import ItcastItem
然後將我們得到的數據封裝到一個 ItcastItem 對象中,可以保存每個的屬性:
import scrapy
from mySpider.items import ItcastItem
def parse(self, response):
#open("teacher.html","wb").write(response.body).close()
# 存放老師信息的集合
items = []
for each in response.xpath("//div[@class='li_txt']"):
# 將我們得到的數據封裝到一個 `ItcastItem` 對象
item = ItcastItem()
#extract()方法返回的都是unicode字符串
name = each.xpath("h3/text()").extract()
title = each.xpath("h4/text()").extract()
info = each.xpath("p/text()").extract()
#xpath返回的是包含一個元素的列表
item['name'] = name[0]
item['title'] = title[0]
item['info'] = info[0]
items.append(item)
# 直接返回最後數據
return items
scrapy 保存信息的最簡單的方法主要有四種,-o 輸出指定格式的文件,命令如下:
scrapy crawl itcast -o teachers.json
json lines 格式,默認為 Unicode 編碼
scrapy crawl itcast -o teachers.jsonl
csv 逗號表達式,可用Excel打開
scrapy crawl itcast -o teachers.csv
xml 格式
scrapy crawl itcast -o teachers.csv
name = "" :這個爬蟲的識別名稱,必須是唯一的,在不同的爬蟲必須定義不同的名字。
allow_domains = [] 是搜索的域名范圍,也就是爬蟲的約束區域,規定爬蟲只爬取這個域名下的網頁,不存在的URL會被忽略。
start_urls = () :爬取的URL元祖/列表。爬蟲從這裡開始抓取數據,所以,第一次下載的數據將會從這些urls開始。其他子URL將會從這些 起始URL中繼承性生成。
parse(self, response) :解析的方法,每個初始URL完成下載後將被調用,調用的時候傳入從每一個URL傳回的Response對象來作為唯一參數,主要作用如下:
1.負責解析返回的網頁數據(response.body),提取結構化數據(生成item)
2.生成需要下一頁的URL請求。
(這個沒有成功所以沒有具體的爬取出的內容)換一個
我們從該網址([https://so.gushiwen.cn/shiwenv_4c5705b99143.aspx](javascript:void(0)))爬取這首詩的標題和詩句,然後保存在我們的文件夾中,
scrapy startproject poems
scrapy genspider verse www.xxx.com
打開爬蟲文件’verse‘,更改需要爬取的網頁地址
import scrapy
class VerseSpider(scrapy.Spider):
name = 'verse'
# allowed_domains = ['www.xxx.com']
start_urls = ['www.xxx.com']
更改parse解析部分,對獲取到的數據(response)進行數據解析,所用到的解析方式為xpath解析,方法與requests發送請求的解析方式大同小異,首先在找到我們需要解析的部分內容,並填寫相應的代碼(如下圖)。我們發現,與requests發送請求的解析方式不同的是,在原有基礎上加上extract方法,和join方法才能獲取文本信息
title = response.xpath('//div[@class="cont"]/h1/text()').extract()
content = response.xpath('//div[@id=contson4c5705b99143]/text()').extract()
title = ''.join(content)
我們要保存數據就需要parse模塊有返回值,我們先新建一個空列表data,然後我們將title和content放入字典中並添加到列表中
import scrapy
class VerseSpider(scrapy.Spider):
name = 'verse'
allowed_domains = ['https://so.gushiwen.cn/']
start_urls = ['https://so.gushiwen.cn/shiwenv_4c5705b99143.aspx/']
def parse(self, response):
data = []
title = response.xpath('//*[@id="sonsyuanwen"]/div[1]/h1').extract()
content = response.xpath('//div[@id=contson4c5705b99143]/text()').extract()
title = ''.join(title)
content=''.join(content)
dic = {

'title': title, 'content': content
}
data.append(dic)
return data
依舊用指令進行保存:scrapy +crawl+爬蟲文件名±o+保存路徑,最終結果如下圖:
scrapy crawl verse -o ./verse.csv