In the past two years, the requirements and difficulties of graduation design and graduation defense have been increasing , The traditional design topic lacks innovation and highlights , Often fail to meet the requirements of graduation defense , In the past two years, younger students and younger students have been telling their elders that the project system they have built cannot meet the requirements of teachers .
In order that everyone can pass BiShe smoothly and with the least energy , Senior students share high-quality graduation design projects , What I want to share today is
Implementation of face age and gender recognition algorithm based on deep learning
The senior here gives a comprehensive score for a topic ( Each full marks 5 branch )
🧿 Topic selection guidance , Project sharing :
https://gitee.com/dancheng-senior/project-sharing-1/blob/master/%E6%AF%95%E8%AE%BE%E6%8C%87%E5%AF%BC/README.md
Age and gender are important biological characteristics of human beings , Can be applied to a variety of scenarios , Such as age-based human-computer interaction system 、 Personalized marketing in e-commerce 、 Age filtering in criminal case investigation . However, image-based age classification and gender detection are affected by many factors in real scenes , Such as the living and working environment the day after tomorrow , And the complex light environment in the face image 、 Posture 、 Factors such as the expression and the quality of the image itself will make it difficult to recognize .
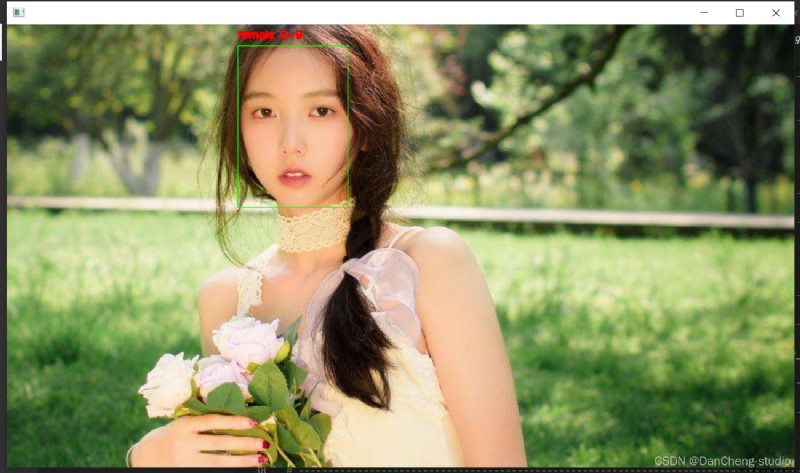
The project designed by the senior Convolutional neural network based on deep learning , utilize Tensorflow and Keras And other tools to achieve image age and gender detection .
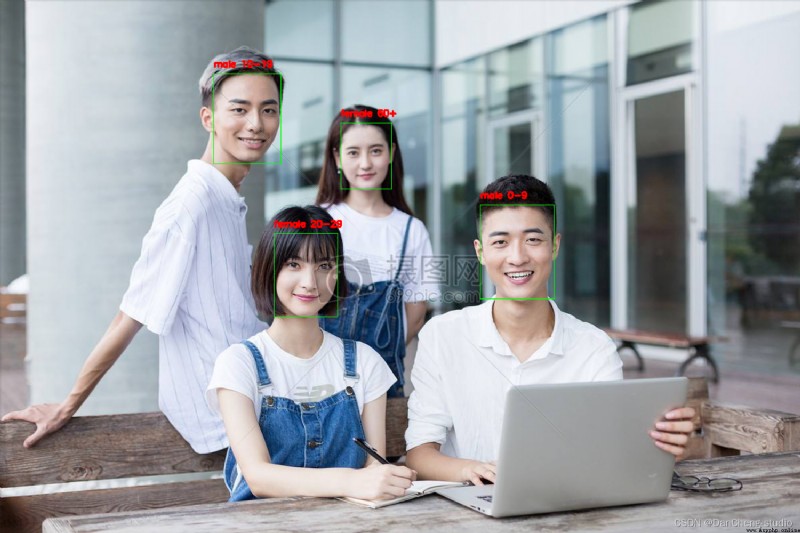
Inspired by the interconnection pattern of human brain synaptic structures , Neural network is an important part of artificial intelligence , Process information in a distributed way , It can solve complex nonlinear problems , In terms of structure , Mainly including the input layer 、 Hidden layer 、 The output layer is composed of three structures . Each node is called a neuron , There are corresponding weight parameters , Some neurons are biased , When entering data x After entering , For passing neurons, we will do something similar :y=w*x+b Calculation of linear function of , among w Is the weight of the neuron at this position ,b Is the offset function . Through the logical operation of each layer of neurons , Input the result into the activation function of the last layer , Finally, we get the output output.
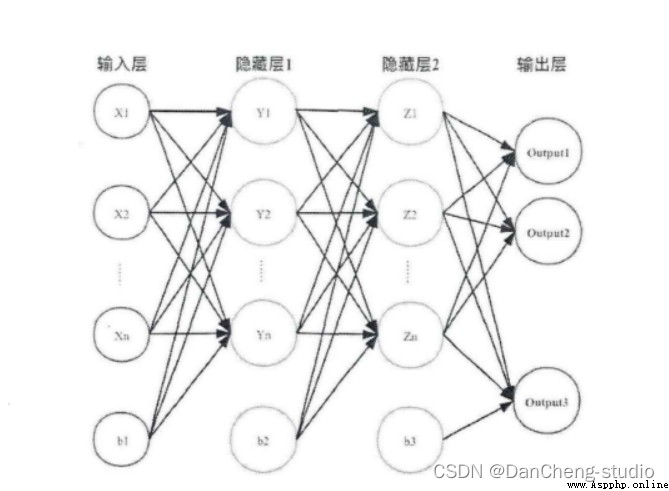
Convolution kernel is equivalent to a sliding window , Schematic diagram 3x3 The convolution kernels of size are crossed in turn 6x6 The corresponding area in the input data of size , And slide over the region with the convolution kernel to do matrix point multiplication , Fill the results in the corresponding positions in order to get the right 4x4 Convolution characteristic graph of size , For example, draw to the upper right corner 3x3 When the area is circled , There will be 0x0+1x1+2x1+1x1+0x0+1x1+1x0+2x0x1x1=6 Calculation operation of , And fill the obtained value into the upper right corner of the convolution feature .
Pooling operation is also called downsampling , Extracting the main features of the network can achieve the effect of spatial invariance at the same time , Effectively reduce network parameters , Therefore, the computational complexity of the network is simplified , Prevent over fitting phenomenon . In practice, two methods of maximum pooling or average pooling are often used , As shown in the figure below . Although pooling can effectively reduce the number of parameters , But excessive pooling will also lead to the loss of some picture details , Therefore, when building the network, we should adjust the pooling operation according to the actual situation .

Activation functions can be roughly divided into two types , In the early stage of convolutional neural network , Use the more traditional saturation activation function , It mainly includes sigmoid function 、tanh Functions, etc ; With the development of neural network , Researchers found the weakness of saturation activation function , And for its potential problems , The unsaturated activation function is studied , It mainly contains ReLU Functions and their variants
Play a role in the whole network structure “ classifier ” The role of , Through the front convolution 、 Pooling layer 、 After activating the function layer , The network has carried out feature extraction on the original data of the input picture , And map it to the hidden feature space , The full connection layer will be responsible for mapping the learned features from the hidden feature space to the sample tag space , Generally, it includes the location information of the extracted feature on the picture and the probability of the category to which the feature belongs . Visualize the information of hidden feature space , It is also an important part of image processing .
class CNN(tf.keras.Model):
def __init__(self):
super().__init__()
self.conv1 = tf.keras.layers.Conv2D(
filters=32, # Convolution layer neurons ( Convolution kernel ) number
kernel_size=[5, 5], # Feel the size of the field
padding='same', # padding Strategy (vaild or same)
activation=tf.nn.relu # Activation function
)
self.pool1 = tf.keras.layers.MaxPool2D(pool_size=[2, 2], strides=2)
self.conv2 = tf.keras.layers.Conv2D(
filters=64,
kernel_size=[5, 5],
padding='same',
activation=tf.nn.relu
)
self.pool2 = tf.keras.layers.MaxPool2D(pool_size=[2, 2], strides=2)
self.flatten = tf.keras.layers.Reshape(target_shape=(7 * 7 * 64,))
self.dense1 = tf.keras.layers.Dense(units=1024, activation=tf.nn.relu)
self.dense2 = tf.keras.layers.Dense(units=10)
def call(self, inputs):
x = self.conv1(inputs) # [batch_size, 28, 28, 32]
x = self.pool1(x) # [batch_size, 14, 14, 32]
x = self.conv2(x) # [batch_size, 14, 14, 64]
x = self.pool2(x) # [batch_size, 7, 7, 64]
x = self.flatten(x) # [batch_size, 7 * 7 * 64]
x = self.dense1(x) # [batch_size, 1024]
x = self.dense2(x) # [batch_size, 10]
output = tf.nn.softmax(x)
return output
keras It is a development software specially used for deep learning . Its programming language is the most popular python Language , Integrated packaging CNTK,Tensorflow perhaps Theano The deep learning framework provides deep modeling for the computer background , Easy to learn , The function of efficient programming , Data processing support GPU and CPU, It really realizes the seamless switching between the two . It is keras It has such special functions , So its advantages are as follows :
Keras Deep learning models can be divided into two types : One is the sequence model , One is a general model . The difference between them is that they have different network topologies . Sequence model is an example of general model , Generally, it is widely used . The connection between each layer is linear , And any available elements can be added between the two adjacent layers to build a neural network . The general model is designed for complex models , So it is often used in complex neural networks . In the process of using, the elements and structures of the application interface model usually need to be defined by functionalization . The general process of its definition : The first is the definition of the input layer , Then there is the definition of other layers and elements , Finally to the output layer , And take this definition process as a model , Run and Commission .
Keras Many objects are predefined for the purpose of constructing its network structure , It is with so many predefined objects that Keras It is very convenient to use . At most, regularization is used in research 、 Activate the function and initialize the object .
Regularization is one of the most commonly used and effective means to prevent over fitting in modeling . The means used in neural networks are weight parameters 、 Offset term and activation function , The corresponding codes are kernel_regularizier、bias_regularizier as well as activity_regularizier.
The selection of activation function in network definition is very important . For convenience Keras Predefined rich activation functions , This is to adapt to different network structures . There are two ways to use active objects : One is to define an activation function layer separately , Second, Tongli uses the activation options of the front-end layer to define the activation function .
The initialization object is a randomly given network layer activation function kernel_initializer or bias_initializer The starting value of . The good or bad weight initialization value directly affects the training time of the model .
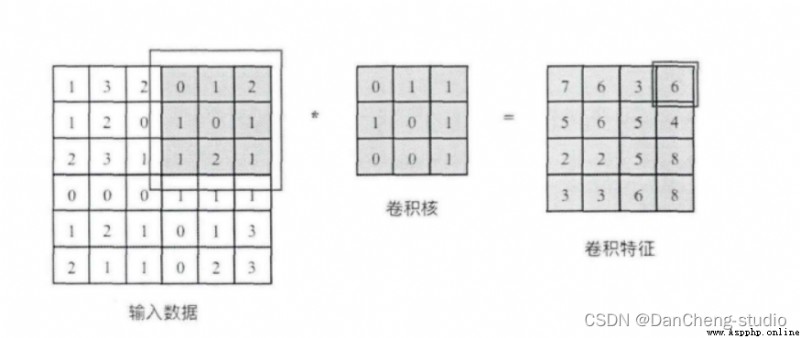
stay Keras In the frame , Different network layers (Layer) The specific structure of neural network is defined . Commonly used in actual network construction Core Layer、Convolution Layer、Pooling Layer、Emberdding Layer etc. .
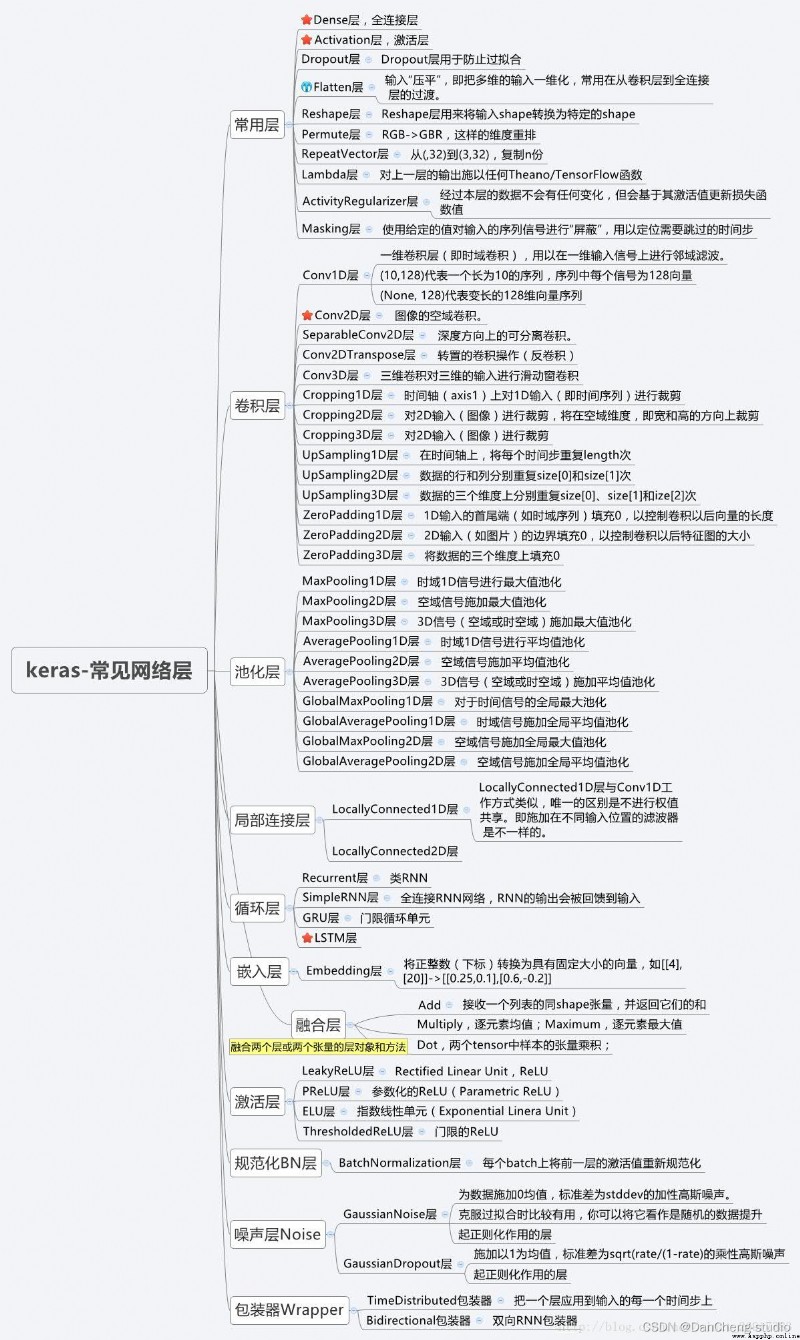
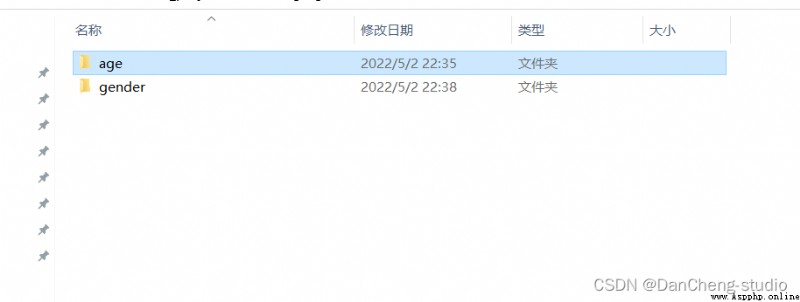
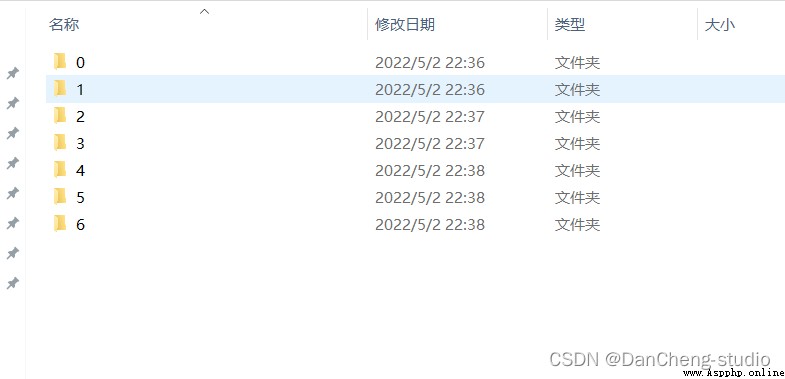
The project divides the collected photos into men and women ;‘0-9’, ‘10-19’, ‘20-29’, ‘30-39’, ‘40-49’, ‘50-59’, ‘60+’, Seven age groups ; Extract the pictures of gender and age respectively , And save it to two folders of gender and age , The structure is as follows :

# ----------------------------------------------------------------------------------------------------------------------
# Import some third-party packages
# ----------------------------------------------------------------------------------------------------------------------
import tensorflow as tf
from nets import net
EPOCHS = 40
BATCH_SIZE = 32
image_height = 128
image_width = 128
model_dir = "./models/age.h5"
train_dir = "./data/age/train/"
test_dir = "./data/age/test/"
def get_datasets():
train_datagen = tf.keras.preprocessing.image.ImageDataGenerator(
rescale=1.0 / 255.0
)
train_generator = train_datagen.flow_from_directory(train_dir,
target_size=(image_height, image_width),
color_mode="rgb",
batch_size=BATCH_SIZE,
shuffle=True,
class_mode="categorical")
test_datagen = tf.keras.preprocessing.image.ImageDataGenerator(
rescale=1.0 /255.0
)
test_generator = test_datagen.flow_from_directory(test_dir,
target_size=(image_height, image_width),
color_mode="rgb",
batch_size=BATCH_SIZE,
shuffle=True,
class_mode="categorical"
)
train_num = train_generator.samples
test_num = test_generator.samples
return train_generator, test_generator, train_num, test_num
# ----------------------------------------------------------------------------------------------------------------------
# Network initialization --- net.CNN(num_classes=7)
# model.compile --- The training parameters of neural network are set --- tf.keras.losses.categorical_crossentropy --- Loss function ( Cross entropy )
# tf.keras.optimizers.Adam(learning_rate=0.001) --- The choice of optimizer , And the setting of learning rate
# metrics=['accuracy'] --- List of metrics to be evaluated by the model during training and testing
# return model --- Return the initialized model
# ----------------------------------------------------------------------------------------------------------------------
def get_model():
model = net.CNN(num_classes=7)
model.compile(loss=tf.keras.losses.categorical_crossentropy,
optimizer=tf.keras.optimizers.Adam(lr=0.001),
metrics=['accuracy'])
return model
if __name__ == '__main__':
train_generator, test_generator, train_num, test_num = get_datasets()
model = get_model()
model.summary()
tensorboard = tf.keras.callbacks.TensorBoard(log_dir='./log/age/')
callback_list = [tensorboard]
model.fit_generator(train_generator,
epochs=EPOCHS,
steps_per_epoch=train_num // BATCH_SIZE,
validation_data=test_generator,
validation_steps=test_num // BATCH_SIZE,
callbacks=callback_list)
model.save(model_dir)
# ----------------------------------------------------------------------------------------------------------------------
# ----------------------------------------------------------------------------------------------------------------------
# Import some third-party packages
# ----------------------------------------------------------------------------------------------------------------------
import tensorflow as tf
from nets import net
EPOCHS = 20
BATCH_SIZE = 32
image_height = 128
image_width = 128
model_dir = "./models/gender.h5"
train_dir = "./data/gender/train/"
test_dir = "./data/gender/test/"
def get_datasets():
train_datagen = tf.keras.preprocessing.image.ImageDataGenerator(
rescale=1.0 / 255.0
)
train_generator = train_datagen.flow_from_directory(train_dir,
target_size=(image_height, image_width),
color_mode="rgb",
batch_size=BATCH_SIZE,
shuffle=True,
class_mode="categorical")
test_datagen = tf.keras.preprocessing.image.ImageDataGenerator(
rescale=1.0 /255.0
)
test_generator = test_datagen.flow_from_directory(test_dir,
target_size=(image_height, image_width),
color_mode="rgb",
batch_size=BATCH_SIZE,
shuffle=True,
class_mode="categorical"
)
train_num = train_generator.samples
test_num = test_generator.samples
return train_generator, test_generator, train_num, test_num
def get_model():
model = net.CNN(num_classes=2)
model.compile(loss=tf.keras.losses.categorical_crossentropy,
optimizer=tf.keras.optimizers.Adam(lr=0.001),
metrics=['accuracy'])
return model
if __name__ == '__main__':
train_generator, test_generator, train_num, test_num = get_datasets()
model = get_model()
model.summary()
tensorboard = tf.keras.callbacks.TensorBoard(log_dir='./log/gender/')
callback_list = [tensorboard]
model.fit_generator(train_generator,
epochs=EPOCHS,
steps_per_epoch=train_num // BATCH_SIZE,
validation_data=test_generator,
validation_steps=test_num // BATCH_SIZE,
callbacks=callback_list)
model.save(model_dir)
# ----------------------------------------------------------------------------------------------------------------------

# ----------------------------------------------------------------------------------------------------------------------
# Load the basic library
# ----------------------------------------------------------------------------------------------------------------------
import tensorflow as tf
from PIL import Image
import numpy as np
import cv2
import os
# ----------------------------------------------------------------------------------------------------------------------
# tf.keras.models.load_model('./model/age.h5') --- Load age model
# tf.keras.models.load_model('./model/gender.h5') --- Load gender model
# ----------------------------------------------------------------------------------------------------------------------
model_age = tf.keras.models.load_model('./models/age.h5')
model_gender = tf.keras.models.load_model('./models/gender.h5')
# ----------------------------------------------------------------------------------------------------------------------
# Category name
# ----------------------------------------------------------------------------------------------------------------------
classes_age = ['0-9', '10-19', '20-29', '30-39', '40-49', '50-59', '60+']
classes_gender = ['female', 'male']
# ----------------------------------------------------------------------------------------------------------------------
# cv2.dnn.readNetFromCaffe --- Loading face detection model
# ----------------------------------------------------------------------------------------------------------------------
net = cv2.dnn.readNetFromCaffe('./models/deploy.prototxt.txt', './models/res10_300x300_ssd_iter_140000.caffemodel')
# ----------------------------------------------------------------------------------------------------------------------
# os.listdir('./images/') --- Get a list of folders
# ----------------------------------------------------------------------------------------------------------------------
files = os.listdir('./images/')
# ----------------------------------------------------------------------------------------------------------------------
# Traversal information
# ----------------------------------------------------------------------------------------------------------------------
for file in files:
# ------------------------------------------------------------------------------------------------------------------
# image_path = './images/' + file --- Splice the image file path
# cv2.imread(image_path) --- Use opencv Read the picture
# ------------------------------------------------------------------------------------------------------------------
image_path = './images/' + file
print(image_path)
image = cv2.imread(image_path)
# ------------------------------------------------------------------------------------------------------------------
# (h, w) = image.shape[:2] --- Get the height and width of the image
# cv2.dnn.blobFromImage --- With DNN Loading images
# net.setInput(blob) -- Set the input of the network
# detections = net.forward() --- Network pre phase propagation process
# ------------------------------------------------------------------------------------------------------------------
(h, w) = image.shape[:2]
blob = cv2.dnn.blobFromImage(cv2.resize(image, (300, 300)), 1.0, (300, 300), 127.5)
net.setInput(blob)
detections = net.forward()
# ------------------------------------------------------------------------------------------------------------------
# for i in range(0, detections.shape[2]): --- Traverse the detection results
# ------------------------------------------------------------------------------------------------------------------
for i in range(0, detections.shape[2]):
# --------------------------------------------------------------------------------------------------------------
# confidence = detections[0, 0, i, 2] Get the accuracy of detection
# --------------------------------------------------------------------------------------------------------------
confidence = detections[0, 0, i, 2]
# --------------------------------------------------------------------------------------------------------------
# if confidence > 0.85: --- Judgment of confidence
# --------------------------------------------------------------------------------------------------------------
if confidence > 0.85:
# ----------------------------------------------------------------------------------------------------------
# detections[0, 0, i, 3:7] * np.array([w, h, w, h]) --- Get the information of the detection box
# (startX, startY, endX, endY) = box.astype("int") --- Decompose the information into x,y, And... In the lower right corner x,y
# cv2.rectangle --- Frame your face
# ----------------------------------------------------------------------------------------------------------
box = detections[0, 0, i, 3:7] * np.array([w, h, w, h])
(startX, startY, endX, endY) = box.astype("int")
cv2.rectangle(image, (startX, startY), (endX, endY), (0, 255, 0), 1)
# ----------------------------------------------------------------------------------------------------------
# Extract part of the face
# ----------------------------------------------------------------------------------------------------------
roi = image[startY-15:endY+15, startX-15:endX+15]
# ----------------------------------------------------------------------------------------------------------
# Image.fromarray(cv2.cvtColor(roi, cv2.COLOR_BGR2RGB)) --- take opencv special trip PIL Formatted data
# img.resize((128, 128)) --- Change the size of the image
# np.array(img).reshape(-1, 128, 128, 3).astype('float32') / 255 --- Change the shape of the data , And normalization
# ----------------------------------------------------------------------------------------------------------
img = Image.fromarray(cv2.cvtColor(roi, cv2.COLOR_BGR2RGB))
img = img.resize((128, 128))
img = np.array(img).reshape(-1, 128, 128, 3).astype('float32') / 255
# ----------------------------------------------------------------------------------------------------------
# Call the age recognition model to get the detection results
# ----------------------------------------------------------------------------------------------------------
prediction_age = model_age.predict(img)
final_prediction_age = [result.argmax() for result in prediction_age][0]
# ----------------------------------------------------------------------------------------------------------
# Call the gender recognition model to get the detection results
# ----------------------------------------------------------------------------------------------------------
prediction_gender = model_gender.predict(img)
final_prediction_gender = [result.argmax() for result in prediction_gender][0]
# ----------------------------------------------------------------------------------------------------------
# Splice the identified information , And then use cv2.putText Show
# ----------------------------------------------------------------------------------------------------------
res = classes_gender[final_prediction_gender] + ' ' + classes_age[final_prediction_age]
y = startY - 10 if startY - 10 > 10 else startY + 10
cv2.putText(image, str(res), (startX, y), cv2.FONT_HERSHEY_SIMPLEX, 0.45, (0, 0, 255), 2)
# ------------------------------------------------------------------------------------------------------------------
# Show
# ------------------------------------------------------------------------------------------------------------------
cv2.imshow('', image)
if cv2.waitKey(0) & 0xFF == ord('q'):
break
🧿 Topic selection guidance , Project sharing :
https://gitee.com/dancheng-senior/project-sharing-1/blob/master/%E6%AF%95%E8%AE%BE%E6%8C%87%E5%AF%BC/README.md