ImageAI是一個python的庫,它能使開發人員用簡單幾行代碼構建具有深度學習和計算機視覺功能的應用程序和系統。它是由Moses Olafenwa和John Olafenwa兩位開發並維護。
具體git地址:https://github.com/OlafenwaMoses/ImageAI
幾年前介紹過ImageAI的使用方法,但是很多小伙伴都碰到了各種依賴包的版本等很多問題 導致無法正常運行
今天再一次在git上看更新時 發現了官方將其打包 方便下載使用 並且取名DeepStack
文檔:https://docs.deepstack.cc/index.html
我將用幾篇文章一次來簡單介紹一下DeepStack的使用
較ImageAI更加方便
官方提供了多種環境的下載方式
這裡介紹CPU版本的兩種方式
docker是近幾年非常火的容器工具,它依賴於 Linux 內核環境。
這裡不做過多介紹,網上可以找到安裝教程。
docker pull deepquestai/deepstack
只需要將deepstack拉下來就可以 稍稍有點大 需要等待一會兒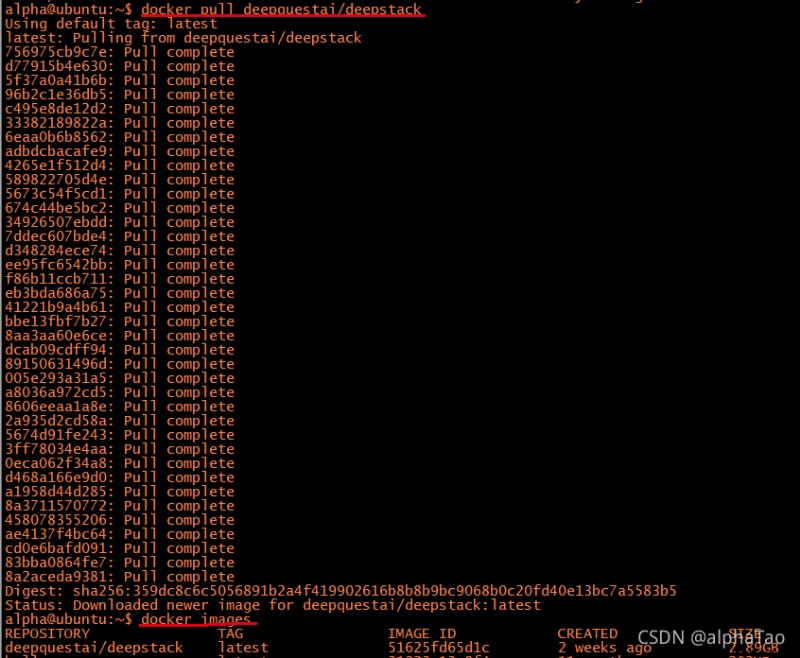
地址:https://docs.deepstack.cc/windows/
正常下載安裝包後點擊安裝即可
安裝好後記得在環境變量中加入安裝的地址
linux
docker run -e VISION-FACE=True -v localstorage:/datastore -p 8080:5000 deepquestai/deepstack
【說明】
-e VISION-FACE=True 開啟有關face的api
-v localstorage:/datastore 指定DeepStack將數據存儲在哪裡
-p 8080:5000 指定了可以通過8081端口訪問DeepStack
windows
deepstack --VISION-FACE True --PORT 8080
安裝啟動後即可通過python調用DeepStack
官方提供了兩種方式1.通過url 2.通過發布的py包
如果需要使用py包 需要先進行下載
pip install deepstack-sdk --upgrade
接下來將介紹人臉檢測 人臉匹配 人臉比較
兩種方式我都會介紹
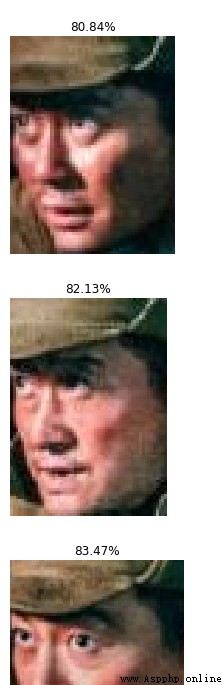
import requests
from PIL import Image
import matplotlib.pyplot as plt
def useUrl():
host = "http://192.168.0.101:8080"
##load需要檢測的圖片
image_data = open("jz.jpg","rb").read()
image = Image.open("jz.jpg").convert("RGB")
## 調用http://192.168.0.101:8080/v1/vision/face 對圖片中的人臉進行檢測
response = requests.post(host+"/v1/vision/face",files={
"image":image_data}).json()
## 打印檢測出來的人臉
for face in response["predictions"]:
y_max = int(face["y_max"])
y_min = int(face["y_min"])
x_max = int(face["x_max"])
x_min = int(face["x_min"])
conf = face["confidence"]
confstr = format(conf*100,'.2f') ## 人臉的概率
cropped = image.crop((x_min,y_min,x_max,y_max))
plt.imshow(cropped)
plt.axis('off')
plt.title(confstr+"%")
plt.show()
輸入圖片及結果
from deepstack_sdk import ServerConfig, Face
def pythonsdk():
## 連接DeepStack
config = ServerConfig("http://192.168.0.101:8080")
face = Face(config)
##檢測圖片中所有人臉
response = face.detectFace("jz.jpg",output="jz_output.jpg")
這裡的結果會顯示在圖片中
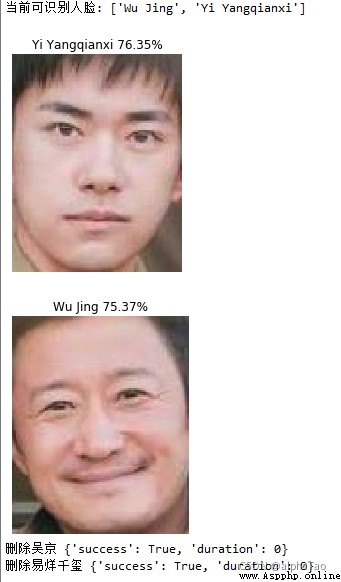
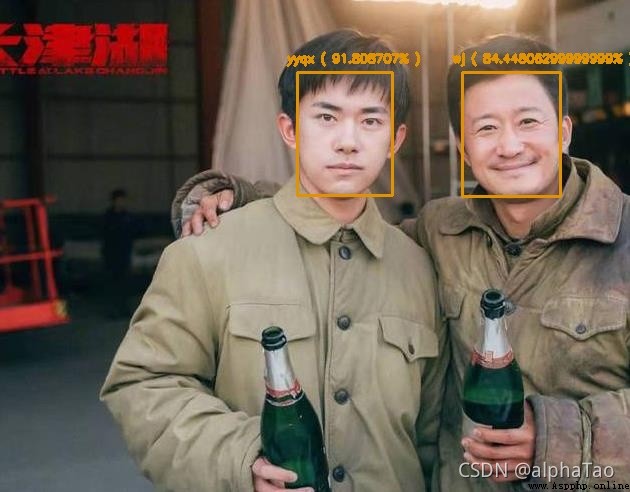
該功能需要事先准備好打了標簽的人臉
輸入測試圖片後 將會把圖片中的人臉進行匹配
功能說明:你准備了很多吳京的照片 然後在其它吳京與別人的合影中能找出吳京
這裡我使用了 吳京和易烊千玺的照片
[注:] 因為打標簽的人臉只使用了兩張 為了得到理想的展示結果 所以測試用的人臉與標簽人臉越像越好
import requests
from PIL import Image
import matplotlib.pyplot as plt
def useUrl():
host = "http://192.168.0.101:8080"
##/v1/vision/face/register 添加已知人臉
user_image1 = open("wj1.jpg","rb").read()
user_image2 = open("wj2.jpg","rb").read()
response = requests.post(host+"/v1/vision/face/register",
files={
"image1":user_image1,"image2":user_image2},data={
"userid":"Wu Jing"}).json()
print("添加吳京",response)
user_image1 = open("yy1.jpg","rb").read()
user_image2 = open("yy2.jpg","rb").read()
response = requests.post(host+"/v1/vision/face/register",
files={
"image1":user_image1,"image2":user_image2},data={
"userid":"Yi Yangqianxi"}).json()
print("添加易烊千玺",response)
##/v1/vision/face/list 打印當前可識別人臉
faces = requests.post(host+"/v1/vision/face/list").json()
print("當前可識別人臉:",faces["faces"])
##/v1/vision/face/recognize 檢測圖片中人臉
image_data = open("wjtest.jpg","rb").read()
image = Image.open("wjtest.jpg").convert("RGB")
response = requests.post(host+"/v1/vision/face/recognize",
files={
"image":image_data},data={
"min_confidence":0.4}).json()
for face in response["predictions"]:
userid = face["userid"]
y_max = int(face["y_max"])
y_min = int(face["y_min"])
x_max = int(face["x_max"])
x_min = int(face["x_min"])
conf = face["confidence"]
confstr = format(conf*100,'.2f')
cropped = image.crop((x_min,y_min,x_max,y_max))
plt.imshow(cropped)
plt.axis('off')
plt.title(userid+" "+confstr+"%")
plt.show()
## /v1/vision/face/delete 刪除人臉
response = requests.post(host+"/v1/vision/face/delete",
data={
"userid":"Wu Jing"}).json()
print("刪除吳京",response)
response = requests.post(host+"/v1/vision/face/delete",
data={
"userid":"Yi Yangqianxi"}).json()
print("刪除易烊千玺",response)

from deepstack_sdk import ServerConfig, Face
def pythonsdk():
## 連接DeepStack
config = ServerConfig("http://192.168.0.101:8080")
face = Face(config)
##添加已知人臉信息
wj = ["wj1.jpg","wj2.jpg"]
yy = ["yy1.jpg","yy2.jpg"]
response = face.registerFace(images=wj,userid="wj")
response = face.registerFace(images=yy,userid="yyqx")
## 打印當前可識別人臉
response = face.listFaces()
for face in response:
print("當前可識別人臉:",face)
##檢測圖片中人臉
response = face.recognizeFace(image=r"wjtest.jpg",output="face_output.jpg",min_confidence=0.5)
該功能需要輸入兩張頭像照片 輸出兩張的相似程度
import requests
from PIL import Image
import matplotlib.pyplot as plt
def useUrl():
host = "http://192.168.0.101:8080"
## 人臉比較
wj1 = open("wj.jpg","rb").read()
wj2 = open("wj2.jpg","rb").read()
yy1 = open("yy2.jpg","rb").read()
response = requests.post(host+"/v1/vision/face/match",files={
"image1":wj1,"image2":wj2}).json()
print(response)
response = requests.post(host+"/v1/vision/face/match",files={
"image1":yy1,"image2":wj2}).json()
print(response)


結果
{‘success’: True, ‘similarity’: 0.6551768, ‘duration’: 0} wj1 wj2
{‘success’: True, ‘similarity’: 0.5895447, ‘duration’: 0} yy1 wj2
官方暫時沒有提供
import requests
from PIL import Image
import matplotlib.pyplot as plt
def useUrl():
host = "http://192.168.0.101:8080"
##檢測圖片中所有人臉
image_data = open("jz.jpg","rb").read()
image = Image.open("jz.jpg").convert("RGB")
response = requests.post(host+"/v1/vision/face",files={
"image":image_data}).json()
for face in response["predictions"]:
y_max = int(face["y_max"])
y_min = int(face["y_min"])
x_max = int(face["x_max"])
x_min = int(face["x_min"])
conf = face["confidence"]
confstr = format(conf*100,'.2f')
cropped = image.crop((x_min,y_min,x_max,y_max))
plt.imshow(cropped)
plt.axis('off')
plt.title(confstr+"%")
plt.show()
return
##添加已知人臉
user_image1 = open("wj1.jpg","rb").read()
user_image2 = open("wj2.jpg","rb").read()
response = requests.post(host+"/v1/vision/face/register",
files={
"image1":user_image1,"image2":user_image2},data={
"userid":"Wu Jing"}).json()
print("添加吳京",response)
user_image1 = open("yy1.jpg","rb").read()
user_image2 = open("yy2.jpg","rb").read()
response = requests.post(host+"/v1/vision/face/register",
files={
"image1":user_image1,"image2":user_image2},data={
"userid":"Yi Yangqianxi"}).json()
print("添加易烊千玺",response)
## 打印當前可識別人臉
faces = requests.post(host+"/v1/vision/face/list").json()
print("當前可識別人臉:",faces["faces"])
##檢測圖片中人臉
image_data = open("wjtest.jpg","rb").read()
image = Image.open("wjtest.jpg").convert("RGB")
response = requests.post(host+"/v1/vision/face/recognize",
files={
"image":image_data},data={
"min_confidence":0.4}).json()
for face in response["predictions"]:
userid = face["userid"]
y_max = int(face["y_max"])
y_min = int(face["y_min"])
x_max = int(face["x_max"])
x_min = int(face["x_min"])
conf = face["confidence"]
confstr = format(conf*100,'.2f')
cropped = image.crop((x_min,y_min,x_max,y_max))
plt.imshow(cropped)
plt.axis('off')
plt.title(userid+" "+confstr+"%")
plt.show()
## 刪除人臉
response = requests.post(host+"/v1/vision/face/delete",
data={
"userid":"Wu Jing"}).json()
print("刪除吳京",response)
response = requests.post(host+"/v1/vision/face/delete",
data={
"userid":"Yi Yangqianxi"}).json()
print("刪除易烊千玺",response)
## 人臉比較
wj1 = open("wj1.jpg","rb").read()
wj2 = open("wj2.jpg","rb").read()
yy1 = open("yy2.jpg","rb").read()
response = requests.post(host+"/v1/vision/face/match",files={
"image1":wj1,"image2":wj2}).json()
print(response)
response = requests.post(host+"/v1/vision/face/match",files={
"image1":yy1,"image2":wj2}).json()
print(response)
from deepstack_sdk import ServerConfig, Face
def pythonsdk():
config = ServerConfig("http://192.168.0.101:8080")
face = Face(config)
##檢測圖片中所有人臉
response = face.detectFace("jz.jpg",output="jz_output.jpg")
##添加已知人臉信息
wj = ["wj1.jpg","wj2.jpg"]
yy = ["yy1.jpg","yy2.jpg"]
response = face.registerFace(images=wj,userid="wj")
response = face.registerFace(images=yy,userid="yyqx")
## 打印當前可識別人臉
response = face.listFaces()
for face in response:
print("當前可識別人臉:",face)
##檢測圖片中人臉
response = face.recognizeFace(image=r"wjtest.jpg", output="face_output.jpg",min_confidence=0.5)
## 刪除人臉
response = face.deleteFace("wj")
response = face.deleteFace("yyqx")
## 人臉比較
##未提供
useUrl()
pythonsdk()