下面我將向大家介紹使用 Scrapy 爬蟲獲取 網易雲音樂 的熱門歌單信息。
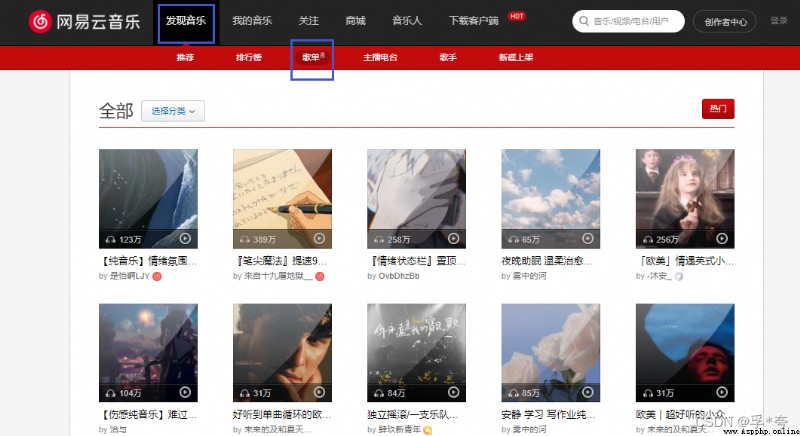
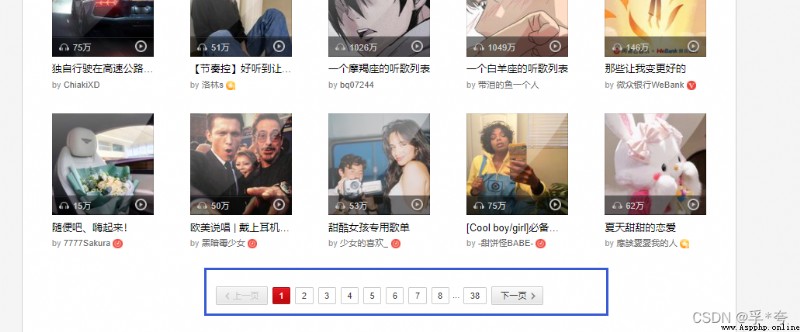
這裡是網易雲音樂的歌單頁面,可以看到歌單信息非常得結構化,是非常適合爬蟲來爬取的。
URL:全部歌單 - 歌單 - 網易雲音樂 (163.com)
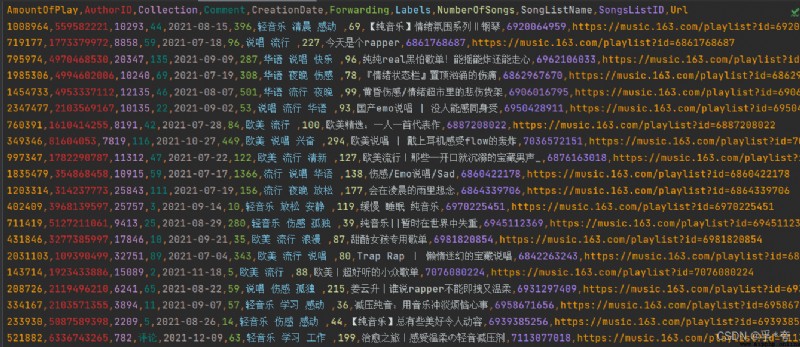
爬取結果預覽(爬取時間提早於寫這篇文章時間約一周,所以歌單信息部分有變化):

Scrapy框架主要由五大組件組成,它們分別是調度器(Scheduler)、下載器(Downloader)、爬蟲(Spider)和實體管道(Item Pipeline)、Scrapy引擎(Scrapy Engine)。下面我們分別介紹各個組件的作用。
(1)、調度器(Scheduler):
調度器,說白了把它假設成為一個URL(抓取網頁的網址或者說是鏈接)的優先隊列,由它來決定下一個要抓取的網址是 什麼,同時去除重復的網址(不做無用功)。用戶可以自己的需求定制調度器。
(2)、下載器(Downloader):
下載器,是所有組件中負擔最大的,它用於高速地下載網絡上的資源。Scrapy的下載器代碼不會太復雜,但效率高,主要的原因是Scrapy下載器是建立在twisted這個高效的異步模型上的(其實整個框架都在建立在這個模型上的)。
(3)、 爬蟲(Spider):
爬蟲,是用戶最關心的部份。用戶定制自己的爬蟲(通過定制正則表達式等語法),用於從特定的網頁中提取自己需要的信息,即所謂的實體(Item)。 用戶也可以從中提取出鏈接,讓Scrapy繼續抓取下一個頁面。
(4)、 實體管道(Item Pipeline):
實體管道,用於處理爬蟲(spider)提取的實體。主要的功能是持久化實體、驗證實體的有效性、清除不需要的信息。
(5)、Scrapy引擎(Scrapy Engine):
Scrapy引擎是整個框架的核心.它用來控制調試器、下載器、爬蟲。實際上,引擎相當於計算機的CPU,它控制著整個流程。
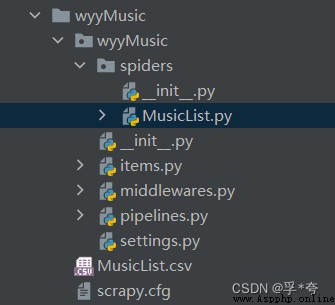
重點:一個Scrapy項目的文件目錄結構如下:
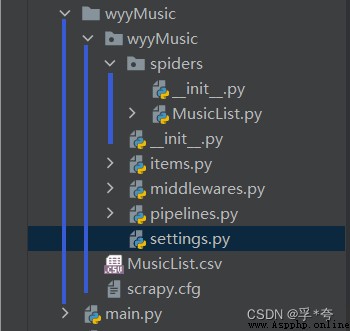
我們需要編輯的一般只有 spiders 、items.py、 pipeline.py、settings.py
在桌面新建一個項目文件夾,然後使用pycharm打開,在終端(Terminal)中輸入:
scrapy startproject 爬蟲項目名稱 #創建一個Scrapy爬蟲項目
cd my 爬蟲項目名稱 #進入到此項目中
如本文是:
scrapy startproject wyyMusic
cd wyyMusic
這樣一個網易雲音樂爬蟲項目就創建好了。
1. 設置settings.py
在settings.py中寫上一下代碼:(用於設置爬蟲的一些全局配置信息)
 #去除掉日志中其他描述性的信息,只輸出我們需要的信息
LOG_LEVEL = "WARNING"
USER_AGENT = '自己浏覽器的user agent'
#默認為True,更改為False,即不遵守君子協定
ROBOTSTXT_OBEY = False
#下載延遲,可以設為每下載一次暫停2秒,以防下載過快被禁止訪問
DOWNLOAD_DELAY = 2
DEFAULT_REQUEST_HEADERS = {
'Accept': 'text/html,application/xhtml+xml,application/xml;q=0.9,*/*;q=0.8',
# 'Accept-Language': 'en', #不要這條代碼
}
2. 設置items.py:(定義需要爬取的字段)
import scrapy
class MusicListItem(scrapy.Item):
SongsListID = scrapy.Field() #歌單id號
SongListName = scrapy.Field() #歌單名
AmountOfPlay = scrapy.Field() #播放量
Labels = scrapy.Field() #標簽名
Url = scrapy.Field() #歌單域名,為下一次詳細爬取留備份
Collection = scrapy.Field() #歌單收藏量
Forwarding = scrapy.Field() #轉發量
Comment = scrapy.Field() #評論量
NumberOfSongs = scrapy.Field() #歌曲數量
CreationDate = scrapy.Field() #歌單創建日期
AuthorID = scrapy.Field() #作者id
3. 創建歌單爬蟲 MusicList.py:
在spiders包下新建一個 MusicList.py,創建後的目錄結構如下
在MusicList.py中獲取歌單信息
import scrapy #導入scrapy 包
#使用相對路徑從我們剛剛編寫的items.py中導入MusicListItem類
from ..items import MusicListItem
#導入深拷貝包,用於在爬取多個頁面時保存到pipeline中的歌單信息順序不會亂,防止出現重復,非常關鍵
from copy import deepcopy
class MusicListSpider(scrapy.Spider):
name = "MusicList" #必須要寫name屬性,在pipeline.py中會用到
allowed_domains = ["music.163.com"] #設置爬蟲爬取范圍
start_urls = ["https://music.163.com/discover/playlist"] #起始爬取的頁面,即歌單第一面
offset = 0 #自己設置的一個指針,用於記錄當前爬取的頁碼
def parse(self, response):
#使用.xpath語法來從HTML頁面中解析需要的信息
#獲取一頁中的全部歌單,保存到liList中
liList = response.xpath("//div[@id='m-disc-pl-c']/div/ul[@id='m-pl-container']/li")
#對liList中的歌單,一個一個遍歷,獲取歌單詳細頁面的信息
for li in liList:
itemML = MusicListItem()
a_href = li.xpath("./div/a[@class = 'msk']/@href").extract_first()
itemML["SongsListID"]= a_href[13:]
#獲取歌單詳細頁面的Url地址
Url = "https://music.163.com" + a_href
itemML["Url"] = Url
#調用SongsListPageParse來獲取歌單詳細頁面的信息
yield scrapy.Request(Url, callback=self.SongsListPageParse, meta={"itemML" : deepcopy(itemML)})
#爬取下一頁
if self.offset < 37:
self.offset += 1
#獲取下一頁的Url地址
nextpage_a_url="https://music.163.com/discover/playlist/?order=hot&cat=%E5%85%A8%E9%83%A8&limit=35&offset=" + str(self.offset*35)
print(self.offset ,nextpage_a_url)
yield scrapy.Request(nextpage_a_url, callback=self.parse)
print("開始爬下一頁")
#用於爬取每一個歌單中的詳細頁面信息
def SongsListPageParse(self, response):
cntc = response.xpath("//div[@class='cntc']")
itemML = response.meta["itemML"]
SongListName = cntc.xpath("./div[@class='hd f-cb']/div/h2//text()").extract_first()
itemML["SongListName"] = SongListName #獲取歌單名
user_url = cntc.xpath("./div[@class='user f-cb']/span[@class='name']/a/@href").extract_first()
user_id = user_url[14:]
itemML["AuthorID"] = user_id #獲取歌單創作者id號
time = cntc.xpath("./div[@class='user f-cb']/span[@class='time s-fc4']/text()").extract_first()
itemML["CreationDate"] = time[0:10] #獲取歌單創建日期
aList = cntc.xpath("./div[@id='content-operation']/a")
Collection = aList[2].xpath("./@data-count").extract_first()
itemML["Collection"] = Collection #獲取收藏量
Forwarding = aList[3].xpath("./@data-count").extract_first()
itemML["Forwarding"] = Forwarding #獲取轉發量
Comment = aList[5].xpath("./i/span[@id='cnt_comment_count']/text()").extract_first()
itemML["Comment"] = Comment #獲取評論量
tags = ""
tagList = cntc.xpath("./div[@class='tags f-cb']/a")
for a in tagList:
tags = tags + a.xpath("./i/text()").extract_first() + " "
itemML["Labels"] = tags
songtbList = response.xpath("//div[@class='n-songtb']/div")
NumberOfSongs = songtbList[0].xpath("./span[@class='sub s-fc3']/span[@id='playlist-track-count']/text()").extract_first()
itemML["NumberOfSongs"] = NumberOfSongs
AmountOfPlay = songtbList[0].xpath("./div[@class='more s-fc3']/strong[@id='play-count']/text()").extract_first()
itemML["AmountOfPlay"] = AmountOfPlay
yield itemML #將爬取的信息傳給 pipelines.py
每一頁的每一個歌單,都對應一個 li 標簽,li標簽中的a標簽就是歌單詳細頁面的地址
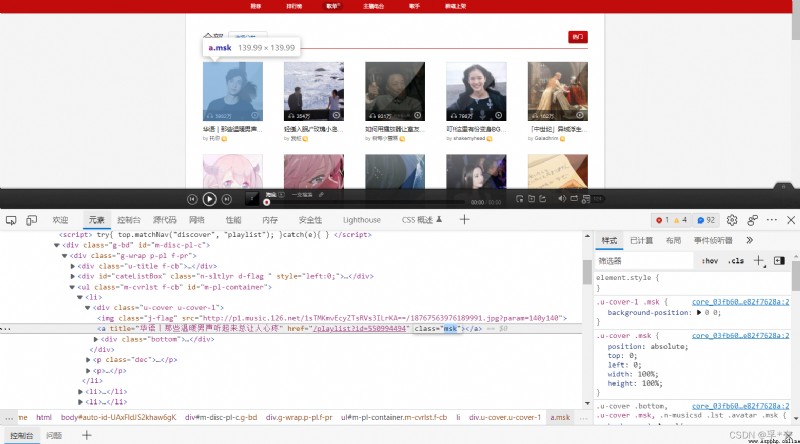
進入到一個歌單的詳細信息頁面:
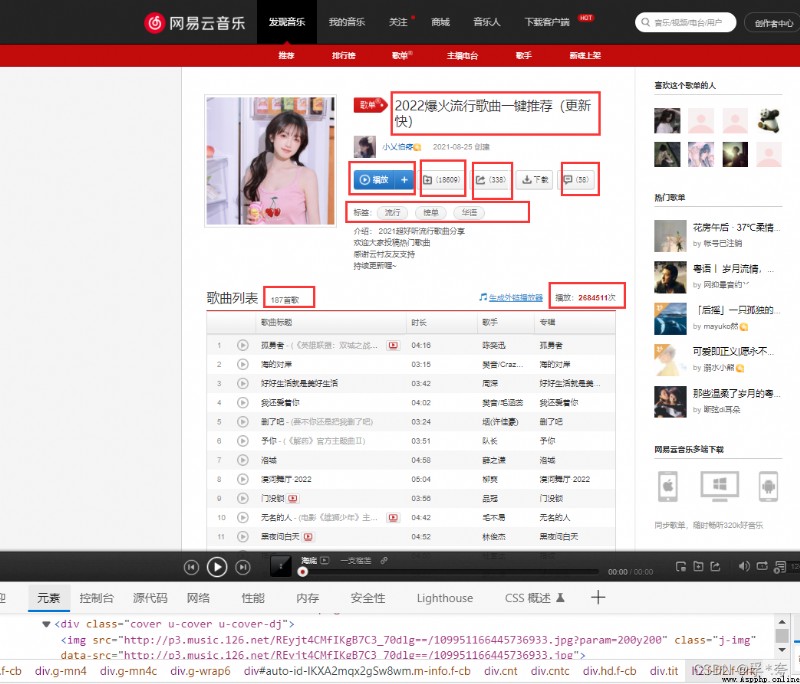
我們爬取的信息就是上圖中畫紅框的地方,它們對應的字段名為:
SongsListID = scrapy.Field() #歌單id號
SongListName = scrapy.Field() #歌單名
AmountOfPlay = scrapy.Field() #播放量
Labels = scrapy.Field() #標簽名
Url = scrapy.Field() #歌單域名,為下一次詳細爬取留備份
Collection = scrapy.Field() #歌單收藏量
Forwarding = scrapy.Field() #轉發量
Comment = scrapy.Field() #評論量
NumberOfSongs = scrapy.Field() #歌曲數量
CreationDate = scrapy.Field() #歌單創建日期
AuthorID = scrapy.Field() #作者id
它們都是在 SongsListPageParse 函數中,通過解析歌單詳細信息頁面的來獲取。
爬取下一頁:
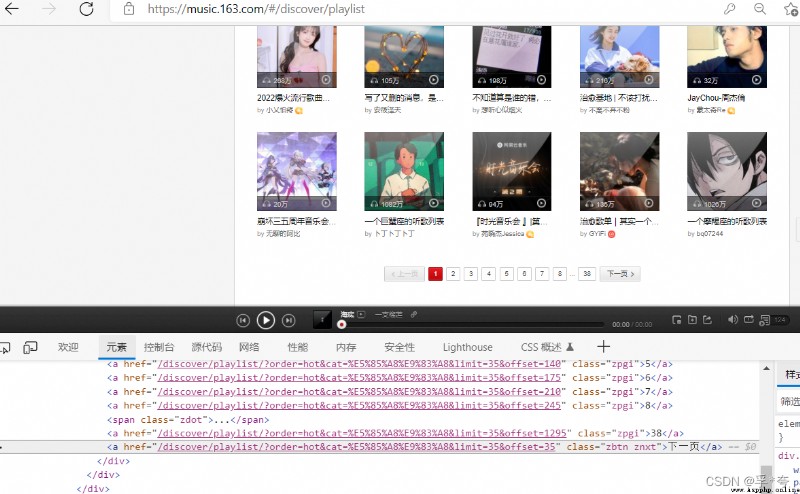
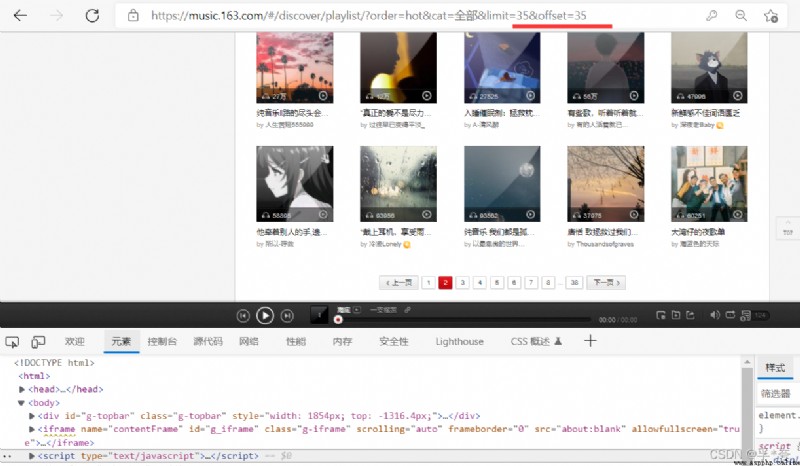
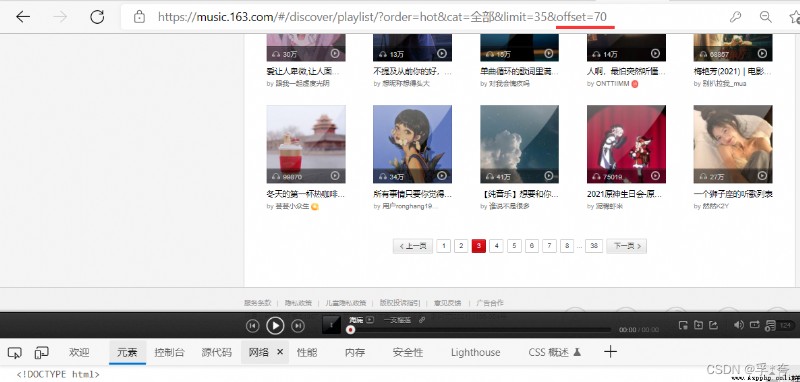
獲取下一頁的方法有兩種:
一是從 每頁的“下一頁” a標簽中獲取下一頁的url地址
二是根據翻頁的規律,每頁的url中的offset參數相差35(即每頁有35個歌單),因此只要令 offset+= 35 進行循環就可以一直爬取到下一頁,直到 offset <= 35 * 37 為止,37是有37頁。
其實每次 ,所以在爬取下一頁的時候沒有用for ,而只是用 if 來判斷offset
yield scrapy.Request(nextpage_a_url, callback=self.parse)
其實就是一個遞歸,調用parse函數自身。
由於第二種方法更為簡便,所以這裡使用的第二種方法來爬取下一頁
4. 設置pipelines.py 來保存獲取到的信息(即item)
from scrapy.exporters import CsvItemExporter
class WyymusicPipeline:
def __init__(self):
self.MusicListFile = open("MusicList.csv", "wb+") #保存為csv格式
self.MusicListExporter = CsvItemExporter(self.MusicListFile, encoding='utf8')
self.MusicListExporter.start_exporting()
def process_item(self, item, spider):
if spider.name == 'MusicList':
self.MusicListExporter.export_item(item)
return item
5.終於到了激動人心的時刻!—— 啟動爬蟲
在終端(Terminal)中輸入:
scrapy crawl MusicList
(注意:在此之前要保證是在wyyMusic爬蟲目錄下,若不在,則可以通過 cd wyyMusic 來進入到爬蟲目錄下。)
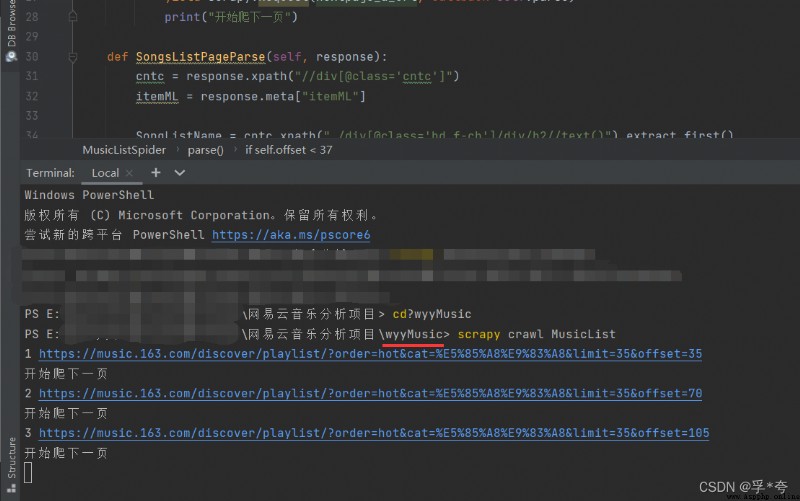
已經在開始爬取了!過一會兒會自動在wyyMusic 包下生成MusicList.csv 文件,裡面存放的就是爬取到的並整理好的全部熱門歌單信息。
最終爬取到了1288個歌單,效果如下:

最後:
網易雲音樂中有些頁面的信息無法使用Scrapy來爬取,表現為爬取到的內容為空。這時候就需要使用python Selenium爬蟲來爬取,下篇文章將教小伙伴們使用Selenium爬蟲來爬取網易雲音樂用戶頁面詳細信息,如用戶昵稱、性別、vip等級、所在地、簡介、收藏與創建的歌單歌曲、粉絲等等信息。
期待的小伙伴不妨加個關注、點個贊,創作不易