FIIQA-PyTorch
FIIQA
Be happy , Run , I found it completely useless . The data downloaded is only 3 class , combination github On 200 class , There is a little gap .

So I want to make it myself , The reference papers are as follows :
Face Illumination Transfer through Edge-preserving Filters

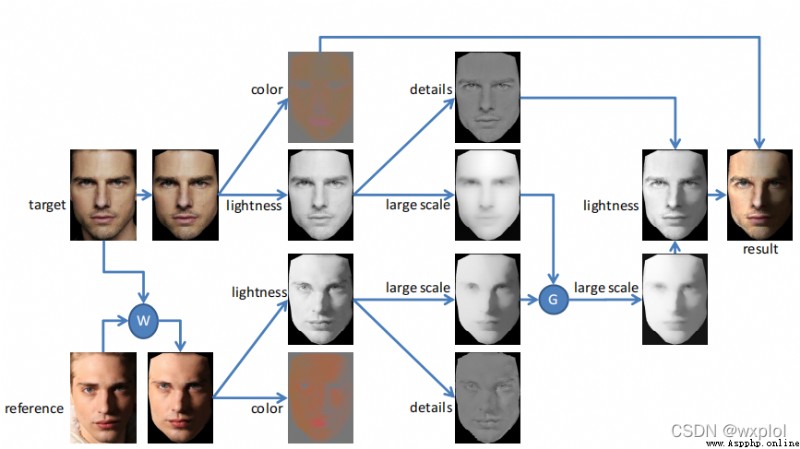
In this paper, faces are mainly divided into 3 part : Color layer 、 Large scale layer and detail layer . Convert the face image to Lab Color space , among L The channel represents the brightness value ;a、b Represents the color layer . Yes L Passage through wsl( Weighted least two filter ) Large scale layer can be obtained by filtering , And then through the following :
d e t a i l s = L l a r g e s c a l e details=\frac{L}{largescale} details=largescaleL
among :largscale Represents a large-scale layer ,details Represents the detail layer .
By the above methods , Extract large-scale layers from the template and the target image in turn , then , These two images are Guided filtering / Guided filtering (Guided Filter). Be careful , Here, take the target as the guidance diagram , Template as initial image , Make the template similar to the target .
adopt , After guidance filtering , You need to restore the brightness channel L, Calculate with reference to the above formula , And then Lab Space is transformed into BGR Space , Finally, we get the migration picture of uneven illumination of human face .
import cv2
from cv2.ximgproc import *
import numpy as np
def lightness_layer_decomposition(img,conf,sigma):
''' Separate the picture into color layer and brightness layer :param img: :return: '''
# wsl wave filtering
large_scale_img=fastGlobalSmootherFilter(img, img, conf, sigma)
detail_img=img/large_scale_img
return large_scale_img,detail_img
def face_illumination_transfer(target=None, reference=None):
''' Migrate the label illumination to the target face :param target: :param reference: :return: '''
h,w=reference.shape[:2]
target=cv2.resize(target,(w,h))
# lab Color conversion
# Extract color (a,b) And brightness layer l
lab_img = cv2.cvtColor(target, cv2.COLOR_BGR2Lab)
l, a, b = cv2.split(lab_img)
lab_rimg = cv2.cvtColor(reference, cv2.COLOR_BGR2Lab)
lr, ar,br = cv2.split(lab_rimg)
# Layer the brightness layer : Large scale layer and detail layer
large_scale_img, detail_img= lightness_layer_decomposition(l,600,20)
large_scale_rimg, detail_rimg = lightness_layer_decomposition(lr,600,20)
# The template brightness is transferred to the target image by guided wave filtering
large_scale_rimg = large_scale_rimg.astype('float32')
large_scale_img = large_scale_img.astype('float32')
out=guidedFilter(large_scale_img,large_scale_rimg,18,1e-3)
out=out*detail_img
out=out.astype(np.uint8)
res=cv2.merge((out,a,b))
res=cv2.cvtColor(res,cv2.COLOR_Lab2BGR)
return res
if __name__=="__main__":
img_file=r"D:\data\face\good3\1630905386503.jpeg"
reference=r"D:\data\face_illumination\illumination patterns\office-lamp-night-6.JPG"
# Read face pictures
img = cv2.imread(img_file)
rimg=cv2.imread(reference)
res=face_illumination_transfer(img,rimg)
cv2.imshow("res",res)
cv2.waitKey(0)
The final results are as follows :
Refer to the connection :
opencv Use — fastGlobalSmootherFilter
Pilot map filtering (Guided Image Filtering) Principles and OpenCV Realization