django Some of the basic operations of should be almost here , The model layer is the layer that deals with the database , It is also a key layer , Also encountered bug A layer of , Because the database version and django The version mismatch will cause the connection to fail , Then lose django The essence , There is no back-end operation , That is playing a rogue . Fortunately ,CSDN There are many tutorials , I successfully reinstalled the database and then connected it .
This article is followed by Django Framework URL Reverse DNS 、 Static file configuration and application creation Go on , Therefore, some basic configurations will not be repeated .
Django Is the use of the ORM frame 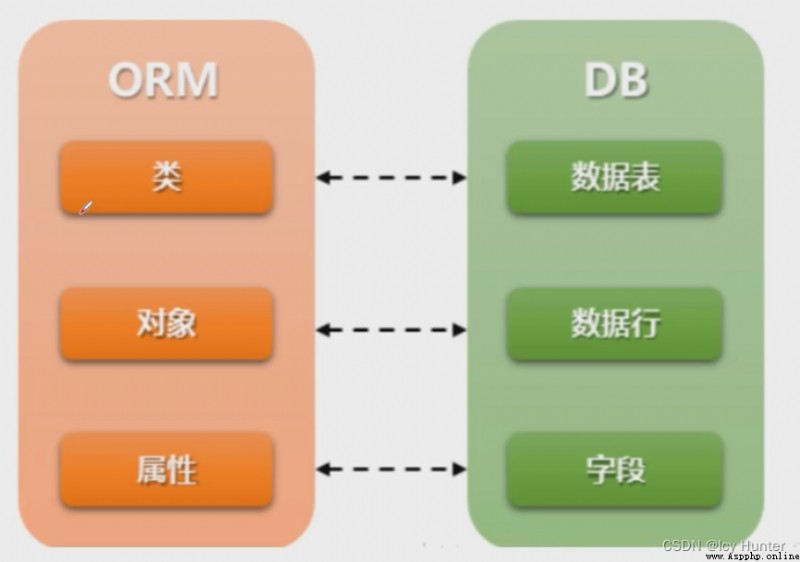
ORM Object relation mapping , It's a programming technology , It allows you to operate on the database using classes and objects , So as to avoid passing through SQL Statement operation database
effect :
advantage :
Only object-oriented programming is needed , No need to write code for database .
Realize the decoupling of data model and database , Shielding the differences between different database operations
shortcoming :
For business complexity , High use cost .
Convert to SQL sentence , Convert into objects according to the results of the query , Performance loss during mapping .
Installation is required first mysqlclient>=1.3.13
pip install mysqlclient
If it cannot be installed, the following two are not installed , The following... Needs to be installed
python3-dev
libmysqlclient-dev
How to install it or CSDN Well , I installed my own computer before but forgot .
then
Open the terminal to enter the database, create the database or open navicat And so on
Create database Database name default charset utf8
Usually the database name is consistent with the project name
Create database mysite1 default charset utf8;
After creating the database
Need in the project Setting.py Database configuration in
modify DATABASES Content of configuration item , from sqlite3 Turn into mysql
setting.py It was :
DATABASES = {

'default': {

'ENGINE': 'django.db.backends.sqlite3',
'NAME': BASE_DIR / 'db.sqlite3',
}
}
To configure mysql Need to change to :
DATABASES = {

'default': {

'ENGINE': 'django.db.backends.mysql',
'NAME': "mysite1", # Database name
"USER": "root", # user
"PASSWORD": "root", # password
"HOST": "127.0.0.1", # ip
"PORT": "3306" # Port number
}
}
The database name, user password, etc. need to be modified according to the configuration of your computer , The above is my own computer configuration .
The rules in the model layer are :
From Django.db import models
Class Model class name (models.Model):
Field name = models. Field type ( Field options )
You also need to migrate synchronization makemigrations + migrate:
When moving Django Synchronize changes to the model ( Add fields , Delete model, etc ) To the database schema
Generate migration file perform python manage.py makemigrations Apply the models.py File generates an intermediate file , And keep it in migrations In file
Execute the migration script python manage.py migrate Execute the migration program to realize the migration . Apply the migrations The intermediate files in the directory are synchronized back to the database .
After configuration , Here is a small example to see if you can connect to the database :
First mysite1 Next application sports Template layer in models.py The code is as follows :
from django.db import models
# Create your models here.
class animal(models.Model):
name = models.CharField(" name ", max_length=50, default="")
age = models.DecimalField(" Hair length ", max_digits=7, decimal_places=2)
That is, according to the rules defined above , Define a name sports_animal Data sheet for , And there is id( The default auto generated primary key ),name,age Three fields
And then the command line (mysite1 Next ) Input :
python manage.py makemigrations
Generate migration file 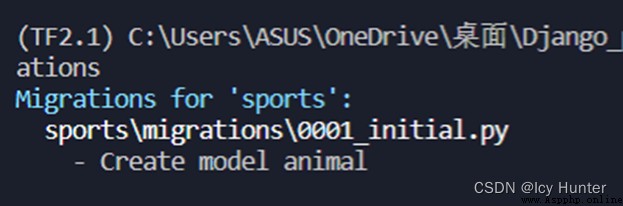
Then execute the migration script , Transfer the table to the database and generate the corresponding table structure in the database , Here is the key step to prove whether you have successfully connected to the database .
Command line execution :
python manage.py migrate
If the following :
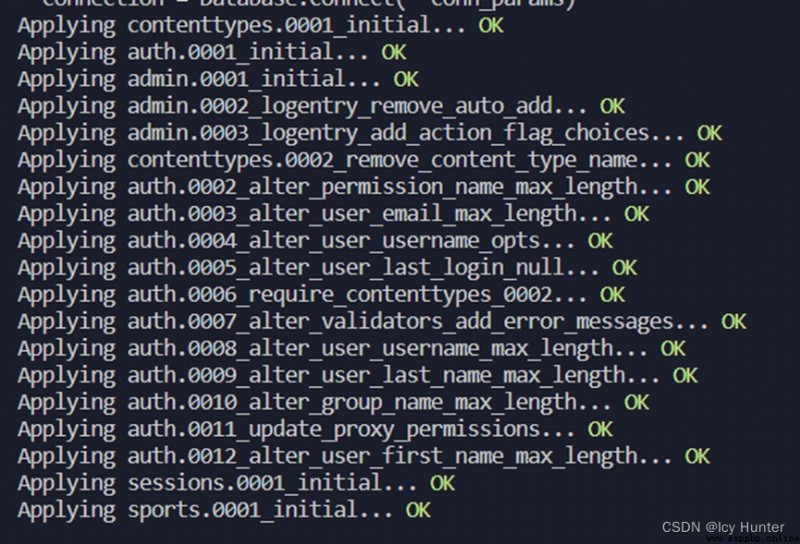
congratulations ! The connection is successful !
If not , Maybe there is something wrong with the previous configuration , If you are sure that the previous configuration is OK , There is a high probability that the database cannot be connected due to version mismatch , because django I won't support it 3.+ Not for mysql database 5.6 The following version .
Then please move : Uninstall and reinstall the latest version mysql The database pro test is valid
There is another way django Downgrade , But it's not necessary , It's good to upgrade .
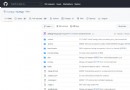
After successfully connecting to the database , Several tables will be created in the database , Including the table we just defined , as follows :
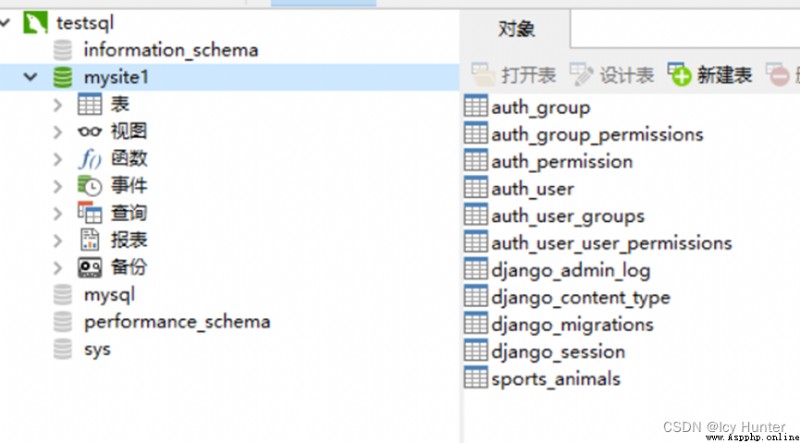
I use navicat Open to see that the table has been created .
Tables are migrated to the database .
The table we define ourselves is sports_animals, Other tables are django Self contained .
then Django Many other data types are also defined in the corresponding database types :
BooleanFiled() Boolean type
CharField() varchar Must specify max_length
DataField() The date type
DateTimeField Represents time and date
DecimalField() decimal(x,y)max_digits, decimal_places
EmailFiled() varchar
ImageFiled() varchar Save image path
TextField() longtext
For details, please refer to the official documents
Field type document
https://docs.djangoproject.com/en/4.0/ref/models/fields/#field-types
Field options document
https://docs.djangoproject.com/en/4.0/ref/models/fields/#field-opions
class animals(models.Model):
name = models.CharField(' name ', max_length=50, default="")
age = models.DecimalField(' Hair length ', max_digits=7, decimal_places=2, default=0)
# Add a new field
info = models.CharField(' describe ', max_length=100, default="")
class Meta:
db_table = 'Ani'
class Meta:
db_table = 'Ani'
// The function of this is to change the name of the database to user-defined “ani”
Then you can re python manage.py makemigrations + python manage.py makemigrations
Update the tables in the database 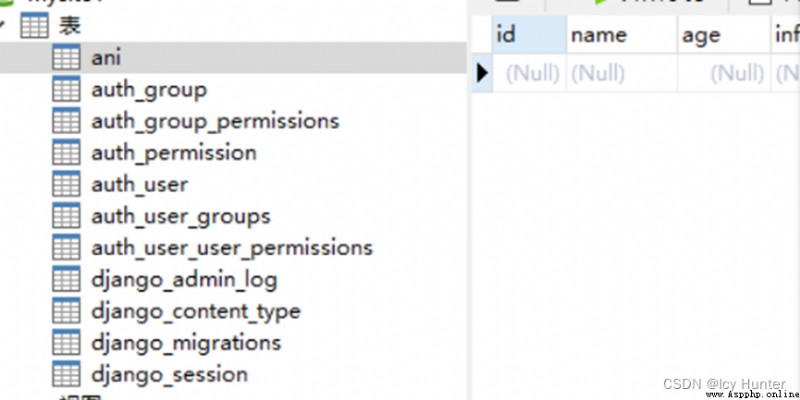
Create data
Additions and deletions CRUD
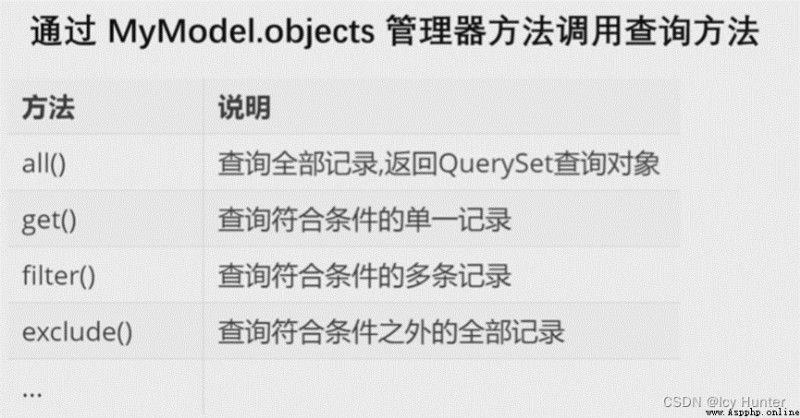
Django Using the manager object
Create data , There are two options :
Scheme 1 :
MyModel.objects.create( attribute 1= value 1, …)
success : Returns the created entity object
Failure : Throw an exception
Option two :
Obj = MyModel( attribute = value ,…)
Obj. attribute = value
Obj.save()
python manage.py shell
Get into Django Provided shell Easy to operate .
After entering, you can create data according to the above two schemes
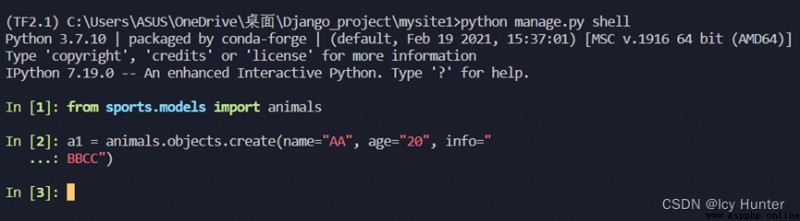
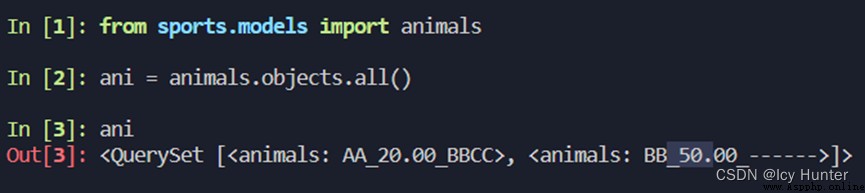
from sports.models import animals
a1 = animals.objects.create(name="AA", age="20", info="BBCC")
No error is inserted successfully .
We can open it navicat have a look 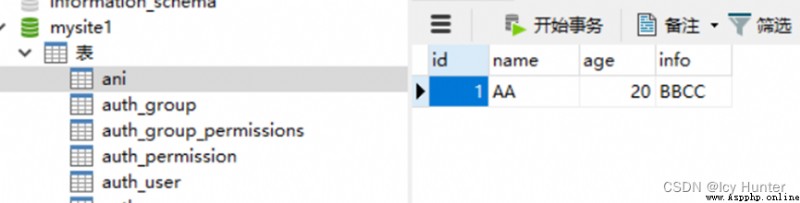
Indeed, the insertion was successful
It can also be opened cmd Command line
Mysql -uroot -p
Then enter the password
Then find the database
Use mysite1( Database name )
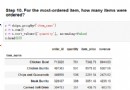
Then check the table inside
Select * from ani
You can find :
It does insert the data we just operated on .
Use the second method to insert data 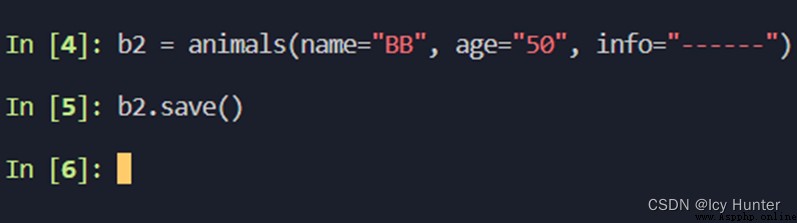
Look at the data sheet 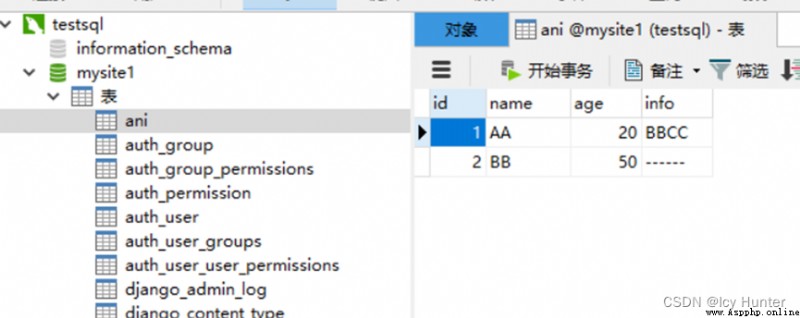
Also successfully inserted .
Also in Django Provided shell in :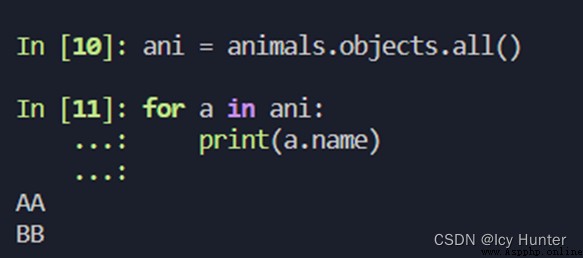
ani = animals.objects.all() # Query all data
for a in ani:
print(a.name)
You can also easily print all the data , rewrite __str__ that will do
models.py:
from django.db import models
# Create your models here.
class animals(models.Model):
name = models.CharField(' name ', max_length=50, default="")
age = models.DecimalField(' Hair length ', max_digits=7, decimal_places=2, default=0)
info = models.CharField(' describe ', max_length=100, default="")
class Meta:
db_table = 'Ani'
def __str__(self):
return '%s_%s_%s' % (self.name, self.age, self.info)
Some operations are recorded slightly :
object .object.value() Return dictionary
object .object.values_list() Return a tuple
object .object.order_by(“- Column ”, Column ) Default ascending order
object .query see sql sentence
Now that you can connect to the database , Then you can do a small example of data transmission from the back end to the front end .
sports Under the models.py:
from django.db import models
# Create your models here.
class animals(models.Model):
name = models.CharField(' name ', max_length=50, default="")
age = models.DecimalField(' Hair length ', max_digits=7, decimal_places=2, default=0)
info = models.CharField(' describe ', max_length=100, default="")
class Meta:
db_table = 'Ani'
def __str__(self):
return '%s_%s_%s' % (self.name, self.age, self.info)
sports Under the views.py:
Only need to models You can call the database by importing from the .
from django.shortcuts import render
from django.http import HttpResponse
from .models import animals
def index(request):
all = animals.objects.all()
return render(request, 'sport_new.html', locals()) # All variables are passed into the page in the form of a dictionary
# Create your views here.
then sports Under the templates Medium sports_new.html:
It can be modified , Add a table :
<!DOCTYPE html>
<html lang="en">
<head>
<meta charset="UTF-8">
<meta http-equiv="X-UA-Compatible" content="IE=edge">
<meta name="viewport" content="width=device-width, initial-scale=1.0">
<title>Document</title>
</head>
<body>
hello world i am from app_sports
<table border="1">
<tr>
<th>name</th>
<th>age</th>
<th>info</th>
</tr>
{
% for a in all %}
<tr>
<td>{
{
a.name}}</td>
<td>{
{
a.age}}</td>
<td>{
{
a.info}}</td>
</tr>
{
% endfor %}
</table>
</body>
</html>
Then start the server
visit http://127.0.0.1:8000/sports/sport_index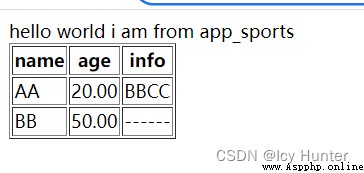
thus ,Django The value returned by the front-end web page to the back-end database can be realized , You can basically do something .
Of course, there are also changes and deletions in the database , It should not be too bad , I will probably talk about it in general later .
 A help function solves the problem of viewing all document information in Python
stay python The interactive co
 Invincible Python copy and paste -- Interview outsourcing of a review data
as everyone knows , There has