Wake up the wrist Python Reptile study notes , Like the students can collect , Thank you for your support .
Segmentation of strings
webString = 'www.baidu.com'
print(webString.split('.'))
# ['www', 'baidu', 'com']
Handling of spaces before and after strings , Or the handling of special characters
webString = ' www.baidu.com '
print(webString.strip())
# www.baidu.com
webString = '!*www.baidu.com*!'
print(webString.strip('!*'))
# www.baidu.com
String formatting
webString = '{}www.baidu.com'.format('https://')
print(webString)
# https://www.baidu.com
Custom function
webString = input("Please input url = ")
print(webString)
def change_number(number):
return number.replace(number[3:7], '*'*4)
print(change_number("15916881234"))
# 159****1234
python There are usually two ways to use files :
The first is to execute directly as a script .
The second is import To the others python Called in script ( Module reuse ) perform .
therefore if __name__ == 'main' Its function is to control the process of executing code in these two situations , stay if __name__ == 'main' In the first case only ( That is, the file is executed directly as a script ) To be executed , and import It will not be executed in other scripts .
Add up : Very important knowledge ,python Byte stream and character stream
Byte stream : Introduce
The input and output in the program are saved in the form of stream ( Input stream or Output stream ), All that is saved in the stream is actually bytes ( One byte is equal to one Byte Occupy 8 individual bit) file .Java Provides OutputStream、InputStream Two classes that specifically operate on byte streams .
The only thing a computer can store is bytes, To store things in a computer , We have to code it first (encode), For example, convert it into bytes
such as : To save music ( Save in bytes ), First we have to use MP3,WAV And so on ; To save a picture , First we have to use PNG,JPEG And so on ; To save text , First we have to use ASCII,UTF-8 And so on .
Unicode It's a character set. , It's not character encoding .Unicode Collect and number all the characters in the world , But no specific coding rules are specified . The coding rules are UTF-8、GBK etc. .
Byte stream : Use scenario summary
Byte stream is suitable for data transmission of all types of files , Because bytes (Byte) It's the smallest unit of information in a computer ( Usually a ACSII Code is a byte space to store ).
If it's an audio file 、 picture 、 song , Just use byte stream , If it's about Chinese ( Text ) Of , Use character stream .
Character stream : Introduce
Character stream by character ( A character takes up two bytes ) Reading data : Read two bytes at a time , Returns the characters corresponding to these two bytes int Type value ( code ). When writing a file, decode the contents of these two bytes into this character in Unicode Write the corresponding binary data under the code . That is, the binary data in the original file is read out in the form of characters , Then write the characters in binary form , So the resulting file is stored in character form . Character streams can only handle characters or strings .
Character stream : Use scenarios
Character streams can only handle plain text ( chinese ) data , Other types of data don't work , But it's easier for character stream to process text than for byte stream to process text .
Byte stream And Character stream difference
Byte stream not used in buffer ( Memory ), It is directly operated with the file itself . The character stream uses a buffer , The data in the buffer needs to use close() perhaps flush() Method to force the buffer to be flushed and output ( If the program does not close, the data will not be output from the buffer ).
Byte stream when operating file , Even if you don't close resources (close() Method ), Files can also output , But if the character stream doesn't use close() Method words , It will not output anything .
When saving files or transferring files on all hard disks, they are carried out in bytes , Including pictures is also completed by bytes , Characters are formed only in memory , So the operation using bytes is the most .
Byte streams provide the ability to handle any type of IO Function of operation , But it can't deal directly with Unicode character , And character streams do .
Byte stream reads data by byte , Bytes do not need to be encoded 、 decode , Encoding is only required for conversion between bytes and characters 、 decode !
Byte stream And Character stream transformation ( Encoding and decoding )
Byte stream is the most basic , It's mainly used to process binary data , It is processed by bytes , But in reality, a lot of data is text , Therefore, the concept of character stream is proposed on the basis of byte stream .
Conversion between byte stream and character stream , With python For example , take string Turn it into bytes First you need to code (encode). And will be bytes Turn it into string It needs to be decoded (decode).
string to bytes by utf-8 ( use utf-8 Rules encode character streams into byte streams )
name = 'wristwaking'
name_utf8 = name.encode(encoding='utf-8')
type(name_utf8) # <class 'bytes'>
string to bytes by gb2312 ( use gb2312 Rules encode character streams into byte streams )
name = 'cassie'
name_gb2312 = name.encode(encoding='gb2312')
type(name_gb2312) # <class 'bytes'>
bytes to string take bytes Decoded into string, The default is utf-8 The rules
name_string = name_utf8.decode()
type(name_string) # <class 'str'>
bytes to string by gb2312 Press gb2312 The rules will bytes Decoded into string
name_string_gb2312 = name_gb2312.decode('gb2312')
type(name_string_gb2312) # <class 'str'>
Be careful : If used utf-8 Encoding , And then use gb2312 If you decode , no . With what code , How to decode .
name = " Wake up the wrist "
name_utf8 = name.encode(encoding='gb2312')
print(type(name_utf8))
print(name_utf8)
# b'\xbb\xbd\xd0\xd1\xca\xd6\xcd\xf3'
name_string = name_utf8.decode(encoding='gb2312')
print(type(name_string))
print(name_string)
# Wake up the wrist
HTTP content-type
Content-Type( Content type ), Generally, it refers to the existence of Content-Type, Used to define the type of network files and the encoding of web pages , Decide what form the browser will take 、 What encoding reads this file , This is what we often see PHP The result of a web click is the reason to download a file or a picture .
Content-Type The header tells the client what type of content is actually returned .
Content-Type: text/html; charset=utf-8
Content-Type: multipart/form-data; boundary=something
Common media formats are as follows :
With application The beginning of the media format type :
Another common media format is used when uploading files :
Network request encryption method :1. Symmetric key encryption 2. Asymmetric key encryption 3. Certificate encryption (https)
First installation request Third party libraries 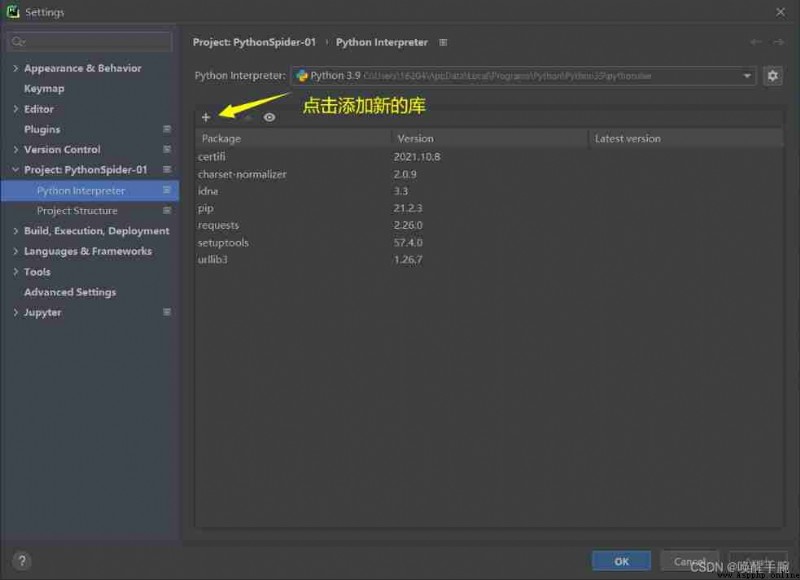
GuessedAtParserWarning: No parser was explicitly specified No parser added
Cases of basic requests
import requests
link = "http://www.santostang.com/"
headers = {
'User-Agent': 'Mozilla/5.0 (iPhone; CPU iPhone OS 13_2_3 like Mac OS X) AppleWebKit/605.1.15 (KHTML, like Gecko) Version/13.0.3 Mobile/15E148 Safari/604.1'}
data = requests.get(link, headers=headers)
print(data.text)
Full code display
import requests
from bs4 import BeautifulSoup
link = "http://www.santostang.com/"
headers = {

'User-Agent': 'Mozilla/5.0 (iPhone; CPU iPhone OS 13_2_3 like Mac OS X) AppleWebKit/605.1.15 (KHTML, like Gecko) Version/13.0.3 Mobile/15E148 Safari/604.1'}
data = requests.get(link, headers=headers)
soup = BeautifulSoup(data.text, "html.parser")
print(soup.find("h1", class_="post-title").a.text)
# Chapter four – 4.3 adopt selenium Simulate browser crawling
Data persistence operation , Write to file
with open('index.txt', 'w+', encoding="utf-8") as f:
f.write(text)
f.close()
BeautifulSoup The use of third-party libraries
Beautiful Soup Provide some simple 、python Function to handle navigation 、 Search for 、 Modify analysis tree and other functions . It's a toolbox , Provide users with data to be grabbed by parsing documents , Because of the simple , So it doesn't take much code to write a complete application .
Beautiful Soup Automatically convert the input document to Unicode code , The output document is converted to utf-8 code . You don't need to think about coding , Unless the document does not specify a coding method , At this time ,Beautiful Soup We can't recognize the coding mode automatically . then , You just need to explain the original encoding .
You can also use local HTML File to create objects :
soup = BeautifulSoup(open('index.html'))
Standard selector find_all( name , attrs , recursive , text , ·· kwargs )
find_parents() and find_parent()
find_parents() Return all ancestor nodes ,find_parent() Return direct parent .
find_next_siblings() and find_next_sibling()
find_next_siblings() Back to all the sibling nodes in the back ,find_next_sibling() Go back to the first sibling node .
find_previous_siblings() and find_previous_sibling()
find_previous_siblings() Return to all previous sibling nodes ,find_previous_sibling() Return to the first sibling node .
find_all_next() and find_next()
find_all_next() All the eligible nodes after returning the node , find_next() Return the first eligible node
find_all_previous() and find_previous()
find_all_previous() All the eligible nodes after returning the node , find_previous() Return the first eligible node
According to the tag name 、 attribute 、 Content to find documents .find Return single element ,find_all Return all elements
print(soup.find_all('ul'))
for ul in soup.find_all('ul'):
print(ul.find_all('li'))
print(soup.find_all('ul')[0])
print(soup.find_all(attrs={
'id': 'list-1'}))
print(soup.find_all(attrs={
'name': 'elements'}))
print(soup.find_all(id='list-1'))
print(soup.find_all(class_='element'))
print(soup.find_all(text='Foo'))
CSS Selectors
adopt select() Direct in CSS The selector completes the selection
print(soup.select('.panel .panel-heading'))
print(soup.select('ul li'))
print(soup.select('#list-2 .element'))
print(type(soup.select('ul')[0]))
for ul in soup.select('ul'):
print(ul.select('li'))
get attribute And Get content
for ul in soup.select('ul'):
print(ul['id'])
print(ul.attrs['id'])
for li in soup.select('li'):
print(li.get_text())
Basic summary :
Recommended lxml Parsing library , Use... If necessary html.parser, Tag selection and filtering is weak but fast , It is recommended to use find()、find_all() The query matches a single result or multiple results , If the CSS The selector is familiar with the recommended use of select(), Remember the common ways to get attributes and text values
The realization of online word search translation
import requests
import pymongo
from bs4 import BeautifulSoup
word_search = input(" Please enter the word you want to query :")
headers = {
'User-Agent': "Mozilla/5.0 (Windows; U; Windows NT 6.1; en-us) AppleWebKit/534.50 (KHTML, like Gecko) Version/5.1 Safari/534.50"}
link = "https://www.iciba.com/word?w=" + word_search
data = requests.get(link, headers=headers)
soup = BeautifulSoup(data.text, features="html.parser")
with open('index.html', 'w', encoding='utf-8') as f:
f.write(str(soup))
f.close()
word_infor = soup.select(".Mean_part__UI9M6 li")
word = {
"english": word_search, "chinese": []}
for item in word_infor:
chinese = {
item.find("i").text: []}
for each_chinese in item.find_all("span"):
chinese[item.find("i").text].append(each_chinese.text)
word["chinese"].append(chinese)
print(word)
choose = input(" Would you like to know if it is deposited into Mongodb database :")
if choose == 'yes':
MongoClient = pymongo.mongo_client.MongoClient("mongodb://root:[email protected] Server address :27017")
db = MongoClient["english"]
collection = db.words
collection.insert_one(word)
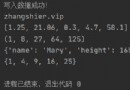
MongoClient.close()
print(" congratulations , Deposit successful !")
else:
print(" You abandoned the save operation !")
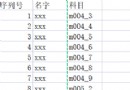
Run code , The results are shown below :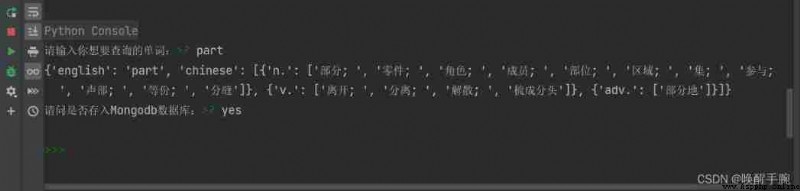
The effect in the database is as follows :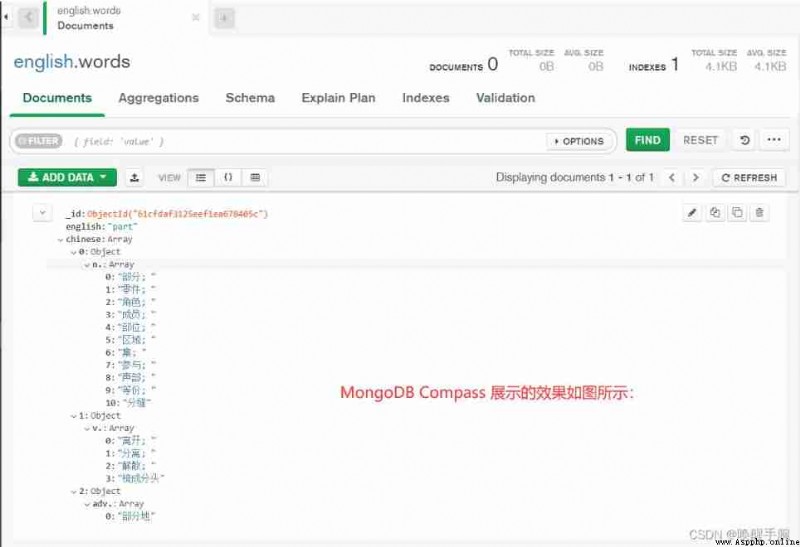
If the characters written to the file appear garbled , So we need to add encoding="utf-8
There are three basic modes of file operation ( The default mode of operation is r Pattern ):
There are two formats for reading and writing files ( The default mode for reading and writing content is b Pattern ):
Common file open modes :
r: read only mode , The pointer to the file is placed at the beginning of the file
w: Write only mode , Create if file does not exist , File exists , The original content is overwritten , The file pointer is at the beginning of the file
a: Open file in append mode , Create if file does not exist , File pointer at the beginning , If the file exists, add content at the end of the file , The file pointer is at the end of the source file
b: Open the file in binary mode , Not to be used alone , Need to be used with other modes , Such as :rb,wb
+: Open the file in read-write mode instead , Not to be used alone , Need to be used with other modes , Such as :a+
import requests
import json
headers = {

'User-Agent': 'Mozilla/5.0 (iPhone; CPU iPhone OS 13_2_3 like Mac OS X) AppleWebKit/605.1.15 (KHTML, like Gecko) Version/13.0.3 Mobile/15E148 Safari/604.1'}
data = requests.get("http://localhost:8080/person/words/all", headers=headers, timeout=0.5)
json_data = json.loads(data.text)
for index, each_row in enumerate(json_data):
print()
print(str(index + 1) + '.\t' + each_row['english'].ljust(20) + each_row['chinese'])
# 1. extreme adj. Extreme , Extreme ;n. extreme
#
# 2. concern n. Care for ; Relationship ; company vt. involve , of ; To worry about
#
# 3. benefic adj. beneficial
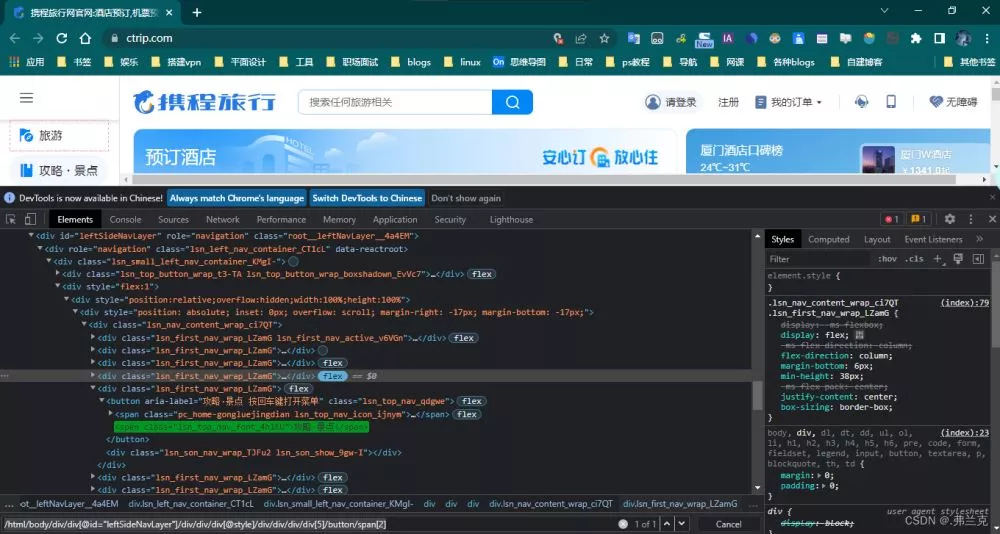
If we had one Web page , Through front-end tools ( Such as ,Firebug) You can see the attributes of an element like this .
<html>
<head></head>
<body link="#0000cc">
<a id="result_logo" href="/" onmousedown="return c({
'fm':'tab','tab':'logo'})">
<form id="form" class="fm" name="f" action="/s">
<span class="soutu-btn"></span>
<input id="kw" class="s_ipt" name="wd" value="" maxlength="255" autocomplete="off"/>
</form>
</body>
</html>
adopt id location :
dr.find_element_by_id("kw")
adopt name location :
dr.find_element_by_name("wd")
adopt class name location :
dr.find_element_by_class_name("s_ipt")
adopt tag name location :
dr.find_element_by_tag_name("input")
adopt xpath location ,xpath Positioning has N Species writing , Here are some common ways of writing :
dr.find_element_by_xpath("//*[@id='kw']")
dr.find_element_by_xpath("//*[@name='wd']")
dr.find_element_by_xpath("//input[@class='s_ipt']")
dr.find_element_by_xpath("/html/body/form/span/input")
dr.find_element_by_xpath("//span[@class='soutu-btn']/input")
dr.find_element_by_xpath("//form[@id='form']/span/input")
dr.find_element_by_xpath("//input[@id='kw' and @name='wd']")
adopt css location ,css Positioning has N Species writing , Here are some common ways of writing :
dr.find_element_by_css_selector("#kw")
dr.find_element_by_css_selector("[name=wd]")
dr.find_element_by_css_selector(".s_ipt")
dr.find_element_by_css_selector("html > body > form > span > input")
dr.find_element_by_css_selector("span.soutu-btn> input#kw")
dr.find_element_by_css_selector("form#form > span > input")
Next , We have a set of text links on our page .
<a class="mnav" href="http://news.baidu.com" name="tj_trnews"> Journalism </a>
<a class="mnav" href="http://www.hao123.com" name="tj_trhao123">hao123</a>
adopt link text location :
dr.find_element_by_link_text(" Journalism ")
dr.find_element_by_link_text("hao123")
adopt partial link text location :
dr.find_element_by_partial_link_text(" new ")
dr.find_element_by_partial_link_text("hao")
dr.find_element_by_partial_link_text("123")
jieba.cut Method accepts three input parameters : A string that requires a participle ;cut_all Parameter is used to control whether the full mode is adopted ;HMM Parameter to control whether to use HMM Model
jieba.cut as well as jieba.cut_for_search The returned structure is all one iteration generator, have access to for Loop to get each word that comes after the participle (unicode)
print(*objects, sep=’ ‘, end=’\n’, file=sys.stdout, flush=False) print Don't wrap ,print(“helloworld”,end="")
import jieba
String = "My name is wrist waking"
for item in jieba.cut(String):
print(item, end='')
String_chinese = " My name is wake up wrist "
for item in jieba.cut(String_chinese, cut_all=True):
print(item, end=',')
# My name is wrist waking I , Of , name , Cry , Wake up the , wrist ,
python3 And MySQL Interactive programming requires installation pymysql library , Therefore, first use the following command to install pymysql
pip install pymysql
import pymysql
# Open database connection
conn = pymysql.connect(host='localhost', user="root", passwd="root", db="nodedb")
print(conn)
print(type(conn))
conn.cursor() : To obtain the cursor
To operate a database , Optical connection data is not enough , You must get the cursor that operates the database , To carry out subsequent operations , Such as reading data 、 Add data . By obtaining the database connection instance conn Under the cursor() Method to create a cursor .
The cursor is used to receive the returned result
explain :cursor Returns a cursor instance object , There are many ways to manipulate data , Such as execution sql sentence .
perform sql sentence execute and executemany
A large part of the bottleneck of database performance lies in the network IO And disk IO, Will be multiple sql Put statements together , Only once IO, It can effectively improve the database performance .
use executemany() Method is executed in batch at one time sql sentence , Of course it's very good , But when too much data comes in at one time server End , May cause server Terminal buffer overflow , There may also be some unexpected troubles . therefore , reasonable 、 Use in batches executemany It's a reasonable way .
Classes that define data connection operations
# connect_db: Connect to database , And operate the database
import pymysql
class OperationMysql:
""" database SQL The relevant operation import pymysql # Open database connection db = pymysql.connect("localhost","testuser","test123","TESTDB" ) # Use cursor() Method to create a cursor object cursor cursor = db.cursor() # Use execute() Method execution SQL Inquire about cursor.execute("SELECT VERSION()") """
def __init__(self):
# Create an object to connect to the database
self.conn = pymysql.connect(
host='127.0.0.1', # The host name of the connected database server
port=3306, # Database port number
user='root', # Database login user name
passwd='root',
db='nodedb', # Database name
charset='utf8', # Connection code
cursorclass=pymysql.cursors.DictCursor
)
# Use cursor() Method to create a cursor object , For operating the database
self.cur = self.conn.cursor()
# Query a piece of data
def search_one(self, sql):
self.cur.execute(sql)
result = self.cur.fetchone() # Use fetchone() Method to get a single piece of data . Show only one line of results
# result = self.cur.fetchall() # Show all results
return result
# to update SQL
def updata_one(self, sql):
try:
self.cur.execute(sql) # perform sql
self.conn.commit() # After adding, deleting and modifying the database , Commit operation is required
except:
# Rollback on error
self.conn.rollback()
self.conn.close() # Remember to close the database connection
# Insert SQL
def insert_one(self, sql):
try:
self.cur.execute(sql) # perform sql
self.conn.commit() # After adding, deleting and modifying the database , Commit operation is required
except:
# Rollback on error
self.conn.rollback()
self.conn.close()
# Delete sql
def delete_one(self, sql):
try:
self.cur.execute(sql) # perform sql
self.conn.commit() # After adding, deleting and modifying the database , Commit operation is required
except:
# Rollback on error
self.conn.rollback()
self.conn.close()
if __name__ == '__main__':
op_mysql = OperationMysql()
res = op_mysql.search_one("SELECT * from people WHERE id = 1")
print(res)
# {'id': 1, 'name': ' Jay Chou ', 'age': 42}
MongoDB It's a database based on distributed file storage . from C++ Language writing . For the purpose of WEB Applications provide scalable, high-performance data storage solutions .
MongoDB Is a product between relational and non-relational databases , Non-relational databases are the most versatile , Most like a relational database .
MongoDB The server can run on Linux、Windows or mac os x platform , Support 32 Bit and 64 Bit application , The default port is 27017.
It is recommended to run on 64 Bit platform , because MongoDB stay 32 The maximum file size supported when running in bit mode is 2GB.
MongoDB The main features
Since any type of document can be stored in the collection , So why use multiple sets ?
This is because all documents are placed in the same collection , For both developers and administrators , It's hard to manage collections , And in this case , The efficiency of operations such as querying collections is not high . So in practice , Documents are often classified and stored in different collections .
MongoDB Instance can host multiple databases . They can be seen as independent of each other , Each database has its own permission control . On disk , Different databases are stored in different files .
MongoDB The following system databases exist in :
Admin database : A database of permissions , If you add the user to admin In the database , Then the user automatically inherits all database permissions .
Local database : This database will never be copied , It can be used to store any collection of local single servers .
Config database : When MongoDB When using tile mode ,config The database is used internally , It is used to save the information of fragmentation .
Introduction to user permissions 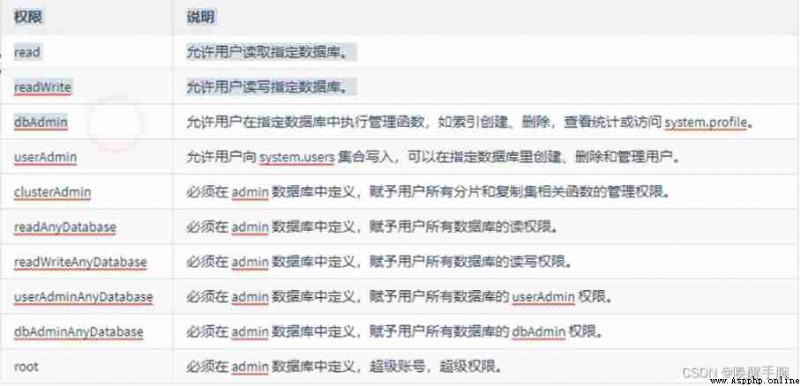
Create user
cd /www/server/mongodb/bin
# mongo Install under directory bin Catalog
mongo
# start-up mongo service , Enter the command line mongo, Get into mongodb Environmental Science
use admin
# Switch to admin database
# Under normal circumstances, an error will be reported Error: not authorized on admin
# Authenticate and log in first db.auth('root', ' Here is the password ')
db.createUser({user: "root",pwd:"root",roles:[{ role: "readWriteAnyDatabase" , db: "DBNAME" }] })
# Create user
db.createUser({user:"root",pwd:"123456",roles:["root"] }) # The second way
# The results are as follows :
Successfully added user: {
"user" : "root",
"roles" : [
{
"role" : "readWriteAnyDatabase",
"db" : "admin"
}
]
}
show users
# View the list of users
Remote online pagoda centos Systematic Mongodb database
Modify the configuration of :
Pagoda panel and Server platform All have to be turned on 27017 Port number 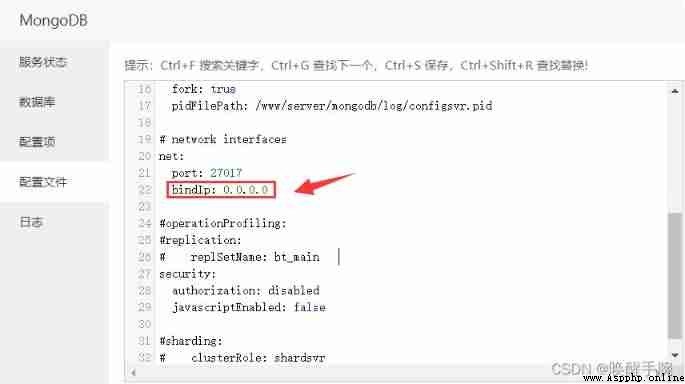
Mongodb combination Flask Frame making interface :
import pymongo
from flask import Flask, make_response
from bson import json_util
app = Flask(__name__)
app.MongoClient = pymongo.mongo_client.MongoClient("mongodb://root:[email protected] The server IP:27017")
@app.route("/login")
def index():
db = app.MongoClient["campus"]
# Select database library
collection = db.login
# Select collection
data = collection.find()
# Query data
data_res = []
for item in data:
data_res.append(item)
res = make_response(json_util.dumps(data_res))
res.status = 200
res.headers['Content-Type'] = "application/json"
return res
if __name__ == '__main__':
app.run(host="0.0.0.0", port=8080, debug=True)
Object of type ‘ObjectId’ is not JSON serializable Report errors
from mongo The data directly found in dumps export , Report errors :
Object of type 'ObjectId' is not JSON serializable
resolvent :
from bson import json_util
json_util.dumps(data)
It's about me Mongodb The tragic history of hackers' hacking scripts 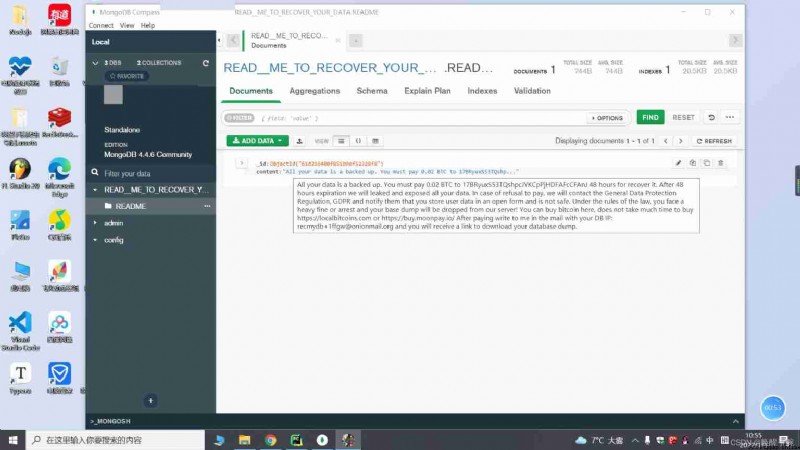
The above translation roughly means :
All your data is backed up , You must report to 17BRyuxS53TQshpcJYKCpHDFAFcCFAnJ 48 Hourly payment 0.02 BTC To restore it .48 Hours later, , We will divulge and expose all your data . In case of refusal to pay , We will be with GDPR General data protection regulations , And inform them that you store user data in an open form , And it's not safe . According to the law , You will face heavy fines or arrest , Your base dump will be discarded from our server ! You can buy bitcoin here , Don't spend too much time buying https://localbitcoins.com or https://buy.moonpay.io/ Use your... After payment dbp Write to me in the mail .
The reason is simple , The configuration I modified ,bind_ip by 0.0.0.0, The default port number is 27017. This makes it easy to scan , What's more, I didn't set the user name and password , Weak passwords set by some people can also be easily cracked , This is naked running on the Internet , People can catch it by writing a script , Only yourself to blame .
Solution :
Modify... In configuration file bind_ip by 127.0.0.1, This allows only native access to .
Change the port number if you want , Avoid the default port 27017 Scan .
nohttpinterface: Whether to ban http Interface , namely 28017 Port open service . Default false, Support auth: User authentication , Default false. No authentication required . When set to true When , Entering the database requires auth verification , When there are no users in the database , It can be operated without verification . Until the first user is created , Later operations need to be verified .
dbpath = /usr/local/mongodb/db
logpath = /logs/mongodb.log
port = 27017
fork = true
nohttpinterface=true
bind_ip = 127.0.0.1
auth = true
Be careful : To strengthen Mongodb Of admin password , Do not use :admin or root Wait for a simple password
modify Mongodb User's password
db.changeUserPassword("root","mongodbadmin");
Remote connection of the pagoda panel Mongodb
import pymongo
from datetime import datetime
print(datetime.now())
# username="test"
# password="test"
# connection=pymongo.mongo_client.MongoClient(host="192.168.10.9:27017,connect=False,username=username,password=password)
# Link server , It's a local server. You don't need to pass in parameters
MongoClient = pymongo.mongo_client.MongoClient("mongodb://root:[email protected] remote server IP:27017")
# MongoClient = pymongo.MongoClient("mongodb://root:[email protected] remote server IP:27017")
# Get the database , Fill in the name in the database in square brackets
db = MongoClient["wrist"]
collection = db.zhangyan
res = collection.find()
for item in res:
print(item.get("name"))
stay Document Insert data :
collection.insert_one({
'name': ' Wake up the wrist ', 'datetime': datetime.now()})
insert_many(list_of_dict) # Insert multiple
Comparison operator Find data
filterOption = {

"age": {
"$gte": 20}
}
# Query age is greater than or equal to 20 Year old
data = collection.find_one(filterOption)
print(data)
# {'_id': ObjectId('61c7297dfff4db0a50af9f06'), 'name': ' Zhang Yan ', 'age': 20}
Logical operator query 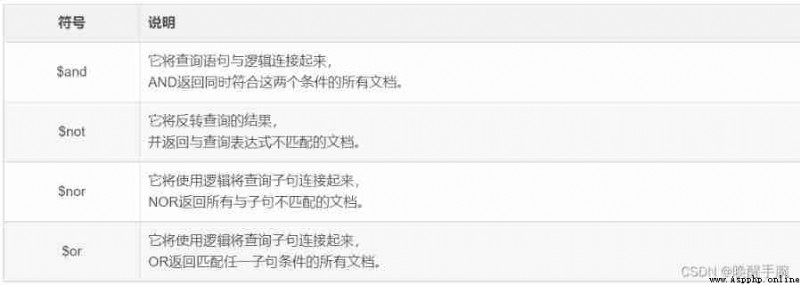
filterAnd = {

'$and':[
{
'fid': {
'$eq': 2048}}, # filter_01
{
'sid': {
'$ne': 1024}} # filter_02
]
}
filterOr = {

'$or':[
{
'fid': {
'$eq': 2048}}, # filter_01
{
'sid': {
'$ne': 1024}} # filter_02
]
}
Regular expression queries
filterOption = {

'name': {
'$regex': r'Tom [a-zA-Z]+'}
}
Traverse the document to get all the files in the collection :
# collection.find({})
# collection.find_one(filter) Only return 1 individual
for one in collection.find({
}):
print(one)
Deleted actions :
Delete one collection.delete_one(filter)
To delete multiple collection.delete_many(filter)
Modified operation :
collection.update_many(filter, update)
New parameter update explain : form {command: {key: value}}
# Modify or add new fields
filter = {
'name': ' Master Ma '}
add_data = {
'age': 60}
# key name There is , Change its value to Master Ma ?
update1 = {
'$set': {
'name': ' Master Ma ?'}}
# key age non-existent , Insert fields
update2 = {
'$set': add_data}
collection.update_one(filter, update1)
collection.update_one(filter, update2)
# Delete the specified field
filter = {
'name': ' Master Ma ?'}
del_data = {
'age': 60}
update = {
'$unset': del_data}
collection.update_one(filter, update)
# Rename field
filter = {
'name': ' Master Ma ?'}
update = {
'$rename': {
'name': ' name '}}
collection.update_one(filter, update)
disconnect :
client.close()
Comprehensive case :
import requests
import json
import pymongo
headers = {
'User-Agent': 'Mozilla/5.0 (iPhone; CPU iPhone OS 13_2_3 like Mac OS X) AppleWebKit/605.1.15 (KHTML, like Gecko) Version/13.0.3 Mobile/15E148 Safari/604.1'}
data = requests.get("http://localhost:8080/person/words/all", headers=headers)
words = json.loads(data.text)
MongoClient = pymongo.mongo_client.MongoClient("mongodb://root:[email protected] remote server IP:27017")
db = MongoClient['wrist']
collection = db.word
collection.insert_many(words)

requests Object's get and post Methods will return an object Response object , All the information returned by the server is stored in this object , Including response headers , Response status code, etc .
.textIt's a ready-made string ,.contentAnd code , however .text Not all the time , This is what we need to use.contentCode manually .
About crawling image resources
The first is to get the picture resources URL Address , Make a request to the address to get binary data data.content
import requests
url = "https://gimg2.baidu.com/image_search/src=http%3A%2F%2Fc-ssl.duitang.com%2Fuploads%2Fitem%2F202005%2F12%2F20200512131057_4Rsc8.thumb.1000_0.jpeg"
data = requests.get(url)
with open('minitang.jpg', 'wb') as f:
f.write(data.content)
f.close()
About crawling video resources
The first is to obtain video resources URL Address , Make a request to the address to get binary data data.content
import requests
url = "https://vd3.bdstatic.com/mda-mmq1yv5cag635vhm/cae_h264/1640395713342120634/mda-mmq1yv5cag635vhm.mp4"
data = requests.get(url)
with open("kaoyan.mp4","wb") as f:
f.write(data.content)
f.close()
Use PIL Previous needs import Image modular
PIL yes python In fact, the image processing standard library of the platform , but PIL Only to python2.7, Plus years of disrepair , So in PIL A compatible version of pillow, Support the latest python3.X.
Then you can use Image.open(‘xx.bmp’) To open a bitmap file for processing .
You don't have to worry about the format when opening a file , You don't need to know the format , Whatever the format , Just throw the file name to Image.open That's all right. . It's so called bmp、jpg、png、gif……, Everything can be cut .
img = Image.open(‘origin.png’) # Get an instance object of the image img
Image processing , The most basic is the transformation of color space . generally speaking , Our images are RGB Color space , But in image recognition , We may need to convert images to grayscale images 、 Different color spaces such as binary graphs .
PIL It also provides very complete support in this regard , We can :
new_img = img.convert(‘L’)
hold img Convert to 256 Grade-gray image , convert() Is a method of image instance object , Accept one mode Parameters , To specify a color mode ,mode The value of can be as follows :
Image enhancement is usually used for preprocessing before image recognition , Proper image enhancement can make the recognition process get twice the result with half the effort . PIL In this regard, an example named ImageEnhance Module , Several common image enhancement schemes are provided :
import ImageEnhance
enhancer = ImageEnhance.Sharpness(image)
for i in range(8):
factor = i / 4.0
enhancer.enhance(factor).show("Sharpness %f" % factor)
The above code is a typical use ImageEnhance Examples of modules .
Sharpness yes ImageEnhance A class of modules , To sharpen the picture . This module mainly contains the following classes :Color、Brightness、Contrast and Sharpness, They all have a common interface .enhance(factor), Accept a floating-point parameter factor, Mark the proportion of enhancement .
Production of gray scale image
from PIL import Image
img = Image.open("../ImageMake/minitang.jpg")
img = img.convert('L')
try:
img.save("L.jpg")
except IOError:
print("cannot convert")
Paste the child image onto the parent image
from PIL import Image
import os
imgMini = Image.open('../ImageMake/L.jpg')
imgMini = imgMini.resize((300, 300))
imgBack = Image.open('../ImageMake/minitang.jpg')
imgBack = imgBack.resize((600, 600))
imgBack.paste(imgMini, (200, 200, 500, 500))
try:
imgBack.save("bingjie.jpg")
except IOError:
print("cannot save")
Gaussian blur map making
from PIL import Image,ImageFilter
image = Image.open("minitang.jpg")
image = image.filter(ImageFilter.GaussianBlur(radius=20))
try:
image.save("gaoshi02.jpg")
except IOError:
print("cannot save")
QR code making
First install qrcode library ,url It can be a link address , It can also be text data .
import qrcode
qr = qrcode.QRCode(
version=None,
error_correction=qrcode.constants.ERROR_CORRECT_Q,
box_size=10,
border=1,
)
url = ' Gong Shiwei, you are a fool !'
qr.add_data(url)
qr.make(fit=True)
img = qr.make_image(fill_color="green", back_color="transparent")
print (img.pixel_size)
img.save('output2.png')
Character recognition of pictures
If not installed pillow, Open the command prompt as an administrator , Input :pip install pillow.
For example, identify the words in the following pictures , Print to console :
The code is as follows :
from PIL import Image
import pytesseract
im = Image.open('imgText.png')
print(pytesseract.image_to_string(im, lang='chi_sim').replace('\n', ''))
function Python file , If an error is reported as follows , The reason for the error is that : No recognition engine installed tesseract-ocr
tesseract-ocr : link :https://pan.baidu.com/s/1cu4xF8fAXfKYq71qMETeCg Extraction code :5hjq
After decompressing , double-click tesseract-ocr-w64-setup-v4.1.0.20190314.exe Installation
Unpack the installation tesseract-ocr Then do the following operations , It can support Chinese recognition . because tesseract-ocr Chinese recognition is not supported by default .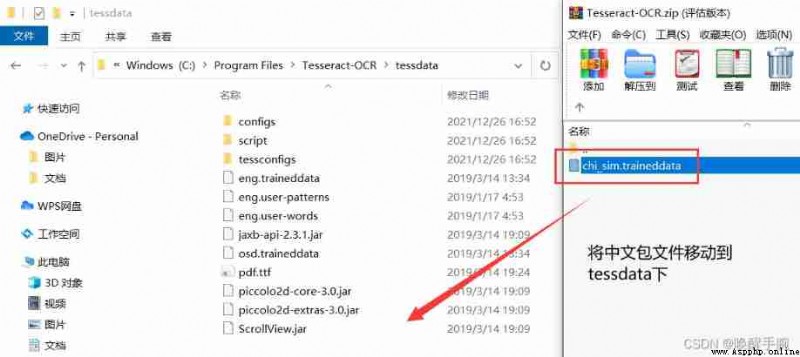
installation is complete tesseract-ocr after , We also need to do some configuration
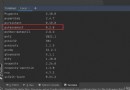
Open Directory :C:\Users\ Your account name \AppData\Local\Programs\Python\Python39\Lib\site-packages\pytesseract
My account name is 16204, The effect is as follows :,
find pytesseract.py, open ( use pycharm open ) Then do the following operations
......
# tesseract_cmd = 'tesseract'
# Put the comments above ,tesseract_cmd, Reassign to you tesseract-ocr Installation directory tesseract.exe Address value of the file
tesseract_cmd = r'C:\Program Files\Tesseract-OCR\tesseract.exe'
# Add r It means not to escape
......
The above operation is : relation OCR and pytesseract
At this point, all our configurations are complete , Run the following code to parse into text
If the following error occurs , Don't worry , The environment variable is not configured , Let's configure the environment variables .
pytesseract.pytesseract.TesseractError: (1, 'Error opening data file C:/Program Files/Tesseract-OCR/tessdata/chi_sim.traineddata Please make sure the TESSDATA_PREFIX environment variable is set to the parent directory of your "tessdata" directory. Failed loading language \'chi_sim\' Tesseract couldn\'t load any languages! Could not initialize tesseract.')
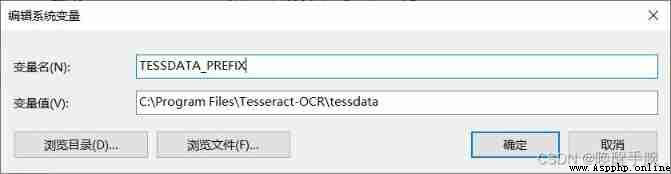
Configuring system variables 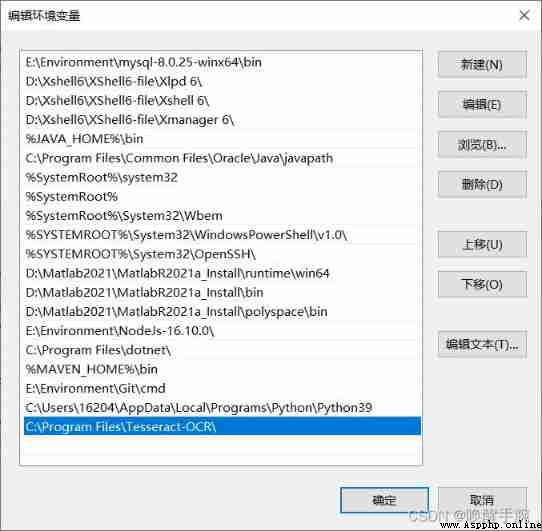
The running results are as follows :( There are still errors in Chinese recognition )
Wake up the ˉˉ Wrist you gang Silly fool !
English picture recognition test
Read the English in the following picture , Print on the console .
Code display :
from PIL import Image
import pytesseract
im = Image.open('imgenglish.png')
print(pytesseract.image_to_string(im, lang='eng').replace('\n', ''))
# lang='eng' The recognition language is set to eng ( English )
# Explain why .replace('\n', ''), Because there will be blank lines in character recognition , So clear these unnecessary blank lines .
The printed results are as follows :( It can be seen that the recognition degree of English is higher than that of Chinese )
Time runs fast with the rapid of my heart.
The last section introduced , Image recognition technology , So this section , introduce Intelligent voice reading
The third-party libraries that need to be used are pypiwin32, You can go to pycharm Of setting Install the third-party library under
import win32com.client
speaker = win32com.client.Dispatch("SAPI.SpVoice")
speaker.Speak(" Wake up your wrist you are really handsome !") # Reading content
Run the above code , You can hear intelligent language reading , Not only support Chinese reading , It also supports reading aloud in English .
Write voice reading alarm clock function example code
First of all python Library about time in :time, It is python The native library of the environment , No installation required .
import time
currentTime = time.localtime() # Get local time assignment to currentTime Variable
print(currentTime)
# result :time.struct_time(tm_year=2021, tm_mon=12, tm_mday=26, tm_hour=19, tm_min=23, tm_sec=29, tm_wday=6, tm_yday=360, tm_isdst=0)
By the visible on time.localtime() Is the structure of the current system time .time.struct_time.tm_year Indicates the current year ,time.struct_time.tm_mon Indicates the current month ······, Other expressions are easy to understand , No examples .
import win32com.client
import time
speak = win32com.client.Dispatch("SAPI.SpVoice")
setUpTime = input(" When do you want the alarm ( for example :19:45:40)= ")
def timeFormat(value):
if value >= 10:
return str(value)
else:
return '0' + str(value)
# Customize Time format function
while 1:
currentTime = time.localtime()
# The era value of the current time
currentH = timeFormat(currentTime.tm_hour)
currentM = timeFormat(currentTime.tm_min)
currentS = timeFormat(currentTime.tm_sec)
timeShow = currentH + ':' + currentM + ':' + currentS
print(' current time :' + timeShow)
if timeShow == setUpTime:
speak.Speak(" Please note that , Please note that ,It's time for homework")
break
time.sleep(1)
# time.sleep(1) Delay 1 second
About datatime Library details
print ' Time :(%Y-%m-%d %H:%M:%S %f): ' , dt.strftime( '%Y-%m-%d %H:%M:%S %f' )
print ' Time :(%Y-%m-%d %H:%M:%S %p): ' , dt.strftime( '%y-%m-%d %I:%M:%S %p' )
print ' Week abbreviation %%a: %s ' % dt.strftime( '%a' )
print ' All week %%A: %s ' % dt.strftime( '%A' )
print ' Month abbreviation %%b: %s ' % dt.strftime( '%b' )
print ' Month full batch %%B: %s ' % dt.strftime( '%B' )
print ' Date time %%c: %s ' % dt.strftime( '%c' )
print ' Today is the first day of the week %s God ' % dt.strftime( '%w' )
print ' Today is the %s God ' % dt.strftime( '%j' )
print ' This week is the... Of this year %s Zhou ' % dt.strftime( '%U' )
print ' Today is the day of the month %s God ' % dt.strftime( '%d' )
What is learning Data visualization , We are crawling to the data for analysis , So data visualization is essential . If you are interested in big data 、 machine learning 、 Words from the field of artificial intelligence , Data visualization Is the first to bear the brunt , So I have to learn .
Data visualization refers to exploring data through visual representation , It is closely related to data mining , Data mining refers to the use of code to explore the rules and associations of data sets .
For bloggers , Commonly used by bloggers Matlab Data visualization , I am BiliBili Matlab The direction of the UP Lord ,Matlab and Python Can be used for data visualization , The main difference :Matlab It is more inclined to engineering calculation , For the simulation of Computational Mathematics . and python What do you mean , More lightweight , It is superior for data visualization .
Third party libraries commonly used for data visualization :plotly、Matplotlib
How to draw a line chart ?
import matplotlib.pyplot
plt = matplotlib.pyplot
# Show me ,y = x^2
X_value = [1, 2, 3, 4, 5]
Y_value = [1, 4, 9, 16, 25]
plt.plot(X_value, Y_value)
plt.show()
# plt.show() Display images
Run the above code , The effect is as follows :
Code the data table , It's shown as follows ( We don't need to be able to recite , Just understand and use , In the later stage, you can check the documents for production )
import matplotlib.pyplot
plt = matplotlib.pyplot
# Show me ,y = x^2
X_value = [1, 2, 3, 4, 5]
Y_value = [1, 4, 9, 16, 25]
plt.plot(X_value, Y_value)
plt.title("Squares Numbers", fontsize=24)
# Set the title and size , Only English is supported
plt.xlabel("variable X_value", fontsize=14)
# Set up x Coordinate name and size , Only English is supported
plt.ylabel("Function Squares of X_value", fontsize=14)
# Set up y Coordinate name and size , Only English is supported
plt.tick_params(axis='both', labelsize=14)
# Set the number size on the axis
plt.legend(['X'], loc=1)
# Add line descriptions for ;loc Is the location of the description , The available numbers are 1-10; When there are multiple labels, it is ['X,'Y'] Reason by analogy
plt.show()
# plt.show() Display images
Perfect the image after the information , The effect of the demonstration is as follows :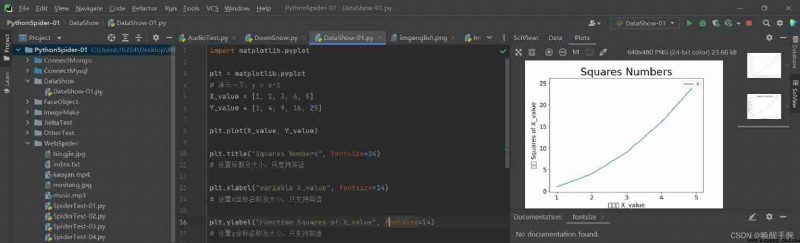
Display Chinese characters :matplotlib.pyplot Chinese characters are not supported by default , The easiest way to do this is to add the following commands to your code :
plt.rcParams['font.sans-serif']=['SimHei']
In the last section, we introduced a simple case of data visualization , In this section, we will introduce in detail matplotlib How to use the library .
matplotlib.pyplot Is to make matplotlib image MATLAB Set of command style functions that work the same .
Every pyplot Functions will make some changes to the graphics : for example , Create graphics , Create a drawing area in the drawing , Draw some lines in the drawing area , Decorate drawings with labels, etc .
Use pyplot Generating visualizations is very fast :
import matplotlib.pyplot as plt
plt.plot([1, 2, 3, 4])
plt.ylabel('some numbers')
plt.show()
# import matplotlib.pyplot
# plt = matplotlib.pyplot
# The two lines of code commented above are simplified to import matplotlib.pyplot as plt
The effect of the demonstration is as follows :
If plot() Command provides a single list or array , be matplotlib Suppose it is y Sequence of values , And automatically generate x value . because python Range from 0 Start , So default x The length of the vector is the same as y identical , But from 0 Start , therefore x The data is [0, 1, 2, 3]
plot() It's a general order , It will accept any number of arguments . for example , To draw x And y The relationship between , You can give the following command :
plt.plot([1, 2, 3, 4], [1, 4, 9, 16])
Format drawing styles
For each pair x,y Parameters , There is an optional third parameter , It is a format string that represents the color and line type of a graph .
The letters and symbols of the format string come from MATLAB, You concatenate a color string with a line style string . The default format string is “ b-”, This is a solid blue line . for example , To draw the above with a red circle , You need to write the following code :
plt.plot([1, 2, 3, 4], [1, 4, 9, 16], 'ro')
plt.axis([0, 6, 0, 20]) #[xmin, xmax, ymin, ymax]
If matplotlib Use lists only , Will be useless for digital processing . Usually , Will use numpy Array to complete . actually , All sequences are internally converted to numpy Array . The following example shows how to use an array to draw several rows with different formatting styles in one command .
import matplotlib.pyplot as plt
import numpy as np
#numpy yes python Built in Library , No installation required
# Returns an array , from 0 To 5, Spacing is 0.25
t = np.arange(0, 5, 0.25)
# Red dotted line , Blue Square , Green triangle
plt.plot(t, t, 'r--', t, t ** 2, 'bs', t, t ** 3, 'g^')
plt.show()
The effect of the demonstration is as follows :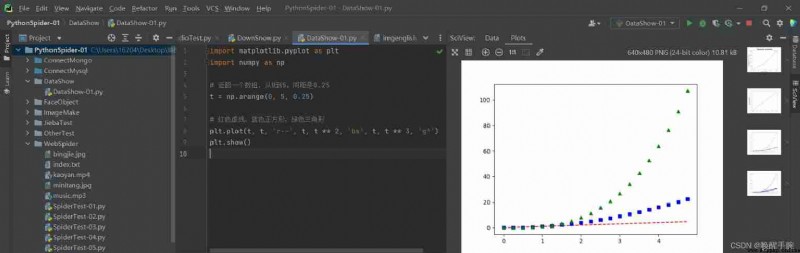
Data visualization picture size setting and saving
import matplotlib.pyplot as plt
x = range(2, 12, 2)
y = [3, 6, 2, 7, 8]
# Set picture size , Pixels
plt.figure(figsize=(10, 4), dpi=70)
# Draw line chart , The color is red , The line width is 2, Transparency is 0.5
plt.plot(x, y, 'r', label='line 1', linewidth=2, alpha=0.5)
# Draw blue dots
plt.plot(x, y, 'bo')
# Save the picture In the current directory image.png
plt.savefig("./image.png")
# display picture
plt.show()
The effect of the demonstration is as follows :
How to use python Data analysis , Make a cloud of words , Like this one below “ The pig ”
We divide the construction of word cloud into two steps :
1、 Processing text data
When generating word clouds ,wordcloud By default, the target text will be segmented with spaces or punctuation as separators .
For Chinese text , Word segmentation needs to be done by the user . The general step is to segment the text first , Then splice with spaces , Call again wordcloud Library function .
2、 Generate word cloud pictures
wordcloud The core of the library is WordColoud class , All functions are encapsulated in WordCloud class in .
You need to instantiate a WordCloud class The object of , And call it generate(text) Methods will text Text into word cloud .
Processing text data
jieba Three word segmentation modes are supported :
lcut(), Try to cut the sentence as precisely as possible , Suitable for text analysis , Words are not redundant ;lcut(s, cut_all=True), Scan the sentences for all the words that can be made into words , Very fast , But it doesn't solve the ambiguity , Redundancy exists ;cut_for_search(s), On the basis of exact patterns , Again shred long words , Increase recall rate , Suitable for search engine segmentation .The case is shown as follows :
import jieba
with open("wordCloudData.txt", "r", encoding='utf-8') as f: # Read our pending text
txt = f.read()
f.close()
remove_data = [",", ".", '\n', '\xa0', ' '] # Invalid data
# '\xa0' Namely HTML Inside
# Remove invalid data
for r_data in remove_data:
txt = txt.replace(r_data, "")
words = jieba.lcut(txt) # Use the exact word segmentation mode to segment words and save them as word list
with open("wordCloud_Save.txt", "w", encoding='utf-8') as f:
for word in words:
f.write(word+' ')
print("File save successfully")
# UnicodeDecodeError: 'gbk' codec can't decode byte 0xad in position 111: illegal multibyte sequence
# In case of any error reported above :encoding='utf-8' The reason for not adding
After successful operation , We can generate in the current directory wordCloud_Save.txt file
Generate word cloud pictures
wordcloud Common methods of class :
We need to prepare a pure background picture as the background shape of the word cloud , You can use Meitu XiuXiu to make deduction , I looked for a picture of a horse to make a deduction , Place on a white background layer (PNG or JPG Fine ), The effect is as follows :
To generate a word cloud, you need to call the font library , Find the local font of your computer , Select a suitable font , A copy of , Put it in the current directory . route : This computer > C: > Windows > Fonts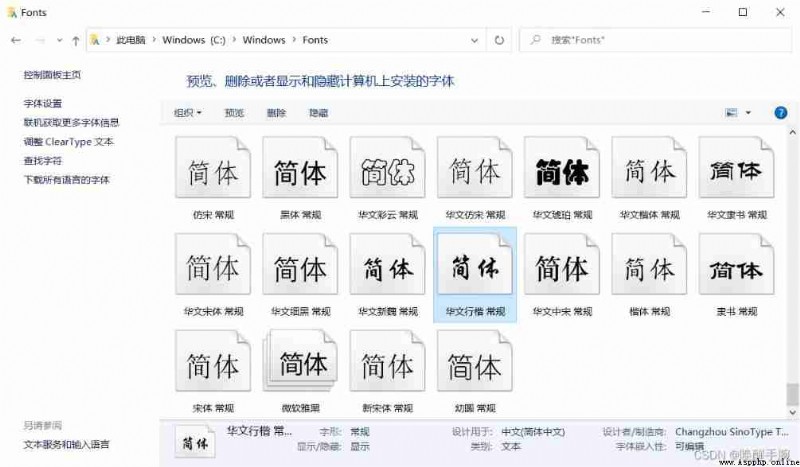
The files in our current directory are as follows :
from wordcloud import WordCloud
import matplotlib.pyplot as plt
import numpy
from PIL import Image
mask = numpy.array(Image.open("horseBackImg.jpg"))
# Read the word cloud shape background image
with open("wordCloud_Save.txt", "r", encoding='utf-8') as f:
txt = f.read()
f.close()
# Read txt( The data of the word cloud to be generated )
word = WordCloud(background_color="white", width=1200, height=1200, font_path='STXINGKA.TTF', mask=mask,).generate(txt)
word.to_file('finalImg.png')
#background_color The background color of the generated word cloud .red,blue
print(" Word cloud picture saved , The name is finalImg.png")
plt.imshow(word) # Use plt The library displays pictures
plt.axis("off") # Turn off the axis
plt.show() # Start presentation
Complete code presentation :
from wordcloud import WordCloud
import matplotlib.pyplot as plt
import jieba
import numpy
from PIL import Image
with open("wordCloudData.txt", "r", encoding='utf-8') as f: # Read our pending text
txt = f.read()
f.close()
remove_data = [",", ".", '\n', '\xa0', ' '] # Invalid data
# Remove invalid data
for r_data in remove_data:
txt = txt.replace(r_data, "")
words = jieba.lcut(txt) # Use the exact word segmentation mode to segment words and save them as word list
with open("wordCloud_Save.txt", "w", encoding='utf-8') as f:
for word in words:
f.write(word + ' ')
f.close()
print("File save successfully")
# UnicodeDecodeError: 'gbk' codec can't decode byte 0xad in position 111: illegal multibyte sequence
# In case of any error reported above :encoding='utf-8' The reason for not adding
mask = numpy.array(Image.open("horseBackImg.jpg"))
with open("wordCloud_Save.txt", "r", encoding='utf-8') as f:
txt = f.read()
f.close()
word = WordCloud(background_color="white", width=2000, height=2000, font_path='STXINGKA.TTF', mask=mask,).generate(txt)
word.to_file('finalImg.png')
print(" Word cloud picture saved , The name is finalImg.png")
plt.imshow(word) # Use plt The library displays pictures
plt.axis("off")
plt.show()
Click on the run , Show the effect 
Python Be able to carry on Web Development of server side , By comparison , Blogger Java Stack web Development has also been learned for a long time , about Java Direction popular Spring frame , The distributed model has also been learned . that Python It can also be done Web Development of , There are lightweight Flask frame , There are also popular heavyweights Django frame .
A heavyweight framework : To facilitate the development of business procedures , Provides a wealth of tools 、 Components , Such as D
jango
Lightweight framework : Only available Web Core functions of the framework , free 、 flexible 、 Highly customized , Such as Flask、Tornado
Let's start with Falsk frame ,Flask It's a lightweight based on Python Of web frame .
First, we need to install the third-party library :falsk
from flask import Flask
app = Flask("MyWebServer")
# MyWebServer It is our app name , Can start from
@app.route('/index')
# ‘/index’ Mapping directory of the server , relative Spring In the framework mapping
def Hello_World():
# For server-side code that maps directory bindings
return ' Wake up your wrist you are really handsome !'
if __name__ == '__main__':
app.run()
# These two lines of code , Is to run this python The meaning of the document , That is to start. Start The meaning of the project .
Falsk The default is 5000 port , And in the Springboot By default, it is enabled in :8080 port , There is a difference between the two .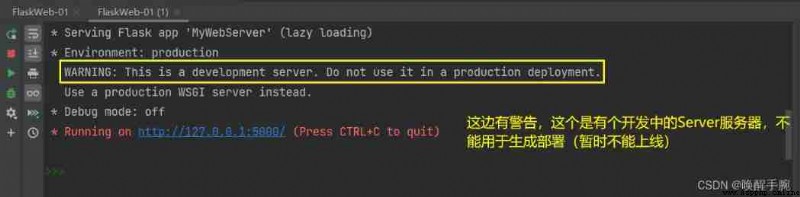
We open our browser to access :
If we want to change our port number , Can be in app.run() Add corresponding parameters to
if __name__ == '__main__':
app.run(host='127.0.0.1', port=8080, debug=True)
# host The host address ,port Port number ,
# debug Open or not debug Pattern ( Modify the code to restart the server automatically , Back end error , Return the true error message to the front end )
test POST Request mode
Let's create a form submission page first , The code is as follows :
<!DOCTYPE html>
<html lang="en">
<head>
<meta charset="UTF-8">
<title>Title</title>
</head>
<body>
<form action="http://127.0.0.1:5000/form" method="post">
<input type="text" name="username" placeholder="Please input your username:">
<input type="password" name="password" placeholder="Please input your password">
<input type="submit" value="Submit">
</form>
</body>
</html>
Server side Python The code is as follows :
from flask import Flask, request
app = Flask("MyWebServer")
@app.route('/index')
def Login():
with open('index.html', 'r', encoding='utf-8') as f:
html = f.read()
return html
@app.route('/form', methods=["POST"])
def ShowData():
print(request.form['username'])
print(request.form['password'])
return "username : " + request.form['username'] + " and password : " + request.form['password']
if __name__ == '__main__':
app.run(host='127.0.0.1', port=5000, debug=True)
We open the browser to access :http://127.0.0.1:5000/index, Fill in the form data and submit , The results are shown below :
Dynamic routing , Implementation of path parameters :
@app.route('/user/<username>/friends')
def user_friends(username):
print(username)
return 'hello ' + username
How to return JSON Data of type
 The first way :
@app.route('/json', methods=["GET"])
def GetJsonData():
print(" return json data ")
print()
return json.dumps({
"name": "wristwaking", "time": str(time.localtime())})
The second way :
from flask import jsonify
def GetJsonData():
print(" return json data ")
print()
return jsonify({
"name": "wristwaking", "time": str(time.localtime())})
that jsonify 、json.dumps What is the difference between the two methods ?
return jsonify Not only will the object be converted into json Format string , Response headers are also set Content-Type:application/json, and json.dumps Just convert the object to json Format string .
How to bind static resource directories , And template file directory
app = Flask(__name__, static_url_path='/app', static_folder='static_files', template_folder='template_files')
# static_url_path Static resource access path , Default :/ + static
# static_folder Static folder Directory , Default :static for example : The media file Resource file
# template_folder Template file directory , Default :template for example :html file
Flask Saved the configuration information to app.config Properties of the , This attribute can be operated according to the dictionary type .
Load... From the configuration object config Information
class DefaultConfig(object):
database_url = 'localhost'
database_user = 'root'
database_password = 'root'
app.config.from_object(DefaultConfig)
View the information about configuring routes :
print(app.url_map)
stay Flask in , Use blueprints Blueprint To organize and manage by module
Blueprint You can have your own template 、 Static files or other general operation methods , It does not have to implement the views and functions of the application .
When an application is initialized , You should register what you need to use Blueprint
But one Blueprint Not a complete application , It cannot run independently of the application , You have to register to an application .
__init__.py file
from flask import Blueprint
student_bp = Blueprint("student", __name__)
from . import student
student.py file
from . import student_bp
@student_bp.route("/student")
def showStudent():
print("students")
server.py file Applications ( Blueprint for import definition )
from students import student_bp
app.register_blueprint(student_bp, url_prefix="/stu")
# url_prefix Pre address setting
The running results are as follows :
request Introduction of relevant parameters :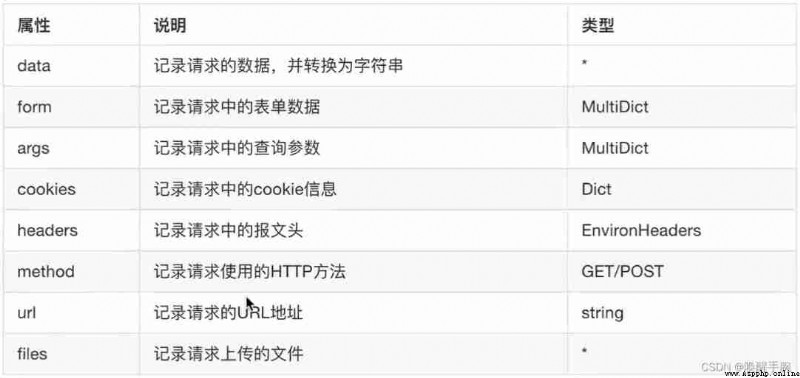
Page redirection or request forwarding :
return redirect( Redirect address )
# How to return to the template page
# return render_template( Address of the page )
You can return a tuple , Such a tuple must be (response, status, headers) In the form of , And contain at least one element .status Value will override the status code , headers It can be a list or a dictionary , As an additional message header value .
@student_bp.route("/student")
def showStudent():
print("students")
return " This is the response body ", 520
In the browser, you can see the results as follows :
How to do cookie Set up :
First introduce flask Under the Treasury make_response
from flask import make_response
@student_bp.route("/student")
def showStudent():
resp = make_response("helle student")
resp.status_code = 200
resp.set_cookie("username", "wristwaking")
# request.cookies.get("username") Read cookie
# delete_cookie("username")
return resp
In the browser, you can see the results as follows :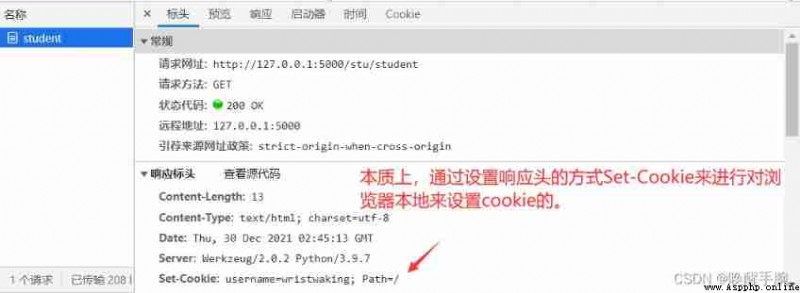
How to do session Set up :
@student_bp.route("/student")
def showStudent():
resp = make_response("helle student")
resp.status_code = 200
resp.set_cookie("username", "wristwaking")
session['loginer'] = ' Wake up the wrist '
print(session.get('loginer'))
return resp
In the browser, you can see the results as follows :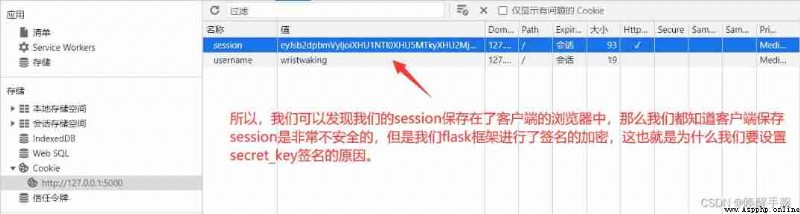
app.secret_key = "wristwaking"
By comparison , stay Springboot In the frame , We are session Stored in the server memory , For session Better management , How to read and write efficiently , We introduce Redis Database as middleware .Redis database , Reads per second can reach 11 Ten thousand times , The efficiency is very high .
Given status code :abort Method
Throw a given status code HTTP Exception Or specify the response , For example, you want to request a page with an exception that is not found , You can call abort(404)
from flask import abort
data = request.args.get("data")
if data is None:
abort(400)
return "you wanna get data = {}".format(data)
Unified exception handling :errorhandler Decorator
@app.errorhandler() Register an error handler , When the program throws the specified error status code , The method parameters decorated by the decorator will be called :
code_or_exception - HTTP Error status code or specified exception
For example, the unified processing status code is 500 Error gives user-friendly tips :
@app.errorhandler(500)
def internal_server_erroi(e):
return ' Server moved '
For example, unified processing ZeroDivisionError A hint of :
@app.errorhandler(ZeroDivisionError)
def zero_division_error():
return " Can not be 0 except "
Introduction to the request hook middleware :( Relative to Spring Namely Filter filter )
before_request
after_request
teardown_request
# Top note before calling , You can do some initialization inside this method
@app.before_first_request
def before_first_request():
print("before_first_request")
# Call... Before each request , There is already a request at this time , It is possible to verify the request in this method
# If the requested verification is not successful , You can respond directly in this method , direct return After that, the view function will not be executed
@app.before_request
def before_request():
print("before_request")
# Called after the view function is executed , And the response generated by the view function will be passed in , In this last step, we can make a unified response
@app.after_request
def after_request(response):
print("after_request")
response.headers["Content-Type"] = "application/json"
return response
# Please call after each request , Will accept a parameter , Parameter is the error message from the server
@app.teardown_request
def teardown_request(response):
print("teardown_request")
print(response)
Start the server , The first 1 Requests , The effect of the demonstration is as follows :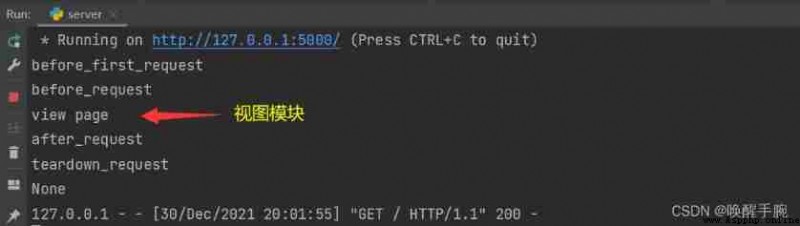
Start the server , The first 2 Requests , The effect of the demonstration is as follows :
Request context Request context And Application context Application context
Flask It's based on WerkZeug Implementation framework , therefore Flask Of App Context and Request Context Is based on WerkZeug Of Local Stack The implementation of the .
These two context object classes are defined in flask.ctx in ,ctx.push The current context object will be pushed onto the stack flask._request_ctx_stack in , This _request_ctx_stack It's also a Thread Local object , That is, it is different in each thread , After the context is pushed onto the stack , When you ask again, you pass _request_ctx_stack.top Take... At the top of the stack , The retrieved object is always an object belonging to its own thread , In this way, the context between different threads is isolated . After request , Thread to exit ,ThreadLocal Local variables are also destroyed , And then call ctx.pop() Pop up the context object and reclaim memory .
Reference blog address :https://zhuanlan.zhihu.com/p/86341642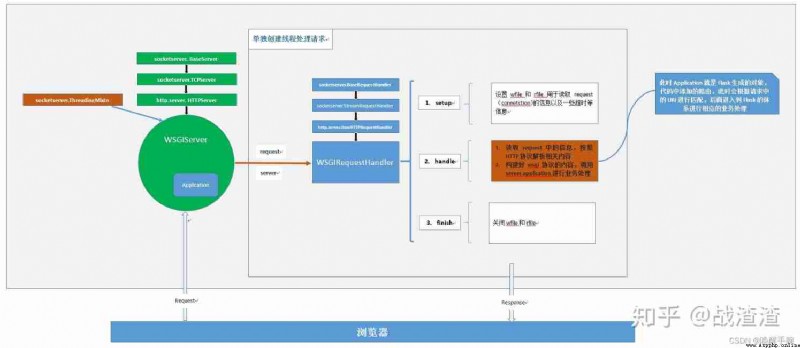
First of all, I have been studying recently flask When , Yes flask The principle of context is not very clear , About localstack The implementation logic of is not very clear , So all kinds of Baidu know , I wrote a blog memo here , First of all, understand localstack Before , Let's get to know python Self contained thread.local
Let's start with Spring Medium ThreadLocal?
ThreadLocal The main function of this system is to isolate data , The filled data belongs to the current thread only , Variable data is relatively isolated from other threads , In multithreaded environment , How to prevent your own variables from being tampered with by other threads .
Spring use Threadlocal The way , To ensure that database operations in a single thread use the same database connection , meanwhile , In this way, the business layer does not need to sense and manage the transaction when using it connection object , Through the propagation level , Skillfully manage switching between multiple transaction configurations , Suspend and resume .
Spring It's used in the frame ThreadLocal To achieve this isolation , Mainly in the TransactionSynchronizationManager In this class , The code is as follows :
private static final Log logger = LogFactory.getLog(TransactionSynchronizationManager.class);
private static final ThreadLocal<Map<Object, Object>> resources =
new NamedThreadLocal<>("Transactional resources");
private static final ThreadLocal<Set<TransactionSynchronization>> synchronizations =
new NamedThreadLocal<>("Transaction synchronizations");
private static final ThreadLocal<String> currentTransactionName =
new NamedThreadLocal<>("Current transaction name");
······ Omitted below
Again for instance : A lot of scenarios cookie,session Data isolation is done through ThreadLocal To do what is realized .
Python Medium ThreadLocal Introduce
We know that in a multithreaded environment , Each thread can use the global variables of its own process . If a thread modifies a global variable , Will affect all other threads . In order to avoid multiple threads modifying variables at the same time , Introduced thread synchronization mechanism , Through mutexes , Conditional variables or read-write locks control access to global variables .
In multithreaded environment , Each thread has its own data . It is better for a thread to use its own local variables than global variables , Because local variables can only be seen by the thread itself , Does not affect other threads , The global variables must be locked .
Sometimes it's inconvenient to use local variables , For example, when functions call each other , Parameter passing , At this time, it is not possible to use global variables , Because each thread handles different objects , therefore python It also provides ThreadLocal Variable , It itself is a global variable , But each thread can use it to save its own private data , This private data is also invisible to other threads , This will kill two birds with one stone .
The following figure vividly shows the relationship between these variables :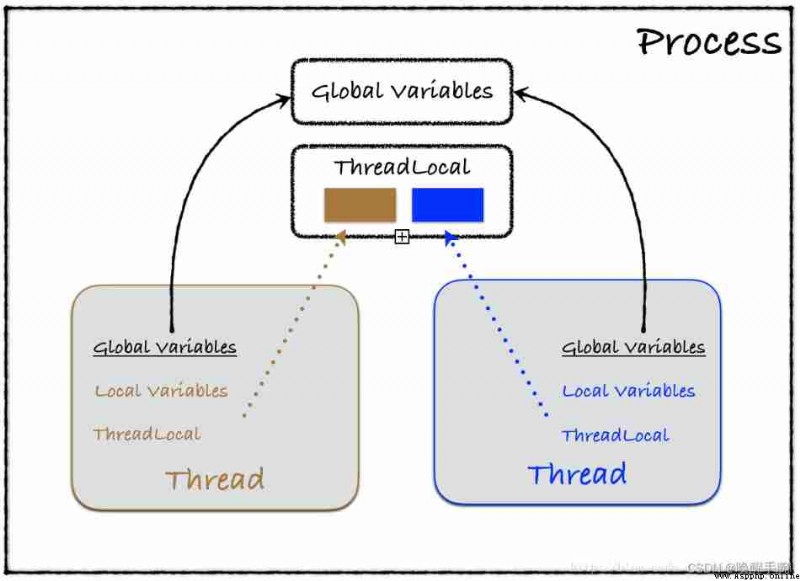
As you can see from the figure, a process contains threads , Different threads can use the same global variable , But changes to global variables can also affect other threads , Now there is threadlocal The appearance of variables , That is, the problem of global variables is solved , It also solves the problem of changing local variables between different threads , They don't influence each other .
Using local variables in a thread doesn't have this problem , Because the local variables of each thread cannot be accessed by other threads :
# coding=utf-8
import threading
def show(num):
print('i am %s num=%s \n' % (threading.current_thread().getName(), num))
def thread_cal():
local_num = 0 # local variable
for _ in range(5):
# time.sleep(2)
local_num += 1
show(local_num)
threads = []
for i in range(5):
threads.append(threading.Thread(target=thread_cal))
threads[i].start()
for i in range(5):
threads[i].join() # Block the main process
print('main process end!')
From the running results of the code, we can see that each thread here has its own local_num, Threads don't interfere with each other .
In the above procedure, we need to give show Function transfer local_num local variable , There's nothing wrong . However, in the actual production environment , We might call a lot of functions , Every function needs a lot of local variables , At this time, the method of passing parameters will be very unfriendly .
To solve this problem , An intuitive way is to create a global dictionary , Save process ID Mapping to local variables of the process , The running thread can change the thread according to its own ID To get the data you own . such , You can avoid passing parameters in function calls , The following example :
# coding=utf-8
import threading
global_data = {
}
def show():
cur_thread = threading.current_thread()
print('i am %s num=%s \n' % (cur_thread.getName(), global_data[cur_thread]))
def thread_cal():
global global_data
cur_thread = threading.current_thread()
global_data[cur_thread] = 0
for i in range(5):
# time.sleep(2)
global_data[cur_thread] += 1
show()
threads = []
for i in range(5):
threads.append(threading.Thread(target=thread_cal))
threads[i].start()
for i in range(5):
threads[i].join() # Block the main process
print('main process end!')
Save a global dictionary , Then use the thread identifier as key, The local data of the corresponding thread is used as value, This approach is a little cumbersome . And there is no real data isolation between threads , Because every thread can read the global dictionary , Each thread can make changes to the dictionary content .
To better solve this problem ,python The thread library implements ThreadLocal Variable ( Many languages have similar implementations , such as Java).ThreadLocal It really achieves data isolation between threads , And you don't need to get your own thread manually ID, The following example :
import threading
import time
global_data = threading.local()
def show():
cur_thread = threading.current_thread()
print('i am %s num=%s \n' % (cur_thread.getName(), global_data.num))
def thread_cal():
global_data.num = 0
# cur_thread=threading.current_thread()
# global_data[cur_thread]=0
for i in range(5):
global_data.num += 1
time.sleep(1)
show()
threads = []
for i in range(5):
threads.append(threading.Thread(target=thread_cal))
threads[i].start()
for i in range(5):
threads[i].join() # Block the main process
print('main thread:', global_data.__dict__) # {}
In the above example, each thread can pass global_data.num Get your own unique data , And each thread reads global_data All different , Really achieve the isolation between threads .
of threading Parameter introduction of
threading.active_count() Returns the currently existing Tread Number of objects
threading.current_thread() Returns the of the currently running thread Tread object
threading.enumerate() Return a list , In the list are still alive Tread object
threading.Thread(group=None, target=None, name=None, args=(), kwargs={}, *, daemon=None) Create thread , Use it directly Tread Class, this is a method , Another way is to create a new class and inherit threading.Thread
group Should be None; For future expansion ThreadGroup Class implementation while retaining .
target Is used for run() Callable objects for method calls . The default is None, Indicates that no method needs to be called .
name Is the thread name . By default , from “Thread-N” The format forms a unique name , among N It's a small decimal number .
args Is a tuple of parameters used to call the target function . The default is ().
kwargs Is the keyword parameter dictionary used to call the target function . The default is {}. If not None,daemon Parameter will explicitly set whether the thread is in daemon mode . If it is None ( The default value is ), The thread inherits the current thread's guard mode property .
Thread Class start() Method is used to start a thread .
hread Class join(timeout=None) Method will make the thread that starts the thread ( Generally refers to the main thread ) wait for , Blocking this thread , The wait does not end until the thread runs .timeout The parameter value of is floating point number , Used to set the timeout time of the operation .
threading.Lock Lock object , It can be used to create locks that are unlocked when they are created , The original lock has two states: locked and unlocked .
Lock object acquire(blocking=True, timeout=-1) Method , Gets the lock .
When the state of the lock is unlocked , acquire() Change the lock state to lock and return immediately ( Execute the following procedure ).
When the state is locked , acquire() Will block ( Suspend the thread that initiated the acquisition of the lock until the lock is released ), When other threads call release() After changing the lock to the unlocked state ( That is, after the lock is released ), Suspended thread acquire() The lock will be acquired and reset to the locked state and return to ( And 1 Agreement ).
blocking Parameter is bool value ( Default True), Locks can be obtained with or without blocking ( That is, whether to block the thread when the lock cannot be obtained )
timeout The parameter is a floating point number ( Default -1), When a lock cannot be obtained ,timeout Positive determines the blocking time , When it is negative, it is infinite waiting .blocking by False when timeout No use ( Blocking time is not involved, of course )
Lock object release() Method , Release the lock .
When the lock is locked , Reset it to unlocked , And back to . If other threads are waiting for the lock to unlock and are blocked , Only one of them is allowed .
When an unlocked lock is invoked , May trigger RuntimeError abnormal .
Lock Object's locked() Method , Used to determine whether the lock has been obtained .
lock , It is generally used when two threads use a common variable at the same time . To prevent confusion caused by two threads modifying variables at the same time .
import threading,time
thread_lock = threading.Lock() # Create a lock
share = ''
def thread_1():
thread_lock.acquire() # Lock the lock and return
global share
for i in range(10):
share = 'hi'
print(share)
thread_lock.release()
def thread_2():
thread_lock.acquire()
global share
for i in range(10):
share = 'hello'
print(share)
thread_lock.release()
if __name__ == '__main__':
thread1=threading.Thread(target=thread_1)
thread2=threading.Thread(target=thread_2)
thread1.start()
thread2.start()
import threading
import time
lock = threading.Lock()
def test():
lock.acquire()
for i in range(5):
print(threading.current_thread().name + ' - ' + str(i))
time.sleep(1)
lock.release()
thread = threading.Thread(target=test)
thread.start()
for i in range(5):
lock.acquire()
print(threading.current_thread().name + ' - ' + str(i))
time.sleep(1)
lock.release()
When printing, there are line breaks and the output is not atomic .
import threading
import time
lock = threading.Lock()
def lock_print(value):
with lock:
print(value)
def test():
for i in range(5):
lock_print(threading.current_thread().name + ' - ' + str(i))
time.sleep(1)
thread = threading.Thread(target=test)
thread.start()
for i in range(5):
lock_print(threading.current_thread().name + ' - ' + str(i))
time.sleep(1)
When to use asynchronous programming ?
Usually , The best time to use asynchrony is when you try to perform work that has the following characteristics :
Asynchrony allows you to set up multiple tasks in parallel and traverse them effectively , Without blocking the rest of the application .
Some examples of tasks that work well asynchronously :
The important thing is to pay attention , Asynchronous programming is different from multithreading or multiprocessing . Asynchronous operations all run in the same thread , But they can be transformed into each other as needed , This makes asynchronous processing more efficient than threading or multitasking .
Python async await and asyncio
Python Recently added two keywords async and await , Used to create asynchronous operations . Consider the following script :
redis-py Provide two classes Redis and StrictRedis Used to implement Redis The order of ,StrictRedis Used to implement most official commands , And use the official syntax and commands ,Redis yes StrictRedis Subclasses of , Backward compatible with older versions redis-py
How to conduct Tencent cloud remote online pagoda Redis database ?
First, Tencent cloud and pagoda panels are released at the same time 6379 Default port number , Then, in the configuration file bind Of IP Binding set to 0.0.0.0, Additional settings Redis The password of is increased Auth Protection of authority authentication .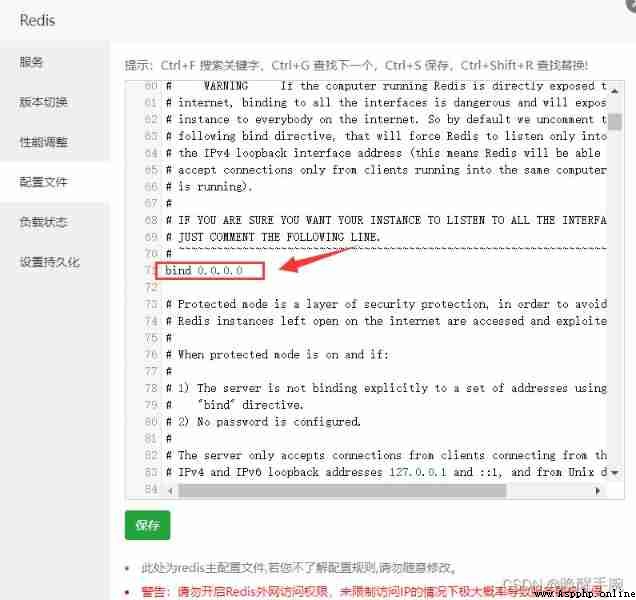
Python Connect redis Need to download the third party Library :redis
import redis
conn = redis.Redis(host='127.0.0.1', password=' Your password ', port=6379)
# have access to url How to connect to the database
# conn = redis.Redis.from_url('redis://@localhost:6379/1')
conn.set('name', ' Wake up the wrist ')
print(conn.get('name'))
The running results are shown below :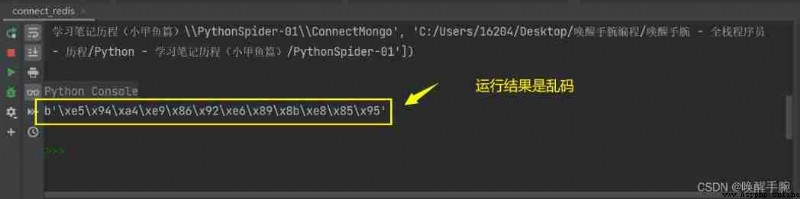
Solution , summary :
Be careful : stay redis The key value pairs stored in are bytes type
If we want to query a certain str Whether the key of type is in the database , Need to use encode, take str Convert to bytes, See if you're db.keys() in ; Use decode Will query out bytes Value to str
If we always use encode and decode Encoding - Decode key value pairs , It will be very troublesome . stay python in , We can make a statement redis The connection pool decode_responses Field to modify the default code of key value pairs .
conn = redis.StrictRedis(host='', password='', port=6379, decode_responses=True)
Implementation of connection pool technology
redis-py Use connection pool To manage one redis server All connections , Avoid every build 、 Free the overhead of the connection . Default , Every Redis Each instance maintains its own connection pool . You can create a connection pool directly , And then as an argument Redis, This allows you to implement multiple Redis Instances share a connection pool
from redis import ConnectionPool
POOL=ConnectionPool(host='127.0.0.1',port=6379,max_connections=100)
Use connection pool :test_redis.py
import redis
from redis_pool import POOl
conn = redis.Redis(connection_pool=POOl)
conn.set('name', 'LinWOW')
print(conn.get('name'))
redis://[:password]@host:port/db # TCP Connect
rediss://[:password]@host:port/db # Redis TCP+SSL Connect
unix://[:password]@/path/to/socket.sock?db=db # Redis Unix Socket Connect
How to traverse query data ?
conn.set('name', ' Wake up the wrist ')
conn.set('password', '5201314')
data = conn.keys() # List the type
data.reverse()
for item in data:
print(item + ' : ' + conn.get(item))
First, let's talk about the only ID Generate UUID:
UUID It should be a familiar thing , Its full name is Universal unique identification code ( English :Universally Unique Identifier, abbreviation :UUID)
import uuid
print(uuid.uuid1())
# 47869270-6aea-11ec-9951-18cc18368a07
print(uuid.uuid1().hex)
# 478692716aea11eca11e18cc18368a07
Through the above code, we use Python Generate a UUID character string , It's using uuid1 Method generation , A minus sign is generated by default ( - ) String , We can go through hex Get the version without minus sign , It can be used according to the actual situation .
Believed to have been used mongodb My friends know very well , Its document defaults to key It's actually a uuid, So we can also use mongodb Of ObjectId To create a UUID.
stay python Directly use a name called bson Third party package of ,BSON Is a computer data exchange format , Mainly used for MongoDB Data storage and network transmission format in database .
The main codes are as follows :
import bson
demoid = bson.ObjectId()
print(demoid)
Snowflake algorithm is to solve the distributed problem id An efficient solution for , Most Internet companies are using the snowflake algorithm , Of course, there are other solutions implemented by the company itself .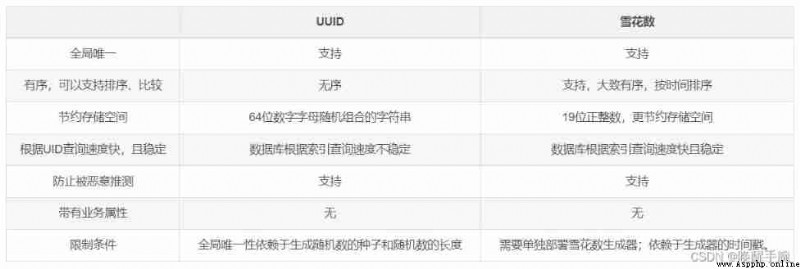
The snowflake algorithm uses 64 position long Type of data storage id, The highest bit is stored 0 perhaps 1,0 For integers ,1 It's a negative number , It's usually 0, So the highest position remains the same ,41 Bits store millisecond timestamps ,10 Bit storage machine code ( Include 5 position datacenterId and 5 position workerId),12 Store serial number . This is the largest 2 Of 10 The power machine , That is to say 1024 Taiwan machine , At most every millisecond, each machine generates 2 Of 12 To the power of 4096 individual id.( Here is the code implementation )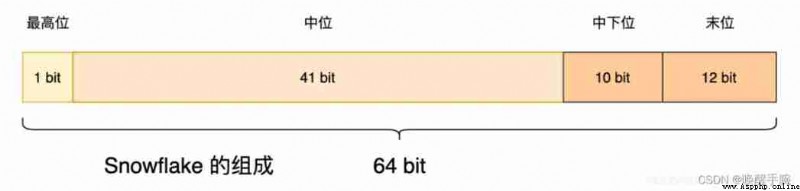
But generally we don't have so many machines , So we can also use 53 Bits to store id. Why use 53 position ?
Because we are almost all with web The page deals with , Just follow js Dealing with ,js The maximum integer range supported is 53 position , Beyond this range, accuracy will be lost ,53 It can be directly by js Read , exceed 53 Bits need to be converted into strings to ensure js Handle it right .53 For storage ,32 Bits store second timestamps ,5 Bit storage machine code ,16 Bit storage serialization , In this way, each machine can produce 65536 It's a non repetitive one id.
import snowflake.client
# Link the server and initialize a pysnowflake client
snowflake.client.setup()
# Generate a globally unique ID( stay MySQL Can be used in the BIGINT UNSIGNED Corresponding )
def get_distributed_id():
return snowflake.client.get_guid()
if __name__ == '__main__':
get_distributed_id()
Regular expressions are used to match and find strings , Crawling data from the Internet naturally uses regular expressions more or less ,python The regular expression of must be introduced first re modular , Regular expression to r guide , for example :
import re
re.match # Match from the start , If not at the beginning, then nothing
re.search # Search the entire string
re.findall # Search the entire string , Return to one list
among r“\d+” Regular expressions represent matching consecutive numbers ,search yes re The function in , from "abc123cd1234" Search for consecutive values in a string , obtain "123", Returns a matching object , The result is as follows. :
import re
reg = r"\d+"
result = re.search(reg, "abcd123efg1234")
print(result) # <re.Match object; span=(4, 7), match='123'>
result = re.findall(reg, "abcd123efg1234")
print(result) # ['123', '1234']
character string "\d" matching 0~9 A number between , character "+" Repeat the previous matching character one or more times .
Be careful :
r"d\d+"The first character must match"b", Followed by consecutive numbers , So it is"d123", No"g123".
"\w" Matches characters including words within underscores , Equivalent to "[a-zA-Z0-9]"
import re
reg = r"\w+"
result = re.search(reg, "Python is easy")
print(result)
# <re.Match object; span=(0, 6), match='Python'>
[a-zA-Z]|[0-9] It means that the number or letter can be matched , This rule is equivalent to [a-zA-Z0-9]
Common regular expressions :
verification Email Address :"^w+[-+.]w+)*@w+([-.]w+)*.w+([-.]w+)*$"
Only Chinese characters can be entered :"^[u4e00-u9fa5],{0,}$"
matching HTML Tagged regular expression :"/<(.*)>.*<!--1-->|<(.*) />/"
Instant messaging on websites is very common , For example, on the web QQ, Chat system, etc . According to the previous technical capability, polling is usually used 、Comet Technical solutions .
HTTP The protocol is non persistent , One way network protocol , After the connection is established, only the browser is allowed to make a request to the server , The server can return the corresponding data . When instant messaging is needed , By polling at a specific time interval ( Such as 1 second ), Send... From the browser to the server Request request , Then the latest data is returned to the browser .
The most obvious disadvantage of this method is that it needs to send requests constantly , And usually HTTP request Of Header It's very long , To transmit a very small amount of data There's a huge price to pay , It's very uneconomical , It takes up a lot of Broadband .
shortcoming : Can lead to too many unnecessary requests , Waste traffic and server resources , Every request 、 The reply , All waste a certain amount of traffic on the same header information
WebSocket protocol yes HTML5 A new agreement . It realizes full duplex communication between browser and server (full-duplex). The first handshake needs the help of HTTP Request completed .
stay WebSocket in , Just server and browser through HTTP The protocol makes a handshake , Then create a single TCP The communication channel for data transmission .
Connection process —— Handshake process

WebSocket And HTTP The relationship between
The same thing :
Difference :
contact :
WebSocket When establishing a handshake , The data is through HTTP Transmission of . But after it was built , It's not necessary to HTTP Agreed .
http Status code 101 summary
Handover protocol . Server switches protocol according to client's request . Can only switch to a more advanced protocol , for example , Switch to HTTP New version agreement for .
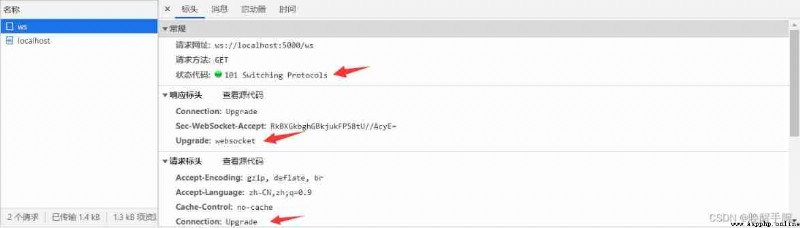
The back-end code implementation is as follows :
from flask import request, Flask
from geventwebsocket.handler import WebSocketHandler # Provide WS Agreement processing
from geventwebsocket.server import WSGIServer # Hosting services
from geventwebsocket.websocket import WebSocket # Grammar tip
app = Flask(__name__)
user_socket_list = []
@app.route("/socket")
def chat_socket():
# Get the current client and server Socket Connect
user_socket = request.environ.get("wsgi.websocket") # type:WebSocket
if user_socket:
user_socket_list.append(user_socket)
print(len(user_socket_list), user_socket_list)
# 1 [<geventwebsocket.websocket.WebSocket object at 0x000001D0D70E1458>]
print(user_socket, "OK The connection has been established , Next, send a message ")
while 1:
# Wait for the front end to send the message
msg = user_socket.receive()
print(msg)
for u_socket in user_socket_list:
try:
u_socket.send(msg)
except:
continue
@app.route("/chat")
def chat():
with open("index.html", 'r', encoding='utf-8') as f:
html = f.read()
f.close()
return html
if __name__ == '__main__':
http_serve = WSGIServer(("0.0.0.0", 5000), app, handler_class=WebSocketHandler)
# This startup mode is similar to app.run() No conflict , Any request sent by this startup mode can be accepted
http_serve.serve_forever()
Content-Type:multipart/form-data : Request body binary data , And with the boundary boundary To segment field, Each can set the data type of the next level Content-Type;
The front-end code is shown below :
<form action="/load" method="post" enctype="multipart/form-data">
<input type="file" name="file"/>
<input type="submit" value="upload"/>
</form>
The back-end code is shown below :
@app.route("/load", methods=['POST'])
def load():
file = request.files['file']
print(file) # <FileStorage: 'picture.jpg' ('image/jpeg')>
print(file.filename) # picture.jpg
print(file.content_type) # image/jpeg
print(file.mimetype) # image/jpeg
return " Upload successful !"
When web When the server receives a static resource file request , Depending on the suffix of the request file in the server's MIME The corresponding... Is found in the configuration file MIME-Type, According to MIME-Type Set up HTTP Response Of Content-Type, The browser then follows Content-Type Value processing file for .
stay Flask In the service framework , When the client transfers files to the server , When the file arrives at the server , Will be taken as stream Is cached in memory as a temporary file .
Save directly on the server ( When you know what you are uploading pdf still png still jpg… when )
filestorage.save(' Temporary storage .pdf')
Read into binary stream using
file_bytes = filestorage.read()
here : adopt .read() After the method ,FileStorage The object has been taken out of the cache for use , So many people use it again later FileStorage.read() The way when , No data was read ( Empty bytes data ), therefore , The best way is , Save it with a variable , As above file_bytes, When you need to use it later , Don't worry about not reading data anymore .
Comprehensive case :
Front end upload pictures , And preview the code :
<!DOCTYPE html>
<html lang="en">
<head>
<meta charset="UTF-8">
<title> Picture upload preview </title>
<meta name="viewport" content="width=device-width, initial-scale=1.0, maximum-scale=1.0,minimum-scale=1.0,user-scalable=no">
<script src="https://code.jquery.com/jquery-3.3.1.min.js"></script>
</head>
<body>
<!-- Set up input Of type and accept, Of course, you can also set multiple Allow multiple file uploads , There is no setting here -->
<form method="post" action="/load" enctype="multipart/form-data">
<input type="file" accept="image/*" name="file" onchange="showImg(this)"/>
<input type="submit" value=" Click on the submit ">
</form>
<h2> Picture preview effect :</h2>
<img src="" alt="" id="img">
<script> function showImg(obj) {
 var file = $(obj)[0].files[0]; // Get file information  var imgdata = ''; if (file) {
 var reader = new FileReader(); // call FileReader reader.readAsDataURL(file); // Read file as DataURL(base64) reader.onload = function (event) {
 // Triggered when the read operation is completed . $("#img").attr('src', event.target.result) // take img Labeled src Bind as DataURL }; } else {
 alert(" Upload failed "); } } </script>
<style> img {
 width: calc(100% - 50px);display: block;margin: 0 auto } </style>
</body>
</html>
Back end Flask Back to picture ( Byte stream returns )
from flask import Flask, make_response, request
from PIL import Image
@app.route("/load", methods=['POST'])
def load():
save_path = "D:/ My picture /picture.jpg"
file = request.files["file"]
file.save(save_path)
img = Image.open(save_path)
img = img.convert('L')
img.save(save_path)
with open(save_path, 'rb') as file_bytes:
image = file_bytes.read()
resp = make_response(image)
resp.status_code = 200
resp.headers["Content-Type"] = "image/jpg"
return resp
The effect is shown as follows : Upload pictures and turn them into grayscale images 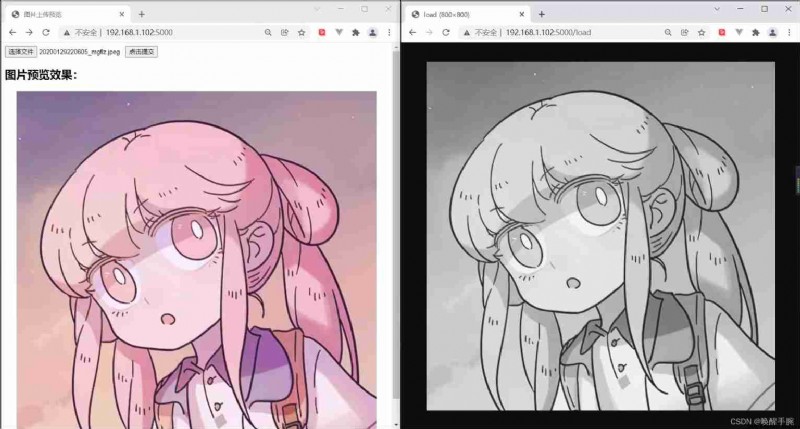
If you use yum Install third party package , The following error is reported :
cannot open Packages database in /var/lib/rpm
The solution is as follows :
[[email protected]_0_17_centos rabbitmq]# cd /var/lib/rpm
[[email protected]_0_17_centos rpm]# ls
Basenames Conflictname __db.001 __db.002 __db.003 Dirnames Group Installtid Name Obsoletename Packages Providename Requirename Sha1header Sigmd5 Triggername
[[email protected]_0_17_centos rpm]# rm -rf __db*
[[email protected]_0_17_centos rpm]# rpm --rebuilddb
yum install pip Methods :
No, python-pip The package executes the command yum -y install epel-release
After successful execution , Re execution yum install python-pip
Yes, installed pip upgrade pip install --upgrade pip
of pip Common operations for
pip(3) -V: Check for locally installed pip Version number
pip(3) list: Check local installed python library
pip(3) install Package name : Install a third-party library
pip(3) uninstall Package name : Uninstall a third-party library installed locally
About Flask Enable access to the Internet
Specify to use a host, The default is localhost, If you want access outside the server , To develop :host: "0.0.0.0"
But after I set it like this , Can also be passed locally localhost Access to the , Can not help but want to break the difference between the two , Here's a summary :
Each host may have multiple ip Address , For example, multiple network cards or multiple ip,127.0.0.1 It's a local loopback address , It is for you to visit yourself , Fast ( No need to go through the entire protocol stack ), Never appear in a network outside the host , So it is only suitable for development environment .
localhost It's just 127.0.0.1 Another name for
0.0.0.0 There are several different meanings , But when you tell the server to listen 0.0.0.0, It means listening to every available network interface , From a server process perspective ,IP The address is 127.0.0.1 The loopback adapter for looks like any other network adapter on the machine , So I was told to listen 0.0.0.0 Your server will also accept connections on this interface .
So in practice , In general, when Binding ports on the server, we can choose to bind to 0.0.0.0, In this way, my service can be accessed through multiple servers of the host ip Address access to my services .
For example, I have a server , An Internet address A, An intranet address B, If the port I bind specifies 0.0.0.0, Then you can access the application through the intranet address or the extranet address .
from flask import Flask
app = Flask(__name__)
@app.route('/')
def hello_world():
return 'Hello, World!'
if __name__ == "__main__":
app.run(host='0.0.0.0', port=8080)
Linux function python Introduction to :
ps -ef|grep python # View the current python The process of
nohup python server.py & # Protected process mode operation python, Background operation
pyenv: python2.7: command not found The `python2.7’ command exists in these Python versions: 2.7.5
As below , To set up Python3.6 For the default version , You should also be able to run other versions such as 3.5,3.7, Use :
pyenv install 3.6.6
pyenv install 3.5.6
pyenv install 3.7.0
pyenv local 3.6.6 3.5.6 3.7.0
If you want to restore the system's own Python, Use
pyenv local system
Force removal of installed programs and their associations (python)
rpm -qa|grep python|xargs rpm -ev --allmatches --nodeps
Force deletion of all remaining files (python)
whereis python |xargs rm -frv
The program doesn't have any configuration files , So it's totally closed to the outside world , Once the program needs to modify some parameters, the program code itself must be modified and recompiled , In order to make the necessary configuration possible after the program leaves the factory , So use the configuration file ; There are many kinds of configuration files , Such as INI The configuration file ,XML The configuration file ,cfg The configuration file , You can also use the system registry .
This paper mainly introduces INI File format information .
INI ” It's English “initialization” An abbreviation for the first three letters of ; Of course INI file The suffix of is not necessarily ".ini" It can also be ".cfg",".conf ” Or is it ".txt"
INI The format of the file is very simple , The three most basic elements are :parameters,sections and comments
What is? parameters?
INI The most basic “ Elements ” Namely parameter; every last parameter There is one. name And a value, As shown below :
name = value
What is? sections ?
be-all parameters It's all about sections Combined as a unit . be-all section The names are all on one line , also sections Names are surrounded by square brackets ([ and ])
stay section All after the declaration parameters All belong to section. For one section There is no obvious end flag , One section The beginning of is the last section The end of , Or is it end of the file.
Sections In general, it cannot be nested, Of course, it can also be realized under special circumstances sections Nesting of .
section As shown below :
[section]
What is? comments ?
stay INI The comment statements in the file are marked with semicolons “;” At the beginning . All comment statements, no matter how long, are exclusive until the end . Everything between the semicolon and the line terminator is ignored .
Examples of notes are as follows : The default is the character type , No need to add ""
;comments text
give an example ini file The format of :
[infor]
username= Wake up the wrist
password=12345
;this is my information
utilize python To read and write ini file : utilize configparser Library for reading and writing
import configparser
config = configparser.ConfigParser()
config.read_file(open('config.ini', encoding='utf-8', mode='rt'))
test_value = config.get("mysql", "username")
print(test_value)
For more information, please refer to this blog :python ini File read and write Method
About why to use Python To operate Word ? For the following reasons :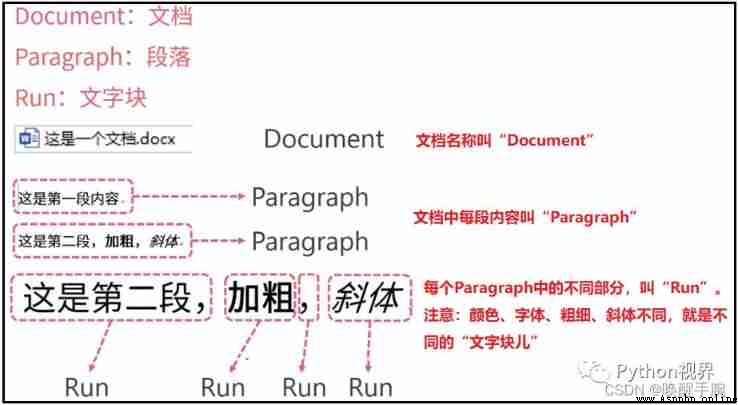
In our work , If you just use Word Documents to complete the work , That must be understandable , But there are always some scenes , It will annoy you . For example, copy some information from web pages in large quantities , Put it in order Word in .
Before the start , Third party libraries should be installed first python-docx
pip install python-docx
Add Title paragraph add_heading(self, text="", level=1)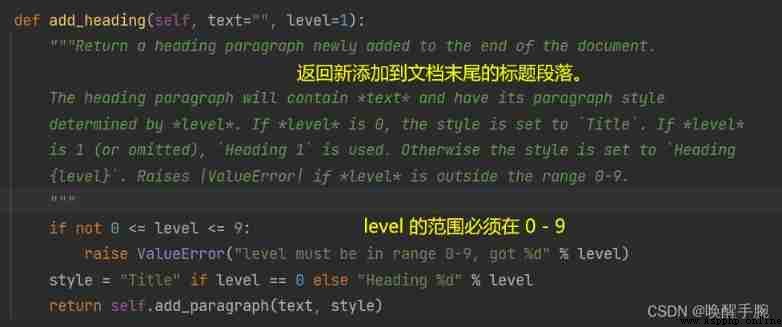
Generated in word The effect in the document is shown as follows :
Add a blank page ( Page break operation )docx.add_page_break()
Add a new natural segment add_paragraph(self, text='', style=None)
from docx import Document
from docx.document import Document as Document_Me
# create Document() object
docx: Document_Me = Document()
# docx.add_heading(" The first natural paragraph ", level=0)
docx.add_paragraph(text=" The first sub natural paragraph ", style=None)
docx.save("word.docx")
Some students encounter the function that the code does not display prompts , So it's because docx object , The editor mistook it for Document() The direct object of ,from docx.document import Document as Document_Me, Let's go docx The object is subordinate to docx.document.Document Class object .
add_paragraph(self, text='', style=None) After the function call, it will return Paragraph Class object 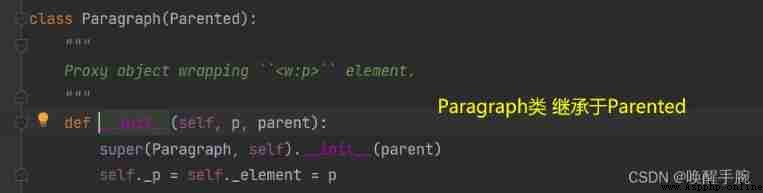
Then we operate Paragraph Class to write paragraph content .
parag = docx.add_paragraph(text=" The first sub natural paragraph ", style=None)
parag.add_run("hello world")
Generated in word The effect in the document is shown as follows :
The generated Chinese characters are strange , because docx The library is not very friendly to Chinese support , therefore , You need to set the font in the program . When initializing the document , Set to global .
hold helloworld Change color operation :
from docx.shared import RGBColor
parag.add_run("hello world").font.color.rgb = RGBColor(255, 0, 0)
In fact, the operation of the text in these paragraphs is Run Operation of class object :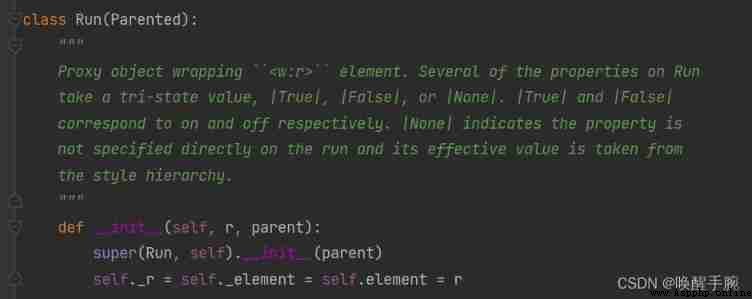
The font size of the text in the relevant paragraph 、 The font size 、 The font italics are adjusted as follows :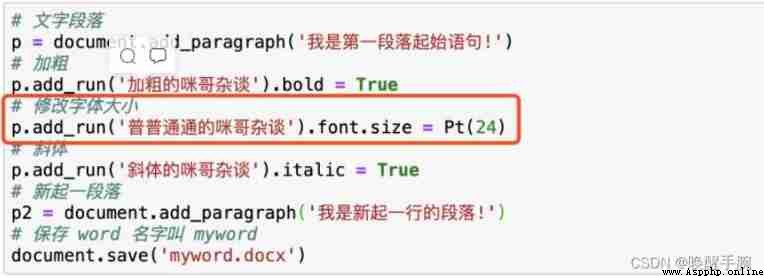
Case study : utilize Python adjustment Word Document style : Original blog address
from docx import Document
from docx.shared import Pt,RGBColor
from docx.oxml.ns import qn
doc = Document(r"G:\huanxingshouwan\_test2.docx")
for paragraph in doc.paragraphs:
for run in paragraph.runs:
run.font.bold = True
run.font.italic = True
run.font.underline = True
run.font.strike = True
run.font.shadow = True
run.font.size = Pt(18)
run.font.color.rgb = RGBColor(255,255,0)
run.font.name = " Song style "
# Set a Chinese font like Tahoma , The following... Must be added 2 Line code
r = run._element.rPr.rFonts
r.set(qn("w:eastAsia")," Song style ")
doc.save(r"G:\huanxingshouwan\_test1.docx")
Other detailed operation introduction :
Add table
from docx import Document
doc = Document()
list_cont = [
[" Wake up the wrist ", " male ", " Hubei province "],
[" Wake up the wrist ", " male ", " The Beijing municipal "],
[" Wake up the wrist ", " male ", " Guangdong province, "],
[" Wake up the wrist ", " male ", " Hunan province "]
]
table = doc.add_table(rows=4, cols=3)
for row in range(4):
cells = table.rows[row].cells
for col in range(3):
cells[col].text = str(list_cont[row][col])
doc.save("test.docx")
Modify paragraph style : Alignment style
from docx import Document
from docx.enum.text import WD_PARAGRAPH_ALIGNMENT
doc = Document()
print(doc.paragraphs[0].text)
doc.paragraphs[0].alignment = WD_PARAGRAPH_ALIGNMENT.CENTER
doc.save(r" Alignment style .docx")
Modify paragraph style : Row spacing
from docx import Document
doc = Document()
for paragraph in doc.paragraphs:
paragraph.paragraph_format.line_spacing = 5.0
doc.save(" Row spacing .docx")