In the last class , We designed a smart Agricultural Internet of things system , Through a blank board to detect the soil moisture during plant growth , Upload humidity data to SIoT Internet of things platform for remote viewing and remote control of watering from the platform when the humidity is low .
However , In the real agricultural scene , It is often necessary to detect diverse data in different places , And it is aggregated to a platform master station for remote access .
that , In this class , Let's use DFRobot Of 3 A blank board , Let's design a multi node intelligent agricultural system , Simulate the real agricultural scene .

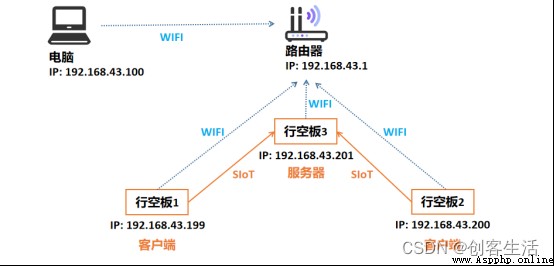
Prepare multiple blank boards ( With 3 Block as an example ), Connect all blank boards and computers to the same LAN segment . Then open it separately on the third blank board SIoT Application as server , The soil moisture data detected by the first row blank plate and the light value data detected by the second row blank plate , While each is displayed on the screen , Also sent to the board 3 Of SIoT On the Internet of things platform ; Last , Make the third blank board subscribe to the messages received by the IOT platform , Place plate 1 Soil moisture and plate 2 The light intensity is displayed on the screen together , also , When the two detected environmental data are poor , Automatically send an alert email to our mailbox , To remind us of watering and lighting in time .


Knowledge point
Hardware list :
Empty board x3
Type-C&Micro Two - USB Line x3
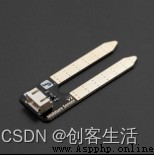
Soil moisture sensor x1
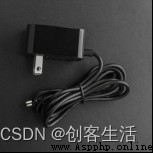
12V/1000mA The power adapter x1
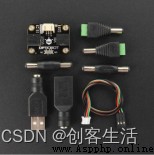
Simple relay module x1

Submersible pump with water pipe x1
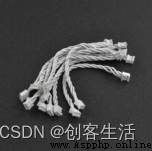
both ends PH2.0-3P White Silicone stranded wire x2

The number is red LED Light emitting module x1
Software use :Mind+ Programming software x1
other : 1、 Flowerpots with plants x1
Use Python Programming to send mail requires two key steps , The next step is to construct the message content , Another step is to send an email . The former , We can use email Library to implement , the latter , We can use smtplib Library for .

2、email.mime.text package MIMEText Module creates mail text
email.mime.text Bag MIMEText The module can create text content when constructing messages , When using , You need to import this module first , Then instantiate MIMEText() Class to create text objects .
from email.mime.text import MIMEText # Import email.mime.text In bag MIMEText modular
msg=MIMEText('Hello World','plain','utf-8') # Create a message text object ,‘Hello World’ Corresponding text content ,'plain' Refers to the set text format ,'utf-8' Refers to the set code
among ,“Hello World” Refers to the text content to be sent ,“plain” Refers to the format of text ,“utf-8” It means coding .
3、email.utils package formataddr Module format content
email.utils Bag formataddr The module can format the input content when constructing the mail , So that the mail server can recognize . When using , You need to import this module first .
from email.utils import formataddr # Import formataddr modular , Responsible for formatting the input content
''' Three header messages : Sender , The recipient , The theme '''
msg['From']=formataddr([my_name,my_sender]) # Define sender information : The nickname of sender's email in brackets 、 Sender email account
msg['To']=formataddr([my_user_name,my_user]) # Define recipient information : The nickname of the recipient's email in brackets 、 Email account of the addressee
msg['Subject']= ' Email test ' # Define the subject of the message , It can also be said that the title
among ,“msg['From']” Indicates the sender information in the e-mail message , Including email 、 nickname ;“msg['To']” Indicates the information of the recipient in the mail message , Including email 、 nickname ;“msg['Subject']” The subject of the email , Text content “ Email test ” Is its specific content .
here , We go through “formataddr()” Function formats the sender information and recipient information text of the e-mail .
4、smtplib Library functions
smtplib The library can realize the function of sending mail , When using , First, you need to import the library , secondly , Through “SMTP_SSL()” Function to create a SMTP Service object to connect to mailbox , Then passed “login()” Function login mailbox , Then use “sendmail()” Function to send mail , Finally through “quit()” Function to exit the connection to the mailbox server .
(1)smtplib library SMTP_SSL() Function creation SMTP service object
smtplib In the library SMTP_SSL() Function to create SMTP Service object to connect to mailbox . When using , First, you need to import the library . import smtplib # Import smtplib library
server=smtplib.SMTP_SSL("smtp.qq.com", 465) # establish SMTP service , Connect qq Mailbox server , In the sender's mailbox SMTP The server ,SMTP Protocol encryption port yes 465
among ,“smtp.qq.com” refer to QQ Mailbox server ,“465” Express SMTP Protocol encryption port .
(2)smtplib library login() Function login mailbox
smtplib In the library login() Function to log in to the sender's mailbox . When using , It is necessary to set the account number of the mailbox to be logged in and the third-party login authorization code .
my_sender='10******[email protected]' # Set the sender's email account , Enter your own email
my_pass = 'sq******ga' # Set the sender's mailbox authorization code
server.login(my_sender, my_pass) # Login mailbox , The brackets correspond to the sender's email account 、 Mailbox password
among ,“my_sender” It refers to the sender's email account ,“my_pass” It refers to the authorization code of the sender's mailbox .
(3)smtplib library sendmail() Function to send mail
smtplib In the library sendmail() Function to send mail . When using , The sender's email account should be set 、 The email account of the recipient and the content of the message to be sent .
msg=MIMEText(content,'plain','utf-8') # Create a message text object ,Title Corresponding text content ,'plain' Refers to the set text format ,'utf-8' Refers to the set code
my_sender='10******[email protected]' # Set the sender's email account , Enter your own email
my_user='10******[email protected]' # Set the recipient email account , I'll send it to myself
server.sendmail(my_sender,my_user,msg.as_string()) # Send E-mail , The brackets correspond to the sender's email account 、 Email account of the addressee 、 The string format of the message
among ,“my_sender” It refers to the sender's email account ,“my_user” It refers to the email account number of the recipient ,“msg.as_string()” This refers to defining the message as a string .
(4)smtplib library quit() Function to close the connection
smtplib In the library quit() Function to close the connection to the mailbox server .
server.quit() # Close the connection
1、 Analysis design
In this project , We will complete the design of multi node intelligent agriculture system . First , We need to 3 The blank board and the computer are connected in the same LAN ( With the help of routers / Mobile hotspot ); after , We will use each board in turn USB Cable to connect the computer for network configuration ; Last , Let's open one of the boards separately SIoT The application makes it a server , Other boards are used as clients , Send data to by programming SIoT On the Internet of things platform .
2、 configure network
STEP1: Connect the computer to the router Wi-Fi in
Tips : Without a router, you can also realize networking by turning on the hotspot on your mobile phone .
STEP2: Take a board , It through USB Connect the cable to the computer .
STEP3: Open the browser , Sign in “10.1.2.3” Blank board page menu , configure network , Connect them together Wi-Fi in .
STEP4: After completion , pull out USB Line , Configure the network for the other two blank boards in the same way .
STEP5: to 3 Power on the board , Keep them all on
here , There are three ways to power on the board , Choose one of them :
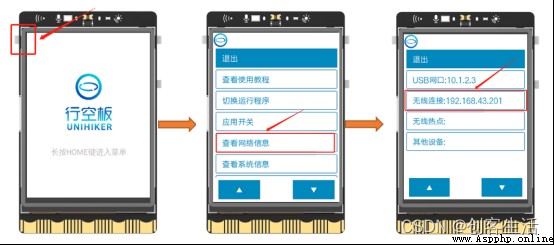
STEP6: Check the wireless connection of each board IP Address .
Check and record in turn 3 The wireless connection of the board IP Address , Here's the picture , The first three groups of numbers should be the same , This shows that our success will 3 All the boards are connected in the same LAN segment .
Tips: here , Wireless connection of three boards IP The addresses are “192.168.43.199”、“192.168.43.200”、“192.168.43.201”.
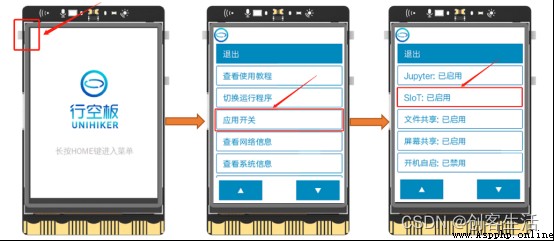
3、 Turn on SIoT
STEP1: Start a board alone SIoT service
Find one of the boards , Press down HOME Key to enter the menu , single click “ Apply switch ”, find SIoT Click enable after application , As shown in the figure below . meanwhile , Confirm the remaining two boards SIoT App off .
Tip1: here , We will SIoT The service started at IP by “192.168.43.201” On my board .
Tip2: Close the... Of other boards SIoT It is to avoid that if the input address is wrong, the data will not be in the same place .
STEP2: Check the computer networking
Open the browser , Input IP Address “192.168.43.201” And return , Enter the web page menu of the line blank board , Find the... Under the application switch SIoT service , Click on “ Open the page ”.
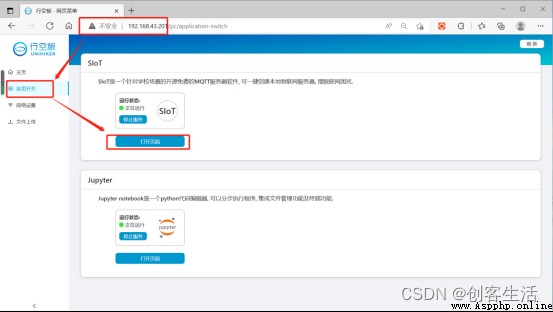
Tips: here , Need to “192.168.43.201” Change to personal actual IP Address .
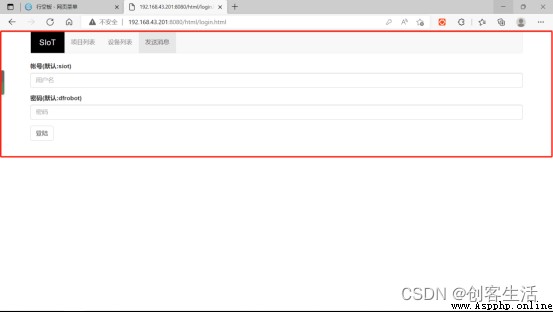
If the following interface appears ( Internet of things platform web side ), It means that the computer and the board are connected in the same LAN , And SIoT Application started successfully .
here , For the sake of distinguishing , We will turn on SIoT The applied board is recorded as the line blank board 3, The other two boards are line blank boards 1 And the line blank board 2 .
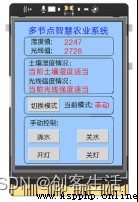
In this task , We will be on the line blank board 1 A background picture of smart agriculture is displayed on the screen of , The moisture data detected by the external soil moisture sensor is displayed on the screen , Send one side to the board 3 Of SIoT On the platform , The overall function here is the same as that in the previous lesson .
meanwhile , Alignment plate 1 Set automatic and manual modes , In automatic mode , When the detected soil moisture value is too low , Automatic watering through external relay and water pump ; In manual mode , It can be watered by clicking the button on the screen ; The modes can also be switched manually through the button .
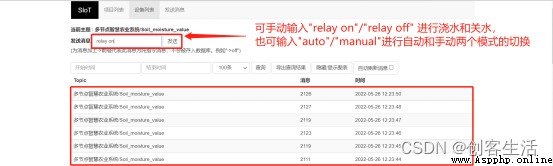
Besides , Also available at SIoT Internet of things platform web page sending “relay on”、“relay off”、“auto” and “manual” Four instructions , Remote control watering 、 Turn off the water 、 Switch between automatic mode and manual mode .
1、 Hardware construction
STEP1: Connect the soil moisture sensor to the blank board 1 Of P21 Pin , The relay is connected to P23 Pin
STEP2: Use a screwdriver to connect the positive and negative lines of the water pump with the adapter

STEP3: Use the relay to turn the 12V The power switch is connected with the adapter of the water pump
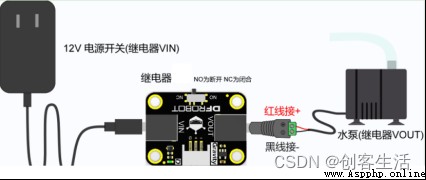
STEP4: Turn the relay switch to NC End
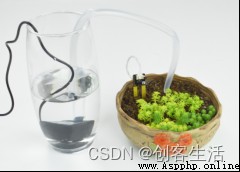
STEP5: Insert the water pipe and the soil moisture sensor into the flowerpot , The water pump is fixed in a beaker full of water
STEP6: take 12V Plug in the power switch 220V Power supply socket
Tips : For the above specific steps, please refer to chapter 8 course .
2、 Programming
STEP1: Create and save project files
start-up Mind+, Save the project as and name it “010、 Multi node intelligent agricultural system 01”.
STEP2: Remote connection line blank board
Programming different boards , We can open multiple at the same time Mind+, In all Mind+ Manually enter different IP Address , In this way, you can connect and access different boards .
(1) choice “ Manual input ”
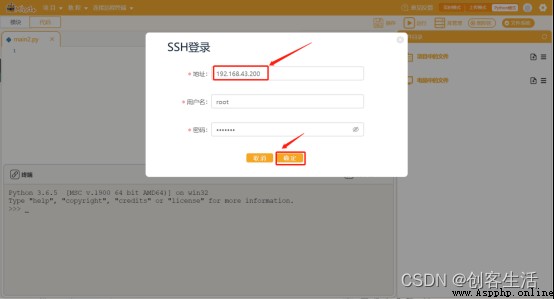
Tips: Need to change to the actual line blank board 1 Of IP Address , At the same time, the board here must be in the normal startup state and in the same place as the computer Wi-Fi Below you can connect successfully .
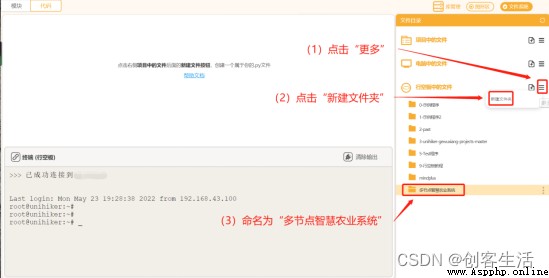
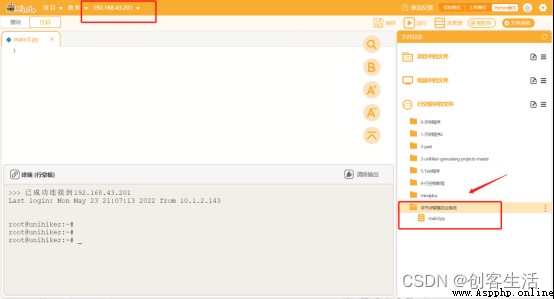
STEP3: On the line blank 1 in gen Create a new folder , And named it “ Multi node intelligent agricultural system ”
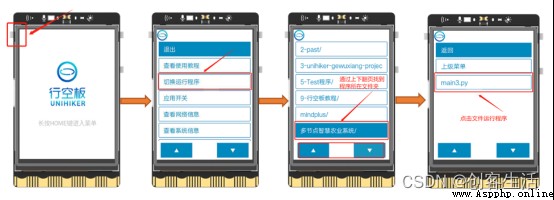
Tips: here , We build the program directly on the board , In this way, it is convenient to directly pass through the blank board Home Menu to run the program without starting MInd+ function , The operation method will be introduced later .
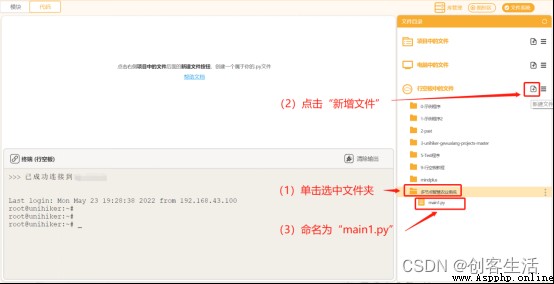
STEP4: Create and save Python file
stay “ Multi node intelligent agricultural system ” In the folder Create a Python Program files “main1.py”, Double-click to open .
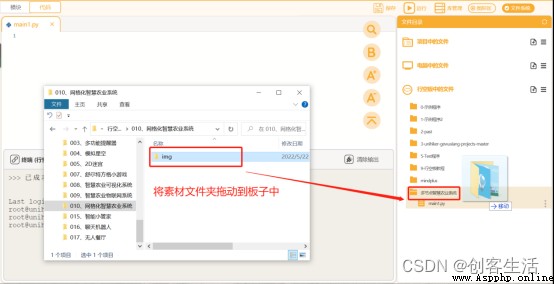
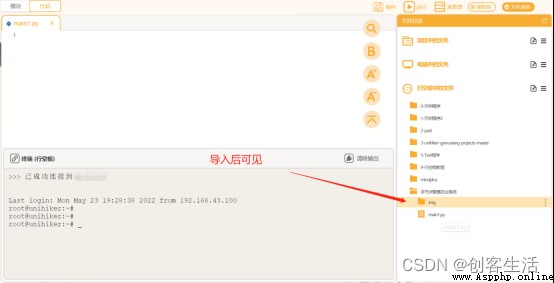
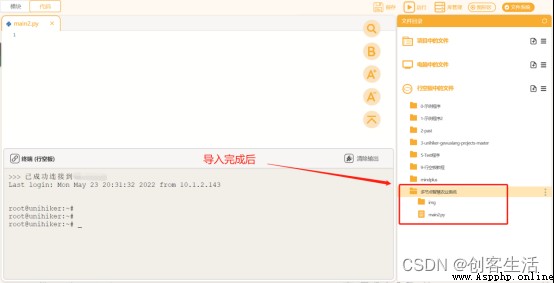
STEP5: Import material folder
stay “ Multi node intelligent agricultural system ” Import the material folder in the folder .( See Appendix for download links 1)
STEP6: Programming
from unihiker import GUI # Import unihiker library GUI modular
from pinpong.board import Board, Pin # Import pinpong Under the Treasury Board, Pin modular
import time # Import time library
import siot # Import siot library
''' Initialize the board and hardware '''
Board().begin() # Initialize the line blank board
adc0 = Pin(Pin.P21, Pin.ANALOG) # initialization 21 The pin is in analog input mode
relay = Pin(Pin.P23, Pin.OUT) # initialization 23 The pin is in digital output mode
Tips: there IP The address is written in the previously recorded blank board 3 Wireless hotspots IP.
''' Set the Internet of things platform connection parameters '''
SERVER = "192.168.43.201" # MQTT The server IP, Enter personal actual IP
CLIENT_ID = "" # stay SIoT On ,CLIENT_ID You can leave it blank
IOT_UserName = 'siot' # user name
IOT_PassWord = 'dfrobot' # password
IOT_pubTopic1 = ' Multi node intelligent agricultural system /Soil_moisture_value' # humidity topic,“ Project name / Equipment name ”
# Define callback function
def sub_relay(client, userdata, msg):
topic = msg.topic
payload = msg.payload.decode()
''' Define the operation when the instruction is received '''
print("\nTopic:" + topic + " Message:" + payload) # Print the received information
if payload == 'relay on': # If you receive “relay on”
img.config(w=240, h=320, image='img/ watering 1.png')
relay.write_digital(1) # Relay output high level
elif payload == 'relay off': # If you receive “relay off”
img.config(w=240, h=320, image='img/ Turn off the water 1.png')
relay.write_digital(0) # Relay output low level
elif payload == 'auto': # If you receive “auto”
print("auto")
click_C() # Switch mode -- Automatic mode
elif payload == 'manual': # If you receive “manual”
print("manual")
click_C() # Switch mode -- Manual mode
siot.init(CLIENT_ID, SERVER, user=IOT_UserName,password=IOT_PassWord) # initialization , Make sure the user name and password entered are correct
siot.connect() # Connect siot Internet of things platform
siot.subscribe(IOT_pubTopic1, sub_relay) # Subscribe to Internet of things platform messages
siot.loop() # loop
''' Display the screen interface '''
gui = GUI() # Instantiation gui object
img = gui.draw_image(w=240, h=320, image='img/ Turn off the water 1.png') # Show background picture
# Define the callback function of the three buttons
def click_A():
''' Define the click button A Time operation -- Toggle the display of watering pictures '''
img.config(w=240, h=320, image='img/ watering 1.png')
relay.write_digital(1) # Relay output high level
def click_B():
''' Define the click button B Time operation -- Switch the display of water off picture '''
img.config(w=240, h=320, image='img/ Turn off the water 1.png')
relay.write_digital(0) # Relay output low level
is_auto_mode = 1 # Define a flag bit -- Automatic mode ,1 To open ,0 Weiguan
def click_C(): # Define the click button C Time operation -- Switch mode
global is_auto_mode
if is_auto_mode == 0: # If the automatic mode flag bit is 0, It was originally in manual mode , Then click
text_mode.config(text=" Automatically ")
button_A.config(state='disabled') # Set the button status to disabled, Indicates that you cannot click
button_B.config(state='disabled')
is_auto_mode = 1 # Set the automatic mode flag bit to 1 , The automatic mode is turned on
elif is_auto_mode == 1: # If the auto mode standard bit is 1, That is, it was originally in automatic mode , Then click
text_mode.config(text=" Manual ")
button_A.config(state='normal') # Set the button status to normal, Indicates that it can be clicked
button_B.config(state='normal')
is_auto_mode = 0 # Set the automatic mode flag bit to 0 , That is, open the manual mode
# Draw the fill rectangle
gui.fill_rect(x=65, y=35, w=70, h=30, color="white") # Draw a rectangle to show “ Humidity value ”
gui.fill_rect(x=148, y=35, w=55, h=30, color="white") # Draw a rectangle to display humidity value data
gui.fill_rect(x=100, y=160, w=70, h=30, color="white") # Draw a rectangle to show “ Current mode ”
gui.fill_rect(x=180, y=160, w=50, h=30, color="white") # Draw a rectangle to show the mode type
# Display text in a rectangular box
gui.draw_text(x=68, y=36, color="red", text=' Humidity value :') # According to the text “ Humidity value :”
text_value = gui.draw_text(x=155, y=36, color="red", text="") # Display humidity value data
gui.draw_text(x=105, y=163, color="red", text=' Current mode :', font_size=11) # According to the text “ Current mode :”
text_mode = gui.draw_text(x=190, y=163, color="red", text=" Automatically ", font_size=11) # Display mode type
# Display button
''' Display the button and set the function triggered after the button is clicked , And the button is not clickable at the beginning '''
button_A = gui.add_button(x=50, y=260, w=70, h=40,text=" watering ", οnclick=click_A, state='disabled')
button_B = gui.add_button(x=140, y=260, w=70, h=40,text=" Turn off the water ", οnclick=click_B, state='disabled')
button_C = gui.add_button(x=10, y=160, w=70, h=30,text=" Switch mode ", οnclick=click_C)
# Define automatic water replenishment when the humidity value is low 3 second
def auto_watering():
''' Define automatic water replenishment when the humidity value is low 3 second '''
if Soil_moisture_value < 2120:
click_A()
time.sleep(3)
click_B()
else:
click_B()
while True: # loop
Soil_moisture_value = adc0.read_analog() # Read analog values
print(Soil_moisture_value) # Print and display humidity value
siot.publish(IOT_pubTopic1, Soil_moisture_value) # Release information to the Internet of things platform
if is_auto_mode == 1:
auto_watering() # Automatic water replenishment
text_value.config(text=Soil_moisture_value) # Update humidity value
time.sleep(1) # delay1 second
Tips: The complete sample program is as follows :
# plate 1 Test soil moisture data , Send to board 3 Open SIoT On the Internet of things platform .
from unihiker import GUI # Import unihiker library GUI modular
from pinpong.board import Board, Pin # Import pinpong Under the Treasury Board, Pin modular
import time # Import time library
import siot # Import siot library
''' Initialize the board and hardware '''
Board().begin() # Initialize the line blank board
adc0 = Pin(Pin.P21, Pin.ANALOG) # initialization 21 The pin is in analog input mode
relay = Pin(Pin.P23, Pin.OUT) # initialization 23 The pin is in digital output mode
''' Set the Internet of things platform connection parameters '''
SERVER = "192.168.43.201" # MQTT The server IP, Enter personal actual IP
CLIENT_ID = "" # stay SIoT On ,CLIENT_ID You can leave it blank
IOT_UserName = 'siot' # user name
IOT_PassWord = 'dfrobot' # password
IOT_pubTopic1 = ' Multi node intelligent agricultural system /Soil_moisture_value' # humidity topic,“ Project name / Equipment name ”
# Define callback function
def sub_relay(client, userdata, msg):
topic = msg.topic
payload = msg.payload.decode()
''' Define the operation when the instruction is received '''
print("\nTopic:" + topic + " Message:" + payload) # Print the received information
if payload == 'relay on': # If you receive “relay on”
img.config(w=240, h=320, image='img/ watering 1.png')
relay.write_digital(1) # Relay output high level
elif payload == 'relay off': # If you receive “relay off”
img.config(w=240, h=320, image='img/ Turn off the water 1.png')
relay.write_digital(0) # Relay output low level
elif payload == 'auto': # If you receive “auto”
print("auto")
click_C() # Switch mode -- Automatic mode
elif payload == 'manual': # If you receive “manual”
print("manual")
click_C() # Switch mode -- Manual mode
siot.init(CLIENT_ID, SERVER, user=IOT_UserName,password=IOT_PassWord) # initialization , Make sure the user name and password entered are correct
siot.connect() # Connect siot Internet of things platform
siot.subscribe(IOT_pubTopic1, sub_relay) # Subscribe to Internet of things platform messages
siot.loop() # loop
''' Display the screen interface '''
gui = GUI() # Instantiation gui object
img = gui.draw_image(w=240, h=320, image='img/ Turn off the water 1.png') # Show background picture
# Define the callback function of the three buttons
def click_A():
''' Define the click button A Time operation -- Toggle the display of watering pictures '''
img.config(w=240, h=320, image='img/ watering 1.png')
relay.write_digital(1) # Relay output high level
def click_B():
''' Define the click button B Time operation -- Switch the display of water off picture '''
img.config(w=240, h=320, image='img/ Turn off the water 1.png')
relay.write_digital(0) # Relay output low level
is_auto_mode = 1 # Define a flag bit -- Automatic mode ,1 To open ,0 Weiguan
def click_C(): # Define the click button C Time operation -- Switch mode
global is_auto_mode
if is_auto_mode == 0: # If the automatic mode flag bit is 0, It was originally in manual mode , Then click
text_mode.config(text=" Automatically ")
button_A.config(state='disabled') # Set the button status to disabled, Indicates that you cannot click
button_B.config(state='disabled')
is_auto_mode = 1 # Set the automatic mode flag bit to 1 , The automatic mode is turned on
elif is_auto_mode == 1: # If the auto mode standard bit is 1, That is, it was originally in automatic mode , Then click
text_mode.config(text=" Manual ")
button_A.config(state='normal') # Set the button status to normal, Indicates that it can be clicked
button_B.config(state='normal')
is_auto_mode = 0 # Set the automatic mode flag bit to 0 , That is, open the manual mode
# Draw the fill rectangle
gui.fill_rect(x=65, y=35, w=70, h=30, color="white") # Draw a rectangle to show “ Humidity value ”
gui.fill_rect(x=148, y=35, w=55, h=30, color="white") # Draw a rectangle to display humidity value data
gui.fill_rect(x=100, y=160, w=70, h=30, color="white") # Draw a rectangle to show “ Current mode ”
gui.fill_rect(x=180, y=160, w=50, h=30, color="white") # Draw a rectangle to show the mode type
# Display text in a rectangular box
gui.draw_text(x=68, y=36, color="red", text=' Humidity value :') # According to the text “ Humidity value :”
text_value = gui.draw_text(x=155, y=36, color="red", text="") # Display humidity value data
gui.draw_text(x=105, y=163, color="red", text=' Current mode :', font_size=11) # According to the text “ Current mode :”
text_mode = gui.draw_text(x=190, y=163, color="red", text=" Automatically ", font_size=11) # Display mode type
# Display button
''' Display the button and set the function triggered after the button is clicked , And the button is not clickable at the beginning '''
button_A = gui.add_button(x=50, y=260, w=70, h=40,text=" watering ", οnclick=click_A, state='disabled')
button_B = gui.add_button(x=140, y=260, w=70, h=40,text=" Turn off the water ", οnclick=click_B, state='disabled')
button_C = gui.add_button(x=10, y=160, w=70, h=30,text=" Switch mode ", οnclick=click_C)
# Define automatic water replenishment when the humidity value is low 3 second
def auto_watering():
''' Define automatic water replenishment when the humidity value is low 3 second '''
if Soil_moisture_value < 2120:
click_A()
time.sleep(3)
click_B()
else:
click_B()
while True: # loop
Soil_moisture_value = adc0.read_analog() # Read analog values
print(Soil_moisture_value) # Print and display humidity value
siot.publish(IOT_pubTopic1, Soil_moisture_value) # Release information to the Internet of things platform
if is_auto_mode == 1:
auto_watering() # Automatic water replenishment
text_value.config(text=Soil_moisture_value) # Update humidity value
time.sleep(1) # delay1 second
3、 The program runs
STEP1: Run and observe the effect
Click on Mind+ The run button on the software , Observe the empty board 1, You can see the board 1 The interface is as follows , It can control watering in both manual and automatic modes , You can also type SIoT Of the blank board where the server is located IP Address ( Here is “192.168.43.201”), Open... In the web page menu application switch SIoT, View humidity data remotely from the Internet of things platform and perform watering and other operations .
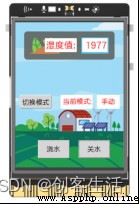

Tips: Only sending messages in manual mode is effective
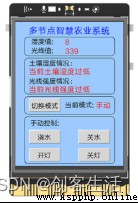
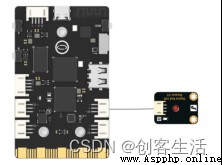
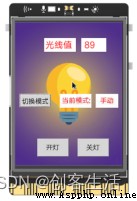
here , We will be on the line blank board 2 A small light background picture is displayed on the screen of , Display the light value data detected by the onboard light sensor on the screen , Send one side to the board 3 Of SIoT On the platform .
meanwhile , Alignment plate 2 Set automatic and manual modes , In automatic mode , When the detected light value is too low , Through external connection LED To automatically fill the light ; In manual mode , Fill the light by clicking the button on the screen ; The modes can also be switched manually through the button .
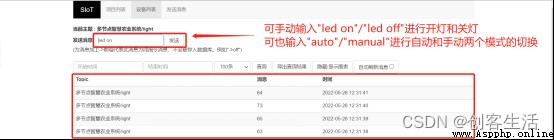
Besides , Also available at SIoT Internet of things platform web page sending “led on”、“led off”、“auto” and “manual” Four instructions , Remote control LED The light is on 、LED The light goes out 、 Switch between automatic mode and manual mode .
1、 Hardware construction
take LED Access the blank board 2 Of P23 Pin
2、 Programming
STEP1: Create and save project files
Again start-up One Mind+ Software , Save the project as and name it “010、 Multi node intelligent agricultural system 02”.
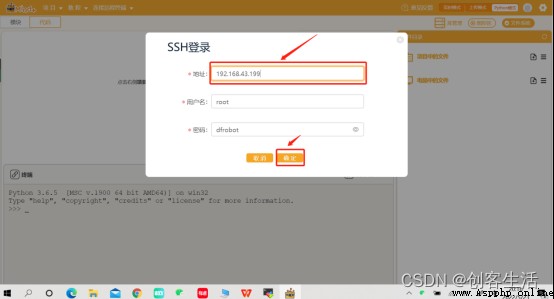
STEP2: Remote connection line blank board
(1) choice “ Manual input ”
(2) Input blank board 2 Wireless connection for IP Address “192.168.43.200”
STEP3: And board 1 equally , Directly on the line blank board 2 in gen Create a new folder , And named it “ Multi node intelligent agricultural system ”
STEP4: Create and save Python file
stay “ Multi node intelligent agricultural system ” In the folder Create a Python Program files “main2.py”, Double-click to open .
STEP5: stay “ Multi node intelligent agricultural system ” Import the material folder in the folder .
STEP6: Programming
On the whole , The programming logic here is the same as the above board 1, So we don't go into too much detail , Note that the actual line blank board is written 3 Of IP Address .
Tips: The complete sample program is as follows :
# plate 2 Detect light data , Send to board 3 Open SIoT On the Internet of things platform .
from unihiker import GUI # Import unihiker library
from pinpong.board import Board, Pin # Import pinpong Under the Treasury Board, Pin modular
from pinpong.extension.unihiker import * # Import pinpong.extension.unihiker All modules in the package
import time # Import time library
import siot # Import siot library
''' Initialize the board and hardware '''
Board().begin() # Initialize the line blank board
led = Pin(Pin.P23, Pin.OUT) # initialization 23 The pin is in digital output mode
''' Set the Internet of things platform connection parameters '''
SERVER = "192.168.43.201" # MQTT The server IP, Enter personal actual IP
CLIENT_ID = "" # stay SIoT On ,CLIENT_ID You can leave it blank
IOT_UserName = 'siot' # user name
IOT_PassWord = 'dfrobot' # password
IOT_pubTopic2 = ' Multi node intelligent agricultural system /light' # humidity topic,“ Project name / Equipment name ”
# Define callback function
def sub_led(client, userdata, msg):
topic = msg.topic
payload = msg.payload.decode()
''' Define the operation when the instruction is received '''
print("\nTopic:" + topic + " Message:" + payload) # Print the received information
if payload == 'led on': # If you receive “led on”
img.config(w=240, h=320, image='img/ turn on the light 1.png')
led.write_digital(1) # led Output high level
elif payload == 'led off': # If you receive “led off”
img.config(w=240, h=320, image='img/ Turn off the lights 1.png')
led.write_digital(0) # led Output low level
elif payload == 'auto': # If you receive “auto”
print("auto")
click_C() # Switch mode -- Automatic mode
elif payload == 'manual': # If you receive “manual”
print("manual")
click_C() # Switch mode -- Manual mode
siot.init(CLIENT_ID, SERVER, user=IOT_UserName,password=IOT_PassWord) # initialization , Make sure the user name and password entered are correct
siot.connect() # Connect siot Internet of things platform
siot.subscribe(IOT_pubTopic2, sub_led) # Subscribe to Internet of things platform messages
siot.loop() # loop
''' Display the screen interface '''
gui = GUI() # Instantiation gui object
img = gui.draw_image(w=240, h=320, image='img/ Turn off the lights 1.png') # Show background picture
# Define callback function
def click_A():
''' Define the click button A Time operation -- Toggle the display of the light on picture '''
img.config(w=240, h=320, image='img/ turn on the light 1.png')
led.write_digital(1) # Relay Output High level
def click_B():
''' Define the click button B Time operation -- Toggles the display of the light off picture '''
img.config(w=240, h=320, image='img/ Turn off the lights 1.png')
led.write_digital(0) # Relay Output Low level
is_auto_mode = 1 # Define a flag bit -- Automatic mode ,1 To open ,0 Weiguan
def click_C(): # Define the click button C Time operation -- Switch mode
global is_auto_mode
if is_auto_mode == 0: # If the automatic mode flag bit is 0, It was originally in manual mode , Then click
text_mode.config(text=" Automatically ")
button_A.config(state='disabled') # Set the button status to disabled, Indicates that you cannot click
button_B.config(state='disabled')
is_auto_mode = 1 # Set the automatic mode flag bit to 1 , The automatic mode is turned on
elif is_auto_mode == 1: # If the auto mode standard bit is 1, That is, it was originally in automatic mode , Then click
text_mode.config(text=" Manual ")
button_A.config(state='normal') # Set the button status to normal, Indicates that it can be clicked
button_B.config(state='normal')
is_auto_mode = 0 # Set the automatic mode flag bit to 0 , That is, open the manual mode
# Draw the fill rectangle
gui.fill_rect(x=65, y=35, w=70, h=30, color="white") # Draw a rectangle to show “ Light value ”
gui.fill_rect(x=148, y=35, w=55, h=30, color="white") # Draw a rectangle to display ray value data
gui.fill_rect(x=100, y=160, w=70, h=30, color="white") # Draw a rectangle to show “ Current mode ”
gui.fill_rect(x=180, y=160, w=50, h=30, color="white") # Draw rectangle display mode type
# Display text in a rectangular box
gui.draw_text(x=68, y=36, color="red", text=' Light value ') # According to the text “ Light value ”
text_value = gui.draw_text(x=155, y=36, color="red", text="") # Display ray value data
gui.draw_text(x=105, y=163, color="red", text=' Current mode :', font_size=11) # According to the text “ Current mode :”
text_mode = gui.draw_text(x=190, y=163, color="red", text=" Automatically ", font_size=11) # Display mode type
# Display button
''' Display the button and set the function triggered after the button is clicked , And the button is not clickable at the beginning '''
button_A = gui.add_button(x=50, y=260, w=70, h=40,text=" turn on the light ", οnclick=click_A, state='disabled')
button_B = gui.add_button(x=140, y=260, w=70, h=40,text=" Turn off the lights ", οnclick=click_B, state='disabled')
button_C = gui.add_button(x=10, y=160, w=70, h=30,text=" Switch mode ", οnclick=click_C)
# Define that the light will turn on automatically when the light value is low
def auto_light():
''' Define that the light will turn on automatically when the light value is low '''
if Light< 666:
click_A()
else:
click_B()
while True: # loop
Light = light.read() # Read the light value
print(Light) # Print display ray values
siot.publish(IOT_pubTopic2, Light) # Release information to the Internet of things platform
if is_auto_mode == 1:
auto_light() # Automatic water replenishment
text_value.config(text=Light) # Update ray values
time.sleep(1) # delay1 second
3、 The program runs
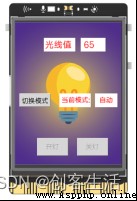
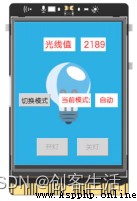
STEP1: Run and observe the effect
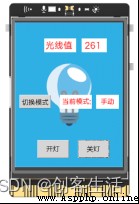
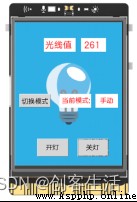
Click on Mind+ The run button on the software , Observe the empty board 2, You can see the board 2 The interface is as follows , It can control the fill light in both manual and automatic modes ( open LED), You can also type SIoT Of the blank board where the server is located IP Address ( Here is “192.168.43.201”), Open... In the web application SIoT, Remotely view the light value data from the Internet of things platform and perform operations such as light compensation .
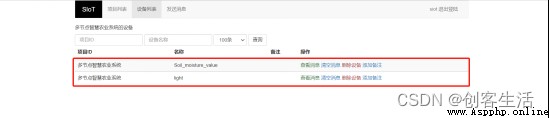
Pay attention to the board 2 Of Topic And board 1 Of Topic Different , The name of the operation that needs to return the device list is “light” Project .
Tips: Only sending messages in manual mode is effective
here , We will empty the board 3 As the main station , Receive line blank board 1 And the line blank board 2 Send to SIoT Soil moisture and light value data on the Internet of things platform , Then the summary is displayed on the board 3 On the screen , And through the plate 3 The button on the board 1 And board 2 Control , Realize respective watering 、 Turn off the water 、 turn on the light 、 Light off function .
meanwhile , On board 3 Set the automatic and manual mode switch buttons on the , Respectively used for control board 1 And board 2 Switching between two modes , It defaults to automatic mode at the beginning .
Besides , The most important , plate 3 The master station can also judge the received data in real time , When some environmental data is poor , Send an email to the mailbox remotely as an alert , So that we can get the information in time and water and fill the light .
1、 Mailbox settings
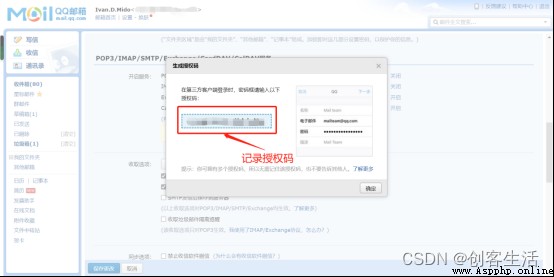
STEP1: Record qq Email authorization code
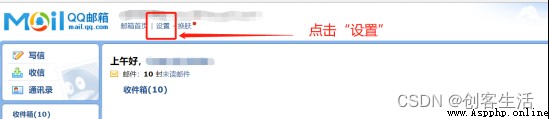
2 Turn on SMTP service , Generate authorization code and record
Tips: You need to send verification SMS through your mobile phone , Generate authorization code

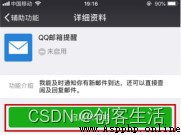
3 Wechat opens QQ Email alert
here , For the convenience of checking the mail , We can also open it on wechat QQ Email reminder function .
Tips: Please refer to the link for specific operation methods :
How to open or close wechat QQ Email alert
2、 Programming
STEP1: Create and save project files
Again start-up One Mind+ Software , Save the project as and name it “010、 Multi node intelligent agricultural system 03”.
STEP2: Remote connection line blank board
(1) choice “ Manual input ”
STEP3: Directly on the line blank board 3 in gen Create a new folder , And named it “ Multi node intelligent agricultural system ”
STEP4: Create and save Python file
stay “ Multi node intelligent agricultural system ” In the folder Create a Python Program files “main3.py”, Double-click to open .
Step5: Programming
(1) Import libraries
here , In order to send mail successfully , We first need to import smtplib library , meanwhile , When constructing messages , We need to deal with text , And format the input , Then we need to import MIMEText Module and formataddr modular .
from unihiker import GUI # Import unihiker library GUI modular
import time # Import time library
import siot # Import siot library
import smtplib # Import smtplib library
from email.mime.text import MIMEText # Import email.mime.text library MIMEText modular , Responsible for processing text
from email.utils import formataddr # Import email.utils library formataddr modular , Responsible for formatting the input content
(2) Set the Internet of things platform connection parameters
next , As we will receive the board 1 And board 2 Data sent to the IOT platform , Therefore, we need to set the connection parameters of the IOT platform first , For subsequent subscriptions .
''' Set the Internet of things platform connection parameters '''
SERVER = "192.168.43.201" # MQTT The server IP Address , Enter personal actual IP
CLIENT_ID = "" # stay SIoT On ,CLIENT_ID You can leave it blank
IOT_UserName = 'siot' # user name
IOT_PassWord = 'dfrobot' # password
IOT_pubTopic1 = ' Multi node intelligent agricultural system /Soil_moisture_value' # humidity topic,“ Project name / Equipment name ”
IOT_pubTopic2 = ' Multi node intelligent agricultural system /light' # The light intensity topic,“ Project name / Equipment name ”
(3) Display screen pages
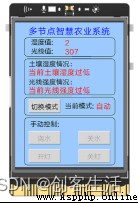
after , We are on the blank board 3 Four parts are displayed on the screen of , The first is the board 1 And board 2 Humidity value and light value data ; The second is the analysis of the data , For example, on the screen “ Current soil moisture is appropriate ”、“ The current light intensity is appropriate ”; Next is the mode switch button and the display of the current mode ; Finally, there are four button controls in manual mode . And in the button , We define the callback function , To set its function .
''' Display screen pages '''
# Define the callback function of the five buttons
def click_A(): # Define the click button A Time operation -- Switch pictures
siot.publish(IOT_pubTopic1, 'relay on') # Publish the information 'relay on' To the Internet of things platform
def click_B(): # Define the click button B Time operation -- Switch pictures
siot.publish(IOT_pubTopic1, 'relay off') # Publish the information 'relay off' To the Internet of things platform
def click_C(): # Define the click button C Time operation -- Switch pictures
siot.publish(IOT_pubTopic2, 'led on') # Publish the information 'led on' To the Internet of things platform
def click_D(): # Define the click button D Time operation -- Switch pictures
siot.publish(IOT_pubTopic2, 'led off') # Publish the information 'led off' To the Internet of things platform
is_auto_mode = 1 # Define a flag bit -- Automatic mode ,1 To open ,0 Weiguan
def click_E(): # Define the click button E Time operation -- Switch mode
global is_auto_mode
if is_auto_mode == 0:
text_mode.config(text=" Automatically ")
button_A.config(state='disabled')
button_B.config(state='disabled')
button_C.config(state='disabled')
button_D.config(state='disabled')
siot.publish(IOT_pubTopic1, 'auto') # Publish the information 'auto' To the Internet of things platform
siot.publish(IOT_pubTopic2, 'auto') # Publish the information 'auto' To the Internet of things platform
is_auto_mode = 1
elif is_auto_mode == 1:
text_mode.config(text=" Manual ")
button_A.config(state='normal')
button_B.config(state='normal')
button_C.config(state='normal')
button_D.config(state='normal')
siot.publish(IOT_pubTopic1, 'manual') # Publish the information 'manual' To the Internet of things platform
siot.publish(IOT_pubTopic2, 'manual') # Publish the information 'manual' To the Internet of things platform
is_auto_mode = 0
gui=GUI() # Instantiation gui object
# Displays the filled rectangle
gui.fill_rect(x=0, y=0, w=240, h=320, color="#99CCFF") # Draw the fill rectangle Show In the background
# Show title
title = gui.draw_text(x=30, y=5, text=' Multi node intelligent agricultural system ', font_size=14, color='blue')
# Show part1 data ( Rounded rectangle 、 written words )
gui.draw_round_rect(x=20, y=33, w=200, h=42, r=8, width=1) # Show rounded rectangle ,( Starting point coordinates (20,33), wide 200, high 42, radius 8, Line width 1)
gui.draw_text(x=35, y=32, text=' Humidity value :', font_size=11) # According to the text “ Humidity value :”
text_value = gui.draw_text(x=110, y=32, color="red", text="", font_size=12) # Display ray value data
gui.draw_text(x=35, y=52, text=' Light value :', font_size=11) # According to the text “ Light value ”
text_value_2 = gui.draw_text(x=110, y=52, color="red", text="", font_size=12) # Display ray value data
# Show part2 Data ( Rounded rectangle 、 written words )
gui.draw_round_rect(x=20, y=80, w=200, h=80, r=8,width=1)
text1 = gui.draw_text(x=30, y=80, text=' Soil moisture :', font_size=11, color='black') # stay (30,60) Coordinate position display “ Soil moisture :”, Font size: 11, The color is black
text2 = gui.draw_text(x=30, y=98, text=' Current soil moisture is appropriate ', font_size=12, color='red')
text3 = gui.draw_text(x=30, y=120, text=' Light intensity :', font_size=11, color='black')
text4 = gui.draw_text(x=30, y=138, text=' The current light intensity is appropriate ', font_size=12, color='red')
# Show part3 Switch mode function ( Rounded rectangle 、 Button 、 written words )
gui.draw_round_rect(x=20, y=165, w=200, h=40, r=8,width=1)
button_E = gui.add_button(x=30, y=170, w=70, h=30, text=" Switch mode ", οnclick=click_E)
gui.draw_text(x=110, y=173, text=' Current mode :', font_size=11) # According to the text “ Current mode :”
text_mode = gui.draw_text(x=178, y=173, color="red", text=" Automatically ", font_size=12) # Display mode type
# Show part4 Manual control mode ( Rounded rectangle 、 Button 、 written words )
gui.draw_round_rect(x=20, y=210, w=200, h=105, r=8,width=1)
gui.draw_text(x=33, y=213, text=' Manual control :',font_size=11) # According to the text “ Manual control :”
button_A = gui.add_button(x=30, y=240, w=70, h=30, text=" watering ", οnclick=click_A,state='disabled')
button_B = gui.add_button(x=140, y=240, w=70, h=30, text=" Turn off the water ", οnclick=click_B,state='disabled')
button_C = gui.add_button(x=30, y=280, w=70, h=30, text=" turn on the light ", οnclick=click_C,state='disabled')
button_D = gui.add_button(x=140, y=280, w=70, h=30, text=" Turn off the lights ", οnclick=click_D,state='disabled')
(4) Email Settings
Next , We will define the mail sending function , First, set the parameters required for sending mail , Including the sender's email account , Sender's email authorization code , Sender email nickname , Email account of the addressee , The recipient mailbox nickname has five parameters in total . after , Define a function to send mail , In which the message content and title are passed in as parameters , So that it can be called many times to send mail .
Tips: The actual sender account number must be filled 、 Authorization code information , Nicknames can be written at will , But it can't be empty .
''' Email Settings '''
my_sender='10******[email protected]' # Set the sender's email account , Enter your own email
my_pass = '******' # Set the sender's mailbox authorization code , Do not empty
my_name = 'IvanD.Mido' # Set sender mailbox nickname
my_user='10******[email protected]' # Set the recipient email account , I'll send it to myself
my_user_name = 'IvanD.Mido' # Set recipient mailbox nickname
# Define the alert email function
def mail(content,title):
ret=True # Define a marker ret, Record email sending events , The initial value is True
try:
msg=MIMEText(content,'plain','utf-8') # Create a message text object ,Title Corresponding text content ,'plain' Refers to the set text format ,'utf-8' Refers to the set code
''' Three header messages : Sender , The recipient , The theme '''
msg['From']=formataddr([my_name,my_sender]) # Define sender information : The nickname of sender's email in brackets 、 Sender email account
msg['To']=formataddr([my_user_name,my_user]) # Define recipient information : The nickname of the recipient's email in brackets 、 Email account of the addressee
msg['Subject']=title # Define the subject of the message , It can also be said that the title
server=smtplib.SMTP_SSL("smtp.qq.com", 465) # establish SMTP service , Connect qq Mailbox server , In the sender's mailbox SMTP The server ,SMTP Protocol encryption port yes 465
server.login(my_sender, my_pass) # Login mailbox , The brackets correspond to the sender's email account 、 Mailbox password
server.sendmail(my_sender,my_user,msg.as_string()) # Send E-mail , The brackets correspond to the sender's email account 、 Email account of the addressee 、 The string format of the message
server.quit() # Close the connection
except Exception: # If try The statement in did not execute , Then the following ret=False
ret=False # take ret Mark as False
return ret # return ret Mark
(6) Define callback function
Because sending mail is detected on the board 1 And board 2 In case of poor data , therefore , We need to set to receive SIoT The functional operation of the data of the Internet of things platform .
When receiving Topic1 After the soil moisture data , We do three steps , The first is to present the data on the screen , The second is to judge the data , Update the screen to display the situation after discriminant analysis , Finally, according to the discrimination results , Set to send an alarm email when the result data is poor , And the interval between each subject email shall not be less than 10s.
And when you receive Topic2 After the ray value data under , We do the same thing .
Tips: The email sending frequency here can be modified by yourself .
soil_mail_enable = True # Define the flag that enables sending soil alert messages
light_mail_enable = True # Defines the flag that enables the sending of light alarm messages
soil_mail_time = time.time() # Scheduled mail sending time record flag
light_mail_time = time.time() # Scheduled mail sending time record flag
# Define callback function
def sub_cb(client, userdata, msg):
global soil_mail_enable,light_mail_enable,soil_mail_time,light_mail_time
topic = msg.topic # topic Data is stored in variables
payload = msg.payload.decode() # payload The message data is converted into a string and stored in a variable
print("\nTopic:" + topic + " Message:" + payload) # Terminal print data
if topic == IOT_pubTopic1: # Definition received Soil_moisture_value Time operation
if payload.isdigit(): # If the received message is of digital type, it indicates that it is the humidity value rather than the control command
Soil_moisture_value = int(payload) # Convert to numeric type for later judgment
text_value.config(text = str(Soil_moisture_value)) # Update screen display data
if Soil_moisture_value < 2120: # Threshold set to 2120, It can be adjusted according to the actual situation
text2.config(text=" The current soil moisture is too low ") # Update text warnings
if soil_mail_enable == True and (time.time()-soil_mail_time) > 10: # If allowed, and the time interval since the last message was sent 10 Seconds or more before sending
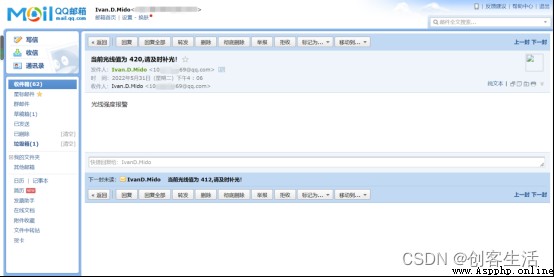
ret1=mail(" Soil moisture alarm "," The current soil moisture value is " + str(Soil_moisture_value) + ", Please replenish water in time !")
if ret1: # If there is an email event
print(" Mail sent successfully 1")
soil_mail_enable = False # Email has been sent , Change the flag to avoid repeated sending
soil_mail_time = time.time() # Record the time this email was sent
else: # otherwise
print(" Failed to send mail 1")
else:
text2.config(text=" Current soil moisture is appropriate ") # Update text
soil_mail_enable = True # If the alarm is cleared, subsequent emails are allowed
elif topic == IOT_pubTopic2: # Definition received Light Time operation
if payload.isdigit(): # If the received message is of digital type, it indicates that it is the ray value rather than the control command
light_value = int(payload) # Convert to numeric type for later judgment
text_value_2.config(text = str(light_value)) # The screen updates the light value
if light_value < 666: # Threshold set to 666, It can be adjusted according to the actual situation
text4.config(text=" The current light intensity is too low ") # Update text warnings
if light_mail_enable == True and (time.time()-light_mail_time) > 10: # Send the message only if it is allowed to send it
ret2=mail(" Light intensity alarm "," The current ray value is " + str(light_value) + ", Please fill the light in time !")
if ret2: # If there is an email event
print(" Mail sent successfully 2")
light_mail_enable = False # Email has been sent , Change the flag to avoid repeated sending
light_mail_time = time.time() # Record the time this email was sent
else: # otherwise
print(" Failed to send mail 2")
else:
text4.config(text=" The current light intensity is appropriate ") # Update text warnings
light_mail_enable = True # If the alarm is cleared, subsequent emails are allowed
(7) Subscribe to Internet of things platform messages
After defining the callback function , We set the board 3 Subscribe to the Internet of things platform , And send at the beginning “auto” To two Topic Next , In order to set the initial default mode to automatic .
siot.init(CLIENT_ID, SERVER, user=IOT_UserName,password=IOT_PassWord) # initialization , Make sure the user name and password entered are correct
siot.connect() # Connect siot Internet of things platform
siot.subscribe(IOT_pubTopic1, sub_cb) # subscribe Topic1 Soil moisture data
siot.subscribe(IOT_pubTopic2, sub_cb) # subscribe Topic2 Light intensity data
siot.publish(IOT_pubTopic1,'auto') # Publish the information 'auto' To the Internet of things platform
siot.publish(IOT_pubTopic2,'auto') # Publish the information 'auto' To the Internet of things platform
siot.loop() # loop
(8) The loop keeps the program running
while True: # loop
time.sleep(0.5) # delay0.5 second
Tips: The complete sample program is as follows :
''' plate 3 Subscription board 1& plate 2 Messages sent to the IOT platform , Displayed on the board 3 On , Send an email when the value is not good '''
from unihiker import GUI # Import unihiker library GUI modular
import time # Import time library
import siot # Import siot library
import smtplib # Import smtplib library
from email.mime.text import MIMEText # Import email.mime.text In bag MIMEText modular , Responsible for processing text
from email.utils import formataddr # Import email.utils In bag formataddr modular , Responsible for formatting the input content
''' Set the Internet of things platform connection parameters '''
SERVER = "192.168.43.201" # MQTT The server IP Address , Enter personal actual IP
CLIENT_ID = "" # stay SIoT On ,CLIENT_ID You can leave it blank
IOT_UserName = 'siot' # user name
IOT_PassWord = 'dfrobot' # password
IOT_pubTopic1 = ' Multi node intelligent agricultural system /Soil_moisture_value' # humidity topic,“ Project name / Equipment name ”
IOT_pubTopic2 = ' Multi node intelligent agricultural system /light' # The light intensity topic,“ Project name / Equipment name ”
# Define the callback function of the five buttons
def click_A(): # Define the click button A Time operation -- Switch pictures
siot.publish(IOT_pubTopic1, 'relay on') # Publish the information 'relay on' To the Internet of things platform
def click_B(): # Define the click button B Time operation -- Switch pictures
siot.publish(IOT_pubTopic1, 'relay off') # Publish the information 'relay off' To the Internet of things platform
def click_C(): # Define the click button C Time operation -- Switch pictures
siot.publish(IOT_pubTopic2, 'led on') # Publish the information 'led on' To the Internet of things platform
def click_D(): # Define the click button D Time operation -- Switch pictures
siot.publish(IOT_pubTopic2, 'led off') # Publish the information 'led off' To the Internet of things platform
is_auto_mode = 1 # Define a flag bit -- Automatic mode ,1 To open ,0 Weiguan
def click_E(): # Define the click button E Time operation -- Switch mode
global is_auto_mode
if is_auto_mode == 0:
text_mode.config(text=" Automatically ")
button_A.config(state='disabled')
button_B.config(state='disabled')
button_C.config(state='disabled')
button_D.config(state='disabled')
siot.publish(IOT_pubTopic1, 'auto') # Publish the information 'auto' To the Internet of things platform
siot.publish(IOT_pubTopic2, 'auto') # Publish the information 'auto' To the Internet of things platform
is_auto_mode = 1
elif is_auto_mode == 1:
text_mode.config(text=" Manual ")
button_A.config(state='normal')
button_B.config(state='normal')
button_C.config(state='normal')
button_D.config(state='normal')
siot.publish(IOT_pubTopic1, 'manual') # Publish the information 'manual' To the Internet of things platform
siot.publish(IOT_pubTopic2, 'manual') # Publish the information 'manual' To the Internet of things platform
is_auto_mode = 0
''' Display screen pages '''
gui=GUI() # Instantiation gui object
# Displays the filled rectangle
gui.fill_rect(x=0, y=0, w=240, h=320, color="#99CCFF") # Draw the fill rectangle Show In the background
# Show title
title = gui.draw_text(x=30, y=5, text=' Multi node intelligent agricultural system ', font_size=14, color='blue')
# Show part1 data ( Rounded rectangle 、 written words )
gui.draw_round_rect(x=20, y=33, w=200, h=42, r=8, width=1) # Show rounded rectangle ,( Starting point coordinates (20,33), wide 200, high 42, radius 8, Line width 1)
gui.draw_text(x=35, y=32, text=' Humidity value :', font_size=11) # According to the text “ Humidity value :”
text_value = gui.draw_text(x=110, y=32, color="red", text="", font_size=12) # Display ray value data
gui.draw_text(x=35, y=52, text=' Light value :', font_size=11) # According to the text “ Light value ”
text_value_2 = gui.draw_text(x=110, y=52, color="red", text="", font_size=12) # Display ray value data
# Show part2 Data ( Rounded rectangle 、 written words )
gui.draw_round_rect(x=20, y=80, w=200, h=80, r=8,width=1)
text1 = gui.draw_text(x=30, y=80, text=' Soil moisture :', font_size=11, color='black') # stay (30,60) Coordinate position display “ Soil moisture :”, Font size: 11, The color is black
text2 = gui.draw_text(x=30, y=98, text=' Current soil moisture is appropriate ', font_size=12, color='red')
text3 = gui.draw_text(x=30, y=120, text=' Light intensity :', font_size=11, color='black')
text4 = gui.draw_text(x=30, y=138, text=' The current light intensity is appropriate ', font_size=12, color='red')
# Show part3 Switch mode function ( Rounded rectangle 、 Button 、 written words )
gui.draw_round_rect(x=20, y=165, w=200, h=40, r=8,width=1)
button_E = gui.add_button(x=30, y=170, w=70, h=30, text=" Switch mode ", οnclick=click_E)
gui.draw_text(x=110, y=173, text=' Current mode :', font_size=11) # According to the text “ Current mode :”
text_mode = gui.draw_text(x=178, y=173, color="red", text=" Automatically ", font_size=12) # Display mode type
# Show part4 Manual control mode ( Rounded rectangle 、 Button 、 written words )
gui.draw_round_rect(x=20, y=210, w=200, h=105, r=8,width=1)
gui.draw_text(x=33, y=213, text=' Manual control :',font_size=11) # According to the text “ Manual control :”
button_A = gui.add_button(x=30, y=240, w=70, h=30, text=" watering ", οnclick=click_A,state='disabled')
button_B = gui.add_button(x=140, y=240, w=70, h=30, text=" Turn off the water ", οnclick=click_B,state='disabled')
button_C = gui.add_button(x=30, y=280, w=70, h=30, text=" turn on the light ", οnclick=click_C,state='disabled')
button_D = gui.add_button(x=140, y=280, w=70, h=30, text=" Turn off the lights ", οnclick=click_D,state='disabled')
''' Email Settings '''
my_sender='10******[email protected]' # Set the sender's email account , Enter your own email
my_pass = '' # Set the sender's mailbox authorization code , Do not empty
my_name = 'IvanD.Mido' # Set sender mailbox nickname
my_user='10******[email protected]' # Set the recipient email account , I'll send it to myself
my_user_name = 'IvanD.Mido' # Set recipient mailbox nickname
# Define the alert email function
def mail(content,title):
ret=True # Define a marker ret, Record email sending events , The initial value is True
try:
msg=MIMEText(content,'plain','utf-8') # Create a message text object ,Title Corresponding text content ,'plain' Refers to the set text format ,'utf-8' Refers to the set code
''' Three header messages : Sender , The recipient , The theme '''
msg['From']=formataddr([my_name,my_sender]) # Define sender information : The nickname of sender's email in brackets 、 Sender email account
msg['To']=formataddr([my_user_name,my_user]) # Define recipient information : The nickname of the recipient's email in brackets 、 Email account of the addressee
msg['Subject']=title # Define the subject of the message , It can also be said that the title
server=smtplib.SMTP_SSL("smtp.qq.com", 465) # establish SMTP service , Connect qq Mailbox server , In the sender's mailbox SMTP The server ,SMTP Protocol encryption port yes 465
server.login(my_sender, my_pass) # Login mailbox , The brackets correspond to the sender's email account 、 Mailbox password
server.sendmail(my_sender,my_user,msg.as_string()) # Send E-mail , The brackets correspond to the sender's email account 、 Email account of the addressee 、 The string format of the message
server.quit() # Close the connection
except Exception: # If try The statement in did not execute , Then the following ret=False
ret=False # take ret Mark as False
return ret # return ret Mark
soil_mail_enable = True # Define the flag that enables sending soil alert messages
light_mail_enable = True # Defines the flag that enables the sending of light alarm messages
soil_mail_time = time.time() # Scheduled mail sending time record flag
light_mail_time = time.time() # Scheduled mail sending time record flag
# Define callback function
def sub_cb(client, userdata, msg):
global soil_mail_enable,light_mail_enable,soil_mail_time,light_mail_time
topic = msg.topic # topic Data is stored in variables
payload = msg.payload.decode() # payload The message data is converted into a string and stored in a variable
print("\nTopic:" + topic + " Message:" + payload) # Terminal print data
if topic == IOT_pubTopic1: # Definition received Soil_moisture_value Time operation
if payload.isdigit(): # If the received message is of digital type, it indicates that it is the humidity value rather than the control command
Soil_moisture_value = int(payload) # Convert to numeric type for later judgment
text_value.config(text = str(Soil_moisture_value)) # Update screen display data
if Soil_moisture_value < 2120: # Threshold set to 2120, It can be adjusted according to the actual situation
text2.config(text=" The current soil moisture is too low ") # Update text warnings
if soil_mail_enable == True and (time.time()-soil_mail_time) > 10: # If allowed, and the time interval since the last message was sent 10 Seconds or more before sending
ret1=mail(" Soil moisture alarm "," The current soil moisture value is " + str(Soil_moisture_value) + ", Please replenish water in time !")
if ret1: # If there is an email event
print(" Mail sent successfully 1")
soil_mail_enable = False # Email has been sent , Change the flag to avoid repeated sending
soil_mail_time = time.time() # Record the time this email was sent
else: # otherwise
print(" Failed to send mail 1")
else:
text2.config(text=" Current soil moisture is appropriate ") # Update text
soil_mail_enable = True # If the alarm is cleared, subsequent emails are allowed
elif topic == IOT_pubTopic2: # Definition received Light Time operation
if payload.isdigit(): # If the received message is of digital type, it indicates that it is the ray value rather than the control command
light_value = int(payload) # Convert to numeric type for later judgment
text_value_2.config(text = str(light_value)) # The screen updates the light value
if light_value < 666: # Threshold set to 666, It can be adjusted according to the actual situation
text4.config(text=" The current light intensity is too low ") # Update text warnings
if light_mail_enable == True and (time.time()-light_mail_time) > 10: # Send the message only if it is allowed to send it
ret2=mail(" Light intensity alarm "," The current ray value is " + str(light_value) + ", Please fill the light in time !")
if ret2: # If there is an email event
print(" Mail sent successfully 2")
light_mail_enable = False # Email has been sent , Change the flag to avoid repeated sending
light_mail_time = time.time() # Record the time this email was sent
else: # otherwise
print(" Failed to send mail 2")
else:
text4.config(text=" The current light intensity is appropriate ") # Update text warnings
light_mail_enable = True # If the alarm is cleared, subsequent emails are allowed
siot.init(CLIENT_ID, SERVER, user=IOT_UserName,password=IOT_PassWord) # initialization , Make sure the user name and password entered are correct
siot.connect() # Connect siot Internet of things platform
siot.subscribe(IOT_pubTopic1, sub_cb) # subscribe Topic1 Soil moisture data
siot.subscribe(IOT_pubTopic2, sub_cb) # subscribe Topic2 Light intensity data
siot.publish(IOT_pubTopic1,'auto') # Publish the information 'auto' To the Internet of things platform
siot.publish(IOT_pubTopic2,'auto') # Publish the information 'auto' To the Internet of things platform
siot.loop() # loop
while True: # loop
time.sleep(0.5) # delay0.5 second
Tips: The actual sender account number must be filled 、 Authorization code and other information , Do not empty .
3、 The program runs
STEP1: Run the program to observe the effect
Click on Mind+ The run button on the software , Observe Empty board 3, You can see that the initial mode is automatic , Water at this time 、 Turn off the water 、 turn on the light 、 The four buttons for turning off the light are gray , Not clickable , Click switch mode , The button returns to the normal state , At the same time, the detected soil moisture value and light value data are also displayed on the screen . here , On board 3 Click on “ watering ” and “ turn on the light ” after , plate 1 The water pump on the starts to work , plate 2 Upper LED Light up . When you click “ Turn off the water ” and “ Turn off the lights ” after , Water pump and LED Stop working .
Observe the Internet of things platform , Can be seen in two different Topic Next , All have data incoming .
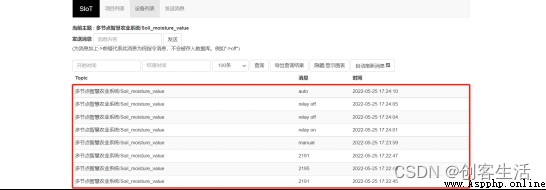
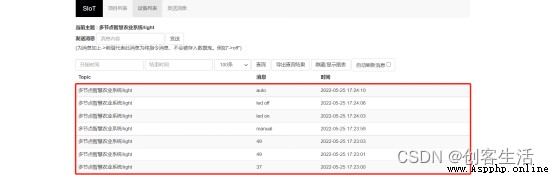
meanwhile , Observe QQ mailbox , When the soil moisture or light value data is poor , We will receive an email .
Tip1: here , Because we will directly Python The program file is built in the memory of the blank board , therefore , We can also run programs directly on the board , With a board 3 For example , The operation method is as follows :
Tip2: The router or mobile hotspot here must be able to access the Internet normally , To send mail .
Think about it , Among the three ways to supply power to the blank board introduced in this lesson ( The power adapter 、 Charging treasure 、 The computer USB mouth ), For scenarios that require long-term running of the program , Which method should be chosen is more suitable , For scenes that need to be used outdoors , Which way is it suitable ?
In addition to sending email alerts as a means , What are the possible methods of remote reminder ?
There is no router , And there is no mobile phone hotspot , Can we build a multi node IOT system ?
Tips: See Appendix for answers 2.
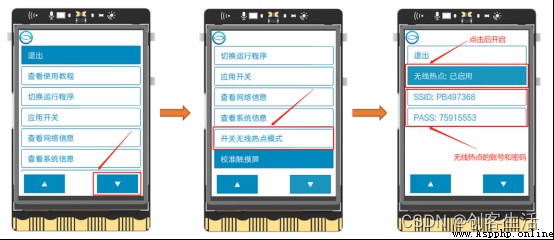
When there is no router or mobile phone and the hotspot cannot be turned on , We can also create one by turning on the hotspot function of one of the blank boards Wi-Fi Wireless hotspot , Other blank boards are connected to this Wi-Fi hotspot , Connect the boards in the same LAN . The opening method is as follows .