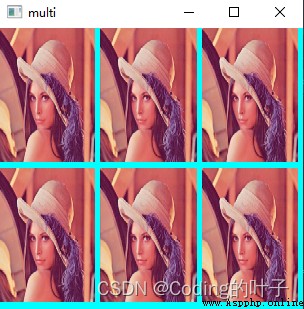
In order to compare the effects before and after image processing , Especially the rendering before and after the algorithm processing , We need to display multiple images at the same time . Here the opencv Image mosaic method to achieve the desired effect .
Define picture display functions show_multi_img, Including 5 Parameters , The meanings and types of each parameter are as follows :
(1)scale:float type , Image scaling , That is to scale the image .
(2)imglist:list type , That is, a list of image data to be displayed .
(3)order:list or tuple type , Refers to the rows and columns of the image display window ,order[0] Said line ,order[1] The column . The default value is 1 That's ok N Column ,N by imglist The length of , That is, the number of images to be displayed .
(4)border:int type , That is, the minimum interval between images .
(5)border:tuple type , The color of the image space .
This function is compatible with displaying pictures of different sizes at the same time .
# -*- coding: utf-8 -*-
"""
The official account of Lele perception school
@author: https://blog.csdn.net/suiyingy
"""
import cv2
import numpy as np
def show_multi_imgs(scale, imglist, order=None, border=10, border_color=(255, 255, 0)):
"""
:param scale: float Scale of original image scaling
:param imglist: list Image sequence to be displayed
:param order: list or tuple According to the order That's ok × Column
:param border: int Image spacing distance
:param border_color: tuple Bay area color
:return: Back to the spliced numpy Array
"""
if order is None:
order = [1, len(imglist)]
allimgs = imglist.copy()
ws , hs = [], []
for i, img in enumerate(allimgs):
if np.ndim(img) == 2:
allimgs[i] = cv2.cvtColor(img, cv2.COLOR_GRAY2BGR)
allimgs[i] = cv2.resize(img, dsize=(0, 0), fx=scale, fy=scale)
ws.append(allimgs[i].shape[1])
hs.append(allimgs[i].shape[0])
w = max(ws)
h = max(hs)
# Splice the pictures to be displayed
sub = int(order[0] * order[1] - len(imglist))
# Judge the size relationship between the input display format and the number of images to be displayed
if sub > 0:
for s in range(sub):
allimgs.append(np.zeros_like(allimgs[0]))
elif sub < 0:
allimgs = allimgs[:sub]
imgblank = np.zeros(((h+border) * order[0], (w+border) * order[1], 3)) + border_color
imgblank = imgblank.astype(np.uint8)
for i in range(order[0]):
for j in range(order[1]):
imgblank[(i * h + i*border):((i + 1) * h+i*border), (j * w + j*border):((j + 1) * w + j*border), :] = allimgs[i * order[1] + j]
return imgblank
if __name__ == '__main__':
image = cv2.imread('lena.jpg')
img = show_multi_imgs(0.9, [image, image, image, image, image, image], (2, 3))
cv2.namedWindow('multi', 0)
cv2.imshow('multi', img)
cv2.waitKey(0)The test results are shown in the following figure :

More 3D 、 Please pay attention to two-dimensional perception algorithm and financial quantitative analysis algorithm “ Lele perception school ” WeChat official account , And will continue to update .