hello , Hello everyone , Today, I will continue to share interesting AI project .
Today we share NoGAN New image enhancement technology to color old photos . Like to remember to collect 、 Focus on 、 give the thumbs-up .
notes : Data 、 At the end of the article, a technical exchange group is provided
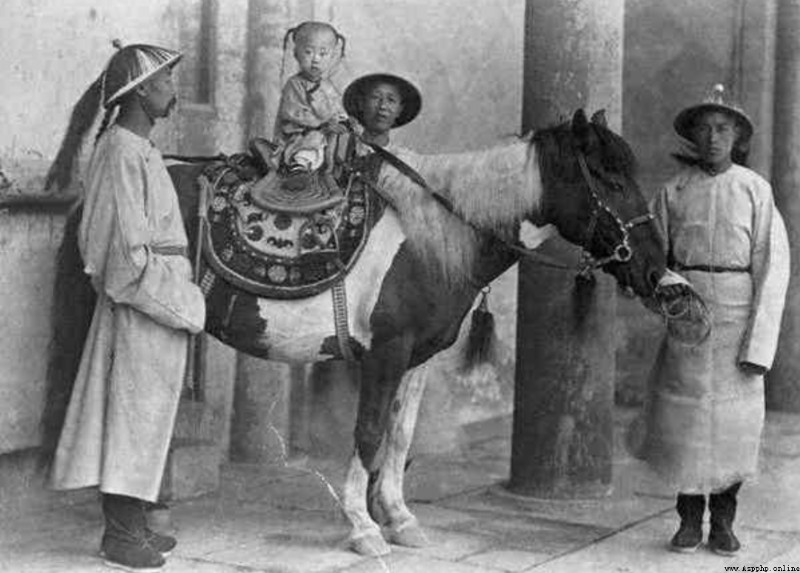
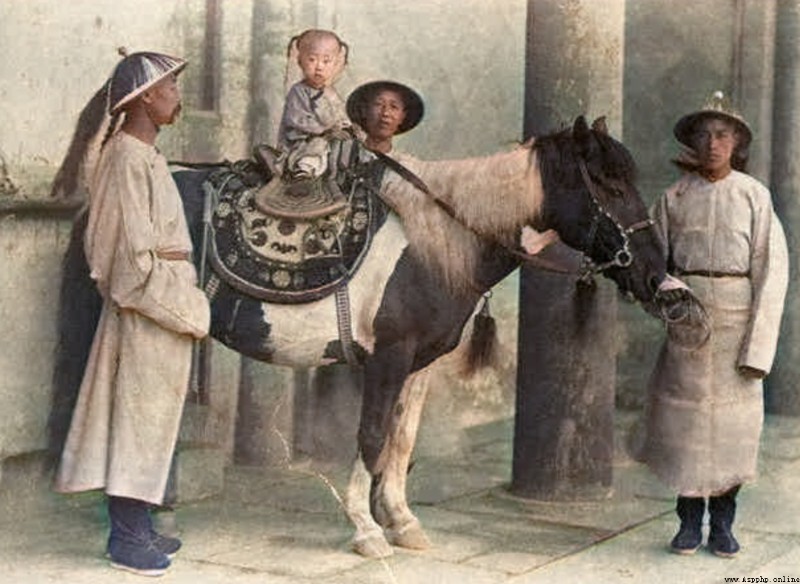
The effect is as follows :
Original picture

After coloring
NoGAN It's a new kind of GAN, It can take the least amount of time to do GAN Training .
The project shared today has been in GitHub Open source project , Let's run it .
First , use git clone Command download source code
git clone https://github.com/jantic/DeOldify.git
Go to the project root directory , install Python Dependency package
pip3 install -r requirements.txt
Before writing code to run the project , You need to download the pre trained model . The project provides three models

Model
The difference between the following :
ColorizeArtistic_gen.pth: Achieve the highest quality of image shading in terms of interesting details and vitality , The model is in UNet Upper use resnet34 For the backbone , adopt NoGAN the 5 Second critic pre training /GAN Cycle and repeat
ColorizeStable_gen.pth: Achieved the best results in landscape and portrait , The model is in UNet Upper use resnet101 For the backbone , adopt NoGAN the 3 Second critic pre training /GAN Cycle and repeat
ColorizeVideo_gen.pth: Optimized for smooth video , It uses only the initial generator / Critic pre training /GAN NoGAN Training . Due to the pursuit of smooth speed , It has less color than the first two .
Put the downloaded model file in the project root directory models Under the directory .
Create... Under the same level of the project root directory Python file , Write code to load the model file just downloaded .
from DeOldify.deoldify.generators import gen_inference_wide
from DeOldify.deoldify.filters import MasterFilter, ColorizerFilter
# Specify model file
learn = gen_inference_wide(root_folder=Path('./DeOldify'), weights_name='ColorizeVideo_gen')
# Load model
deoldfly_model = MasterFilter([ColorizerFilter(learn=learn)], render_factor=10)
root_folder Specify the project root directory ,weights_name Specify which model to use next to color the photo .
Read old photos , Color it
import cv2
import numpy as np
from PIL import Image
img = cv2.imread('./images/origin.jpg')
img = cv2.cvtColor(img, cv2.COLOR_BGR2RGB)
pil_img = Image.fromarray(img)
filtered_image = deoldfly_model.filter(
pil_img, pil_img, render_factor=35, post_process=True
)
result_img = np.asarray(filtered_image)
result_img = cv2.cvtColor(result_img, cv2.COLOR_RGB2BGR)
cv2.imwrite('deoldify.jpg', result_img)
use cv2 Read old photos , And use PIL.Image The module converts the picture into the format required for model input , Send it to the model for coloring , Save when done .
The above code is extracted from the project source code , You can see , Running the code is still very simple .
Interested friends can run it by themselves , You can also try other models .
At present, a technical exchange group has been opened , Group friends have exceeded 2000 people , The best way to add notes is : source + Interest direction , Easy to find like-minded friends

Research directions include : machine learning 、 data mining 、 object detection 、 Image segmentation 、 Target tracking 、 Face detection & distinguish 、OCR、 Attitude estimation 、 Super resolution 、SLAM、 Medical imaging 、Re-ID、GAN、NAS、 Depth estimation 、 Autopilot 、 Reinforcement learning 、 Lane line detection 、 Model pruning & Compress 、 Denoise 、 Defogging 、 Go to the rain 、 Style transfer 、 Remote sensing image 、 Behavior recognition 、 Video understanding 、 Image fusion 、 image retrieval 、 Paper Submission & communication 、PyTorch、TensorFlow and Transformer etc. .
Be sure to note : Research direction + School / company + nickname ( Such as Transformer Or target detection + Hand in + kaka ), Note according to the format , Can be passed and invited into the group faster .