website :
JSON Web Token(JWT) It's an open standard (RFC 7519), It defines a compact and self-contained way , Used to securely treat information as between parties JSON Object transfer . Because this information is digitally signed , So it can be verified and trusted . You can use secrets ( Use HMAC Algorithm ) Or use RSA or ECDSA Public use of / Private key pair JWT To sign .
Yes, though JWT Encrypt to provide confidentiality between the parties , But we will focus on signed tokens . The signed token verifies the integrity of the declaration it contains , The encrypted token hides these claims in front of other parties . When using the public key / When the private key is used to sign the token , The signature also proves that only the party holding the private key is the party signing it .
emmmm.......balabala A pile of words , So let's briefly summarize :
JWT It's a JSON Open standards for information transmission , It can use a key to digitally sign information , To make sure the information is verifiable and trustworthy .
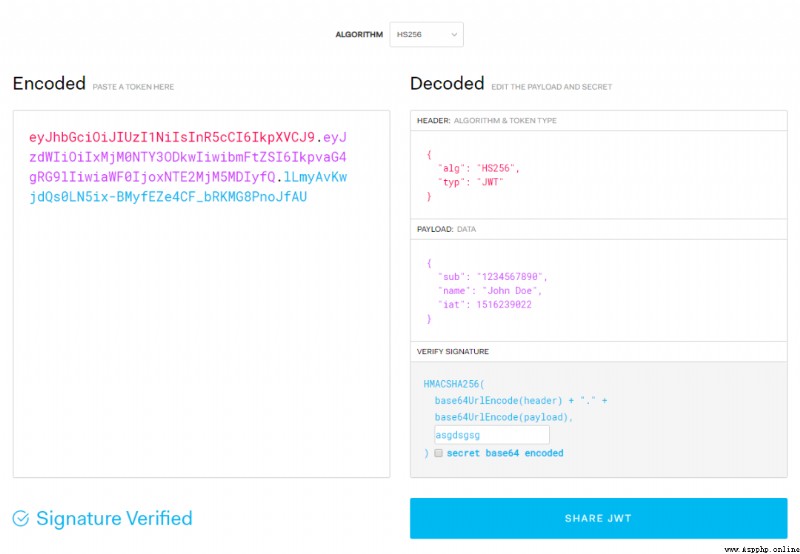
JWT It consists of three parts :header( Head )、payload( load ) and signature( Signature ). It consists of these three parts in a compact form , from “.“ Separate .
therefore ,JWT Usually as follows .
xxxxx.yyyyy.zzzzz
Let's break down this strange string of things :
header Usually It's made up of two parts : Type of token ( namely JWT) And the signature algorithm used , for example HMAC SHA256 or RSA wait .
for example :
{ "alg": "HS256", "typ": "JWT" } Obvious , This is a json data , Then the goods will be Base64 Code formation JWT The first part of , That is to say xxxxx.yyyyy.zzzzz Medium xxxxxx.
What's this JWT Part two , Called load ( load ), The content is also a json object , It is Where valid information is stored , It can store JWT Off the shelf fields provided :
iss: The JWT Issued by .
sub: The JWT Target users .
aud: To receive JWT On the side of .
exp(expires): When does it expire , Here is a Unix Time stamp .
iat(issued at): When was it issued .
for instance :
{
  "iss": "www.baidu.com",
"sub": "you",
  "aud": "me",
"name": "456",
"admin": true,
  "iat": 1584091337,
  "exp": 1784091337,
}
The goods will also be Base64 code , And then form JWT Part two , That is to say xxxxx.yyyyy.zzzzz Medium yyyyyy.
This is a JWT Part three , It's called signature , This part Used to prevent JWT The content has been tampered with . Use English periods for the above two encoded strings . come together ( Head in front ), Formed
xxxxxx.yyyyyy
And then use header Declare the signature algorithm to sign . If you want to use HMAC SHA256 Algorithm , Then the signature will be created by :
HMACSHA256( base64UrlEncode(header) + "." + base64UrlEncode(payload), secret) Of course , When encrypting , We also need to provide a key (secret), We can designate as we like . In this way JWT Part three , That is to say xxxxx.yyyyy.zzzzz Medium zzzzzz.
Last , We put these three parts together , It forms a complete JWT.
Here is a complete JWT, It's right first header and payload Encoding , Finally, a key is used to form a signature .

If we want to experiment , Can be in JWT On our official website debugger. Post it on the official website :https://jwt.io/
Here are JSON Web Token Some useful situations :
to grant authorization : This is the use of JWT The most common solution . Once the user logs in , Each subsequent request will include JWT, This allows the user to access the route allowed by the token , Services and resources . Single sign on is widely used today JWT A feature of , Because it costs little and can be easily used in different domains .
Information switching :JSON Web Token It's a good way to safely transfer information between parties . Because you can be right JWT To sign ( for example , Use public key / Private key pair ), So you can be sure that the sender is the person they are talking about . Besides , Because the signature is computed using headers and payloads , So you can also verify that the content has been tampered with .
that , Someone will say , I know everything , How should I achieve it ? Mo panic ..

I'll use it next python Realization JWT, Do not want to pull hatred , however ,python Dafa is good ....
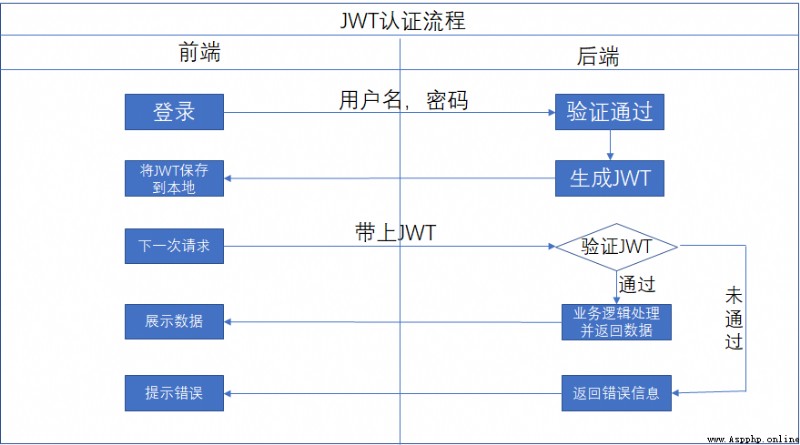
In projects where the front and back ends are separated , We need to agree an identity authentication mechanism with the front end . When the user logs in , The back end will generate token, And then it goes back to the front end , The front end needs to token Get it and put it in according to certain rules header in , It will be sent to the backend at the next request , Back end token Identity verification .
Here we agree that the front end needs to add header information when requesting back-end services Authorization , The content is token.
I use it fastapi web frame , Building projects is very fast .
from datetime import timedelta, datetime
import jwt
from fastapi import FastAPI, HTTPException, Depends
from starlette.status import HTTP_401_UNAUTHORIZED
from starlette.requests import Request
app = FastAPI()
SECRET_KEY = "sdifhgsiasfjaofhslio" # JWY The key used for signing , It's private , Save only on the server
ALGORITHM = "HS256" # encryption algorithm , What I use here is HS256
@app.get("/")
async def root():
return {"message": "Hello World"}
@app.post("/create_token")
def create_token(username,password):
if username == "123" and password == "123":
access_token_expires = timedelta(minutes=60)
expire = datetime.utcnow() + access_token_expires
payload = {
"sub": username,
"exp": expire
}
# Generate Token, Back to the front end
access_token = jwt.encode(payload, SECRET_KEY, algorithm=ALGORITHM)
return {"access_token": access_token, "token_type": "bearer"}
else:
raise HTTPException(
status_code=HTTP_401_UNAUTHORIZED,
detail="username or password are not true",
headers={"WWW-Authenticate": "Bearer"}
)
def authorized_user(token):
try:
payload = jwt.decode(token, SECRET_KEY, algorithms=[ALGORITHM])
username: str = payload.get("sub")
print(username)
if username == "123":
return username
except jwt.PyJWTError:
raise HTTPException(
status_code=HTTP_401_UNAUTHORIZED,
detail=" Authentication failed , No permission to view ",
headers={"WWW-Authenticate": "Bearer"},)
@app.get("/app")
def create_token(request: Request):
print(request.headers.get("host"), request.headers.get("Authorization"))
user = authorized_user(request.headers.get("Authorization")) # verification Token
if user:
return {"username": user,"detail": "JWT adopt , The query is successful "}
here , Because of the existing JWT The library has already been encapsulated for us , We can use JWT Directly generate token, It's not manual base64 Encryption and splicing .
Test it :
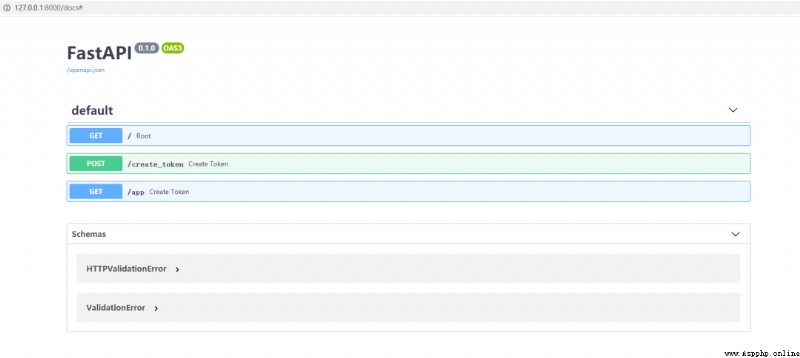
After starting the project , We turn on http://127.0.0.1:8000/docs# , You will see the following prepared by us api:
First , Let's test it first create_token Interface
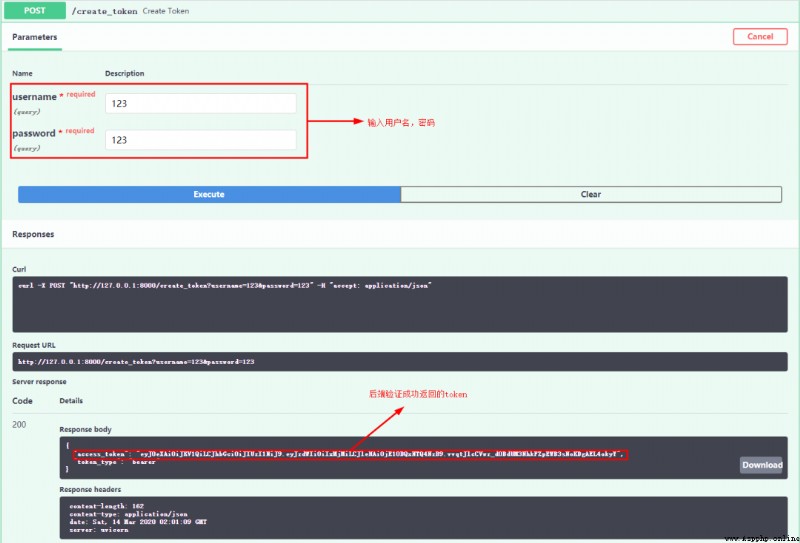
When we enter the user name , After the password , Back end verification , After the verification is successful, it will be returned to the front end token, That is to say JWT. The front end gets this token after , You must bring this with you next time you ask token 了 , Because the front and back ends have been agreed . Let's try :
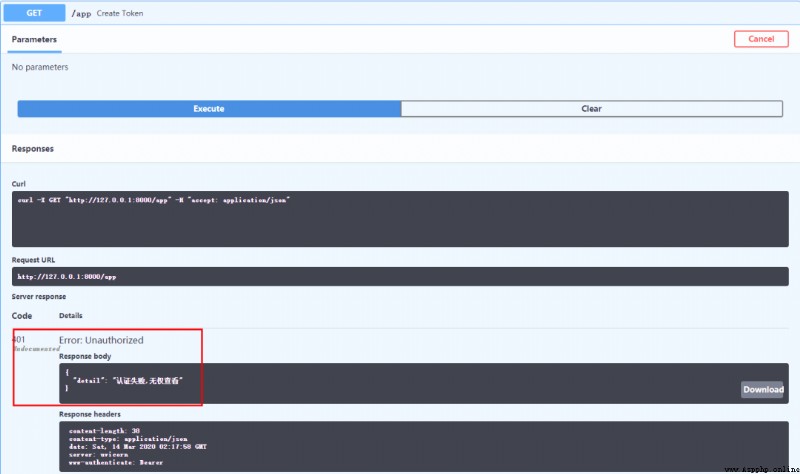
Authentication failed ???

What's the cause ?? Let's click to check and grab the bag :
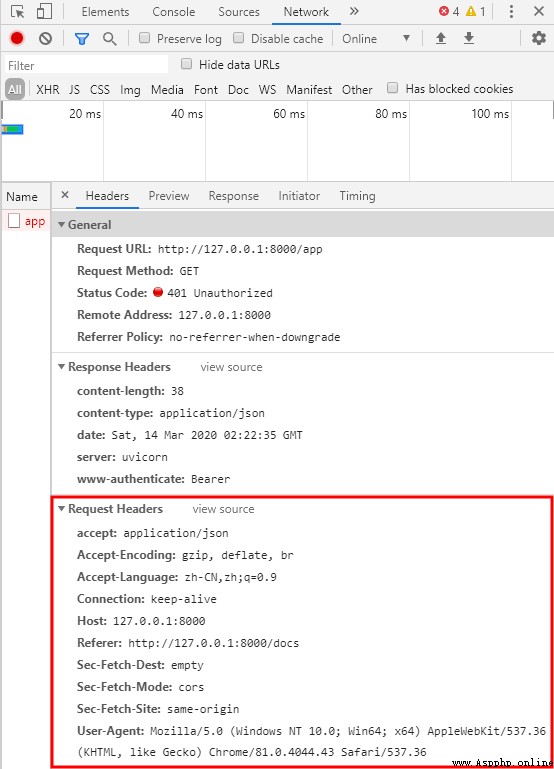
See light suddenly , Just now we said , The front and back ends have been agreed in advance , Requested header Be sure to bring token, stay Authorization , Content token. We are now asking for header Did not bring token, That kind of debug In the mode, the request cannot be changed header The information of , We can use interface testing tools to test , My main push Postman!!!, Let's have a try :
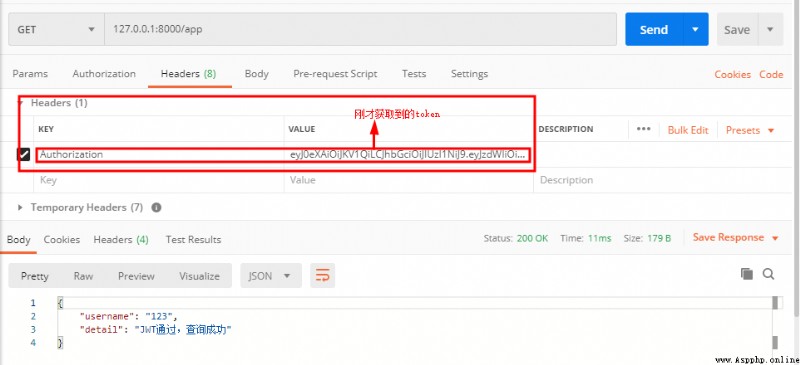
thus ,JWT The introduction and use are finished .