本篇文章是基於導師與師姐發布的論文: Xue-Yang Min, Kun Qian, Ben-Wen Zhang, Guojie Song, and Fan Min, Multi-label active learning through serial-parallel neural networks, Knowledge-Based Systems (2022) 相關論文內容可以自行查看, 本文也是主要對於文章算法進行學習和分析, 最後對代碼進行學習與自我理解學習
目錄
前言
1.多標簽概念准備
1.1 何為多標簽
1.2 多標簽模型
1.3 多標簽的其他內容
2.MASP中的主動學習(學習場景)
2.1 冷啟動
2.2 主動學習(額外查詢)
2.3 主動學習中的一些查詢理由
3.MASP中神經網絡(學習模型)
4.多標簽的評價指標
4.1 傳統評價的瓶頸
4.2 混淆矩陣與參數
4.3 相關的評價方案與曲線
4.3.1 ROC曲線與AUC值
4.3.2 PR曲線
4.3.3 F1曲線
5.程序主體框架部分
5.1 總覽
5.2 test_active_learning 函數
5.3 Masp構造函數
5.4 MultiLabelData構造函數
5.5 MultiLabelAnn與ParallelAnn構造函數
6.具有代表的函數一覽
6.1 網絡的學習: one_round_train與bounded_train函數
6.2 冷啟動與主動學習: two_stage_active_learn函數
· 關於參數
6.2.1 冷啟動批次與主動學習批次計算
6.2.3 冷啟動
6.2.4 主動學習
6.3 F1的計算my_test與compute_f1
尾言
MASP全稱是Multi-label active learning through serial-parallel neural networks, 是通過串行與並行混合構造的神經網絡為學習模型與算法, 並且以主動學習作為學習的場景從而構建的一種面向解決多標簽學習問題的一種高效的算法
之前我的文章中大多機器學習的算法都聚焦了iris這個數據集, 眾所周知, 這個數據集有三個標簽
@RELATION iris
@ATTRIBUTE sepallength REAL
@ATTRIBUTE sepalwidth REAL
@ATTRIBUTE petallength REAL
@ATTRIBUTE petalwidth REAL
@ATTRIBUTE class {Iris-setosa,Iris-versicolor,Iris-virginica}
學習中都是確定地對某個數據行進行確定唯一的標簽預測, 這應該是屬於一種多分類問題, 例如下面這個iris的某三個數據行, 他們的正確標簽是"Iris-setosa"這個推斷
4.3,3.0,1.1,0.1,Iris-setosa
5.8,4.0,1.2,0.2,Iris-setosa
5.7,4.4,1.5,0.4,Iris-setosa
而在機器學習領域對於標簽預測中還存在一種多標簽的情況, 在多標簽的問題中, 一個數據行的標簽就不是如此的單一, 有可能是下面的情況. 每個屬性列可以有多個情況, 這就是一種多標簽的案例. 於是, 假定標簽總數是\(L\), 不難發現一個屬性行具有的標簽可能性就是\(2^L\).
4.3,3.0,1.1,0.1,Iris-setosa,Iris-versicolor
5.8,4.0,1.2,0.2,Iris-virginica
5.7,4.4,1.5,0.4,Iris-versicolor,Iris-virginica
6.4,3.1,5.5,1.8,None
6.0,3.0,4.8,1.8,Iris-setosa,Iris-virginica
於是, 假定標簽總數是\(L = 1\), 那麼通常當\(L=1\), 有\(2^1\), 即是一個二分類問題, 也就是對於數據行進行非1即0的二元斷言, AdaBoost中的單個分類器就是實現這種操作, 也是最簡單的一種分類器.
當\(L > 1\) 時就是常見的多標簽問題了, 此刻如果限定標簽選擇是互斥的, 那麼就回到了常見的多分類問題.
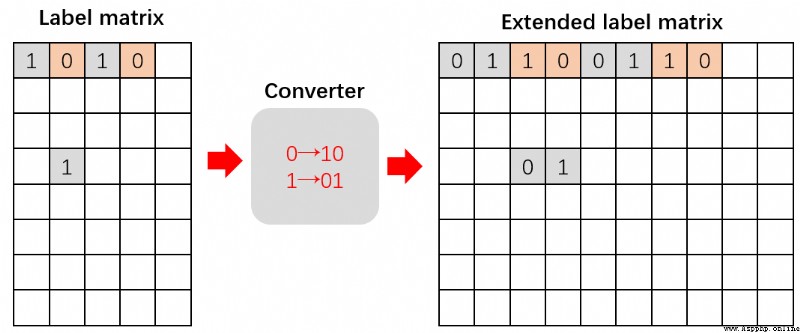
之前在聊多分類問題時我們有一個固定的\(N \times 1\)標簽列, 存放值的范圍在0~\(L-1\) , 用於表示確定的某個標簽. 而進入多標簽領域的話, 這個存放值的" 列 " 應當擴大為一個 " 矩陣 ", 即用一個\(N \times L\)的標簽矩陣來存放. 這就與數據集中存放實例的部分的大小為\(N \times M\)的矩陣構成了一個二元組:\[S=(\mathbf{X}, \mathbf{Y}) \tag{1}\]
其中:
這裡每個標簽值並不像多分類問題中可以取那麼多, 主要來說是布爾含義更多, 常見的數據集中定義的是\(y_{ij}=1\)表示有, \(y_{ij}=-1\)表示無. 當然另外某些情況還會用\(y_{ij}=0\)來表征缺失. 這也是可以理解的, 畢竟現實生活不確信的數據總是多於確信的, 獲得數據容易, 但是要明確其含義, 或者說花時間去明確其含義, 其實都是一件復雜的事. 這也是後來主動學習(Active Learning)發端的原因之一.
多標簽有一些相關的特征, 比如標簽相關性的問題, 這是許多多標簽算法需要考慮的一個部分, 常見的很多算法都會從不同角度去切入, 例如有: 不考慮相關性、考慮兩兩相關性、考慮兩個以上標簽相關性. 例如BP-MLL考慮的是兩兩相關, 而 LIFT 算法又拋棄的了相關性.
BP-MLL 原文: Zhang, M.-L., & Zhou, Z.-H. (2006). Multi-label neural networks with applications to functional genomics and text categorization. IEEE transactions on Knowledge and Data Engineering, 18, 1338–1351.
有關介紹有我老師的博客: BP-MLL
LIFT 原文: Zhang, M.-L., & Wu, L. (2014). LIFT: Multi-label learning with label-specific features. IEEE Transactions on Pattern Analysis and Machine Intelligence, 37, 107–120.
有關介紹有我老師的博客: LIFT
此外標簽的取值也可以采用[0,1]的概率值進行多標簽研究, 而非布爾, 這就是 標簽分布學習問題
這部分更多內容見多標簽學習之講座版 (內部討論, 未完待續)_闵帆的博客-CSDN博客
通過上述多標簽缺失現象與主動學習動機的吻合性, 可以發現多標簽的主動學習應當是可能的. MASP中提出了如下的模型: 有限預算的冷啟動多標簽學習
大體上如此的過程, 這個中但凡需要目標標簽矩陣來輔助的部分都由專家查詢完成, 這就是主動學習的核心所在(代碼中體現在對於目標矩陣的查詢) 這個過程中最特殊的就是冷啟動的介入, 冷啟動保證了基礎的神經網絡的成形, 方便我們後續提取某些欠訓練標簽信息, 從而反哺網絡的特征進一步深化. 我試著用兩張圖來描述這個過程.
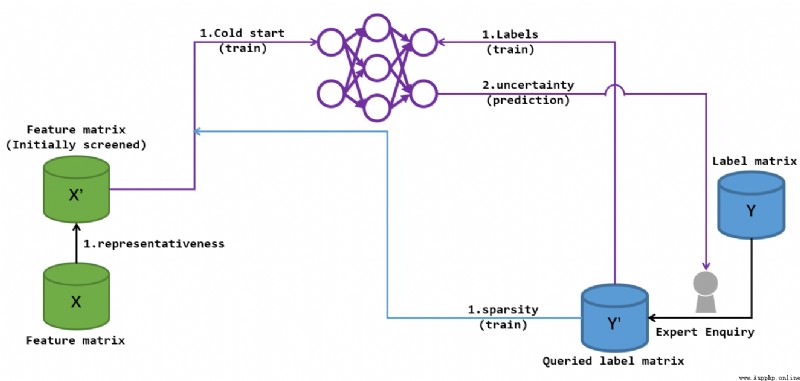
這張圖诠釋了2,3步的冷啟動階段, 圖中的\(Y^{\prime}\)是在專家參與下根據\(X\)標記出的標簽矩陣, 這個矩陣的行數是要小於全體標簽矩陣\(Y\)的, 但\(Y\)是不可知部分, 因此可知的\(Y^{\prime}\)將會為接下來的學習起指導意見. 圖中的\(X^{\prime}\)就是對於特征矩陣\(X\)預處理得到的.
這個預處理得到了訓練的數據行集\(U\), 並通過專業人士所標記的數據中那些sparsity(稀疏)值較高標簽確定數據列\(V\), 最後得到了冷啟動的查詢標簽點集\(\{(i,j)|i \in U, j \in V\}\). 然後在訓練網絡時, \(Y^{\prime}\)提供的標簽將作為網絡損失函數擬合的目標而進行學習. 最後通過有限次batch訓練, 得到一個評價參數: 不確定性(uncertainty). 這個參數可以再度引導專家去標記更多關鍵標簽, 從而進一步推動\(Y\)到\(Y^{\prime}\)的轉化, 完善\(Y^{\prime}\).
冷啟動階段sparsity的導入存在一定的主動學習含義, 但是後續uncertainty的反復刷新過程中主動學習的特征更加明顯:
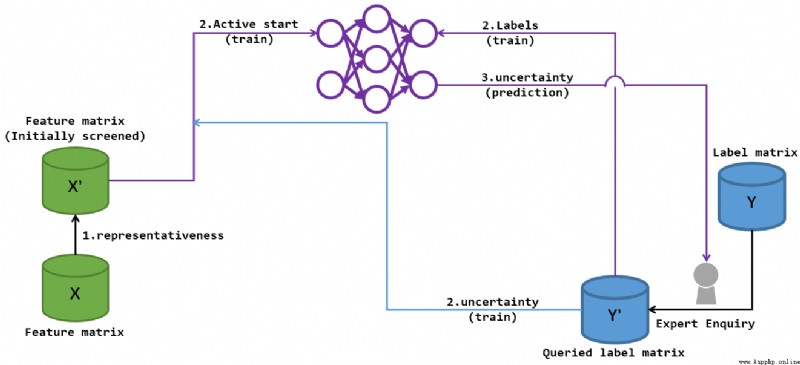
上回合冷啟動結束後提供的"uncertainty"資料推動專家進一步完善了\(Y^{\prime}\), 自然也擴充了\(X^{\prime}\)的可查詢集, 於是根據新的\(S^{\prime} = \mathbf{X^{\prime}}, \mathbf{Y^{\prime}}\)進一步訓練網絡. 之後訓練得到新的uncertainty進一步引導專家進行標簽標記, 從而更新\(Y^{\prime}\), 從而形成一個訓練->得到新的uncertainty->訓練...的循環. 直到專家查詢達到上限, 輸出最終預測.
MASP中的SP描述了其采用的網絡——serial-parallel neural networks. 這裡我采用論文中的原圖來描述:
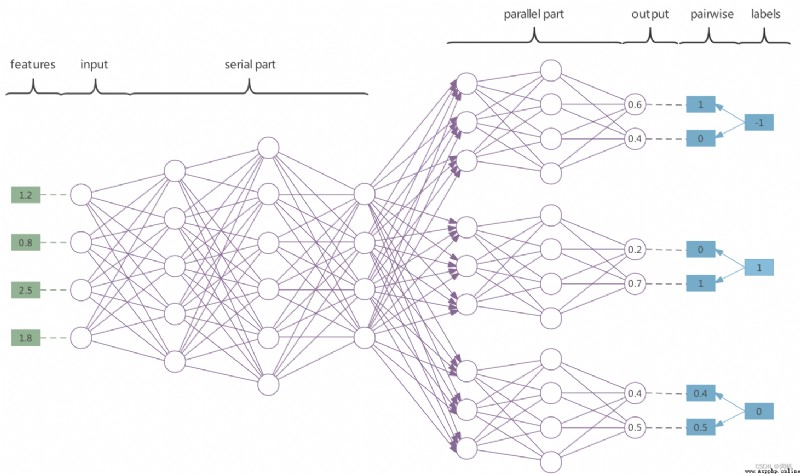
所謂串行(serial)網絡就是圖中的前導serial part, 這部分網絡起到了特征提取的作用, 所有的標簽之間的特征都在這裡串聯進行分析, 同時也實現了標簽相關性的處理. 因此MASP中是考慮了標簽相關性的, 只不過本文的特點就在於標簽相關性的考慮是在先導學習中完成的, 而不是對於預測結果進行分析, 與常見的標簽相關性的處理手段有所差異.
並行(parallel)網絡是圖中平行輸出前的這部分網絡, 這部分網絡的個數等於\(L\), 言下之意, 每個並行網絡實現了對於一個標簽的單獨二分類預測. MASP中采用的並行網絡的輸出是一個雙端口輸出, 輸出的值范圍在[0,1], 在網絡進行預測時, 作為一個正向輸出的結構, 我們定義雙端口中較大部分評估為1, 較小部分評估為0. 最終pairwise = <1, 0>時預測為負標簽(-1), 即標簽不存在; 最終pairwise = <0, 1> 時預測為正標簽(1). 此外還有一種可用的方案就是利用softmax將雙端口計算為一個確定的概率值, 作為正標簽的概率, 最終通過確定一些阈值來決定當前標簽的正負.
在網絡進行訓練時, 作為一個負向backPropagation的結構時, 目標標簽若是負標簽(-1), 那麼就生成一個pairwise = <1, 0>, 訓練時forward後計算損失函數時針對這個pairwise來擬合雙端口; 目標標簽若是正標簽(1), 那麼就生成一個pairwise = <0, 1>, 擬合同理. 額外強調, 當目標標簽缺失(0), 算法會生成的pairwise = <\(\hat{y}_{0}\), \(\hat{y}_{1}\)>, 從而在計算損失函數中不會產生懲罰. 這就是MASP中不對缺失標簽進行懲罰的特征.
具體來說, 代碼模擬MASP時, 缺失標簽並不是說這個標簽在數據集\(Y\)中就缺失了, 而是這個標簽並沒有被專家標記, 也就是說在\(Y^{\prime}\)中找不到這個標簽. 當然, 雖然它缺失了, 但是仍然是可以被成熟的網絡給預測出來, 或者在後續被選中為uncertainty的標簽從而被專家標記(代碼中表征被查詢)從而變成非缺失標簽.
另外我通過閱讀源碼還得到一些網絡信息, MASP中在backPropagation過程中對於損失函數采用的梯度下降方案是自適應矩估計(Adam: Adaptive Moment Estimation), 大部分層的激活函數使用的是Sigmoid, 但是在串行與並行網絡之間采用的是ReLU, 最終采用的損失函數是MSE均方誤差.
MASP采用的F1評價指標, 對於F1, AUC了解的讀者可以直接看4.3.3
在多分類問題中的標簽列因為只有一個, 是否預測正確可以用1/0表示, 擴展到多個數據行之後可以判斷1的占比得到識別的效果, 這就是accuracy.
但是多標簽問題中一個數據行有多個標簽列, 若還以1/0表示是否預測正確就會出現不合理的地方: 首先多標簽問題的標簽正確性是布爾化的, 某個標簽預測 " 不存在/存在 " 可能都是合理的, 例如對於一個\(L=4\)的數據行, 如果說真實情況是{+1, -1, -1, -1}, 我絕不能說預測成{ +1, -1, +1, -1}就絕對地錯誤, 因為我畢竟還預測對三個啊 ! 那麼用比例來算呢, 比如這個數據行預測的accuracy為75%. 但是這樣也不合理, 因為現實中的多標簽數據中的多標簽矩陣具有嚴重的標簽稀疏性, 簡單來說就是一個數據行中負標簽的個數可能占到全體標簽的九成以上! 如此來說似乎我把一個數據行的標簽全預測為負標簽就有99%的正確率了, 但是, 這合理嗎? 無論給你什麼圖片, 讓你預測有什麼動物, 你都預測 " 啥動物都沒 ".
因此我們需要提出一些全新的評價指標.
混淆矩陣是評價總體精度一個非常關鍵的東西, 也是各種評價指標的基礎:
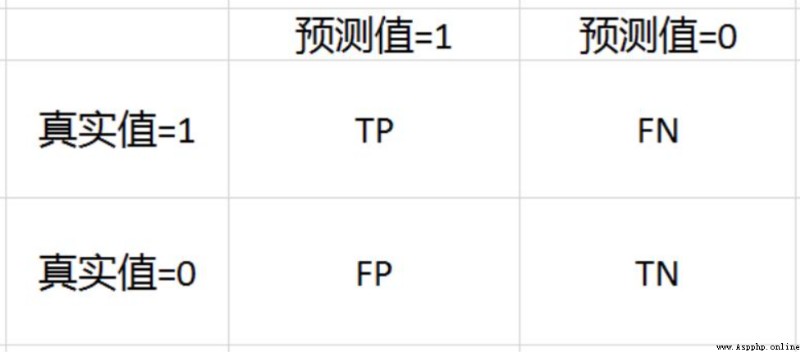
表中重疊交叉部分誕生出四個預測與實際的重疊情況:
通過這四個信息也誕生了相對應的幾個指標:
由上面三個指標衍生出了非常多的評價指標, 這裡簡單列舉幾個.
首先是ROC曲線, 全稱“受試者曲線”, 簡單來說, 他將隨著調查樣本的深入過程中不斷增大的TPR和FPR分別作為縱坐標與橫坐標. 而實際看這個圖像時請不要把它理解為一個函數圖像, 請看成一張地圖, 而(0,0)處有個旅行者, 他每一回合只能向北或向東走, 但是無論怎麼走他最終都會走到(1,1)點. 這樣理解能完美诠釋上文紫色文字的內涵.
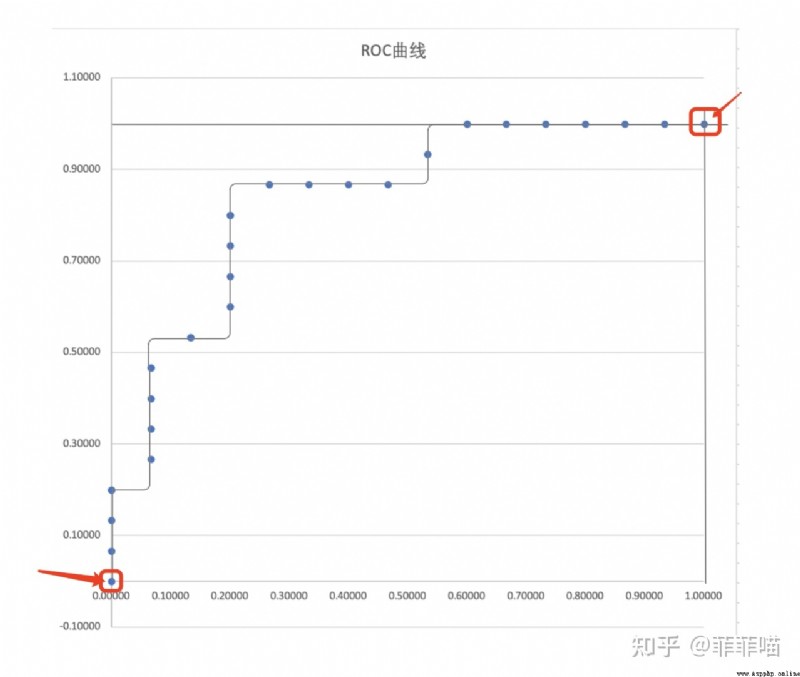
可見ROC曲線是個梯度線, 但隨著樣本的增加, 我們的曲線也會變得更平滑. 與此同時, 當這個曲線"越凸"時, 就證明了TPR的增加是很快的, 也就是說那個旅行者在最開始就盡可能多的往北走, 最後無可奈何必須到達(1,1)於是才向東走. 我們是希望這樣的結果的, 用剛剛將TPR的抓罪犯的例子來看, 若在最開始的前幾次審判中就能抓住劫匪, 我們似乎就能提前結束抓捕避免了余下的冤假錯案. 因此為了度量"凸"的程度, 我們定義這個曲線在[0,1]上的定積分值(面積)為AUC值, 作為評判樣本分布好壞的指標.
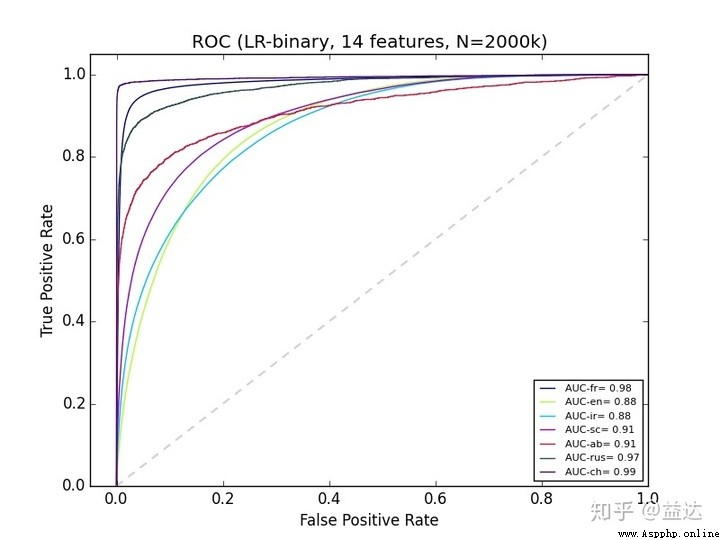
若最開始抽取的\(x\)個樣本預測為正全部預測正確, 而且剛好把所有的\(x\)個真實正樣本全部預測了出來, 那麼TPR在前\(x\)次預測時分數就會從\(\frac{0}{x}\)直接變成\(\frac{x}{x}\), 這就是best的ROC曲線, 他的AUC值為1.
通過介紹得知, Precision的值最開始是從1開始(Precision值一開始就是\(\frac{0}{1}\))的可能性是比較小的, 因為我們往往在實際做預測時都會按照為正樣本可能性排序, 往往第一個樣本的預測為正的可能性是接近100%), 然後隨著預測過程中誤差的發生導致逐步偏離1, 但是因為分子有積累量, 故最終也不會到0. 而Recall值會隨著調查深入從0 逐步接近1, 樣本分布有序時, 這種接近會更早達到. 最終, 以Recall為橫坐標, Precision為縱坐標, 從而得到PR曲線.
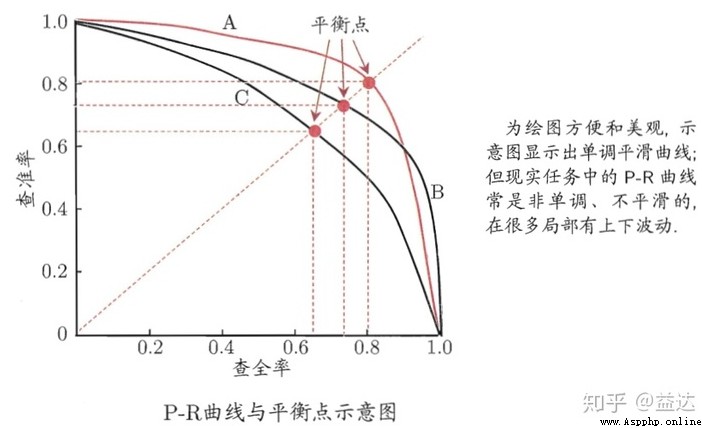
對於不同的模型在相同數據集上的預測效果, 我們可以畫出一系列的PR曲線, 一般來說如果一個曲線完全“包圍”另一個曲線, 我們可以認為該模型的分類效果要好於對比模型. 但是PR曲線的描述終究還是比較粗糙的, 實際上關於Precision與Recall我們更多用的是F1, 這也是MASP中選擇的度量方案之一.
F1值是P和R的調和平均值的2倍:\[F_{1} = \frac{2PR}{P+R} \tag{4}\]這裡P代表Precision, R代表Recall.
實際我們通過網絡的學習或者是其他手段得到了最終的預測的標簽值, 最開始這些標簽值還沒有轉換為確定的1/-1時他們都是一個雙端口值<\(\hat{y}_{0}\), \(\hat{y}_{1}\)> (\(\hat{y}_{p} \in [0,1]\)), 並唯一地與它的真實標簽值在邏輯上對應. 邏輯上這些單獨的雙端口二元組與它的真實標簽值不過都是在標簽矩陣中某個坐標\(\{(i,j)| 0 \leq i < N , 0 \leq j < L\}\) 的映射和取值. 現在我把他們都降為一維數組, 這個對應關系依舊不變, 然後我將真實的標簽值進行依據 雙端口二元組softmax概率值 的排序, 也就是按照網絡訓練出來的標簽可能為正的概率對真實標簽進行重排, 得到一個真實標簽重排數組sortedArray(數組長為N*L, 內容大概是[1,1,1,...,1,1, -1,-1,-1,...,-1,-1], 但是因為預測有缺陷, 可能會出現連續的1中夾雜-1, 連續-1中夾雜1). 然後不斷取出sortedArray的前\(Q\%\)數據, 並且都預測這個數據內的數據為正標簽, 然後根據公式4來計算F1.
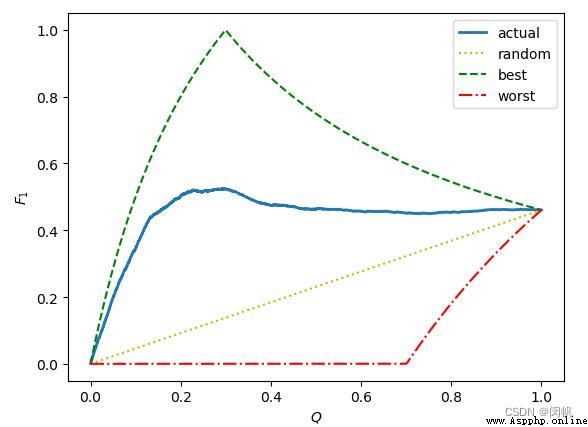
best的曲線表示最佳的F1曲線, 若當前數據總量為\(x+y\), 其中\(x\)個是真實的正樣本, \(y\)個是真實的負樣本. 通過公式可以判斷, 最佳情況下前\(x\)樣本的確是正樣本, 因此前\(x\)次抽樣中Precision將永遠是1(抽取一個預測為正就預測對), 而當預測進入第\(x+1\)個數據時Precision將從1下降(已經沒有正樣本了, 再抽取一個預測為正就會預測錯), 直到最後下降為\(\frac{x}{x+y}\). 而Recall在最開始是\(\frac{0}{x}\), 隨著抽樣繼續逐步\(\frac{1}{x}\),\(\frac{2}{x}\)...增加. 然後在檢查完第\(x\)個數據時變為\(\frac{x}{x} = 1\), 後續將不再變化. 因此當檢查到第\(x\)個數據時, Precision是最後一次為1, 而Recall第一次變為1, 因此就得到best上圖中best曲線最高值:\(F_{1} = \frac{2 \times 1 \times 1}{1+1} = 1\). 之前[0~\(x\)]區間內Precision保持1不變, 而Recall又是一個逐步從0->1的遞增過程, 因此圖中曲線這部分就是遞增.
而實際數據將是藍色的actual曲線, 雖然[0~\(x\)]區間會遞增一部分, 但是Precision可能因為一些錯誤預測導致提前從1開始下降, 而Recall也會因為錯誤預測增加變慢. 所以藍色線會提前偏離best曲線, 提前達到Peak並下降, 最後在末尾又因為少量的成功預測導致Recall上升從而略微拔高F1. 最後關於worst與random曲線諸位讀者可以進行類似分析, 簡言之worst其實就是先排負標簽後排序正標簽的結果.
最終無論怎麼折騰, 最後全局數據測試後Recall一定是1, Precision一定是\(\frac{x}{x+y}\). 所以最後曲線最後都殊途同歸地匯聚於\((1.0,\frac{2x}{2x+y})\)(初中數學計算)
源代碼的體量比較龐大, 進行了多輪測試, 場景分為了監督學習, 隨機查詢的半監督學習和主動學習. 在訓練數據方面, 有通過5折交叉驗證來只利用一個訓練集來分化完成訓練和測試, 也有利用默認原數據集給出的訓練/測試文件來分別指導測試和訓練. 這裡為了簡單起見主要展示一條分支:

具體描述時我就省略一些讀寫文件的代碼了, 一些變量的作用我將在描述時介紹, 並在最後放出一些常用變量的理解. 這次一反我文章常態, 我將自頂向下介紹此代碼, 先將主體, 具體涉及到某函數時我在簡單闡述. 具體有興趣的歡迎查看源碼.
本文用於描述測試的數據是Birds數據集:
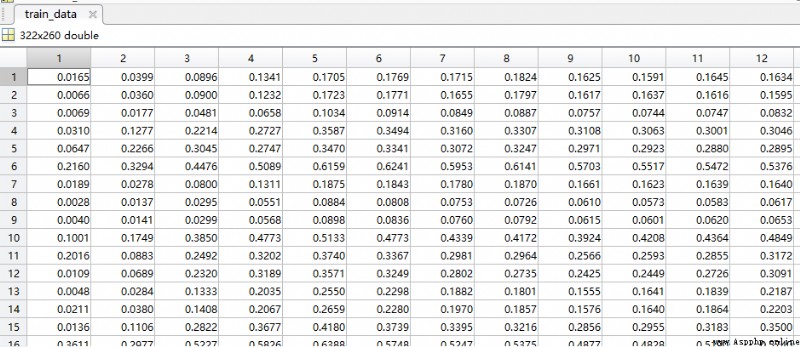
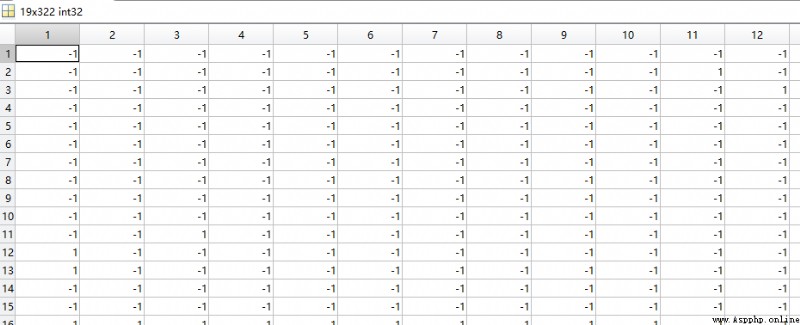
(測試矩陣就不放圖了, 有323個測試數據, 測試與訓練數據集的個數幾乎一致)
具體流程我用一張圖描述
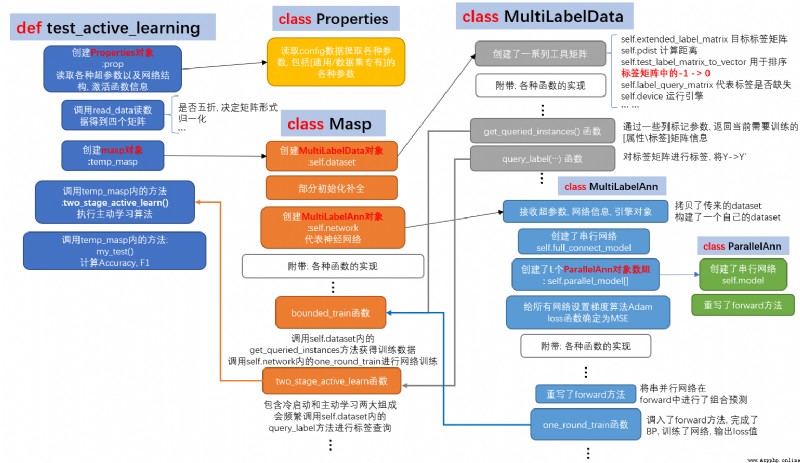
這張圖中每一種顏色代表一個類, 除了最左邊的那個函數除外, 你可以把test_active_learning視為本流程的main函數來理解. 所有類的縱向同顏色流程框代表著此類構造函數中任務完成的過程, 而在"附帶: 各種函數的實現"白框之下是這個類的一些關鍵函數成員, 若沒有這個白框的話說明當前類所擁有方法已經全部展示. 顯然, 只有ParallelAnn和Properties類符合, 因為它們的體量是最小的. 其余三個類都是相對比較龐大的, 具有非常多的附帶方法, 本文不可能也沒必要都介紹, 我只對部分關鍵的做基本闡述.有興趣歡迎查看源碼.
def test_active_learning(para_dataset_name: str = 'Emotion'):
"""
用於填寫第三組實驗數據, 與一般的多標簽學習主動算法比.
:param para_dataset_name: 數據集名稱.
"""
print(para_dataset_name)
temp_start_time = time.time()
prop = Properties(para_dataset_name)
temp_train_data, temp_train_labels, temp_test_data, temp_test_labels = read_data(para_train_filename=prop.filename, param_cross_flag=False)
prop.train_data_matrix = temp_train_data
prop.test_data_matrix = temp_test_data
prop.train_label_matrix = temp_train_labels
prop.test_label_matrix = temp_test_labels
prop.num_instances = prop.train_data_matrix.shape[0]
prop.num_conditions = prop.train_data_matrix.shape[1]
prop.num_labels = prop.train_label_matrix.shape[1]
prop.full_connect_layer_num_nodes[0] = prop.num_conditions
temp_masp = Masp(para_train_data_matrix=prop.train_data_matrix,
para_test_data_matrix=prop.test_data_matrix,
para_train_label_matrix=prop.train_label_matrix,
para_test_label_matrix=prop.test_label_matrix,
para_num_instances=prop.num_instances,
para_num_conditions=prop.num_conditions,
para_num_labels=prop.num_labels,
para_full_connect_layer_num_nodes=prop.full_connect_layer_num_nodes,
para_parallel_layer_num_nodes=prop.parallel_layer_num_nodes,
para_learning_rate=prop.learning_rate,
para_mobp=prop.mobp, para_activators=prop.activators)
temp_init_end_time = time.time()
temp_masp.two_stage_active_learn(para_instance_selection_proportion=prop.instance_selection_proportion,
para_budget=prop.budget,
para_cold_start_labels_proportion=prop.cold_start_labels_proportion,
para_label_batch=prop.label_batch,
para_instance_batch=prop.instance_batch,
para_dc=prop.dc, para_pretrain_rounds=prop.pretrain_rounds,
para_increment_rounds=prop.increment_rounds,
para_enhancement_threshold=prop.enhancement_threshold)
temp_acc, temp_f1 = temp_masp.my_test()
temp_test_end_time = time.time()
print('Init time: ', temp_init_end_time - temp_start_time)
print('Cold start time: ', temp_masp.cold_start_end_time - temp_init_end_time)
print('One round time: ', (temp_masp.multi_round_end_time - temp_masp.cold_start_end_time)/temp_masp.num_additional_queries)
print('Bounded time: ', temp_masp.final_update_end_time - temp_masp.multi_round_end_time)
print('Test time: ', temp_test_end_time - temp_masp.final_update_end_time)class Masp:
"""
Multi-label active learning through serial-parallel networks.
The main algorithm.
"""
def __init__(self, para_train_data_matrix, para_test_data_matrix, para_train_label_matrix, para_test_label_matrix, # 四個矩陣
para_num_instances: int = 0, para_num_conditions: int = 0, para_num_labels: int = 0, # 矩陣的三個參數
para_full_connect_layer_num_nodes: list = None, para_parallel_layer_num_nodes: list = None,
para_learning_rate: float = 0.01, para_mobp: float = 0.6, para_activators: str = "s" * 100):
# Step 1. Accept parameters.
self.dataset = MultiLabelData(para_train_data_matrix=para_train_data_matrix,
para_test_data_matrix=para_test_data_matrix,
para_train_label_matrix=para_train_label_matrix,
para_test_label_matrix=para_test_label_matrix,
para_num_instances=para_num_instances, para_num_conditions=para_num_conditions,
para_num_labels=para_num_labels)
self.representativeness_array = np.zeros(self.dataset.num_instances)
self.representativeness_rank_array = np.zeros(self.dataset.num_instances)
self.output_file = None
self.device = torch.device('cuda')
self.network = MultiLabelAnn(self.dataset, para_full_connect_layer_num_nodes, para_parallel_layer_num_nodes,
para_learning_rate, para_mobp, para_activators, self.device).to(self.device)
self.cold_start_end_time = 0
self.multi_round_end_time = 0
self.final_update_end_time = 0
self.num_additional_queries = 0在test_active_learning函數中聲明了一個Masp對象, 這個類描述了算法的主要過程
class MultiLabelData:
"""
Multi-label data.
This class handles the whole data.
"""
def __init__(self, para_train_data_matrix, para_test_data_matrix, para_train_label_matrix, para_test_label_matrix,
para_num_instances: int = 0, para_num_conditions: int = 0, para_num_labels: int = 0):
"""
Construct the dataset.
:param para_train_filename: The training filename.
:param para_test_filename: The testing filename. The testing data are not employed for testing.
They are stacked to the training data to form the whole data.
:param para_num_instances:
:param para_num_conditions:
:param para_num_labels:
"""
# Step 1. Accept parameters.
self.num_instances = para_num_instances
self.num_conditions = para_num_conditions
self.num_labels = para_num_labels
self.data_matrix = para_train_data_matrix
self.label_matrix = para_train_label_matrix
self.test_data_matrix = para_test_data_matrix
self.test_label_matrix = para_test_label_matrix
# -1 to 0
self.test_label_matrix[self.test_label_matrix == -1] = 0
self.label_matrix[self.label_matrix == -1] = 0
self.test_label_matrix_to_vector = self.test_label_matrix.reshape(-1) # test label matrix n*l to vector
self.extended_label_matrix = np.zeros((self.num_instances, self.num_labels * 2))
for i in range(self.num_instances):
for j in range(self.num_labels):
# Copy label matrix.
if self.label_matrix[i][j] == 0:
self.extended_label_matrix[i][j * 2] = 1
self.extended_label_matrix[i][j * 2 + 1] = 0
else:
self.extended_label_matrix[i][j * 2] = 0
self.extended_label_matrix[i][j * 2 + 1] = 1
# Step 2. Space allocation for other member variables.
self.test_predicted_proba_label_matrix = np.zeros((self.num_instances, self.num_labels))
self.predicted_label_matrix = np.zeros((self.num_instances, self.num_labels))
self.test_predicted_label_matrix = np.zeros(self.test_label_matrix.size)
self.label_query_matrix = np.zeros((self.num_instances, self.num_labels))
self.has_label_queried_array = np.zeros(self.num_instances)
self.label_query_count_array = np.zeros(self.num_labels)
self.distance_measure = MyEnum.EUCLIDEAN
self.device = torch.device('cuda')
self.pdist = torch.nn.PairwiseDistance(p=2, eps=0, keepdim=True).to(self.device)
剛剛也提到過, MultiLabelData類中聲明的成員變量是算法各種階段可能用到的各種標記[數組/矩陣], 桶數組, 暫存[數組/矩陣] 以及作用於這些結構之上的各種操作. 是不同於Properties類的, 既定的, 用於調控的超參數.
class MultiLabelAnn(nn.Module):
"""
Multi-label ANN.
This class handles the whole network.
"""
def __init__(self, para_dataset: MultiLabelData = None, para_full_connect_layer_num_nodes: list = None,
para_parallel_layer_num_nodes: list = None, para_learning_rate: float = 0.01,
para_mobp: float = 0.6, para_activators: str = "s" * 100, para_device=None):
"""
:param para_dataset:
:param para_full_connect_layer_num_nodes:
:param para_parallel_layer_num_nodes:
:param para_learning_rate:
:param para_mobp:
:param para_activators:
:param para_device:
"""
super().__init__()
self.dataset = para_dataset
self.num_parts = self.dataset.num_labels
self.num_layers = len(para_full_connect_layer_num_nodes) + len(para_parallel_layer_num_nodes)
self.learning_rate = para_learning_rate
self.mobp = para_mobp
self.device = para_device
temp_model = []
for i in range(len(para_full_connect_layer_num_nodes) - 1):
temp_input = para_full_connect_layer_num_nodes[i]
temp_output = para_full_connect_layer_num_nodes[i + 1]
temp_linear = nn.Linear(temp_input, temp_output)
temp_model.append(temp_linear)
temp_model.append(get_activator(para_activators[i]))
self.full_connect_model = nn.Sequential(*temp_model)
temp_parallel_activators = para_activators[len(para_full_connect_layer_num_nodes) - 1:]
self.parallel_model = [ParallelAnn(para_parallel_layer_num_nodes, temp_parallel_activators).to(self.device)
for _ in range(self.dataset.num_labels)]
self.my_optimizer = torch.optim.Adam(itertools.chain(self.full_connect_model.parameters(),
*[model.parameters() for model in self.parallel_model]),
lr=para_learning_rate)
self.my_loss_function = nn.MSELoss().to(para_device)
class ParallelAnn(nn.Module):
"""
Parallel ANN.
This class handles the parallel part.
"""
def __init__(self, para_parallel_layer_num_nodes: list = None, para_activators: str = "s" * 100):
super().__init__()
temp_model = []
for i in range(len(para_parallel_layer_num_nodes) - 1):
temp_input = para_parallel_layer_num_nodes[i]
temp_output = para_parallel_layer_num_nodes[i + 1]
temp_linear = nn.Linear(temp_input, temp_output)
temp_model.append(temp_linear)
temp_model.append(get_activator(para_activators[i]))
self.model = nn.Sequential(*temp_model)
MultiLabelData類掌管了網絡的構造與運算等一系列操作. 大部分內容使用了torch編程中的內容.
one_round_train函數是位於MultiLabelAnn類的一個方法, 用於實現一次forward+backPropagation的過程, 這裡因為使用了torch編程, 所以非常簡潔(輪子真實太香了!). 具體輪子的內核是什麼歡迎見我的博客: 基於 Java 機器學習自學筆記 (第71-73天:BP神經網絡)_LTA_ALBlack的博客-CSDN博客
 def one_round_train(self, para_input: np.ndarray = None, para_extended_label_matrix: np.ndarray = None, para_label_query_matrix: np.ndarray = None) -> object:
"""
One round train. Use instances with labels.
:return:
"""
temp_outputs = self(para_input)
temp_memory_outputs = temp_outputs.cpu().data
para_extended_label_matrix = torch.tensor(para_extended_label_matrix, dtype=torch.float)
i_index, j_index = np.where(para_label_query_matrix == 0)
para_extended_label_matrix[i_index, j_index * 2] = temp_memory_outputs[i_index, j_index * 2]
para_extended_label_matrix[i_index, j_index * 2 + 1] = temp_memory_outputs[i_index, j_index * 2 + 1]
temp_loss = self.my_loss_function(temp_outputs, para_extended_label_matrix.to(self.device))
self.my_optimizer.zero_grad()
temp_loss.backward()
self.my_optimizer.step()
return temp_loss.item()
def forward(self, para_input: np.ndarray = None):
temp_input = torch.as_tensor(para_input, dtype=torch.float).to(self.device)
temp_inner_output = self.full_connect_model(temp_input)
temp_inner_output = [model(temp_inner_output) for model in self.parallel_model]
temp_output = temp_inner_output[0]
for i in range(len(temp_inner_output) - 1):
temp_output = torch.cat((temp_output, temp_inner_output[i + 1]), -1)
return temp_output
這個函數需要傳三個參數, 一個是需要訓練的屬性矩陣, 用於forward時提供輸入神經元; 另一個是擴展的目標標簽矩陣, 用於BackPropagation時計算損失函數並為量化懲罰信息更新網絡邊權做准備; 最後是標簽矩陣是否缺失的標記矩陣, 在訓練時專門引入它是為了在計算損失函數的時候專門把那些缺失的標簽拎出來 " 單獨關照 ", 保證其損失為0, 不進行懲罰
 def bounded_train(self, para_lower_rounds: int = 200, para_checking_rounds: int = 200,
para_enhancement_threshold: float = 0.001):
temp_input, temp_extended_label_matrix, temp_label_query_matrix = self.dataset.get_queried_instances()
print("bounded_train")
# Step 2. Train a number of rounds.
for i in range(para_lower_rounds):
if i % 100 == 0:
print("round: ", i)
self.network.one_round_train(temp_input, temp_extended_label_matrix, temp_label_query_matrix)
# Step 3. Train more rounds.
i = para_lower_rounds
temp_last_training_accuracy = 0
while True:
temp_loss = self.network.one_round_train(temp_input, temp_extended_label_matrix, temp_label_query_matrix)
if i % para_checking_rounds == para_checking_rounds - 1:
temp_training_accuracy, temp_testing_accuracy, temp_overall_accuracy = self.network.test()
print("Regular round: ", (i + 1), ", training accuracy = ", temp_training_accuracy)
if temp_last_training_accuracy > temp_training_accuracy - para_enhancement_threshold:
break # No more enhancement.
else:
temp_last_training_accuracy = temp_training_accuracy
print("The loss is: ", temp_loss)
i += 1
temp_training_accuracy, temp_testing_accuracy, temp_overall_accuracy = self.network.test()
print("Training accuracy (learner knows it) = ", temp_training_accuracy,
", testing accuracy (learner does not know it) = ", temp_testing_accuracy,
", overall accuracy (learner does not know it) = ", temp_overall_accuracy)
bounded_train函數一言以蔽之就是做循環訓練的, 第一個參數para_lower_rounds 就描述了循環次數, para_checking_rounds是檢查點寬度, 在實際做循環測試的時候將會在抵達檢查點後輸出提示, 第三個形參para_enhancement_threshold表示當前訓練的精度阈值, 在para_lower_rounds次循環測試之後會進入精度檢測訓練, 當每次訓練之後精度提升低於這個阈值了就停止訓練.
冷啟動與主動學習部分通過一個完整的函數體實現, 大體上分為四個階段
 def two_stage_active_learn(self, para_instance_selection_proportion: float = 1.0,
para_budget: float = 0.2,
para_cold_start_labels_proportion: float = 0.2,
para_label_batch: int = 2,
para_instance_batch: int = 2,
para_dc: float = 0.12, para_pretrain_rounds: int = 200,
para_increment_rounds: int = 100,
para_enhancement_threshold: float = 0.001):
"""
兩階段: 冷啟動與主動學習階段. 總的標簽查詢個數為
num_instances * num_labels * para_budge
:param para_instance_selection_proportion: 實際數據占訓練數據的比例. 其它數據肯定不被查詢, 所以不保留.
:param para_budget: 總的查詢比例. 占總數據 (不只是訓練集) 標簽數的比例.
:param para_cold_start_labels_proportion: 冷啟動階段查詢標簽占總查詢的比例.
:param para_label_batch: 冷啟動階段每個實例每次查詢標簽數.
:param para_instance_batch: 第二階段每輪查詢實例個數.
:param para_dc: 用於計算實例密度的半徑. 為一個比例.
:param para_pretrain_rounds: 網絡預訓練輪數.
:param para_increment_rounds: 每次查詢標簽後, 進行的固定訓練輪數.
:param para_enhancement_threshold: 訓練精度提升小於這個阈值時停止.
:return:
"""
源代碼已有注釋, 這裡再額外強調幾點.
大多為超參數. budge是一個百分比, 主要用於限制冷啟動階段涉及的標簽個數避免開銷過大. para_instance_selection_proportion是定義數據集時每個數據集內部單獨設置的一個百分比, 用於對於某些超大的數據集進一步限制數據量. para_cold_start_labels_proportion是一個分化冷啟動和主動學習的一個比率, 假如說這個比率是\(p \%\), 那麼\(p \%\)的篩選標簽用於冷啟動, 而\(1-p \%\)用於主動學習, 避免兩個階段占用同個數據內容.
這部分的訓練采用的batch訓練, 所以說冷啟動和主動學習都有一個批次步長, 這就是形參中提到的batch.
 # Step 1. Reset the dataset to clean learning information.two_stage_active_learn
print("two_stage_active_learn test 1, para_dc = ", para_dc)
self.dataset.reset()
print("two_stage_active_learn test 2")
# This code should be changed later to suit user requirement.
temp_num_selected = int(self.dataset.num_instances * para_instance_selection_proportion)
print("self.dataset.num_instances = ", self.dataset.num_instances,
"para_instance_selection_proportion = ", para_instance_selection_proportion,
"temp_num_selected: ", temp_num_selected)
temp_cold_start_instances = int(self.dataset.num_instances * self.dataset.num_labels
* para_budget * 5 / 4
* para_cold_start_labels_proportion
// para_label_batch)
print("Cold start instances = ", temp_cold_start_instances)
temp_num_additional_queries = int(self.dataset.num_instances * self.dataset.num_labels
* para_budget * 5 / 4
* (1 - para_cold_start_labels_proportion)
/ para_instance_batch)
print("temp_num_additional_queries = ", temp_num_additional_queries)
self.num_additional_queries = temp_num_additional_queries
批次計算用公式說明可能更好理解(沿用參數解釋中"\(p\)"的定義):\[\operatorname{ColdstartInstances} = \frac{\frac{5}{4}NL\times \text{budget} \times p}{\text{LabelBatchsize}} \tag{5}\]為何冷啟動的批次會用"Instances"來表示? 實際上代碼中冷啟動並不是一批一批進行(不是嚴格意義上的batch訓練), 而是一次性啟動. 代碼中將冷啟動的一批作為一行, 每行查詢的標簽數目應該是均等的, 例如我們分子算出了15個標簽量, 而限定一批(一行)最多查3個標簽, 那麼一共就會冷啟動5行. 這5行不會分為5次訓練, 而是整合為一個矩陣加入一次訓練中去. 實際中我們的數據集會通過代表性進行排序, 因此往往默認對Top-ColdstartInstances數據冷啟動.
此外在冷啟動選擇標簽時會盡量選擇那些查詢次數比較少的標簽, 這就是按照sparsity選取的原則.

\[\operatorname{AdditionalQueries} = \frac{\frac{5}{4}NL\times \text{budget} \times (1-p)}{\text{InstanceBatchsize}} \tag{6}\] 第二個階段是正式的主動學習階段, 這部分是貨真價實的batch訓練, 計算得到的額外查詢次數作為批次總量, 並執行如此量的總循環, 每次循環查詢InstanceBatchsize次, 並按照這個查詢量構建新的\(X^{\prime}\), \(Y^{\prime}\)投入訓練, 更新uncertainty並進一步查詢.
這裡公式中的\(\frac{5}{4}NL\times \text{budget}\)其實就是我們根據實際數據集的數據量估計的一個查詢上限, 換言之, 這就是專家查詢的最大標簽總量, 是第二節介紹MASP主動學習的流程中的上限\(T\).
6.2.2 以代表性重排數據集
 self.compute_instance_representativeness(para_dc, 0)
temp_selected_array = self.representativeness_rank_array[0: temp_num_selected]
temp_dataset_select = self.dataset.select_data(temp_selected_array)
# Replace the training data with the selected part.
self.dataset = temp_dataset_select
self.network.dataset = temp_dataset_select
首先需要通過每個數據行的代表性重排數據, 具體的操作的方案可以參考我在這篇文章中采用的Master樹的Java方案(3.2~3.3), 當然那個方案略顯冗長, 有100多行, 而Python只需要區區30行, 簡直不要更爽. 最後將獲得的代表性排序下標指導數據集重排, 獲得一個排序後的數據集(因為MultiLabelAnn中拷貝了一個dataset, 因此這裡面的dataset也要重排).
 def compute_instance_representativeness(self, para_dc: float = 0.1, para_scheme: int = 0):
"""
Compute the representativeness of all instances.
:param para_dc: The dc ratio.
:return: An array.
"""
# Step 1. Calculate density using Gaussian kernel.
temp_dc_square = para_dc * para_dc
# The array length is n(n-1)/2.
temp_dist2 = torch.nn.functional.pdist(torch.from_numpy(self.dataset.data_matrix)).to(self.device)
# Convert to an n^2 matrix
temp_distances_matrix = scipy.spatial.distance.squareform(temp_dist2.cpu().numpy(), force='no', checks=True)
# Gaussian density.
temp_density_array = np.sum(np.exp(np.multiply(-temp_distances_matrix, temp_distances_matrix) / temp_dc_square),
axis=0)
# Step 2. Calculate distance to its master.
temp_distance_to_master_array = np.zeros(self.dataset.num_instances)
for i in range(self.dataset.num_instances):
temp_index = np.argwhere(temp_density_array > temp_density_array[i])
if temp_index.size > 0:
temp_distance_to_master_array[i] = np.min(temp_distances_matrix[i, temp_index])
# Step 3. Representativeness.
self.representativeness_array = temp_density_array * temp_distance_to_master_array
# Step 4. Sort instances according to representativeness.
self.representativeness_rank_array = np.argsort(self.representativeness_array)[::-1]
return self.representativeness_rank_array
一言以蔽之, 算出\(N\)個數據彼此的距離, 從而通過根據重要性計算的高斯優化公式得到重要性, 然後每個數據都找到距離自己最近的那個重要性比自己大的數據點從而得到獨立性最終相乘就好了. 這段代碼要注意矩陣運算的性質特點, 特別是第15行.
 # Step 2. Cold start stage.
# Can be revised to support the random label selection scheme. This is not the efficiency bottleneck.
for i in range(temp_cold_start_instances):
self.dataset.query_label_batch(i, self.dataset.get_scare_labels(para_label_batch))
print("two_stage_active_learn test 3")
self.bounded_train(para_pretrain_rounds, 100, para_enhancement_threshold)
self.cold_start_end_time = time.time()
冷啟動階段主要是先通過query_label_batch完成標簽的查詢, 建立一些新的未缺失標簽集. 然後在利用循環訓練去訓練這部分數據.
 def get_scare_labels(self, para_length):
temp_indices = np.argsort(self.label_query_count_array)
result_array = np.zeros(para_length)
for i in range(para_length):
result_array[i] = temp_indices[i]
return result_array
代碼中的get_scare_labels方法可以返回sparsity滿足Top-LabelBatchsize的標簽集. 其原理並不復雜, 其實就是每次選擇時都重排標簽桶 label_query_count_array, 選擇其中值最小的前LabelBatchsize個標簽下標. 這個變量初始聲明是在MultiLabelData的構造函數中.
而確定當前第\(i\)行和行內的標簽列數組之後就可以唯一確定一堆標簽了, 確定標簽之後需要為這個標簽進行標記(也就是" 專家查詢 "), 執行這個操作的就是dataset.query_label_batch方法.
 # Step 3. Active learning stage.
for i in range(temp_num_additional_queries):
print("Incremental training process: ", i, " out of ", temp_num_additional_queries)
temp_query_matrix = self.network.get_uncertain_label_batch(para_instance_batch)
for j in range(para_instance_batch):
self.dataset.query_label(int(temp_query_matrix[j][0]), int(temp_query_matrix[j][1]))
temp_input, temp_extended_label_matrix, temp_label_query_matrix = self.dataset.get_queried_instances()
for i in range(para_increment_rounds):
self.network.one_round_train(temp_input, temp_extended_label_matrix, temp_label_query_matrix)
self.multi_round_end_time = time.time()
self.bounded_train(200, 100, para_enhancement_threshold)
self.final_update_end_time = time.time()
主動學習過程其實就是學習->獲得最大certainty,完善數據集->學習->... 的循環往復, 直到循環總的次數達到上限.
F1的計算我在介紹F1時(4.3.3)與講解MultiLabelData類的標簽壓縮數組時(5.4 Line 33, 47)有做過類似的參數, 現在簡單一覽下其實現:
 def my_test(self):
temp_test_start_time = time.time()
temp_input = torch.tensor(self.dataset.test_data_matrix[:], dtype=torch.float, device='cuda:0')
temp_predictions = self(temp_input)
temp_switch = temp_predictions[:,::2] < temp_predictions[:,1::2]
self.dataset.test_predicted_label_matrix = temp_switch.int()
self.dataset.test_predicted_proba_label_matrix = torch.exp(temp_predictions[:, 1::2]) / \
(torch.exp(temp_predictions[:, 1::2]) + torch.exp(temp_predictions[:, ::2]))
temp_test_end_time = time.time()
temp_my_testing_accuracy = self.dataset.compute_my_testing_accuracy()
temp_testing_f1 = self.dataset.compute_f1()
print("Test takes time: ", (temp_test_end_time - temp_test_start_time))
print("-------My test accuracy: ", temp_my_testing_accuracy, "-------")
print("-------My test f1: ", temp_testing_f1, "-------")
return temp_my_testing_accuracy, temp_testing_f1 def compute_f1(self):
"""
our F1
"""
temp_proba_matrix_to_vector = self.test_predicted_proba_label_matrix.reshape(-1).cpu().detach().numpy()
temp = np.argsort(-temp_proba_matrix_to_vector)
all_label_sort = self.test_label_matrix_to_vector[temp]
temp_y_F1 = np.zeros(temp.size)
all_TP = np.sum(self.test_label_matrix_to_vector == 1)
for i in range(temp.size):
TP = np.sum(all_label_sort[0:i+1] == 1)
P = TP / (i+1)
R = TP / all_TP
if (P+R)==0:
temp_y_F1[i] = 0
else:
temp_y_F1[i] = 2.0*P*R / (P+R)
return np.max(temp_y_F1)這部分聯合4.3.3節來理解.
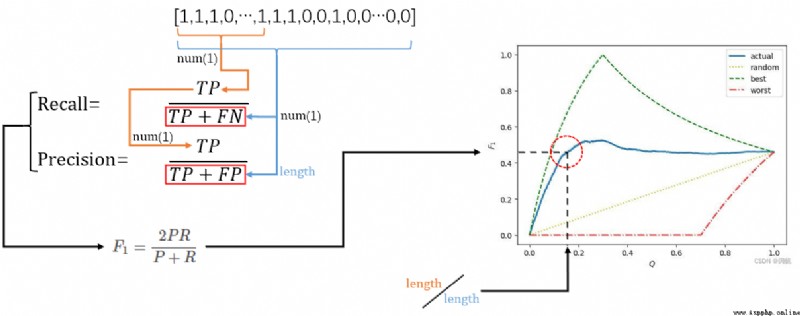
Peak-F1究竟為什麼可用?
我們在測量Peak-F1時將標簽矩陣進行了排序, 其目的是更大地確保在最開始前面大部分都能預測正確, 這樣最開始的實際1就能更多與我們預測的正標簽匹配. 自然, 若這連續的1中沒有夾雜0, 連續的0中沒有夾雜1, 那麼就能逼近F1的best曲線.
由此, 誕生出best曲線的雙端口的softmax概率值中一定能找到一個阈值\(\theta\), 大於\(\theta\)的雙端口預測為正標簽後全部正確, 小於\(\theta\)預測為負標簽也全部正確. 再度以預測值重排標簽數組就能構成一個完美的連續1與連續0構成的排序數組.
也就是說\(\theta\)成為了一個完美的分水嶺, 分水嶺左右沒有雜質. 這種\(\theta\)的存在能說明我們的網絡能做到100%預測正確. 但是在實際中, 再好的多標簽方案也無法找到這樣實現完美分割的\(\theta\), 左右總是有雜質, 但是算法卻能盡可能地找到一個\(\theta\)讓左右的雜質盡可能地最少.
因此Peak-F1本質上描述了多標簽算法能找到盡可能完美得到的\(\theta\)的能力.
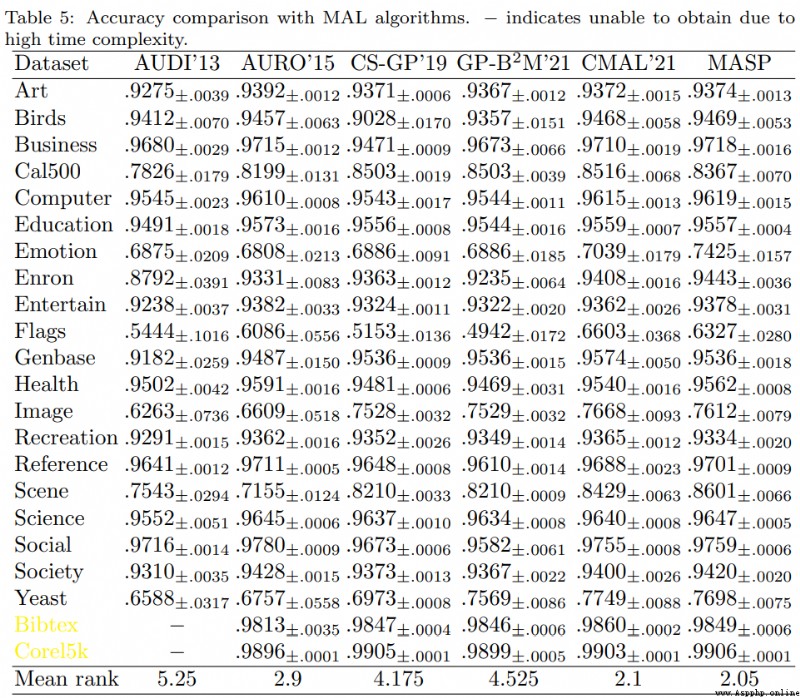
最後就不展示算法的相關運行結果了, 這部分內容可參考原論文. 論文從監督學習, 半監督學習, 主動學習的Accuracy, 以及F1結果, 運行時間等多個角度與各種多標簽算法進行了平行比對, 內容足夠詳盡充實.
文中描述有失偏頗之處歡迎提出指正, 關於多標簽的內容博主也正處在學習過程中 !