Welcome to
Magic house !!The article contains columns
—Django from ( Easy tutorial with pictures and texts ) special column —!!Previous content :
《Django Chapter I establishment project 》
In previous periods Django Chapter I establishment project
We have established our own demo project , And successfully runNext we will be in demo Build our application in the project , Create your own system !!
Shortcut key windows + R Input cmd Go to task manager cmd of use
cd ( Back plus Absolute path , Or the current Absolute path )
Enter the previously created demo After directory , stay cmd Input ( final myapp Custom naming is )
python manage.py startapp myapp
Then we can successfully create our application , stay demo The file appears in our application myapp file

Enter into myapp After the document , The following files will also appear :
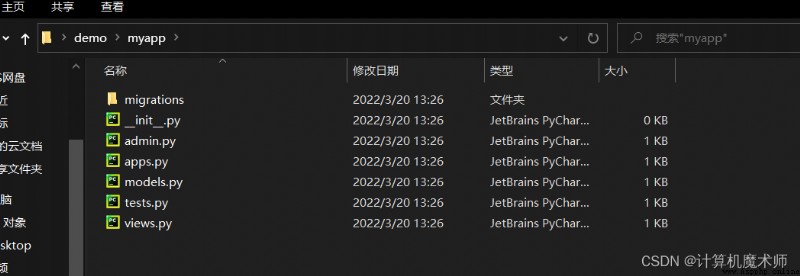
init.py: Tell the system that this is a problem python package
admin: You can customize it django Management project of , Add user , Set up the management page
apps.py: Configuration of the application
models.py: Build a model , A model corresponds to a table , After data migration, the established classes will appear in the database ,
views.py: The view function , To accept url Request , And corresponding , For example, click the login button , Jump to the login page, etc
text.py: Write test files to test the application
Yes demo File use pycharm( You can download it on the official website ) open , Pictured
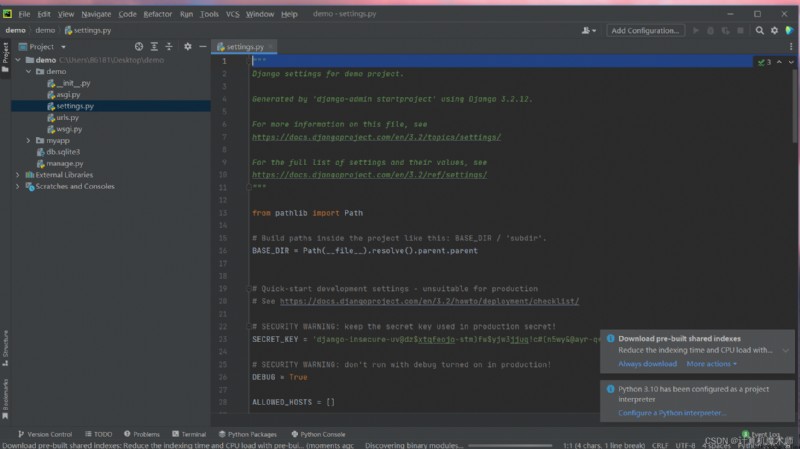
Is currently in setting.py Under the table of contents ( We don't need to configure the database here , By default
django The database that comes with it sqlite3)
a key : Introduce your app , Also in setting Found in file
INSTALLED_APPS, Add the name of your app at the end :( This is very important ! No
However, the following data cannot be migrated )
INSTALLED_APPS = [
'django.contrib.admin',
'django.contrib.auth',
'django.contrib.contenttypes',
'django.contrib.sessions',
'django.contrib.messages',
'django.contrib.staticfiles',
'myapp.apps.MyappConfig', # It can also be used directly for myapp, Is your app name
]
stay myapp Create... In the file urls.py file
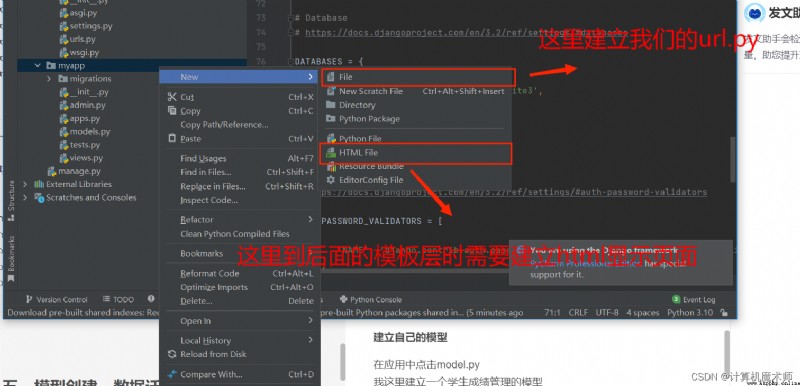
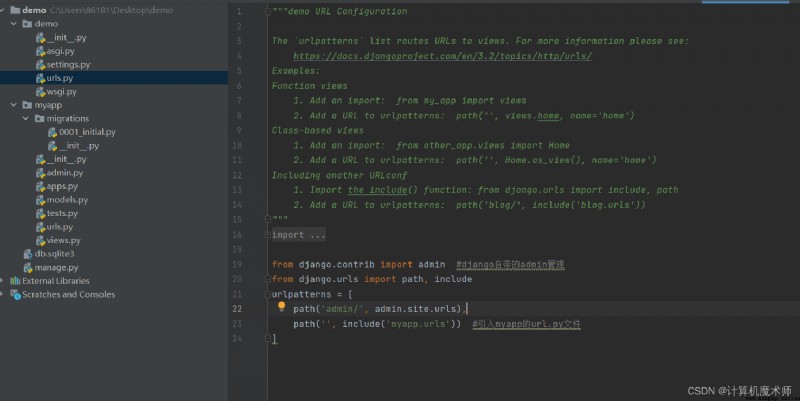
And in demo In the root directory url.py Enter the following code
from django.contrib import admin #django Self contained admin management
from django.urls import path, include
urlpatterns = [
path('admin/', admin.site.urls),
path('', include('myapp.urls')) # introduce myapp Of url.py file
]
The effect is as shown in the picture :
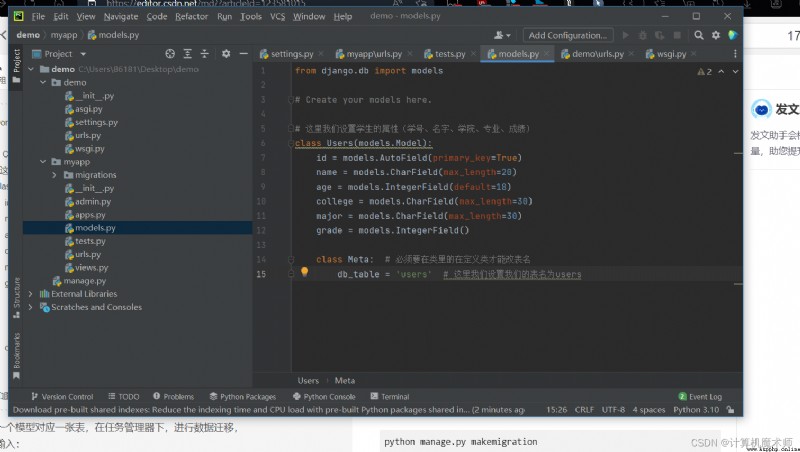
stay myapp Enter... In the directory model.py Here I build a model of student achievement management
from django.db import models
# Create your models here.
# Here we set the attributes of students ( Student number 、 name 、 college 、 major 、 achievement )
class Users(models.Model):
id = models.AutoField(primary_key=True)
name = models.CharField(max_length=20)
age = models.IntegerField(default=18)
college = models.CharField(max_length=30)
major = models.CharField(max_length=30)
grade = models.IntegerField()
class Meta: # You must define a class in the class to change the table name
db_table = 'users' # Here we set our table name to users
Pictured :
One of the models corresponds to a table , Then under the task manager , Data migration ,
Input in sequence :
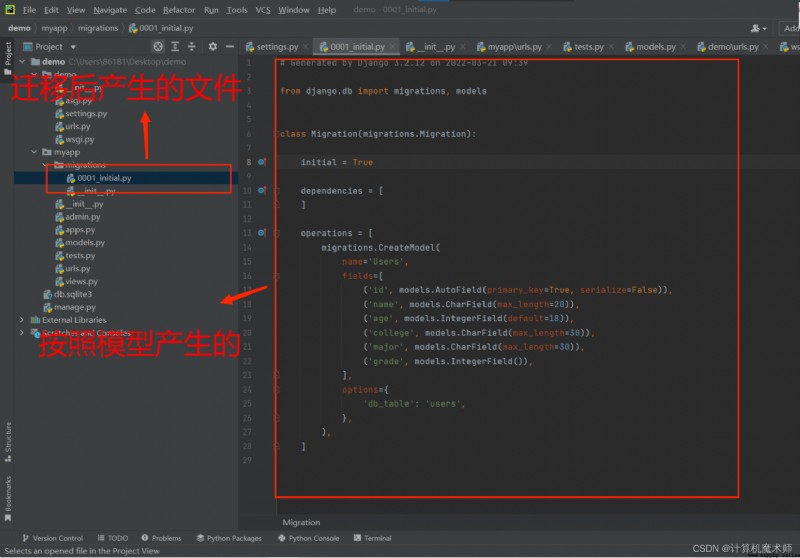
python manage.py makemigrations
At the end of the day myapp Migration files makemigration The file directory appears as shown in the figure :
Then the input :
python manage.py migrate
The effect is as shown in the picture :
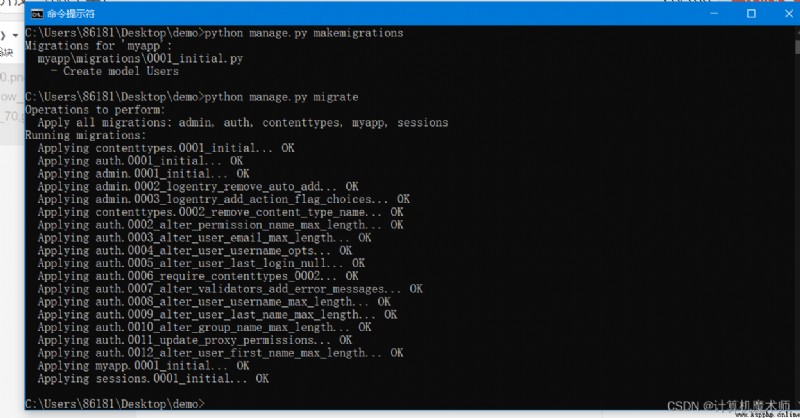
You can see here django Create the above table in the database , Most of them are auth Namely django Self contained user login and registration function , Here we will talk about... In the third chapter of the column
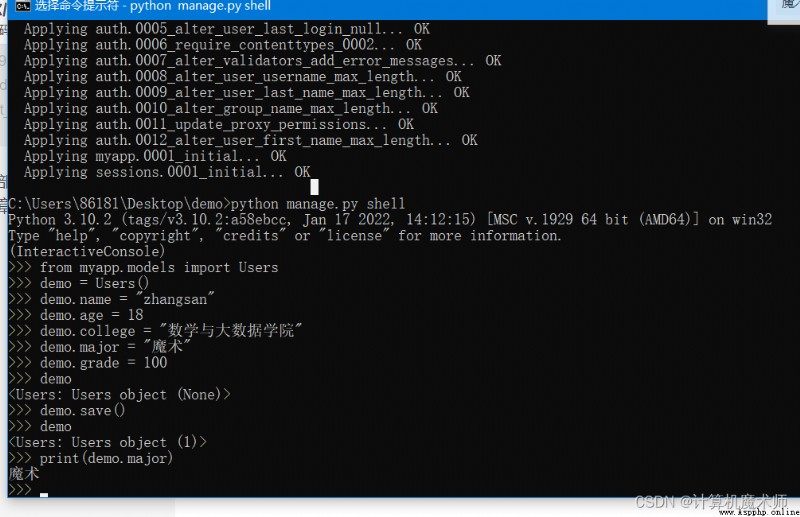
We from myapp.models Introduce the class we created into the file Users, Created the first number
According to the , Test success !
Next we configure myapp Of URL To configure , That is to set the page Jump , And the view function
Line addition, deletion, modification and query , Get into myapp In the catalog urls.py File input :
from django.urls import path
from . import views
app_name = 'myapp' # Set the directory file name to myapp, So in big projects
# Facing multiple applications url Avoid duplicate names in the reverse direction of names , Readers should form this habit
urlpatterns = [
path('', views.home, name='home'), # Homepage
path('read/', views.read, name='read'), # Browse information
path('add/', views.add, name='add'), # Add information
path('delete/<int:sid>/', views.dele, name='dele'), # Delete the information
path('edit/<int:sid>/', views.edit, name='edit'), # Modify the information
]
To myapp in views.py Enter... In the file :
from django.shortcuts import render
from myapp.models import Users # Introduce the student class we defined
# Create your views here.
# The main page
def home(request):
return render(request, 'myapp/home.html') #render It means rendering , Return to a page
# Check the information
def read(request):
stu = Users.objects.all()
context = {
'stu': stu} # Throw it as a dictionary into read.html On the page of
return render(request, 'myapp/read.html', context)
# Add information :
def add(request): # The principle here is , stay read Click the add information button in the page ,
# Jump is requesr in get Method , Will jump first to add.html In the form ,
# Enter values in the form reqeust The request method is post That is to add .
if request.method == "POST":
try:
stu = Users()
stu.name = request.POST['name']
stu.age = request.POST['age']
stu.college = request.POST['college']
stu.major = request.POST['major']
stu.grade = request.POST['grade']
stu.save()
return render(request, 'myapp/info.html', {
"info": " Add success !"})
except:
return render(request, 'myapp/info.html', {
"info": " Add failure !"})
else:
return render(request, 'myapp/add.html') # return
# Modify the information
def edit(request, sid):
if request.method == "POST":
try:
ob = Users.objects.get(id=sid)
ob.name = request.POST['name']
ob.age = request.POST['age']
ob.college = request.POST['college']
ob.major = request.POST['major']
ob.grade = request.POST['grade']
ob.save()
return render(request, 'myapp/info.html', {
"info": " Modification successful !"})
except:
return render(request, 'myapp/info.html', {
"info": " Modification failed !"})
else:
stu = Users.objects.get(id=sid)
context = {
'sid': stu}
return render(request, 'myapp/edit.html', context)
# Delete data
def dele(request, sid):
try:
stu = Users.objects.get(id=sid)
stu.delete()
return render(request, 'myapp/info.html', {
"info": " Delete successful "})
except:
return render(request, 'myapp/info.html', {
"info": " Delete failed "})
Now we have successfully established the view function and URL To configure , But we want him to show in the page
come out , So we need to configure our Templates That is, the template layer , Equivalent to displaying web pages
Noodles
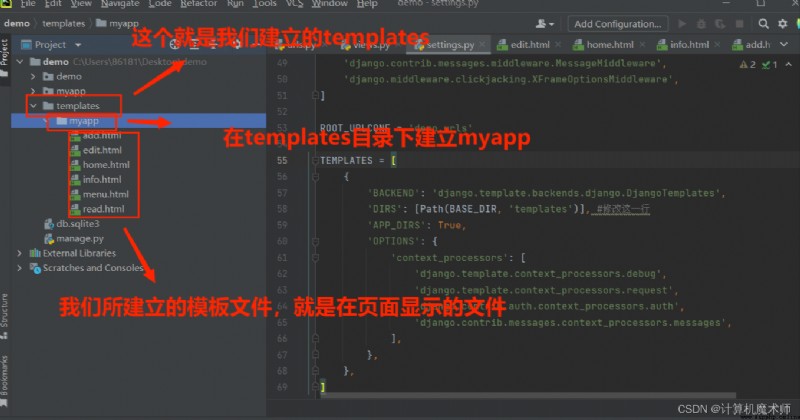
We enter demo In the project file setting.py Find TEMPLATES, Revised as follows :
TEMPLATES = [
{

'BACKEND': 'django.template.backends.django.DjangoTemplates',
'DIRS': [Path(BASE_DIR, 'templates')], # Modify this line
'APP_DIRS': True,
'OPTIONS': {

'context_processors': [
'django.template.context_processors.debug',
'django.template.context_processors.request',
'django.contrib.auth.context_processors.auth',
'django.contrib.messages.context_processors.messages',
],
},
},
]
And then we have demo Established under the general document templates file , And in templates Under file
establish myapp The file effect is shown in the figure :
Then we need to create our page file :
add.html # Used to add information
edit.html # Used to modify information
home.html # The main page
info.html # Prompt for successful and failed page modification
menu.html # Navigation files , Equivalent to a column in a web page
read.html # Browse the information page
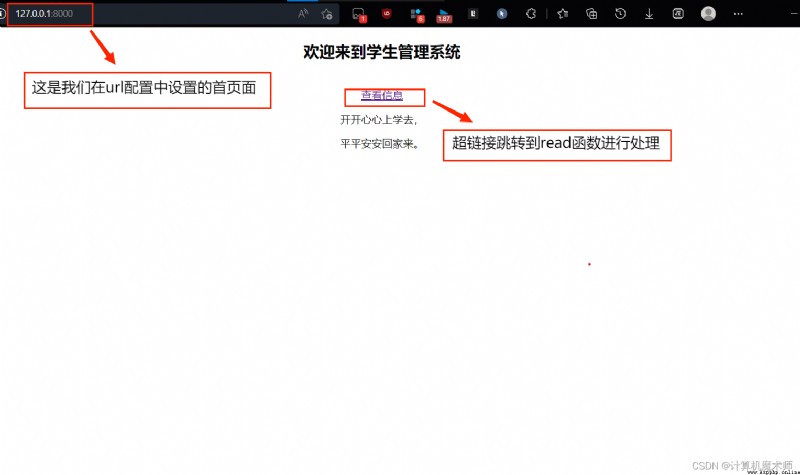
home.html We put the following code :
<!DOCTYPE html>
<html lang="zh-hans">
<head>
<meta charset="UTF-8">
<title> Student management system </title>
</head>
<body>
<center>
<h2> Welcome to the student management system </h2>
<br/>
<a href="{% url 'myapp:read' %}"> Check the information </a>
<p> Go to school happily ,</p>
<p> Come home in peace .</p>
</center>
</body>
</html>
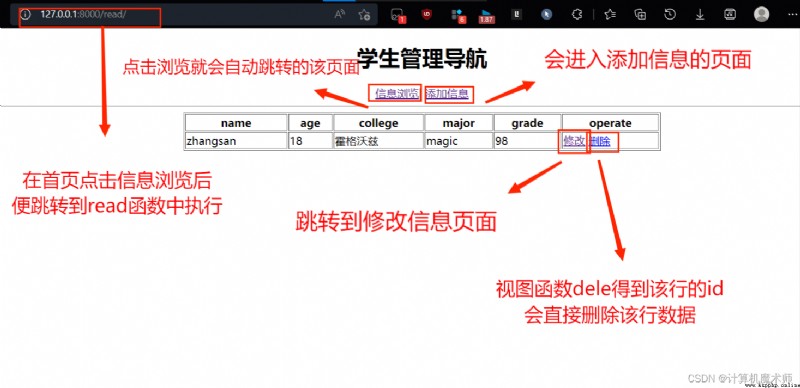
read.html:
<!DOCTYPE html>
<html lang="zh-hans">
<head>
<meta charset="UTF-8">
<title> Student management system </title>
</head>
<body>
<center>
{
% include "myapp/menu.html" %}
<table border="1" width="700">
<tr>
<th>name</th>
<th>age</th>
<th>college</th>
<th>major</th>
<th>grade</th>
<th>operate</th>
</tr>
{
% for s in stu %}
<tr>
<td>{
{
 s.name }}</td>
<td>{
{
 s.age }}</td>
<td>{
{
 s.college }}</td>
<td>{
{
 s.major }}</td>
<td>{
{
 s.grade }}</td>
<td>
<a href="{% url 'myapp:edit' s.id %}"> modify </a>
<a href="{% url 'myapp:dele' s.id %}"> Delete </a>
</td>
</tr>
{
% endfor %}
</table>
</center>
</body>
</html>
edit.html :
<!DOCTYPE html>
<html lang="zh-hans">
<head>
<meta charset="UTF-8">
<title> Student management system </title>
</head>
<body>
<center>
<h1> Modify student information </h1>
<a href="{% url 'myapp:read' %}"> return </a>
<table>
<form action="{% url 'myapp:edit' sid.id %}" method="post">
{
% csrf_token %}<!-- stay django Of csrf Use forms in form security protection -->
<tr> <!-- You need to add this -->
<td>
name:
</td>
<td>
<input type="text" name="name", value="{
{ sid.name }}">
</td>
</tr>
<tr>
<td>
age:
</td>
<td>
<input type="text" name="age", value="{
{ sid.age }}" >
</td>
</tr>
<tr>
<td>
college:
</td>
<td>
<input type="text" name="college", value="{
{ sid.college }}" >
</td>
</tr>
<tr>
<td>
major:
</td>
<td>
<input type="text" name="major" value="{
{ sid.major }}">
</td>
</tr>
<tr>
<td>
grade:
</td>
<td>
<input type="text" name="grade" value="{
{ sid.grade }}">
</td>
</tr>
<tr>
<td align="center" colspan="2">
<input type="submit" value=" modify ">
<input type="reset" value=" Reset ">
</td>
</tr>
</form>
</table>
</center>
</body>
</html>
info.html:
<!DOCTYPE html>
<html lang="zh-hans">
<head>
<meta charset="UTF-8">
<title> Student management system </title>
</head>
<body>
<center>
{
% include "myapp/menu.html" %}
{
{
 info }}
</center>
</body>
</html>
menu.html:
<!doctype html>
<html>
<head>
<meta charset="UTF-8">
<meta name="viewport"
content="width=device-width, user-scalable=no, initial-scale=1.0, maximum-scale=1.0, minimum-scale=1.0">
<meta http-equiv="X-UA-Compatible" content="ie=edge">
<title> Student management system </title>
</head>
<body>
<center>
<h1> Student management navigation </h1>
<a href="{% url 'myapp:read' %}"> Information browsing </a>|
<a href="{% url 'myapp:add' %}"> Add information </a>
<hr/>
</center>
</body>
</html>
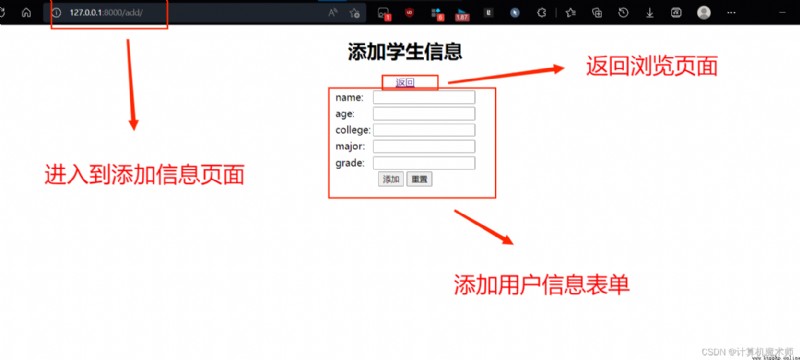
add.html:
<!DOCTYPE html>
<html lang="zh-hans">
<head>
<meta charset="UTF-8">
<title> Student management system </title>
</head>
<body>
<center>
<h1> Add student information </h1>
<a href="{% url 'myapp:read' %}"> return </a>
<table>
<form action="{% url 'myapp:add' %}" method="post">
{
% csrf_token %} <!-- stay django Of csrf Use forms in form security protection -->
<tr> <!-- You need to add this -->
<td>
name:
</td>
<td>
<input type="text" name="name">
</td>
</tr>
<tr>
<td>
age:
</td>
<td>
<input type="text" name="age" >
</td>
</tr>
<tr>
<td>
college:
</td>
<td>
<input type="text" name="college" >
</td>
</tr>
<tr>
<td>
major:
</td>
<td>
<input type="text" name="major" >
</td>
</tr>
<tr>
<td>
grade:
</td>
<td>
<input type="text" name="grade" >
</td>
</tr>
<tr>
<td align="center" colspan="2">
<input type="submit" value=" add to ">
<input type="reset" value=" Reset ">
</td>
</tr>
</form>
</table>
</center>
</body>
</html>
🥳 Be accomplished !!
Now we can run our web page
stay cmd Enter... In the current project directory of the task manager
python manage.py runserver
After successful operation , Copy URL Go to the web page and open , You can add, delete, modify and check ,
home.html , The effect of the home page is shown in the figure :
read.html, Browse the page as shown in the figure :
add.html Add the page as shown in the figure :
edit.html, Modify the page as shown in the figure :
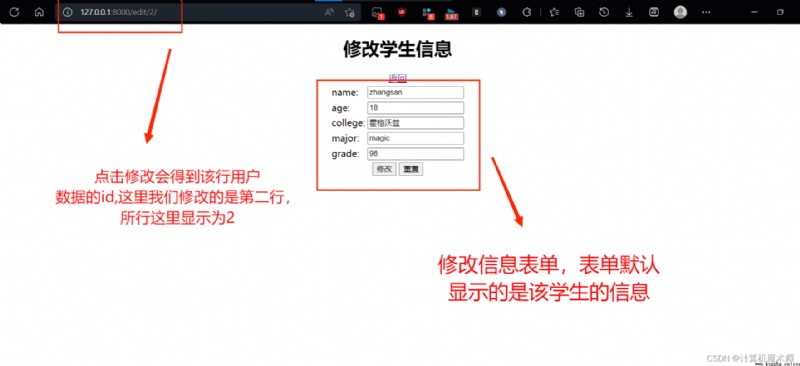
dele.html, Delete the page as shown in the figure :
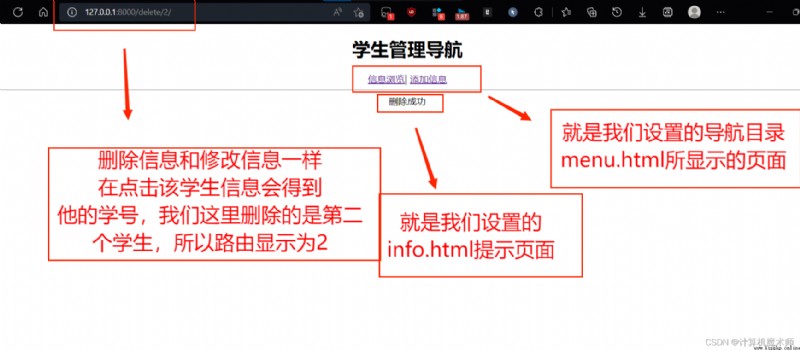
 Come here , If you have any questions about adding, deleting, modifying and checking
Welcome private bloggers to ask questions , Bloggers will do their best to answer your doubts !
🥳 If it helps you , Your praise is the greatest support for bloggers !!🥳
 Tiobe 2022 programming language is expected to be born in Python, C, c++ and C #!
Arrangement | Su mi Produce |
 Scapy: Écrivez votre propre outil de capture de paquets réseau en python
AvecPythonDe plus en plus popu