使用Rational Functional Tester V8.0精確地識別及驗證Graphical Editing Framework(GEF)圖形
由於圖形的難以識別性以及測試工具的局限性,圖形的自動化識別與驗證一直是自動化測試中的薄弱環節。開發人員在 Eclipes 中常用 Graphical Editing Framework(GEF)開發大型圖形矩陣以及圖形界面。在 Rational functional tester(RFT)V8.0 以前,GEF 圖形由於不能夠被精確地識別,與其相關的自動化一直是測試人員的頭痛之處。在新的 RFT V8.0 中引入的對 GEF 圖形單個識別給這部分測試人員帶來了福音,再加上適當的編碼方式,就可以完美地實現對 GEF 圖形的自動化識別。
Graphical Editing Framework(GEF)簡介
GEF(Graphical Editor Framework)是 Eclipse 的一個圖形化編輯框架,它允許開發人員以圖形化的方式展示和編輯模型,從而提升用戶體驗。很多應用軟件會使用到 GEF 進行圖形開發,例如:BPM 結構圖、軟件模塊展示、UML 類圖編輯器、圖形化 XML 編輯器,以及圖形化數據庫結構設計工具等等。GEF 目前提供了兩種展示方式:圖形(GraphicalViewer)和樹狀(TreeViewer)。前者利用 Draw2D 圖形(IFigure)作為表現方式,多用於編輯區域,後者則多用於實現大綱展示。
在自動化測試中,圖形的識別、操作以及驗證一直是薄弱環節。GEF 作為結構化的矢量圖形,理應比 bmp、jpg 等好識別。然而 Rational Functional Tester 的早期版本並不能夠識別到單個 GEF 模型,而只是 Draw2D 的主框架。這對於自動化測試 GEF 圖形是極其不方便的,我們只能使用位置偏移量來定位和操作圖形,這樣圖像任何位置上的移動都會導致自動化測試腳本回放失敗。而針對圖形的驗證更是成為了不可能的任務。
由於應用程序經常會設計到大量的、屬性不確定的 GEF 操作,簡單的錄制腳本並不適合開發系統化的測試用例,推薦使用 ITCL 測試框架來實現涉及到 GEF 圖形的應用程序自動化測試。本文將在最後結合 ITCL 框架來闡述如何在 Rational Functional Tester V8.0 中實現 GEF 圖形的識別,操作以及驗證。
GEF 圖形在 Rational Functional Tester V8.0 中的識別
激活測試環境
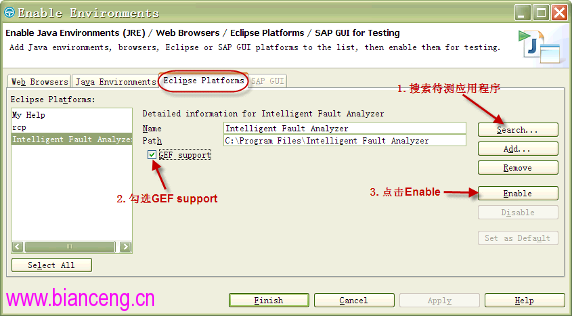
想要在 RFT 中識別 GEF 圖形,就需要對應用程序進行測試環境激活。
在菜單中選擇配置,選擇激活測試環境。如圖 1。
圖 1. 對待測的應用程序進行激活

注意:激活後需要重啟待測應用程序才能生效。
GEF 圖形的分類及層次
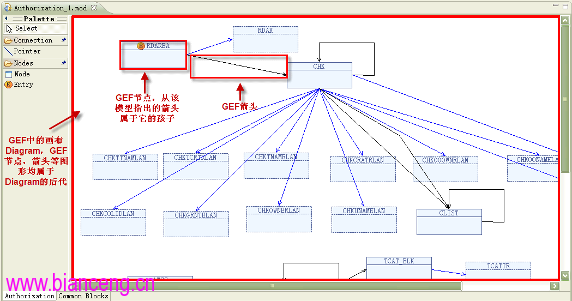
GEF 應用主要是節點與箭頭的鏈接來展示父子以及流程關系。下面以一個簡單的例子來說明 GEF 圖形的分類及其層次。
最上面一層是 RootEditPart,這是一種特殊的 Editpart,用來盛放 GEF 圖像內容,一般我們不會去識別和操作它。接下來的一層是 DiagramPart,也就是所謂畫布,所有畫布上的節點與箭頭都是它的後代(Descendant)。再下來是節點 NodePart,所有從它指出的箭頭都是它的孩子。最後是箭頭 ConnectionPart。
圖 2. GEF 圖形層次

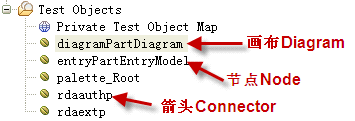
RFT 用於識別 Diagram 的屬性包括 .class、.classIndex、.figureclassname、.modelclassname、height、width。同時還可以選用 name、structure,或者 tooltip。同樣,節點和箭頭的識別屬性還可以選用 name、text 和 tooltip 以更精確地識別。將這些 GEF 對象加入自動化腳本中,我們就可以在右側的 Script Explorer 中看到加入的 GEF 對象。
圖 3. 加入測試腳本的 GEF 對象

如果你的測試對象包含的 GEF 對象數量不多,並且屬性從不發生變化,那麼可以在測試腳本中直接對 GEF 對象進行操作,如下例 1。
清單 1. 直接對 GEF 對象操作
public void testMain (Object[] args)

{

// Unit testing can go here

//right click diagram

diagramPartDiagram().click(RIGHT);

//move node 80pix right, 100pix down

entryPartEntryModel().drag(atPoint(0,0), atPoint(80,100));

//get the tooltip of connector rdaauthp

rdaauthp().getProperty("tooltip");


}
或者也可以直接返回 Public 對象以便其他腳本調用,如下例 2。
清單 2. 返回 Public 對象
public class vcbeEditView extends vcbeEditViewHelper {


//return diagram for public use

public GefEditPartTestObject getDiagramPartDiagram() {

TestObject to = diagramPartDiagram(ANY, NO_STATE);

return new GefEditPartTestObject(to);

}

//return node for public use

public GefEditPartTestObject getEntryPartEntryModel() {

TestObject to = entryPartEntryModel(ANY, NO_STATE);

return new GefEditPartTestObject(to);

}

//return connector for public use

public GefEditPartTestObject getRdaauthp() {

TestObject to = rdaauthp(ANY, NO_STATE);

return new GefEditPartTestObject(to);

}

}
如果你的應用程序包含很多 GEF 圖形,並且需要操作的 GEF 對象是不確定的,那麼你就需要動態尋找你所需要的 GEF 圖形。下面將講述如何針對 GEF 編寫健壯的識別代碼。
針對 GEF 編寫健壯的識別、操作、以及驗證代碼
健壯的識別代碼
由於大多數情況下應用程序會使用到很多 GEF 圖形,並且數量、類型,以及名稱都不確定,使用對象映射圖已經無法幫助我們有效地識別各種圖形對象。這種情況下我們需要動態地查找 GEF 圖形。在上一節我們講過 GEF 圖形的層次,diagram->node->connector,在查找時我們就要應用這個層次去精確地定位所需對象。
比如需要在畫布上尋找一個已知名字的節點,我們可以在腳本中利用 find 方法來查找它的 name 屬性,傳入它的名字 nodeName 作為參數,抑或其他如 text、tooltip 等已知屬性。注意找准該節點的 parent,也就是畫布 diagram。在例 3 中,this.getDiagramPartDiagram 就是 node 的 parent。
清單 3. 利用 find 動態查找名字為”nodeName”的節點
//return the node with given name "nodeName"

public GefEditPartTestObject getNode(String nodeName) {


//wait for the existence of diagram

this.getDiagramPartDiagram().waitForExistence();


//look for the node with given name "nodeName", and the class type is node

TestObject[] to = this.getDiagramPartDiagram().find(atChild("name", nodeName,

".figureclassname","com.ibm.db2zos.ifa.vcbeditor.figures.NodeFigure"));


//if more than 1 node are identified, throw the ambiguous exception

if (to.length > 1)

throw new AmbiguousRecognitionException(

"There are more than 1 object identified.");


return new GefEditPartTestObject(to[0]);

}
健壯的操作代碼
這樣在其他測試腳本中,就可以調用例 3 來對一個 node 節點進行操作,只需傳入所需節點名字即可。如例 4 中定義了一個移動節點的方法,調用了例 3 中的查找方法來定位所需節點,傳入所需節點的名字,需要移動的距離即可。注意如果例 4 與例 3 不在同一腳本中,需要在例 4 腳本開頭將例 3 腳本 import 進來,然後將 this 替換為實例化的例三腳本對象。
清單 4. 調用節點進行操作
//move node rightPix to the right, and downPix to the bottom

public void moveNode(String nodeName, int rightPix, int downPix)

{

this.getNode(nodeName).drag(atPoint(0,0), atPoint(rightPix,downPix));

}
這樣在接下來的測試腳本中,我們只需要寫一句話就可以實現將 node1 向右下移動 (80,100) 像素
this.moveNode(“node1”, 80, 100);
健壯的驗證代碼
自動化測試離不開合理的驗證點,對於 GEF 同樣我們需要編寫靈活健壯的驗證方法。RFT 通常提供的錄制驗證點方法雖然簡便,但卻缺乏靈活性以及重用性,無法在整個測試框架中共享。這裡我們使用 vpManual 方法來進行驗證。比如想要驗證一個叫 connectorName 的箭頭是否連接在節點 nodeName 上,我們可以利用類似例 3 中所講的方法來找到這個箭頭,然後取出它的 parent 看看是不是叫 nodeName,如下例 5。
清單 5. 靈活的、可重用的驗證方法
import ibm.loggers.GenericLogger;

public class vcbeEditView extends vcbeEditViewHelper {


private GenericLogger gl = new GenericLogger();


public boolean verifyConnectorBelong(String connectorName, String nodeName)

{

//find the connector named "connectorName" from the diagram

TestObject[] to = this.getDiagramPartDiagram().find(atDescendant("tooltip",

   connectorName, ".figureclassname",

   "com.ibm.db2zos.ifa.vcbeditor.figures.LinkConnectionFigure"));

if (to.length > 1)

throw new AmbiguousRecognitionException("There are more than 1 object

identified.");

//locate the connector’s parent’s name

String parentName = to[0].getParent().getProperty("name").toString();


//verify if parent’s name = desired nodeName

Boolean succed = vpManual("VERIFY_CONNECTOR_" + connectorName +

"_BELONGS_TO_NODE_" + nodeName, true , parentName == nodeName).performTest();


if (succed)

{

gl.logScriptTestResult("VERIFY_SUCCESS",true,"VERIFY_CONNECTOR_" +

connectorName + "_BELONGS_TO_NODE_" + nodeName);

}

else

{

gl.logScriptTestResult("VERIFY_FAIL",false,"VERIFY_CONNECTOR_" +

connectorName + "DOES_NOT_BELONGS_TO_NODE_" + nodeName);

}


return succed;

}

}
這樣在接下來的自動化腳本中,我們只需一句話便可以驗證 connector1 是否從 node1 指出
this.verifyConnectorBelong("connector1", "node1");
GEF 自動化在 ITCL 框架中的應用
ITCL 框架
ITCL 框架由質量軟件工程(Quality Software Engineering)和 IBM 中有經驗的自動化團隊合作開發而成的。這個框架由三層架構組成,架構的實現貫穿了應用對象、任務和測試用例包(IBM 包)。
我們知道,在 ITCL 框架中,測試腳本分為三層:對象層(AppObject)、任務層(Tasks),測試用例層(Testcases)。
在對象層我們建議直接抓取畫布 Diagram 並返回公有對象,即例 2 中的 getDiagramPartDiagram()。對於節點和箭頭,由於絕大多數情況下它們的數量和名字是不定的,建議使用 find 來動態查找對象,如例 3,以便任務層調用。
在任務層我們就可以調用對象層的公有對象來編寫操作以及驗證代碼,如例 4 和例 5,以便測試用例調用。
在測試用例層事情就變得非常簡單了,只需調用幾句任務層的方法,就可以實現一個靈活而又健壯的測試用例了。如下例 6。
清單 6. 清晰、靈活、健壯的測試用例
//1.Click the Node button in the palette

vcbeEditViewMgr.clickNodeButton();


//2.Click a blank area in the Editor view A blank node is created

//vcbeEditViewMgr.clickFigureArea();

sleep(3);


//3.Select the node name ACE in the name list for control block.

//The node ACE is created successfully

vcbeEditViewMgr.setNodeName("ACE");


//4.Click the save buttonA warning dialog pops up

vcbeToolBarMgr.clickSave();

saveConfirmDlgMgr.verifyNoEntryWarning();
總結
GEF 的自動化主要是抓住兩點:一是 GEF 圖形的基本層次,即 RootEditPart(用來盛放 GEF 圖像內容)、DiagramPart(畫布)、NodePart(節點)和ConnectionPart(箭頭);二是注意使用 find 方法來動態查找所需的 GEF 節點和箭頭,這是由於應用程序所涉及到的 GEF 圖形通常都是數目龐大且不確定的。掌握了這兩點,讀者應該可以自如地編寫出清晰、靈活、且健壯的 GEF 自動化測試用例了。