前言:
雖然現在ssh開發滿天飛,但是對於初學者來說,未必是好事,從基礎學起,一步一個腳印,也許對他們來說更好。
下來的時間裡,講解一個struts的簡單案例,從基礎學起,有興趣的朋友可以慢慢看來。
概要:Front Controller(模式)
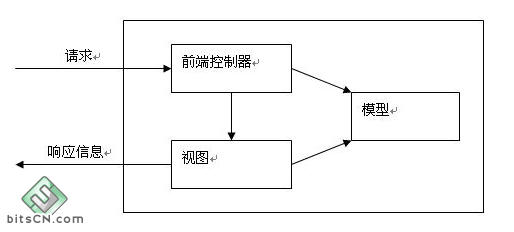
說明:講解struts具體例子之前,先說明一下Front Controller模式(前端控制器模式)。struts就是它的具體實現,得以擴展,並且是Model2結構的完整實現。
Model2結構通過一個控制組件來接受請求,這個控制組件本身可以為請求提供服務,也可以把這項任務分配給其他一些組件。生成響應信息的任務接著被分配給適當的視圖組件。實現這種要求的方式很多,Front Controller就是其中一種。

實現前端控制器可以采取不同的策略,一種典型的策略是使用一個servlet問題:如果把所有的功能集中起來會出現一個大而臃腫的控制器組件,它將負責整個Web的相關處理。
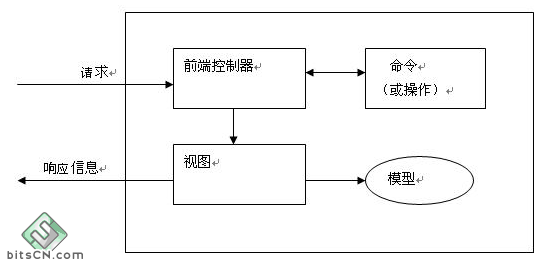
解決:辦法之一是使用多個前端控制器,分別負責某一方面的處理任務。另一種解決方案是使用Command and Controller(命令與控制器)(稍候介紹)
下面是這種Front Controller模式示例程序框架實現:
public class FrontController extends HttpServlet {

protected void processRequest(HttpServletRequest req, HttpServletResponse res)

throws ServletException, IOException {

RequestDispatcher dispatcher =

getServletContext().getRequestDispatcher(nextView);

dispatcher.forward(req, res);

}

protected void doGet(HttpServletRequest req, HttpServletResponse res)

throws ServletException, IOException {

processRequest(req, res);

}

protected void doPost(HttpServletRequest req, HttpServletResponse res)

throws ServletException, IOException {

processRequest(req, res);

}

}
在這裡,它只是HttpServlet一個簡單的擴充,默認實現了doGet()和doPost()方法,這兩個方法負責把請求分配給另一個叫processRequest()的方法。這是為了保證不論發出什麼請求,前端控制器都能為之提供服務。
在processRequest()的方法中我們省去主要部分,但實際上前端控制器將先執行與請求關聯的處理,然後再把它分配給一個視圖組件來生成相關的響應信息。視圖組件一般是JSP頁面。控制器完成了自己的業務邏輯之後,它就可以通過RequestDispatcher把處理分配給一個JSP.到此你可能會提出一個問題。如果控制器要負責處理所有的請求,那麼它怎麼知道各請求都是什麼以及如何處理呢?(Command and Controller,上面問題所提到的,現在開始講解)
Command and Controller策略
在Command and Controller策略中,處理每個具體請求的邏輯被轉移到了一個單獨的組件中。

這些額外組件各表示一個具體的命令(或操作,既action),並且組件中封裝著執行相關操作的邏輯。
前端控制器把對請求的處理分配給適當的命令組件。
操作類
為了實現Command and Controller策略,首先需要定義位於控制器和操作組件之間的接口。
public abstract class Action {

public abstract String process(HttpServletRequest req, HttpServletResponse res);

}
關於請求類型的通信
這裡的處理如下:
FrontController Servlet和URI/controller/*之間定義了一個映射

<servlet>

<servlet-name>FrontController</servlet-name>

<servlet-class>com.wxhx.controller.FrontController</servlet-class>

</servlet>

<servlet-mapping>

<servlet-name>FrontController</servlet-name>

<url-pattern>/controller/*</url-pattern>

</servlet-mapping>
為了從附加路徑信息中獲得的字符串映射到一個特定的操作實例上,當然,同樣有很多策略可供選擇,其中最靈活的就是把這種映射外部化,例如可以通過一個XML文件。
為了簡單起見,我們在這裡建立一個單獨的組件,用於封裝這種映射。
public class ActionHelper {

private static HashMap actions = new HashMap();

static {

actions.put(”Login”, “com.sample.LoginAction”);

}

public static Action getAction(String name) {

Action action = null;

try {

Class c = Class.forName((String) actions.get(name));

action = (Action) c.newInstance();

} catch (Exception e) {

e.printStackTrace();

}

return action;

}

}
好了,以上就是要實現的一個簡單的框架類FrontController,Action以及輔助的ActionHelper類
下一步是把所有這些處理插入到FrontController的processRequest方法中,這將是Web應用程序中所有請求的單一入口:
public class FrontController extends HttpServlet {

protected void processRequest(HttpServletRequest req, HttpServletResponse res)

throws ServletException, IOException {


String actionName =req.getPathInfo().substring(1);

Action action =ActionHelper.getAction(actionName);


String nextView =action.process(req, res);


RequestDispatcher dispatcher =

getServletContext().getRequestDispatcher(nextView);

dispatcher.forward(req, res);

}


protected void doGet(HttpServletRequest req, HttpServletResponse res)

throws ServletException, IOException {

processRequest(req, res);

}


protected void doPost(HttpServletRequest req, HttpServletResponse res)

throws ServletException, IOException {

processRequest(req, res);

}

}
具體相關內容可參見實例!