本教程將介紹如何使用 NetBeans IDE 創建使用 web 服務的移動客戶機應用程序。我們將創建這樣一個應用程序,它可通過實時在線 Web 服務提取每日 Dilbert 連環漫畫,並將圖形轉換為空間節省格式,然後在移動設備上顯示漫畫。
在本教程中,我們首先將在移動應用程序中創建一個 Web 服務客戶機,用於連接在線 DailyDilbert 服務。然後,我們將演示如何使用 Visual MIDlet Designer 以圖形化的方式來設計應用程序布局。接下來,添加代碼將漫畫的圖形格式由 GIF 轉換為移動設備支持的 PNG 格式 。最後,使用模擬器在 IDE 中欣賞連環漫畫。
本教程所需要的軟件
開始之前,需要在您的計算機上下載並安裝以下軟件:
Java Standard Development Kit(JDK)版本 5.0 或 6.0
NetBeans IDE 6.0 的完整發行版
GlassFish 或 Tomcat 等 Java EE 5 服務器,可以與上述項目一起安裝。
創建 Web 服務客戶機
首先,我們需要創建一個新的 Web Application 項目。該項目將包含所需的 Web 服務客戶機。
選擇 File > New Project 選項。從 Categories 列表中,選擇 Web 選項。從 Projects 列表中,選擇 Web Application 選項。單擊 Next 按鈕。
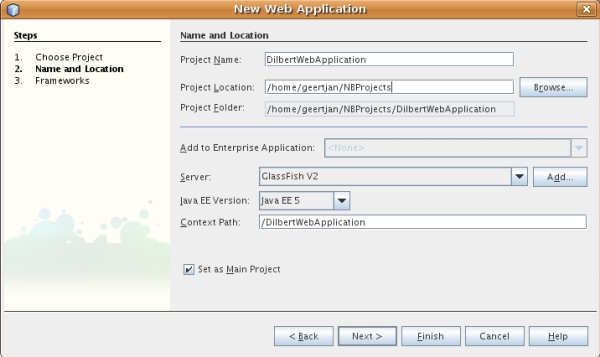
將項目命名為 DilbertWebApplication 並選擇 Java EE 5 選項,如下所示。
單擊 Finish 按鈕,IDE 將創建應用程序。
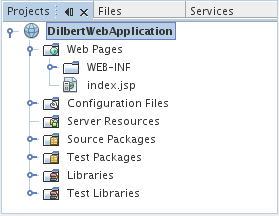
成功創建了應用程序,Projects 窗口應如下所示:
使用 Web Service Client 向導
現在,我們將添加一個 Web 服務客戶機,並讓它使用 DailyDilbert 服務。
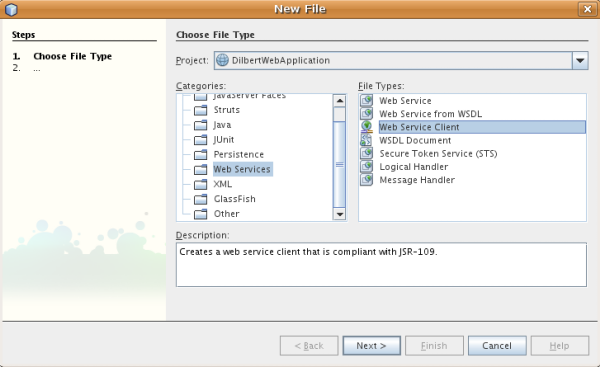
右鍵單擊 DilbertWebApplication 項目節點,然後選擇 New > Web Service Client。或者,你也可以從 New File 向導中選擇此向導 ,如下所示:
此時將顯示 Web Service Client 向導。
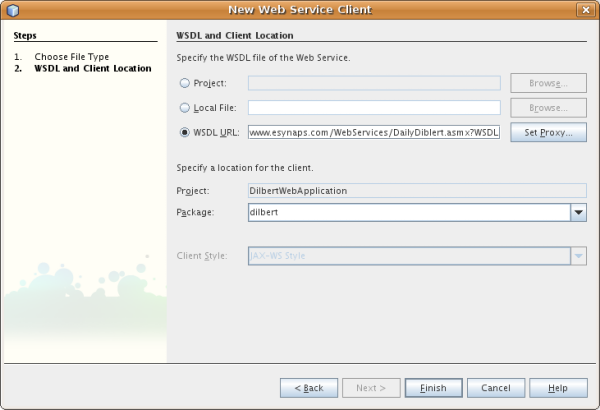
選擇 WSDL URL 並輸入以下 URL:
http://www.esynaps.com/WebServices/DailyDiblert.asmx?WSDL
注意: Web 服務的拼寫是錯誤的,正確拼寫應 為 DailyDilbert.asmx,而它實際上是 DailyDiblert.asmx。記住要錯誤拼寫,否則本教程 將不會運行!
將包命名為 dilbert。現在您應該看到以下內容:
單擊 Finish 按鈕。
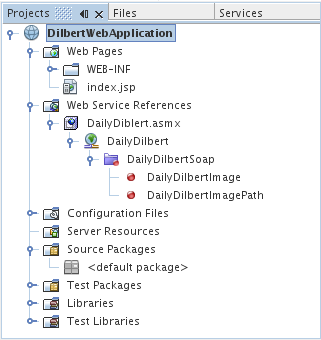
IDE 將下載 WSDL 文件,並創建客戶端工件,可以在 Files 窗口的 build 文件夾中查看這些工件。Projects 窗口顯示的邏輯視圖如下所 示:
創建移動客戶機
在本節中,我們將創建一個新的 Mobile Application 項目。然後,我們使用 Mobile Client to Web Application 向導將應用程序連接到 DailyDilbert 服務。
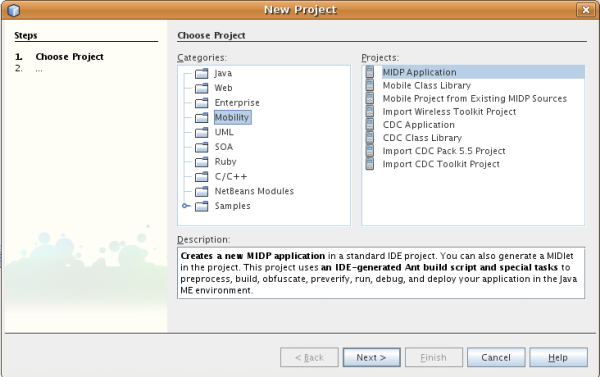
選擇 File > New Project 選項。從 Categories 列表中,選擇 Mobility 選項。從 Projects 列表中選擇 MIDP Application 選項, 如下所示:
單擊 Next 按鈕。
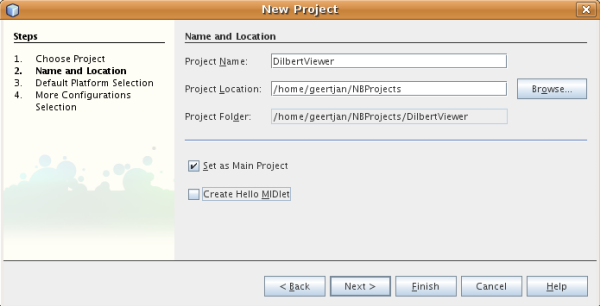
在 Project Name 字段中輸入 DilbertViewer,然後取消選中 Create Hello MIDlet 復選框。
單擊 Finish 按鈕,創建 MIDlet。
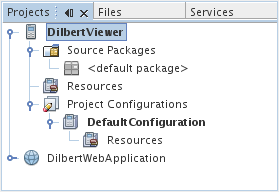
成功創建了移動應用程序,Projects 窗口應如下所示:
使用 Mobile Client to Web Application 向導
Mobile Client to Web Application 向導會生成一個 Servlet,它可連接到包含 Web 服務客戶機的 Web 應用程序。
在 Projects 窗口中,右鍵單擊 DilbertViewer 項目節點並選擇 New > Mobile Client to Web Application 選項,如下所示:
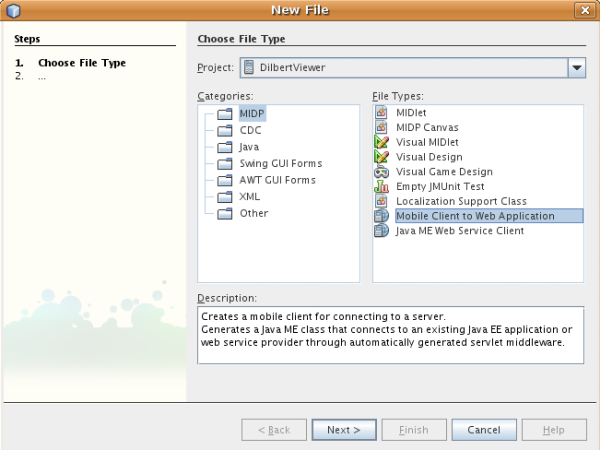
單擊 Next 按鈕。
DibertWebApplication 應作為 Web 應用程序列出。將 Servlet 名稱改為 DilbertServlet,然後將包命名為 dilbert。在 Mobile Client Uses 區域中,先選擇 Web Service Client in Web Application,然後選擇 DailyDiblert.asmx,如下所示:
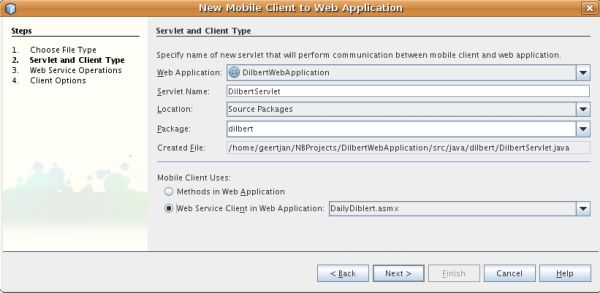
單擊 Next 按鈕。
選擇 DailyDilbertImage,如下所示:
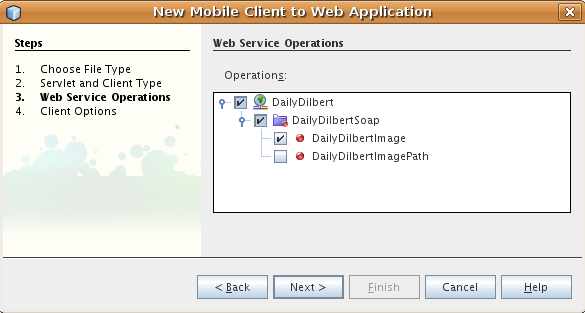
單擊 Next 按鈕。
將 Client Name 更改為 DilbertViewer,在包中添加 dilbert 名稱,如下所示:
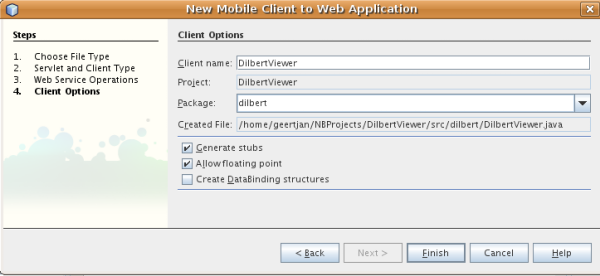
單擊 Finish 按鈕。
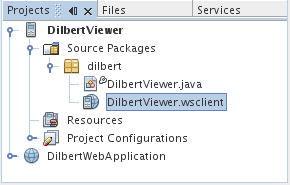
新工件已創建完成。Project 窗口現在會顯示應用程序的邏輯視圖,如下所示:
創建可視 MIDlet
在本節中,我們將創建一個可視 MIDlet,然後使用設計器來添加組件並將它們互相連接起來。
右鍵單擊項目節點,然後選擇 New > Visual MIDlet 選項。
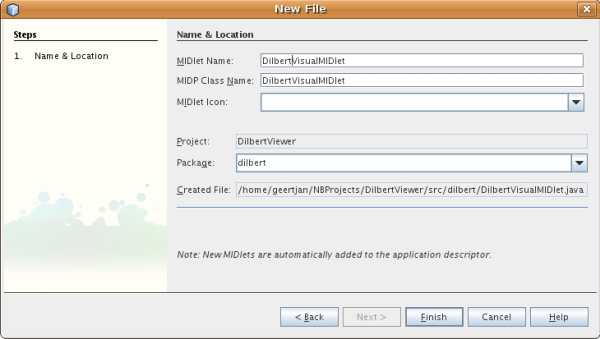
將文件命名為 DilbertVisualMIDlet,並指定 dilbert 作為包名,如下所示:
單擊 Finish 按鈕。
這樣將創建一個新的可視 MIDlet 文件,並在 Visual MIDlet Designer 中打開。
現在,使用 Palette(Ctrl-Shift-8)拖放一個 Alert 組件和一個 Wait Screen 組件到畫布上,如下所示:
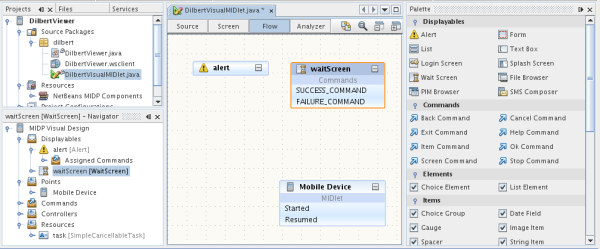
您可以將這些組件放在設計器的任意位置。
在下一節中,我們將創建一個新的組件,並將它添加到組件面板中。然後,我們再將它拖放到設計器上。接下來,我們將這些組件互相連接 起來,建立它們之間的關系。
創建畫布組件
在本節中,我們將創建一個自定義畫布組件用於顯示圖形文件。
右鍵單擊 DilbertViewer 項目節點並選擇 New > Other 選項。在 Categories 列表中,選擇 MIDP 選項。在 File Types 列表中,選 擇 MIDP Canvas 選項,如下所示:
ty/dilbert/dilbert-mob6.png" border="1" alt="Mobile application">
單擊 Next 按鈕。
在 MIDP Class Name 字段中輸入 DilbertCanvas,並將包命名為 dilbert 。單擊 Finish 按鈕。
在 IDE 中打開新創建的文件,然後插入代碼,如下所示:package dilbert;
import javax.microedition.lcdui.Canvas;
import javax.microedition.lcdui.Graphics;
import javax.microedition.lcdui.Image;
public class DilbertCanvas extends Canvas {
private int coordX, coordY;
private int imageWidth, imageHeight;
private Image image;
private int screenWidth, screenHeight;
/** Creates a new instance of DilbertCanvas */
public DilbertCanvas() {
screenHeight = getHeight();
screenWidth = getWidth();
}
public void setImage(Image image) {
this.imageWidth = image.getWidth();
this.imageHeight = image.getHeight();
this.image = image;
}
protected void paint(Graphics graphics) {
graphics.setColor(255, 255, 255);
graphics.fillRect(0, 0, getWidth(), getHeight());
graphics.drawImage(image, coordX, coordY, Graphics.LEFT | Graphics.TOP);
}
protected void keyPressed(int keyCode) {
int key = getGameAction(keyCode);
if (key == DOWN) {
if (coordY - screenHeight + imageHeight > 0) {
coordY -= 10;
}
} else if (key == UP) {
if (coordY < 0) {
coordY += 10;
}
} else if (key == RIGHT) {
if (coordX - screenWidth + imageWidth > 0) {
coordX -= 10;
}
} else if (key == LEFT) {
if (coordX < 0) {
coordX += 10;
}
}
repaint();
}
}
右鍵單擊 DilbertCanvas 項目節點,然後選擇 Build Project 選項。現在,我們已經構建並編譯了畫布組件。
在下一節中,我們將組件添加到組件面板上,然後再將它從組件面板拖放到設計器上。
將畫布組件添加到組件面板
接下來,我們將畫布組件添加到調色板上,然後將畫布組件整合到應用程序中。
在編輯器中打開 DilbertVisualMIDlet 文件,然後打開 Palette (Ctrl-Shift-8)。在 Palette 中單擊鼠標右鍵,然後選擇 Palette Manager 選項。此時將出現 Palette Manager,如下所示:
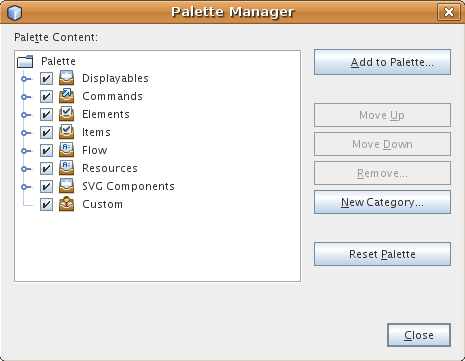
單擊 Add to Palette 按鈕。此時將出現 Add to Palette 向導,如下所示。其中的移動應用程序包含您要添加到組件面板的 Java 類:
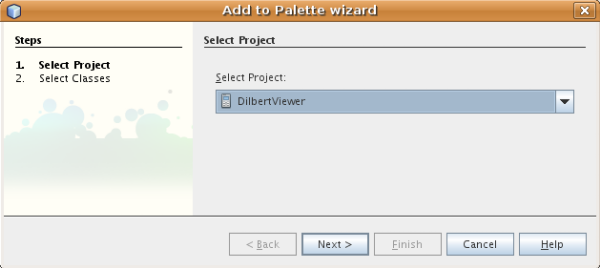
單擊 Next 按鈕。
選擇 dilbert.DilbertCanvas 選項。
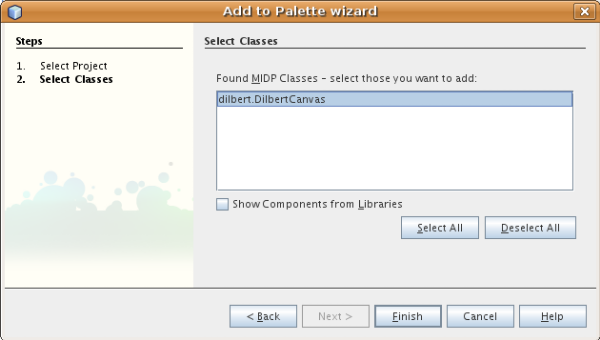
單擊 Finish 按鈕。
檢查所看到的新增畫布類,它應如下所示:
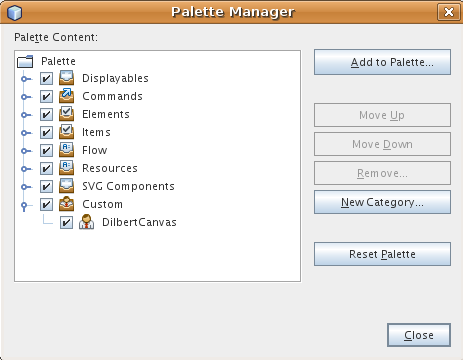
使用畫布組件
打開可視 MIDlet 和 Palette(Ctrl-Shift-8)。在組件面板中,將 Custom 類別中的 DilbertCanvas 項目拖放到設計器中。
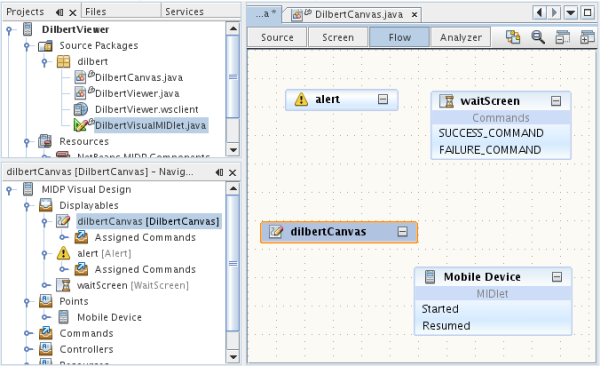
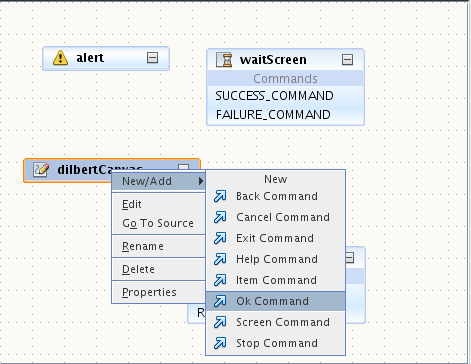
右鍵單擊所拖放的畫布組件,然後選擇 New/Add > OK 命令,如下所示:
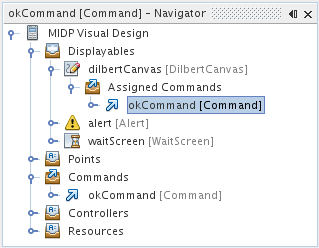
在 Navigator(Ctrl-7)中,您將看到以下內容:
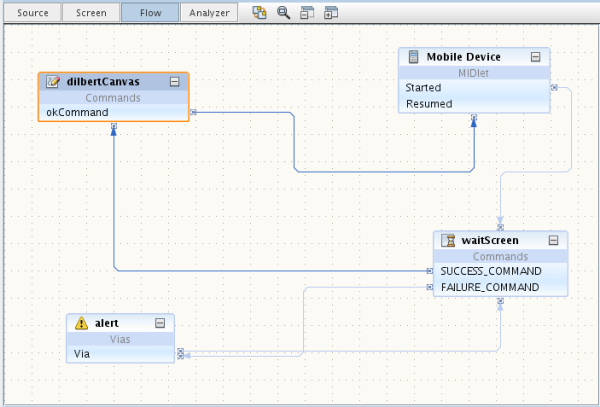
通過將這些組件連接起來創建一個流程,如下所示:
將 Mobile Device 的 Started 點連接到 waitScreen 組件。
將 waitScreen 組件的 Success 命令連接到 dilbertCanvas 組件。
將 waitScreen 組件的 Failure 命令連接到 alert 組件。
將 dilbertCanvas 組件的 okCommand 連接到 Mobile Device。
此時,您將看到以下內容:
切換到 Source 視圖中,然後修改 getTask() 方法,如以下黑體內容所示:private byte[] dailyDilbertImage_returnValue;
public SimpleCancellableTask getTask() {
if (task == null) {
// write pre-init user code here
task = new SimpleCancellableTask();
task.setExecutable(new org.netbeans.microedition.util.Executable() {
public void execute() throws Exception {
if (dailyDilbertImage_returnValue == null) {
DilbertViewer client = new DilbertViewer();
dailyDilbertImage_returnValue = client.dailyDilbertImage();
Image dilbertImage = Image.createImage(dailyDilbertImage_returnValue, 0, dailyDilbertImage_returnValue.length);
getDilbertCanvas().setImage(dilbertImage);
}
}
});
// write post-init user code here
}
return task;
}
轉換圖像
現在,我們已經創建了一個客戶機應用程序,可用於接收每天的圖像。但是所接收的圖像是 GIF 格式,這對於內存有限的移動設備來說太 大了。因此,我們需要將圖像轉換為 PNG 格式,這對於許多不同顯示尺寸的移動設備來說小很多,而且更容易調節大小。
打開 DailyDilbert_Proxy 文件,如下所示:
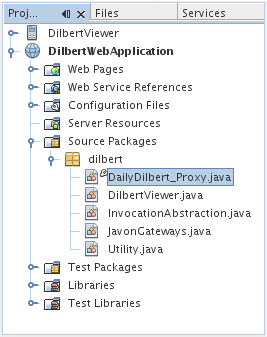
修改 dailyDilbertImage() 方法,在其中添加以下突出顯示的代碼:
public byte[] dailyDilbertImage() throws RemoteException, Exception {

   try {

     ByteArrayInputStream in = new ByteArrayInputStream(getService().getDailyDilbertSoap().dailyDilbertImage());

     BufferedImage image = ImageIO.read(in);

     ByteArrayOutputStream out = new ByteArrayOutputStream();

     ImageIO.write(image, "png", out);

     return out.toByteArray();

   } catch (java.rmi.RemoteException ex) {

     throw ex;

   } catch (Exception ex) {

     throw ex;

   }

     }
部署應用程序
首先,我們需要部署 Web 應用程序。然後將運行移動應用程序。
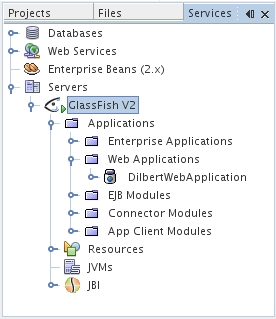
在 Projects 窗口中,右鍵單擊 DilbertWebApplication 項目節點,然後選擇 Deploy Application 選項。如果服務器還沒有運行,那麼 它將會啟動。然後將應用程序部署到服務器中。可以在 Services 窗口中查看應用程序是如何部署的,如下所示:
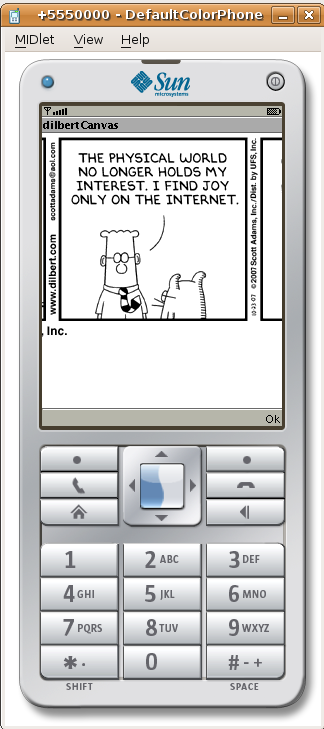
右鍵單擊移動項目,然後選擇 Run 選項。運行移動應用程序。此時將打開設備仿真器。在設備仿真器屏幕中,單擊 Launch 下面的按鈕。 然後單擊 Select 按鈕。應用程序將轉至互聯網,然後返回最新的 Dilbert 漫畫,如下所示:
結束語
本教程展示了如何使用 Mobile Client to Web Application 快速創建一個使用 Web 服務的 MIDlet。
本教程還演示了如何創建一個自定義組件,以及如何使用可視 Mobile 設計器(Visual Mobile Designer )將其添加到應用程序中。