開始之前
關於本系列
“了解 Eclipse 中的 JFace 數據綁定” 系列教程的這一部分介紹了 Eclipse V3.2 中附帶的新 JFace 數據綁定應用程序編程接口 (API) 的高級功能。
使用數據綁定 API 可以將您從必須編寫樣本同步代碼的痛苦中解脫出來。JFace 數據綁定 API 為用戶界面 (UI) 提供了這種功能,該功能是用 Standard Widget Toolkit (SWT) 和 JFace 編寫的。系列教程的前一部分介紹了 API 中的基本組件。本部分將介紹諸如測試、表、轉換程序和和驗證之類的高級主題。
關於本教程
本教程說明了如何使用 JFace 數據綁定的高級功能,例如轉換程序、驗證和表。還介紹了如何以更加可測試的方式構造 UI。您將了解如何利用 JFace 數據綁定 API 來編寫結構良好且可測試的 Java™ UI 應用程序。
先決條件
本教程面向具有一定的 Java 編程語言和 Eclipse 使用經驗的開發人員。您必須對 SWT 和 JFace 有一定的基本了解,並閱讀了 第 1 部分。
系統要求
要運行本教程中的示例,則必須要有一個 Eclipse V3.2 軟件開發包 (SDK) 及一台能夠運行該軟件開發包的計算機。本教程中的示例將使用 Java V5 自動裝箱。因此,首選使用 Java V1.5 Java 運行時環境 (JRE)。
編寫可測試代碼
同步可以為 UI 測試做些什麼?它是 Java UI 開發人員用來編寫可測試 UI 的強大工具。
大多數桌面應用程序開發人員都不測試其 UI。雖然服務器端代碼通常都經過嚴格測試,但是大部分桌面業務邏輯從未接受過 JUnit 的測試。有一些工具可用於執行測試任務,例如 Mercury Interactive Corp. 的產品 Abbot;以及 Redstone Software Inc. 的 Eggplant。但是,很多組織都不使用這些工具。
為什麼不測試 UI?通常有三個原因:
代碼組織混亂 —— 服務器端應用程序具有良好的分層,例如持久性和業務邏輯,但是桌面應用程序通常需要考慮各種錯綜復雜的因素。
UI 更改 —— UI 的功能經常因為用戶需求的改變而改變其目標。即使是最優秀的 UI 測試工具要跟上這種不固定的 UI 的變化都可能有困難。
市場上常見的 UI 測試解決方案都不符合待測試 UI 邏輯的級別。
是否要在 HTTP 級別測試整個 Web 應用程序?用它作為惟一公開的訪問點測試所有應用程序邏輯會有一定困難。同樣地,使用 UI 來測試業務邏輯,就客戶機/服務器而言也非常費勁。
受損代碼是錯誤代碼
身為一名軟件開發人員,長期以來接受的教導就是利用關注點分離很有好處。緊密耦合將導致代碼不可重用,難於測試,並且不易維護。有趣的是,在開發 UI 時,所有這些教訓通常都被拋到九霄雲外。下面的示例就是印證這句話的最好證據。
從 下載 部分中下載項目。從菜單中選擇 File > Import,將其導入工作區。在對話框中,選擇 Existing Projects Into Workspace。在下一個屏幕中選擇歸檔文件選項,然後浏覽以選擇剛下載的壓縮文件。單擊 Finish 將該壓縮文件導入後,工作區內現在應當有了一個 databinding-tutorial2 項目。
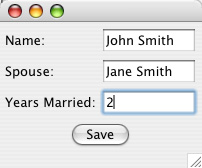
在 MangledConcernsExample 上單擊鼠標右鍵,然後從彈出式菜單中選擇 Run As > SWT Application。將會看到一個類似圖 1 所示的窗口。它提供了一個簡單的啟用規則用於嘗試同時啟用 Name、Spouse 和 Years Married 字段。如果在 Name 字段和 Spouse 字段中填入值,則 Years Married 字段將變為啟用狀態。刪除 Name 或 Spouse 任意一個字段中的值都會導致系統清空 Years Married 字段並將其變為禁用狀態。清單 1 中顯示了啟用此功能的代碼。
圖 1. UI 示例
清單 1. 受損的啟用代碼
private void createControls(Composite c) {


   ...


   YearsMarriedEnablementListener listener = new YearsMarriedEnablementListener();

   this.nameTxt.addModifyListener(listener);

   this.spouseTxt.addModifyListener(listener);

}


private class YearsMarriedEnablementListener implements ModifyListener {


   public void modifyText(ModifyEvent e) {

     boolean enable = false;

     if ((nameTxt.getText().trim().length() > 0)

         && (spouseTxt.getText().trim().length() > 0)) {

       enable = true;

     } else {

       yearsMarriedTxt.setText("");

     }

     yearsMarriedTxt.setEnabled(enable);

   }

}
這個示例中存在很多問題。首先,請注意 YearsMarriedEnablementListener 更像是一個補救措施,而不是應用程序的戰略組成部分。第二個問題是此偵聽程序中的代碼直接引用了 UI 控件。為了測試這段代碼,將必須把整個表實例化,包括 UI 控件。使用 Presentation Model 的 UI 設計模式可以更好地構建這段代碼。
引入 Presentation Model
桌面應用程序開發的一種核心模式是 Model-View-Controller (MVC) 模式。此模式不是十分適合現代 UI 開發。每個小部件都是自身的小型 MVC 三元組,在小部件級別留給應用程序可做的操作很少。但是,在應用程序級別,就要特別關注需要處理的啟用、驗證和數據同步等方面。
嘗試解決這些問題的一種模式是 Model-View-Presenter 模式。使用該模式,UI 控件將委托控制器對象來完成一些業務任務,例如單擊按鈕時 “保存”。將業務邏輯移至控制器是邁向可測試性的正確一步。但是,這種模式沒有注意到一個重要因素:控制器邏輯經常需要訪問 UI 中的數據和更改狀態。如果此狀態保存在小部件中,例如文本小部件的啟用屬性,那麼測試控制器就需要完整的 UI 或樁來假冒其狀態。
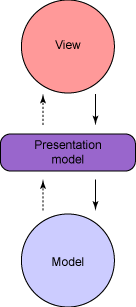
將狀態和業務邏輯從 UI 中提取出來就可以修正這種情況,這種方法是由另一個名為 Presentation Model 的 MVC 模式提出來的。可以在 Presentation Model 中測試業務邏輯和狀態更改而無需使用 UI 代碼。這種分離還使 UI 與 Presentation Model 之間的交互僅限於同步數據和狀態。
圖 2 顯示了 Presentation Model 模式的示意圖。了解了一些關於 Presentation Model 的背景知識之後,現在就可以使用這種結構更優的模式來轉換受損的示例。
圖 2. Presentation Model 模式
編寫可測試的 Presentation Model:測試
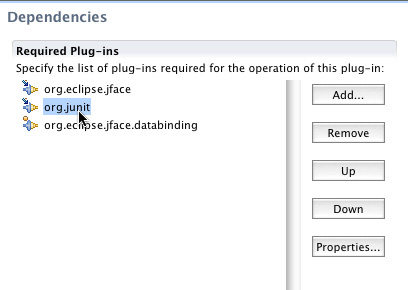
要將先前的示例重構為使用 Presentation Model 的示例,第一步是編寫測試。為此,需要將 JUnit 支持添加到項目中。在軟件包浏覽器中單擊 META-INF/MANIFEST.MF 文件,以打開 Eclipse MANIFEST.MF 編輯器。然後,單擊 Dependencies 選項卡並單擊 Required Plug-ins 部分中的 Add 按鈕。選擇 org.junit 插件,然後單擊 OK。現在將顯示類似圖 3 所示的編輯器。
圖 3. 添加 JUnit 支持後的 Manifest.MF 編輯器
接下來,創建一個新軟件包和一個名為 ContactPresentationModelTest 的新類,該類用於擴展 TestCase。插入清單 2 中所示的測試方法。
清單 2. 用於 Presentation Model 的測試
public void testYearsMarriedEnablement() {

   Contact contact = new Contact();

   ContactPresentationModel presentationModel = new

   ContactPresentationModel(

       contact);


   assertFalse(presentationModel.getEnableYearsMarried());


   presentationModel.getContact().setName("Name");

   assertFalse(presentationModel.getEnableYearsMarried());


   presentationModel.getContact().setSpouse("Spouse");

   assertTrue(presentationModel.getEnableYearsMarried());


   presentationModel.getContact().setYearsMarried("5");

   presentationModel.getContact().setSpouse("");

   assertFalse(presentationModel.getEnableYearsMarried());

   assertNull(presentationModel.getContact().getYearsMarried());

}
這段代碼不能編譯,因為還沒有引用的 Presentation Model。在同一個軟件包中創建一個名為 ContactPresentationModel 的新類。粘貼清單 3 中的代碼。
清單 3. 簡短的 Presentation Model 代碼
private Contact contact;

private boolean enableYearsMarried;


public ContactPresentationModel(Contact contact) {

  this.contact = contact;

}


public Contact getContact() {

  return contact;

}


public void setContact(Contact contact) {

  this.contact = contact;

}


public boolean getEnableYearsMarried() {

  return this.enableYearsMarried;

}
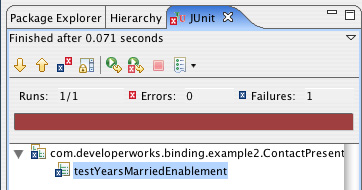
至此,系統將可編譯先前創建的測試。在軟件包浏覽器中的類上單擊鼠標右鍵,然後從彈出式菜單中選擇 Run As > JUnit Test。JUnit 視圖應當顯示測試失敗,如圖 4 所示。
圖 4. 測試失敗後的 JUnit 視圖
我們來看看清單 2 用了什麼測試方法。前幾行設置了一個新的 ContactPresentationModel 並用一個新的 Contact 對象來填充它。由於此對象沒有名稱或配偶的值,因此此對象在其 enableYearsMarried 變量(通過 getEnableYearMarried() getter 方法來訪問)中保存的狀態在初始化時應當是 false。然後測試設定了名稱屬性並斷言啟用的狀態仍是 false。在填充配偶屬性後應當會改變啟用狀態,這段代碼中寫了一條斷言來測試這個條件。然後 yearsMarried 屬性被設定,並清空 spouse 屬性。清空 spouse 屬性應當會導致啟用狀態轉換為 false 並清空 yearsMarried 屬性。結果,最後兩條斷言檢查情況是不是這樣。
編寫可測試的 Presentation Model:業務邏輯
現在已經有了針對 ContactPresentationModel 期望的業務邏輯的完整測試,可以開始實現功能了。
首先,十分有必要查看一個簡短類。該類包含兩個屬性:contact 和 enableYearsMarried。Contact 對象引用已公開,因此其他類可以根據需要通過 Presentation Model 來訪問該對象。將 enableYearsMarried 屬性而不是 Contact 對象添加到 Presentation Model 中,因為更改對象的狀態和業務邏輯都是綁定到 Contact 編輯操作而不是對象本身。
現在可以修改 ContactPresentationModel 來實現測試中指定的約定。在 Eclipse Java 編輯器中打開類。需要的第一處更改是實現對 enableYearsMarried 屬性的屬性更改支持,以供將來與 JFace 數據綁定結合使用。這個更改可以通過將其 setter 更改為匹配清單 4 中所示的代碼來完成。
清單 4. 支持屬性更改的啟用狀態 setter
public void setEnableYearsMarried(boolean enableYearsMarried) {

  boolean oldVal = this.enableYearsMarried;

  this.enableYearsMarried = enableYearsMarried;

  firePropertyChange("enableYearsMarried", \

  oldVal, this.enableYearsMarried);

}
接下來,需要重寫受損示例的 ModifyListener 中的邏輯,使其對 Contact 對象進行操作,而不是直接對 UI 的小部件進行操作。清單 5 中顯示了這個新的屬性更改偵聽程序。
清單 5. 在 Presentation Model 中實現業務邏輯的新屬性更改偵聽程序
private class EnablementPropertyChangeListener implements

  PropertyChangeListener {


  public void propertyChange(PropertyChangeEvent evt) {

  boolean enable = false;

  if ((getContact().getName() != null &&

   getContact().getName().trim().length() > 0) &&

   (getContact().getSpouse() != null &&

   getContact().getSpouse().trim().length() > 0)) {

   enable = true;

  } else {

   getContact().setYearsMarried(null);

  }

  setEnableYearsMarried(enable);

  }

}
最後,ContactPresentationModel 的構造函數需要將這個新偵聽程序與 Contact 的名稱屬性和配偶屬性綁定起來,如清單 6 所示。
清單 6. 向聯系人的字段中添加偵聽程序
EnablementPropertyChangeListener enablementPropertyChangeListener

  = new EnablementPropertyChangeListener();

this.contact.addPropertyChangeListener("name",

enablementPropertyChangeListener);

this.contact.addPropertyChangeListener("spouse",

enablementPropertyChangeListener);
如果在 ContactPresentationModel 測試上單擊鼠標右鍵並將它作為一個 JUnit 測試來運行,則會看到令人滿意的 JUnit 成功綠欄,如圖 5 所示。
圖 5. 測試成功後的 JUnit 視圖

以一種完全可測試的不依賴 UI 的方式重寫後,現在就有了與受損代碼示例相同的業務邏輯。
將 Presentation Model 與 UI 同步
您可能想知道哪些組件必須做 JFace 數據綁定。如您所見,Presentation Model 使代碼更易於測試。但是,Presentation Model 中的數據和狀態仍沒有被反映到 UI 中。自己編寫所有同步代碼會很費事。幸運的是,可以使用 JFace 數據綁定。通過更改構造函數和 bindGUI() 方法可以輕松地重構受損示例中的 ContactForm,如清單 7 所示。
清單 7. 重構的 ContactForm
public ContactForm(Composite c, ContactPresentationModel

presentationModel) {

  this.contact = new Contact();

  createControls(c);

  createButtons(c);

  bindGUI(presentationModel);

}


private void bindGUI(ContactPresentationModel

presentationModel) {

  DataBindingContext ctx = createContext();

  ctx.bind(nameTxt,

   new Property(presentation\

   Model.getContact(), "name"),

   new BindSpec());

  ctx.bind(spouseTxt,

   new Property(presentation\

   Model.getContact(), "spouse"),

   new BindSpec());

  ctx.bind(yearsMarriedTxt,

   new Property(presentation\

   Model.getContact(), "yearsMarried"),

   new BindSpec());

  ctx.bind(new Property(yearsMarriedTxt, "enabled"),

   new Property(presentation\

   Model, "enableYearsMarried"),

   new BindSpec());


}
接下來,更改示例運行程序中的 run() 方法,如清單 8 所示。
清單 8. 重構的示例運行程序
public void run() {


  ...

  ContactPresentationModel presentationModel = \

  new ContactPresentationModel(contact);

  ContactForm contactForm = new ContactForm(shell, presentationModel);


  shell.pack();

  shell.open();

  while (!shell.isDisposed()) {

  if (!display.readAndDispatch())

   display.sleep();

  }

  display.dispose();

}
更改 Presentation Model
現在已將代碼分離為 UI、Presentation Model 和域模型層,您可以輕松地修改代碼以滿足更改要求。假定客戶機需要更直觀並且擁有如圖 6 所示的帶 Married 復選框的 UI,選中/取消選中此框將同時啟用/禁用 Spouse 字段和 Years Married 字段。
圖 6. 添加直觀的復選框後的示例 UI
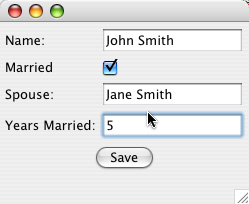
由於要更改 Presentation Model 的功能,因此需要修改測試以驗證實現內容。清單 9 顯示了經過調整的測試方法。復選框將處理啟用狀態的更改,因此只需更改偵聽程序中另一個邏輯來根據需要清空與兩個婚姻狀況相關的字段。
清單 9. 重構後的啟用測試
public void testYearsMarriedEnablement() {

   Contact contact = new Contact();

   ContactPresentationModel presentationModel = new ContactPresentationModel(

       contact);


   assertFalse(presentationModel.getEnableYearsMarried());


   presentationModel.setEnableYearsMarried(true);

   presentationModel.getContact().setSpouse("spouse");

   presentationModel.getContact().setYearsMarried("5");

   presentationModel.setEnableYearsMarried(false);


   assertNull(presentationModel.getContact().getSpouse());

   assertNull(presentationModel.getContact().getYearsMarried());

}
要使測試能夠通過,則需重構 ContactPresentationModel 構造函數和 EnablementPropertyChangeListener,如清單 10 所示。
清單 10. 修改 Presentation Model 使其能夠顯式啟用
public ContactPresentationModel(Contact contact) {

   this.contact = contact;


   EnablementPropertyChangeListener enablementPropertyChangeListener =

    new EnablementPropertyChangeListener();

   addPropertyChangeListener("enableYearsMarried",

       enablementPropertyChangeListener);

}


private class EnablementPropertyChangeListener implements

     PropertyChangeListener {


   public void propertyChange(PropertyChangeEvent evt) {

     if (!getEnableYearsMarried()) {

       getContact().setYearsMarried(null);

    getContact().setSpouse(null);

     }

   }

}
最後還需要做的是修改 UI。需要將標簽和復選框添加到 createControls() 方法中。然後必須將這個新復選框綁定到 Presentation Model。最後,為了像 Years Married 字段一樣可以啟用/禁用 Spouse 字段,請將 Spouse 字段的已啟用屬性綁定到 Presentation Model 中的同一位置。這些更改如清單 11 所示。
清單 11. 將復選框添加到 UI 中
private void bindGUI(ContactPresentationModel

presentationModel) {

. . .

   ctx.bind(chkIsMarried,

     new Property(presentationModel, "enableYearsMarried"),   new BindSpec());

   ctx.bind(new Property(spouseTxt, "enabled"),

     new Property(presentationModel, "enableYearsMarried"),

       new BindSpec());


}


private void createControls(Composite c) {


   . . .


   Label labelMarried = new Label(c, SWT.SHELL_TRIM);

   labelMarried.setText("Married");


   gridData = new GridData(GridData.FILL_HORIZONTAL);

   this.chkIsMarried = new Button(c, SWT.CHECK);

   this.chkIsMarried.setLayoutData(gridData);


   . . .

}
如您所見,可以對示例的每個構建塊做出關系緊密的更改。可以很輕松地修改啟用邏輯以清空模型中的第二個字段。而這只需要多加一行綁定代碼就可以實現對 UI 中的附加 Spouse 字段的啟用並使其保持同步。
引入 BindSpec
在本系列教程的第 2 部分和本教程的至此之前的內容,您已看到了所創建的 BindSpec 的實例,但卻沒有提供任何後續信息。有時,在綁定兩個對象的屬性後,還需要更多配置以實現理想的數據流的來回傳送。這就需要引入 BindSpec 類。該類可用作指定更多綁定配置,並在數據同步期間提供驗證和轉換功能。
觀察一下 BindSpec 類,就會發現它包含用於 model-to-target 和 target-to-model 轉換程序的 setter 方法。每個方法都要求有一個實現 IConverter 接口的類,如清單 12 所示。
清單 12. IConverter 接口
public interface IConverter {


  public Object getFromType();


  public Object getToType();


  public Object convert(Object fromObject);

}
要允許 JFace 數據綁定來檢查是否已為綁定的目標和模型指定了有效的轉換程序,接口需要轉換的兩端的類型信息。通常,這有點像 String.class。然後 DataBindingContext.bind 方法將在綁定時把這些類型與模型和目標的類型相比較以查看一致性。惟一還需要的方法是執行實際轉換。
BindSpec 上的另一個主要選件是驗證程序。驗證程序可以設置在目標端和模型端。調用 setValidator 將默認指向目標端。例如,這會致使來自小部件的數據在與模型同步之前就被驗證。驗證程序必須實現 IValidator 接口,如清單 13 所示。
清單 13. IValidator 接口
public interface IValidator {


  public ValidationError isPartiallyValid(Object value);


  public ValidationError isValid(Object value);


}
isPartiallyValid() 方法允許在值被更改時(例如,在光標位於文本字段中並且用戶正在鍵入信息)執行驗證。相比之下,isValid() 方法卻是在所有更改都已完成但尚未與模型同步時(例如,切換出文本字段)被調用的。
實現自定義轉換程序
再回到示例上來,假設客戶機已經要求將外觀普通的 Married 復選框更改為包含 “Yes” 和 “No” 的文字的組合框,如圖 7 所示。
圖 7. 帶有組合框而不是復選框的 UI 示例
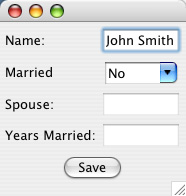
但是,請不要忘記復選框是被綁定到 enableYearsMarried 屬性上的,該屬性屬於 boolean 類型。一端的 String 和另一端的 boolean 類型不匹配。在這就非常適合放置一個轉換程序。
雖然可以編寫針對本教程中其余部分中展示的功能的測試,但是本示例將側重於實現。對於測試僅做為了保持 ContactPresentationModelTest 所需的更改。但是,在開發環境中,編寫測試始終是個很好的做法。
創建一個名為 BooleanToStringConverter 的新類。對於新類的 fromType,返回 Boolean.TYPE;對於新類的 toType,返回 String.class。在 convert() 方法中,將對象指定為 Boolean,並且如果為 true 則返回 Yes;如果為 false 則返回 No。現在,通過創建類 StringToBooleanConverter,創建相應的轉換程序。交換轉換源和轉換目標的類型,並將 convert() 方法改為如果值為 Yes,則返回 true;如果值為 No 則返回 false。Java 5 自動裝箱負責對象轉換。
接下來,需要更改 UI。刪除與復選框相關聯的代碼並將其替換為清單 14 中的代碼。此清單還包含對 bindGUI() 方法的替換綁定方法調用。回想第 2 部分中,組合框小部件有一個選項屬性可供綁定。綁定行還為 BindSpec 類使用了另一個構造函數,該類允許指定 BooleanToStringConverter 和 StringToBooleanConverter 的使用量。
清單 14. 用組合框替換復選框
gridData = new GridData(GridData.FILL_HORIZONTAL);

this.comboIsMarried = new Combo(c, SWT.BORDER);

this.comboIsMarried.setLayoutData(gridData);

this.comboIsMarried.add("Yes");

this.comboIsMarried.add("No");


. . .


ctx.bind(new Property(comboIsMarried, SWTProperties.SELECTION),

     new Property(presentationModel,

      "enableYearsMarried"),

      new BindSpec(new BooleanToStringConverter(),

      new StringToBooleanConverter(), null, null));
實現自定義驗證程序
示例中的字段此刻都只獲取字符串。但是,Years Married 字段應當限定為數字。實現限定的一種方法是使用自定義驗證程序。創建一個名為 YearsMarriedValidator 的類並將清單 15 中的代碼粘貼到其中。
清單 15. 自定義驗證程序
public class YearsMarriedValidator implements IValidator {


   public ValidationError isPartiallyValid(Object value) {

     try {

       Integer.valueOf((String) value);

       return null;

     } catch (NumberFormatException nfe) {

       return new ValidationError(ValidationError.ERROR,

       "Not A Number");

     }

   }


   public ValidationError isValid(Object value) {

     if ("5".equals(value)) {

       return ValidationError.error("5 Is Not Allowed");

     } else {

       return null;

     }

   }

}
這段代碼將同時實現 isPartiallyValid() 和 isValid() 方法。對於 isPartiallyValid() 方法,將嘗試把輸入的字符串轉換為一個整數。如果系統拋出了 NumberFormatException,則知道嘗試失敗。結果將返回 ValidationError。對於本示例,如果輸入數字 5,則 isValid() 方法將返回一個 ValidationError。最後需要做的是將驗證程序包含到 yearsMarriedTxt 字段的 BindSpec 中,如清單 16 所示。
清單 16. 綁定驗證程序
ctx.bind(validationErrorLabel, binding.getValidationError(),

     new BindSpec(new ValidationErrorToStringConverter(),

         new ReadOnlyConverter(String.class,

             ValidationError.class), null, null));
此時,打開修改後的示例,然後在組合框中選中 Yes 啟用 Years Married 字段。嘗試在 Years Married 字段中輸入字符 abc。不會有任何變化,因為驗證程序的部分驗證檢查將阻止輸入數字。現在輸入數字 1,然後嘗試刪除該數字。有趣的是,您會發現不能刪除。因為並未編碼讓驗證程序允許 null 或空字符串,因此不允許刪除數字,因為這樣做會導致產生無效的值。修改部分驗證方法以處理這些問題,然後返回應用程序。
為了更方便地浏覽 YearsMarriedValidator 上的 isValid() 方法,請使用清單 17 中的代碼創建一個標簽小部件並將其綁定到屬性上。
清單 17. 添加顯示 Years Married 值的標簽
Label yvLabel = new Label(c, SWT.NONE);

yvLabel.setText("YM Value:");

this.ymValLabel = new Label(c, SWT.BORDER);

gridData = new GridData(GridData.FILL_HORIZONTAL);

this.ymValLabel.setLayoutData(gridData);


...


ctx.bind(ymValLabel, new Property(presentationModel.getContact(),

"yearsMarried"), new BindSpec());
現在,當 Contact 對象中的屬性被 JFace 數據綁定觸發時,可以真實地看到對其所做的更改。啟用 Years Married 字段,然後再次鍵入 abc。將會注意到標簽中未顯示任何內容,因為無效的更改不會被同步。接下來,輸入數字 1。該數字將會與 Contact 對象同步。由於標簽還被綁定到 Contact 對象上,因此標簽也更改為 1。輸入數字 5,然後切換出該字段。注意:雖然該值仍保留在文本小部件中,但是該值不會顯示在標簽中。這是因為驗證程序阻止了同步。
觀察驗證錯誤
所做的更改都是有用的,但是如果在出現驗證錯誤時能夠通知用戶就更好了。此功能可通過綁定到特定的 observable 來實現。
如果查看 DataBindingContext 類中的 bind() 方法的方法簽名,則會發現該方法簽名返回了一個 Binding 對象,您到現在為止可能都還沒有注意過這個對象。這個 Binding 對象是負責保持數據在模型與目標之間同步。該對象還會在適當的時間調用轉換程序和驗證程序。每個 Binding 對象還有分別用於部分和完整 ValidatorError 的 observable。可以觀察這些數據來確定何時出現了錯誤。修改 ContactForm 類,添加兩個標簽以在其中查看結果,然後綁定這兩個標簽,如清單 18 所示。根據需要修改導入的代碼。這段代碼依賴於此項目附帶的額外軟件包中的一些類。
清單 18. 在標簽中顯示錯誤
ctx.bind(partialValidationErrorLabel, binding

     .getPartialValidationError(), new BindSpec(

     new ValidationErrorToStringConverter(), \

     new ReadOnlyConverter(

         String.class, ValidationError.class),

     null, null));

ctx.bind(validationErrorLabel, binding.getValidationError(),

new BindSpec(new ValidationErrorToStringConverter(),

     new ReadOnlyConverter(String.class,

         ValidationError.class), null, null));


. . .


Label partialLabel = new Label(c, SWT.NONE);

partialLabel.setText("Partial Error:");

this.partialValidationErrorLabel = new Label(c, SWT.BORDER);

gridData = new GridData(GridData.FILL_HORIZONTAL);

this.partialValidationErrorLabel.setLayoutData(gridData);


Label fullLabel = new Label(c, SWT.NONE);

fullLabel.setText("Validation Error:");

this.validationErrorLabel = new Label(c, SWT.BORDER);

gridData = new GridData(GridData.FILL_HORIZONTAL);

this.validationErrorLabel.setLayoutData(gridData);
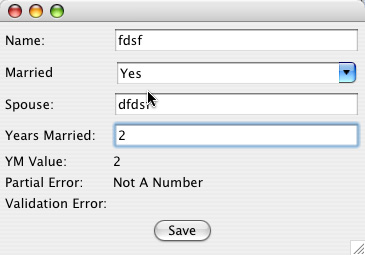
在示例運行程序上單擊鼠標右鍵,然後將應用程序作為一個 SWT 應用程序再次運行。應當會看到一個類似圖 8 所示的對話框。啟用 Years Married 字段,然後輸入一個非數字字符。注意顯示的錯誤消息。接下來,嘗試輸入數字 5,然後按 Tab 鍵從字段中移出以測試其他驗證標簽。最後,將標簽更改為數字 4。兩個錯誤標簽都應當為空,因為未出現過任何驗證錯誤。
圖 8. 帶有顯示驗證錯誤的 UI 示例
主-從關系的表
應用程序經常提供對象的匯總列表。選中一個列表後,詳細信息就會顯示在表單中。此類功能可以被編碼到 JFace 數據綁定中,方法是使用一個集合小部件,例如 List 或 Table。然後可以將選中的值綁定到顯示詳細信息記錄的目標表單上。
實現此功能的第一個步驟是創建另一個 Presentation Model 來保存要顯示的表的列表。清單 19 顯示了此功能的代碼。這個 Presentation Model 還保存了一個 WritableValue 以保留表的選項狀態。請再次注意,所有狀態都被從 UI 表小部件中提取出來,並用 Presentation Model 來表示。
清單 19. TableForm 的 Presentation Model
public class TablePresentationModel extends

PropertyChangeAware {


   private List contacts;


   private WritableValue selectedContact;


   public TablePresentationModel(List contacts) {

     this.contacts = contacts;

     this.selectedContact = new WritableValue(Contact.class);

     this.selectedContact.setValue(contacts.get(0));

   }


   public List getContacts() {

     return contacts;

   }


   public void setContacts(List contacts) {

     this.contacts = contacts;

   }


   public WritableValue getSelectedContactObservable() {

     return selectedContact;

   }


   public void setSelectedContactObservable\

   (WritableValue selectedContact) {

     this.selectedContact = selectedContact;

   }


}
創建了 Presentation Model 之後,現在需要一個 UI。清單 20 顯示了 TableForm 類的代碼。
清單 20. TableForm 的實現
public class TableForm {


   private TableViewer contactsTableViewer;


   public TableForm(Composite c, TablePresentationModel presentationModel) {

     createControls(c);

     bindGUI(presentationModel);

   }


   private void bindGUI(TablePresentationModel presentationModel){

     DataBindingContext ctx = createContext();


     ctx.bind(new Property(this.contactsTableViewer,

ViewersProperties.CONTENT), new TableModelDescription(new

Property(presentationModel, "contacts", Contact.class, true),

new String[] {"name", "spouse"}), null);

     ctx.bind(new Property(this.contactsTableViewer,

ViewersProperties.SINGLE_SELECTION),

presentationModel.getSelectedContactObservable(), null);

   }


   private void createControls(Composite c) {

     GridData gridData = new

GridData(GridData.FILL_HORIZONTAL);

     gridData.horizontalSpan = 2;

     this.contactsTableViewer = new TableViewer(c,

SWT.BORDER);


this.contactsTableViewer.getTable().setLayoutData(gridData);

   }


   public static DataBindingContext createContext() {

     DataBindingContext context = new DataBindingContext();

     context.addObservableFactory(new

  BeanObservableFactory(context, null,

         new Class[] { Widget.class }));

     context.addObservableFactory(new SWTObservableFactory());

     context.addObservableFactory(new ViewersObservableFactory());

     context.addBindSupportFactory(

      new DefaultBindSupportFactory());

     context.addBindingFactory(new DefaultBindingFactory());

     context.addBindingFactory(new ViewersBindingFactory());

     return context;

   }


}
類似於 ContactForm,TableForm 也創建一個 Presentation Model 並將其內容綁定到 UI 上。在本例中,小部件是一張表。bindGUI() 方法中的第一行將列表中的 Contact 對象從 Presentation Model 連接到表上。此處並沒有使用綁定時提供的簡單的 Property 對象,而是使用了 TableModelDescription 對象。此對象允許傳遞一個字符串數組以表示要將 Contact 對象的哪些屬性綁定到表中的列上。方法中的第二個綁定行將把表中的選定值綁定到在 Presentation Model 中創建的 WritableValue 選項保存程序上。最後,注意類定義末尾的 createContext() 方法將把 ViewerObservableFactory 和 ViewersBindingFactory 添加到上下文中。沒有這些工廠,上下文將不知道如何將數據與表綁定在一起。
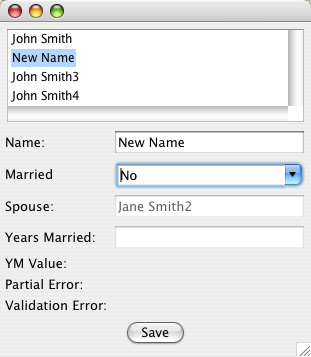
這是一個很好的停止點來測試迄今為止的代碼。用清單 21 中的代碼修改示例運行程序。這段代碼將創建一些示例聯系人,並將這些信息傳遞給 Presentation Model,然後構建 TableForm。在運行程序上單擊鼠標右鍵並以 SWT 應用程序來運行,將打開類似圖 9 所示的窗口。
清單 21. 修改示例運行程序以嘗試 TableForm
Contact contact = new Contact();

List contacts = new ArrayList();

contacts.add(new Contact("John Smith", "Jane Smith"));

contacts.add(new Contact("John Smith2", "Jane Smith2"));

contacts.add(new Contact("John Smith3", "Jane Smith3"));

contacts.add(new Contact("John Smith4", "Jane Smith4"));


TablePresentationModel tablePresentationModel = new

TablePresentationModel(

     contacts);

TableForm tableForm = new TableForm(shell,

tablePresentationModel);


ContactPresentationModel presentationModel = new

ContactPresentationModel(

     contact);

ContactForm contactForm = new ContactForm(shell,

presentationModel);
圖 9. 實現主-從關系的 UI 示例
引入 indirection
最後還需要做的是將選項從表掛接到 ContactPresentationModel 上以供查看。維基百科將計算機編程中的 indirection 定義為 “使用名稱、引用或容器而不是值本身進行引用的能力”。通過綁定到稍後將填入的占位符上,可以將此方法與 ContactForm 和 ContactPresentationModel 結合使用。將其重構,以便 Contact 變量現在就替換 IObservable value。根據成為 contactObservable 的需要更改變量和方法名稱。更改後會導致出現一些編譯錯誤。修正 enablementChangeListener 並用清單 22 中的代碼進行測試。
清單 22. 將 TablePresentation 模型與 ContactPresentationModel 連接起來
if (!getEnableYearsMarried()) {

   Contact contact = (Contact) \

   getContactObservable().getValue();

   if (contact != null) {

     contact.setYearsMarried(null);

     contact.setSpouse(null);

   }

}


. . .


ContactPresentationModel presentationModel = new

ContactPresentationModel(

     new WritableValue(Contact.class));

presentationModel.getContactObservable().setValue(contact);


assertFalse(presentationModel.getEnableYearsMarried());


presentationModel.setEnableYearsMarried(true);

contact.setSpouse("spouse");

contact.setYearsMarried("5");

presentationModel.setEnableYearsMarried(false);


assertNull(contact.getSpouse());

assertNull(contact.getYearsMarried());
現在需要修正 ContactForm。確保先前的 getContact() 方法已被重構為 getContactObservable()。因為現在要綁定到 IObservableValue 而不是直接綁定到 Contact 對象,因此在綁定時必須更加明確這一點。修改 name、spouse 和 yearsMarried 的 Property 對象構造函數以使第三個實參為 String.class,第四個實參為 false。這樣做將指定將要綁定到的屬性的類型和它不是集合的事實。最後,通過將 ContactForm 構造函數更改為從 TablePresentationModel 獲取 WritableValue 實例,來修正示例運行程序中的錯誤。
再次運行示例。注意表的第一個值已被選中並且顯示在下面的表單中。如果更改 Name 字段的值,則表中該字段的值也將更改。更改表中的選項將更改表單中顯示的對象。
結束語
本教程介紹了 JFace 數據綁定 API 的高級核心功能,還展示了數據綁定可以怎樣輔助您編寫更加可測試的代碼來實現 Presentation Model 模式。在此期間,您看到了數據綁定如何將您從痛苦中解脫出來,而不再需要編寫通常在桌面應用程序中必需的乏味的樣本同步代碼。JFace 數據綁定 API 本身提供了一組接口和實現,可以在一般情況下引用 JavaBean 屬性和 SWT/JFace 小部件的屬性。JFace 數據綁定還附帶了功能強大的 API 功能,用於處理轉換、驗證和間接綁定。