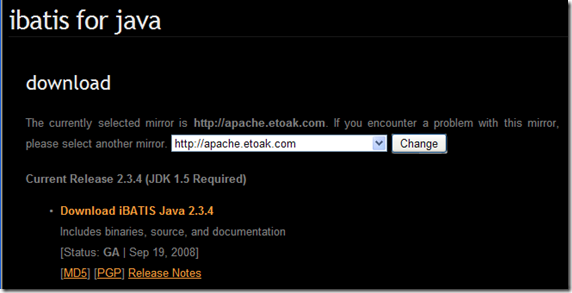
本期開始講Model層的開發,整合iBatis框架,iBatis是Apache旗下Java數據持久層的框架,跟Hibernate是同一類型的框架。大家可到它的官方網站去下載http://ibatis.apache.org/java.cgi,如下圖:

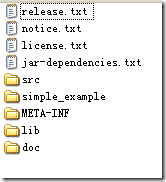
我這裡下載的是當前最新版本iBatis 2.3.4 , 下載之後,解壓包是這樣的:

我們在lib目錄下,找到“ibatis-2.3.4.726.jar”文件,加入到我們項目的lib目錄下,就行。在這裡,我們先說下怎麼學習這個iBatis框架:上圖中,有個simple_example的文件夾,它裡面就包含了一個超級簡單且容易理解的例子,大家可以去學習一下。By the way,如果你學過Hibernate的話,你會發覺iBatis要比Hibernate好學很多。關於Hibernate和iBatis的爭論,網上有很多,大家有興趣可以去了解一下。
好,我們先建立數據庫和設計數據庫吧。我這項目用的是MySQL 5.0。生成數據庫和數據表的SQL語句如下:
create database simpledb;

create table article

(

     ID int auto_increment not null primary key,

     TITLE varchar(25),

     AUTHOR varchar(25),

     CONTENT text,

     PUBTIME date

);
這是我們常見的新聞表及其中的字段。
接下來,寫一個與表對應的新聞類,Article.java,這個其實是POJO類,代碼如下:
package cn.simple.pojo;

import java.util.Date;

public class Article {


     private int id;

     private String title;

     private String author;

     private String content;

     private Date pubtime;


     /** *//***********getter和setter方法***********/

     public int getId() {

         return id;

     }

     public void setId(int id) {

         this.id = id;

     }

     public String getTitle() {

         return title;

     }

     public void setTitle(String title) {

         this.title = title;

     }

     public String getAuthor() {

         return author;

     }

     public void setAuthor(String author) {

         this.author = author;

     }

     public String getContent() {

         return content;

     }

     public void setContent(String content) {

         this.content = content;

     }

     public Date getPubtime() {

         return pubtime;

     }

     public void setPubtime(Date pubtime) {

         this.pubtime = pubtime;

     }

}
有了數據表和實體類,現在來寫兩者之間映射的配置文件Article.xml。代碼如下:
<?xml version="1.0" encoding="UTF-8" ?>

<!DOCTYPE sqlMap

     PUBLIC "-//ibatis.apache.org//DTD SQL Map 2.0//EN"

     "http://ibatis.apache.org/dtd/sql-map-2.dtd">

<sqlMap namespace="Article">

     <!-- Use type aliases to avoid typing the full classname every time. -->

     <typeAlias alias="Article" type="cn.simple.pojo.Article" />

     <!--

         Result maps describe the mapping between the columns returned from a

         query, and the class properties. A result map isn't necessary if the

         columns (or aliases) match to the properties exactly.

     -->

     <resultMap id="ArticleResult" class="Article">

         <result property="id" column="ID" />

         <result property="title" column="TITLE"/>

         <result property="author" column="AUTHOR"/>

         <result property="content" column="CONTENT"/>

         <result property="pubtime" column="PUBTIME"/>

     </resultMap>

     <!--

         Select with no parameters using the result map for Account class.

     -->

     <select id="selectAllArticles" resultMap="ArticleResult">

         select * from article

       </select>

     <!--

         A simpler select example without the result map. Note the aliases to

         match the properties of the target result class.

     -->

     <select id="selectArticleById" parameterClass="int" resultClass="Article">

         select

         ID as id,

         TITLE as title,

         AUTHOR as author,

         CONTENT as content,

         PUBTIME as pubtime

         from Article

         where ID=#id#

   </select>

     <!-- Insert example, using the Account parameter class -->

     <insert id="insertArticle" parameterClass="Article">

         insert into article (

             TITLE,

             AUTHOR,

             CONTENT,

             PUBTIME

         ) values (

             #title#,

             #author#,

             #content#,

             #pubtime#

         )

   </insert>

     <!-- Update example, using the Account parameter class -->

     <update id="updateArticle" parameterClass="Article">

         update article set

         TITLE = #title#,

         AUTHOR = #author#,

         CONTENT = #content#,

         PUBTIME = #pubtime#

         where

         ID = #id#

   </update>

     <!-- Delete example, using an integer as the parameter class -->

     <delete id="deleteArticleById" parameterClass="int">

         delete from article where ID = #id#

   </delete>

</sqlMap>
大家不要覺得這個映射文件很復雜,其實,這挺容易理解的,如果大家賴得寫的話,可復制iBatis自帶的simple_example下的例子的映射文件,然後修改一下就行。
有了表、實體類、表與實體之間的映射文件,之後,該做什麼呢?學過Hibernate的朋友會想到那個數據庫連接信息的配置文件,當然,iBatis也需要類似的文件,即SqlMapConfig.xml,代碼如下:
<?xml version="1.0" encoding="UTF-8" ?>

<!DOCTYPE sqlMapConfig

     PUBLIC "-//ibatis.apache.org//DTD SQL Map Config 2.0//EN"

     "http://ibatis.apache.org/dtd/sql-map-config-2.dtd">

<sqlMapConfig>

   <!-- Configure a built-in transaction manager.  If you're using an

        app server, you probably want to use its transaction manager

        and a managed datasource -->

   <transactionManager type="JDBC" commitRequired="false">

     <dataSource type="SIMPLE">

       <property name="JDBC.Driver" value="com.mysql.jdbc.Driver"/>

       <property name="JDBC.ConnectionURL" value="jdbc:mysql://localhost:3306/simpledb"/>

       <property name="JDBC.Username" value="root"/>

       <property name="JDBC.Password" value="root"/>

     </dataSource>

   </transactionManager>

   <!-- List the SQL Map XML files. They can be loaded from the

        classpath, as they are here (com.domain.data) -->

   <sqlMap resource="cn/simple/pojo/Article.xml"/>

   <!-- List more here

   <sqlMap resource="com/mydomain/data/Order.xml"/>

   <sqlMap resource="com/mydomain/data/Documents.xml"/>

   -->

</sqlMapConfig>
一看這代碼,也有點復雜,我的說法同上,大不了COPY,再略作修改,呵呵
好了,來寫我們的業務邏輯層:
package cn.simple.manager;

import java.io.IOException;

import java.io.Reader;

import java.sql.SQLException;

import java.util.List;

import cn.simple.pojo.Article;

import com.ibatis.common.resources.Resources;

import com.ibatis.sqlmap.client.SqlMapClient;

import com.ibatis.sqlmap.client.SqlMapClientBuilder;

public class ArticleManager {

     /** *//**

      * SqlMapClient instances are thread safe, so you only need one. In this

      * case, we'll use a static singleton. So sue me. ;-)

      */

     private static SqlMapClient sqlMapper;

     /** *//**

      * It's not a good idea to put code that can fail in a class initializer,

      * but for sake of argument, here's how you configure an SQL Map.

      */

     static {

         try {

             Reader reader = Resources.getResourceAsReader("SqlMapConfig.xml");

             sqlMapper = SqlMapClientBuilder.buildSqlMapClient(reader);

             reader.close();

         } catch (IOException e) {

             // Fail fast.

             throw new RuntimeException(

                     "Something bad happened while building the SqlMapClient instance."

                             + e, e);

         }

     }

     /** *//**

      * 查詢列表

      * @return

      * @throws SQLException

      */

     public static List<Article> selectAllArticles() throws SQLException {

         return sqlMapper.queryForList("selectAllArticles");

     }


     /** *//**

      * 插入數據

      * @param article

      * @throws SQLException

      */

     public static void insertArticle(Article article) throws SQLException {

         sqlMapper.insert("insertArticle", article);

     }


     /** *//**

      * 更新數據

      * @param article

      * @throws SQLException

      */

     public static void updateArticle(Article article) throws SQLException {

         sqlMapper.update("updateArticle", article);

     }

     /** *//**

      * 刪除數據

      * @param id

      * @throws SQLException

      */

     public static void deleteArticle(int id) throws SQLException {

         sqlMapper.delete("deleteArticleById", id);

     }


     /** *//**

      * 單查數據

      * @param id

      * @return

      * @throws SQLException

      */

     public static Article queryArticleById(int id) throws SQLException {

         Article article = (Article)sqlMapper.queryForObject("selectArticleById", id);

         return article;

     }

}
寫一個Junit測試類來測試一下吧,代碼如下:
package cn.simple.manager;

import java.sql.SQLException;

import java.util.Date;

import java.util.List;

import org.junit.Test;

import cn.simple.pojo.Article;

public class ArticleManagerTest {

     @Test

     public void testSelectAllArticles() throws SQLException {

         List<Article> list = ArticleManager.selectAllArticles();

         for(Article a : list){

             System.out.println(a.getTitle() + a.getAuthor() + a.getContent() + a.getPubtime());

         }

     }

     @Test

     public void testInsertArticle() throws SQLException {

         for(int i=0; i<10; i++){

             Article article = new Article();

             article.setTitle("title-" + i);

             article.setAuthor("author-" + i);

             article.setContent("content-" + i);

             article.setPubtime(new Date());

             ArticleManager.insertArticle(article);

         }

     }

     @Test

     public void testUpdateArticle() throws SQLException {

         Article article = new Article();

         article.setId(3);

         article.setTitle("title-title");

         article.setAuthor("author-author");

         ArticleManager.updateArticle(article);

     }

     @Test

     public void testDeleteArticle() throws SQLException {

         ArticleManager.deleteArticle(5);

     }

}
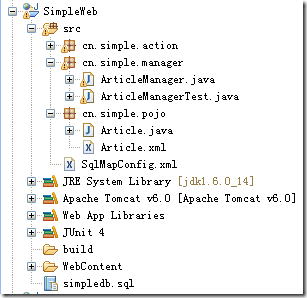
到此,我們的項目文件列表截圖如下:

新聞管理的Model層開發完畢,可以供我們的Action調用了,好,Struts 2.1.6 精簡實例系列教程,敬請大家期待下文!