第七步、編寫Action和JSP。在SpringSide 3.1.4.3中,使用的是Struts 2及 其Convention插件,已經不是前面使用的CodeBehind插件了,關於Convention插 件,這裡要再說幾句,該插件的大部分功能和 CodeBehind相同,唯一讓人有點 迷惑的就是該插件到哪裡尋找Action類的問題,它會根據 struts.convention.package.locators屬性的值來決定,在該項目中,其值為“ web”,之需要查閱一下 struts.xml文件即可知。這說明,Convention會尋找所 有包含“web”這個單詞的包,並在該包及其子包中尋找Action類。這也正是 Action層的包名為personal.youxia.web的原因。
關於SpringSide 3種的Struts的探討,大家可以看看我之前寫的一篇文章 SpringSide 3 中的 Struts 2
ArticleAction的實現思路如下,修改index.jsp,使其重定向到 article.action,該Action默認調用其list方法顯示所有文章,並返回 article.jsp作為其視圖。在該視圖上,有添加文章的連接,點擊該連接則訪問 article!input.action,這時會調用ArticleAction的input方法,並返回 article-input.jsp作為其視圖,在該視圖中輸入文章的內容,點擊保存,調用 article!save.action,這時會調用ArticleAction的save方法以保存數據,如果 要刪除文章,則調用 article!delete.action,這時會調用ArticleAction的 delete方法。在調用以上方法的過程中,會自動調用 prepare系列的方法。
因此,該步驟涉及到三個JSP文件和一個Action類,它們分別是
index.jsp
article.jsp
article-input.jsp
ArticleAction.java
index.jsp的修改很簡單,只是讓項目一啟動後就去訪問ArticleAction,而 不是默認的UserAction。index.jsp的代碼如下:
<% response.sendRedirect("article.action"); %>
這時,重點進入到ArticleAction中,創建該Action,其代碼的框架如下:
package personal.youxia.web;

import personal.youxia.entity.entities.Article;

public class ArticleAction extends  CrudActionSupport<Article> {

     @Override

     public String delete() throws Exception {

         // TODO Auto-generated method stub

         return null;

     }

     @Override

     public String list() throws Exception {

         // TODO Auto-generated method stub

         return null;

     }

     @Override

     protected void prepareModel() throws Exception {

         // TODO Auto-generated method stub

     }

     @Override

     public String save() throws Exception {

         // TODO Auto-generated method stub

         return null;

     }

     public Article getModel() {

         // TODO Auto-generated method stub

         return null;

     }

}
可以看到,該Action從CrudActionSupport類繼承,而CrudActionSupport又 繼承自ActionSupport,並實現了ModelDriven和Preparable接口,這樣Struts 2 的ModelDriven攔截器和Preparable攔截器就會對我們自己的Action發生作用。 CrudActionSupport中的 excute方法默認的實現是調用list方法,所以訪問 article.action就等於訪問ArticleAction的list方法,該方法的目的是為了列 出所有的文章,所以在該方法中使用了ArticleDao的分頁查詢,查詢結果放在一 個page對象中。在Struts 2中,已經沒有了ActionForm的概念,可以直接把 Action對象傳遞到視圖中,為了能夠在視圖中訪問page對象,只需要把page對象 作為 ArticleAction的一個屬性即可。先在ArticleAction.java中加入幾行代碼 :
@Autowired

     private ArticleManager articleManager;

     public void setArticleManager(ArticleManager  articleManager) {

         this.articleManager = articleManager;

     }


     private Page<Article> page = new  Page<Article>(10);


     public Page<Article> getPage() {

         return page;

     }
可以看到該代碼的作用是為了注入ArticleManager和初始化Page對象,此時 list方法的代碼就非常簡單,如下:
@Override

     public String list() throws Exception {

         page = articleManager.getAll(page);

         return SUCCESS;

     }
由於該方法只是簡單獲取一個頁面的Acticle,所以代碼很簡單,使用 articleManager.getAll方法即可。如果要實現復雜的條件查詢,就需要創建一 個包含PropertyFilter對象的列表,然後使用articleManager.search方法進行 查詢,為了簡化 PropertyFilter對象列表的創建,白衣提供了 HibernateWebUtils.buildPropertyFilters()靜態方法供大家使用。
list方法返回的是SUCCESS,因此返回給用戶的視圖頁面為article.jsp,該 頁面應該存放在WEB-INF目錄的content目錄中,這也是Convention插件的一個特 性,這樣用戶就沒有辦法直接訪問到視圖頁面了。在該頁面中,可以通過訪問 page對象來顯示數據,如下:
<%@ page language="java" contentType="text/html;  charset=UTF-8"

     pageEncoding="UTF-8"%>

<%@ include file="/common/taglibs.jsp"%>

<!DOCTYPE html PUBLIC "-//W3C//DTD HTML 4.01  Transitional//EN" "http://www.w3.org/TR/html4/loose.dtd">

<html>

<head>

<meta http-equiv="Content-Type" content="text/html; charset=UTF -8">

<title>Insert title here</title>

</head>

<body>

<table>

     <tr><td><a href="article!input.action">添加文章 </a></td></tr>

     <s:iterator value="page.result">

         <tr>

             <td>${subject}</td>

             <td><a href="article!delete.action?id=${id}">刪除 </a></td>

         </tr>

         <tr>

             <td>${content}</td>

         </tr>

     </s:iterator>

</table>

</body>

</html>
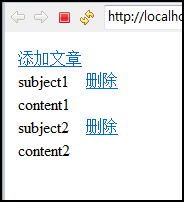
如果數據庫中有初始數據的話,該項目運行效果如下圖:

到目前為止,還沒有涉及到getModel()、prepareModel()、以及prepare系列 的方法,但是,一旦需要添加或者刪除文章,這一系列的方法就有作用了。在 Struts 2中,由於沒有了ActionForm的概念,所有的頁面傳入參數都會被注入到 Action中,如果不想在Action中搞太多的getter和 setter,最有效的方法就是 提供一個Model對象,這時候攔截器會把頁面參數注入到Model中,而在目前的項 目中,沒有比Entity類更適合做 Model對象的了。通過觀察CrudActionSupport 基類,可以發現只有在執行save和input方法之前,才會執行 prepareModel方法 ,該方法可以保證getModel方法返回的對象不是一個空指針,而調用delete方法 之前Model對象沒有初始化,但是delete方法只需要一個id作為參數,因此,可 以在Action中增加一個id屬性來滿足要求。這時候,有改動的幾行代碼如下:
private Long id;

     private Article article;

     public void setId(Long id) {

         this.id = id;

     }

     @Override

     protected void prepareModel() throws Exception {

         if (id != null) {

             article = articleManager.get(id);

         } else {

             article = new Article();

         }

     }

     public Article getModel() {

         return article;

     }

     @Override

     public String delete() throws Exception {

         articleManager.delete(id);

         return RELOAD;

     }
這裡需要特別關注的是delete方法返回的值,為RELOAD,這是一個在基類中 定義好了的字符串。返回該字符串的目的,是為了在delete 方法執行完之後, 不返回任何視圖頁面,而是以redirect的方式再次調用article.action,以便顯 示刪除文章後的結果。因此,需要在 ArticleAction中使用@Result注解,如下 :
@Results( { @Result(name = CrudActionSupport.RELOAD, location = "article.action", type = "redirect") })
經過如上修改,這時候再運行應用,就發現能夠刪除文章了。
再來實現添加文章的功能,從上面的article.jsp中可以看出,添加文章的鏈 接為article!input.action,此時,會運行 ArticleAction的input方法,該方 法只是簡單返回article-input.jsp視圖文件作為用戶輸入文章的接口, article- input.jsp的代碼如下:
<%@ page language="java" contentType="text/html; charset=UTF-8"
pageEncoding="UTF-8"%>
<!DOCTYPE html PUBLIC "-//W3C//DTD HTML 4.01 Transitional//EN" "http://www.w3.org/TR/html4/loose.dtd">
<html>
<head>
<meta http-equiv="Content-Type" content="text/html; charset=UTF -8">
<title>Insert title here</title>
</head>
<body>
<form id="inputForm" action="article!save.action" method="post">
<table class="inputView">
<tr>
<td>主題:</td>
<td><input type="text" name="subject" size="40" id="subject" /></td>
</tr>
<tr>
<td>內容:</td>
<td><textarea name="content" id="subject"></textarea></td>
</tr>
<tr>
<td colspan="2">
<input type="submit" value="提交" />
<input type="button" value="取消" onclick="history.back ()"/>
</td>
</tr>
</table>
</form>
</body>
</html>
而ArticleAction中只需要修改如下幾行,由於ModelDriven攔截器已經把網 頁中傳入的數據注入到了article對象中,所以save方法中只需要執行簡單的保 存操作即可:
@Override

     public String input() throws Exception {

         return INPUT;

     }


     @Override

     public String save() throws Exception {

         articleManager.save(article);

         return RELOAD;

     }
至於實現文章的修改功能,那也是通過input方法和save方法實現的,只不過 此時網頁參數中會包含一個有效的id,而prepare系列的方法會根據該id先從數據庫中提取數據,然後顯示在article-input.jsp中,用戶修改後,再調用save 方法保存到數據庫中。為減少本博文長度,該功能此處不做示范。
通過上面的步驟可以發現,使用SpringSide 3中推薦的CRUD一體的模式,可 以有效減少Action的數量和JSP文件的數量,每實現一個增刪查改功能,只需要 一個Action和兩個JSP,但是,程序員一定要對其中的數據流向有充足的認識, 才能理清它們之間的關系,不至於暈頭轉向。
到這裡大家會發現,ArticleAction誰都可以訪問,一點都不安全,所以第八 步我會探討如何讓ArticleAction和SpringSecurity一起工作,至於第九步,當 然是把項目從單數據庫環境更改到多數據庫環境了。具體內容,且看下回分解!