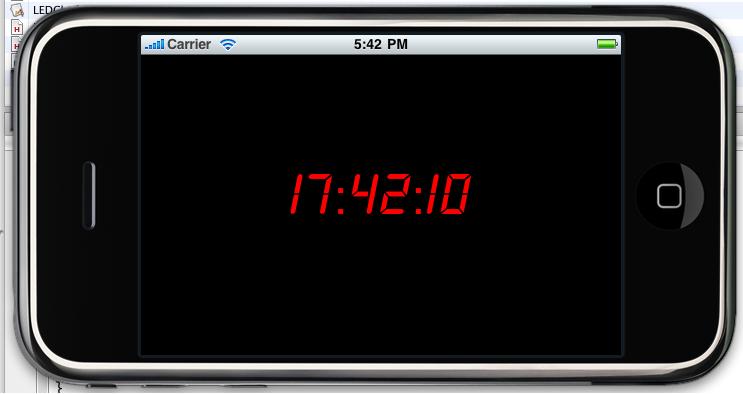
在我們的iphone上如果有一個LED顯示的電子時鐘會有一種特別的感覺吧,呵呵。
首先,我們打開Xcode,點擊File→New Project,選擇iPhone OS→Application,在這裡我們選擇View-based Application模版(我們的整個應用程序只有一個視圖),點選Choose之後保存為LEDClick工程(默認整個工程會保存在/Users/當前登陸用戶名/Documents下面)。之後點擊OK就創建了了整個目錄。
我們來看Groups&Files窗體,它分類顯示了項目中的所有的信息。下面我們來進行具體的程序編寫。對於我們來說,整個程序只有一個輸出口(IBOutlet),我們會將當前的時候通過這個輸出口顯示出來。整個程序用到的主要有時間控制函數與計時器。
打開Classes文件夾中的LEDClockAppDelegate.h文件,這是一個應用程序委托的頭文件,我們在其中添加一個NSTimer類的引用對象聲明,同時添加一個無返回值的函數onInterval來實現時鐘應用的計時功能,每隔一秒鐘進行一次時鐘計時.
Java代碼
//

// LEDClockAppDelegate.h

// LEDClock

//

// Created by blessdyb on 09-9-5.

// Copyright mobroad.com 2009. All rights reserved.

//


#import <UIKit/UIKit.h>


@class LEDClockViewController;


@interface LEDClockAppDelegate : NSObject <UIApplicationDelegate> {

UIWindow *window;

LEDClockViewController *viewController;

NSTimer *timer;

}


@property (nonatomic, retain) IBOutlet UIWindow *window;

@property (nonatomic, retain) IBOutlet LEDClockViewController *viewController;


-(void) onInterval;


@end
之後進入委托程序的實現文件LEDClockAppDelegate.h中(如果你是在LEDClockAppDelegate.h中,那點擊option+command+↑,就可以直接跳轉到相應的實現文件中)。
Objective-c代碼
//

// LEDClockAppDelegate.m

// LEDClock

//

// Created by blessdyb on 09-9-5.

// Copyright mobroad.com 2009. All rights reserved.

//


#import "LEDClockAppDelegate.h"

#import "LEDClockViewController.h"


@implementation LEDClockAppDelegate


@synthesize window;

@synthesize viewController;


- (void)applicationDidFinishLaunching:(UIApplication *)application {


timer=[NSTimer scheduledTimerWithTimeInterval:(1.0) target:self selector:@selector(onInterval) userInfo:nil repeats:YES];

[window addSubview:viewController.view];

[window makeKeyAndVisible];

}


-(void) onInterval{

[viewController interval];

}


- (void)dealloc {

[timer release];

[viewController release];

[window release];

[super dealloc];

}


@end
下面我們進行控制器類的編程實現。首先來看它的頭文件,雙擊LEDClockViewController.h文件,我們在這裡完成輸入口的定義。由於我們的LED電子時鐘是在一個標簽上顯示的,所以我們在這裡聲明一個UILabel的實例做為控制器類的屬性,同時聲明一個interval的無返回值方法(這下知道剛才委托類中的調用是怎麼回事了吧)。
Objective-c代碼
//

// LEDClockViewController.h

// LEDClock

//

// Created by blessdyb on 09-9-5.

// Copyright mobroad.com 2009. All rights reserved.

//


#import <UIKit/UIKit.h>


@interface LEDClockViewController : UIViewController {

IBOutlet UILabel *timerLabel;

}


@property (nonatomic, retain) UILabel *timerLabel;


-(void) interval;


@end
下面進入控制器類的實現文件中對剛才的定義進行實現,雙擊LEDClockViewController.m,我們首先需要設置整個程序視圖加載時時鐘顯示標簽的字體,大小及初始化文本。這樣,在計時器開始運行後,我們只需要每過一秒種改變顯示標簽的文本值就可以了。
Objective-c代碼
//

// LEDClockViewController.m

// LEDClock

//

// Created by blessdyb on 09-9-5.

// Copyright mobroad.com 2009. All rights reserved.

//


#import "LEDClockViewController.h"


@implementation LEDClockViewController


@synthesize timerLabel;


-(void) interval{

NSUInteger unitFlags=NSHourCalendarUnit | NSMinuteCalendarUnit | NSSecondCalendarUnit;

NSCalendar *calendar=[[NSCalendar alloc] initWithCalendarIdentifier:NSGregorianCalendar];

NSDate *date=[NSDate date];

NSDateComponents *now=[calendar components:unitFlags fromDate:date];

int hour=[now hour];

int minute=[now minute];

int second=[now second];

[timerLabel setText:[NSString stringWithFormat:@"%02d:%02d:%02d",hour,minute,second]];

[calendar release];

}


/*

// The designated initializer. Override to perform setup that is required before the view is loaded.

- (id)initWithNibName:(NSString *)nibNameOrNil bundle:(NSBundle *)nibBundleOrNil {

if (self = [super initWithNibName:nibNameOrNil bundle:nibBundleOrNil]) {

// Custom initialization

}

return self;

}

*/


/*

// Implement loadView to create a view hierarchy programmatically, without using a nib.

- (void)loadView {

}

*/


// Implement viewDidLoad to do additional setup after loading the view, typically from a nib.

- (void)viewDidLoad {

[timerLabel setFont:[UIFont fontWithName:@"DBLCDTempBlack" size:50.0]];

[timerLabel setText:@"電子時鐘"];

[super viewDidLoad];

}


// Override to allow orientations other than the default portrait orientation.

- (BOOL)shouldAutorotateToInterfaceOrientation:(UIInterfaceOrientation)interfaceOrientation {

// Return YES for supported orientations

//return (interfaceOrientation == UIInterfaceOrientationPortrait);

return YES;

}


- (void)didReceiveMemoryWarning {

// Releases the view if it doesn't have a superview.

[super didReceiveMemoryWarning];


// Release any cached data, images, etc that aren't in use.

}


- (void)viewDidUnload {

// Release any retained subviews of the main view.

// e.g. self.myOutlet = nil;

}


- (void)dealloc {

[timerLabel release];

[super dealloc];

}


@end
接著我們需要完成程序的界面設計及元素連接,我們來看Resources目錄下的文件,這裡有三個文件,一個是LEDClockViewController.xib,一個是MainWindow.nib(主要是讓應用程序委托、主窗口和視圖控制器實例在運行時創建),還有一個LEDClock-info.plist(應用程序的各種參數配置)文件。
雙擊LEDClockViewController.xib文件,之後會默認打開Interface Builder,我們會看到一個文件管理器窗口,其中有File’s Owner,First Responder 及View.雙擊View圖標後會出現一個窗口,這就是我們應用程序在運行時最終被加載的視圖,我們在菜單欄選取Tools→Inspector,之後就會出現一個View Attributes的窗口,在裡面可以編輯視圖的各種屬性,在這裡我們讓它的背景(Background)為黑色。之後再選取Tools→Library,打開庫面板,我們在Library中找到Label控件,用鼠標選中後拖放到剛才打開的View窗口中,同樣打開屬性選擇器後更改當前Label控件的大小及字體色彩,在這裡我們設置它的色彩為紅色。
最後是整個程序最重要的一個步驟,元素的連接,我們選中xib窗口中的File’s Owner圖標,同時按住Ctrl按鍵後往視圖上的Label控件方向拖動,此時會出現一根藍色的線條,當這根線條到達Label控件後Label控件變為選中狀態,之後就會出現一個Outlets框,選中timerLabel後單擊就可以完成了。(這個步驟完成了後可以先選中Label控件後點Tools→Connections Inspector後會看到彈出的窗口中的Referencing Outlets中出現一個連接項)。
這樣整個程序就編寫完成。我們選擇Xcode中的Run後打開iPhone模擬器就可以看到整個程序的運行結果了。
