JavaWeb Spring注解Annotation深刻進修。本站提示廣大學習愛好者:(JavaWeb Spring注解Annotation深刻進修)文章只能為提供參考,不一定能成為您想要的結果。以下是JavaWeb Spring注解Annotation深刻進修正文
1、注解
注解Annotation,是一品種似正文的機制,在代碼中添加注解可以在以後某時光應用這些信息。跟正文分歧的是,正文是給我們看的,java虛擬機不會編譯,注解也是不編譯的,然則我們可以經由過程反射機制去讀取注解中的信息。注解應用症結字@interface,繼續java.lang.annotition.Annotition
1、javaSE中的注解
先舉個例子往返顧一下在javaSE中注解是甚麼東東,症結是兩點,注解的界說與若何經由過程反射獲得注解下面的信息。
1.先界說兩個注解一個是在類上有注解ClassInfo,一個是在辦法上有注解為MethodInfo.
ClassInfo
package com.itheima10.annotation;

import java.lang.annotation.Documented;
import java.lang.annotation.ElementType;
import java.lang.annotation.Retention;
import java.lang.annotation.RetentionPolicy;
import java.lang.annotation.Target;

@Target(ElementType.TYPE) //該注解可以用於類上
@Retention(RetentionPolicy.RUNTIME) //在java,class文件和運轉時注解都起感化
@Documented //能生成在贊助文檔中
public @interface ClassInfo {
 /**
  * 該注解有兩個String類型的屬性
  * @return
  */
 String name() default "";
 String value() default "";
}
MethodInfo
package com.itheima10.annotation;

import java.lang.annotation.Documented;
import java.lang.annotation.ElementType;
import java.lang.annotation.Retention;
import java.lang.annotation.RetentionPolicy;
import java.lang.annotation.Target;

@Target(ElementType.METHOD) //該注解可以用於辦法上
@Retention(RetentionPolicy.RUNTIME) //在java,class文件和運轉時注解都起感化
@Documented //能生成在贊助文檔中
public @interface MethodInfo {
 /**
  * 該注解有兩個String類型的屬性
  */
 String name() default "";
 String value() default "";
}
2.寫一個類AnnotationUse來應用下面界說的注解
package com.itheima10.annotation;

@ClassInfo(name="小平果118",value="牛")
public class AnnotationUse {
 @MethodInfo(name="java",value="spring框架很主要")
 public void java(){

 }
}
3.編寫測試類AnnotationTest,解析上述兩個注解下面的屬性
package com.itheima10.annotation;

import java.lang.reflect.Method;

import org.junit.Test;

public class AnnotationTest {
 public static void test(){
  /**
   * 假如解析類的注解,先獲得Class
   * 假如解析辦法的注解,先獲得method
   */
  Class class1 = Itheima10.class;
  //斷定類下面能否有ClassInfo注解
  if(class1.isAnnotationPresent(ClassInfo.class)){
   //獲得類下面的注解
   ClassInfo classInfo = (ClassInfo)class1.getAnnotation(ClassInfo.class);
   System.out.println(classInfo.value());
   System.out.println(classInfo.name());
  }

  Method[] methods = class1.getMethods();
  for (Method method : methods) {
   //正在遍歷的辦法下面能否存在MethodInfo注解
   if(method.isAnnotationPresent(MethodInfo.class)){
    MethodInfo methodInfo = method.getAnnotation(MethodInfo.class);
    System.out.println(methodInfo.name());
    System.out.println(methodInfo.value());
   }
  }
 }

 @Test
 public void test(){
  AnnotationTest.test();
 }
}
2、spring中的注解
spring框架為我們供給了注解功效。
應用注解編程,重要是為了替換xml文件,使開辟加倍疾速。然則,xml文件的應用就是處理修正法式修正源代碼,如今又不去應用xml文件,那末不就違反了開閉准繩了麼,得確是。不外麼,注解也有注解的好,應用注解就不消設置裝備擺設那末多的xml文件啦,最主要的是開辟效力高。。
在沒有應用注解時,spring框架的設置裝備擺設文件applicationContext.xml文件中須要設置裝備擺設許多的<bean>標簽,用來聲明類對象。應用注解,則不用在設置裝備擺設文件中添加標簽拉,對應的是在對應類的“正文”地位添加解釋。詳細引見以下:
•1.@Resource 對象間關系的組合,默許采取的是按稱號方法停止拆卸,假如依據稱號查找不到聯系關系的對象,那末會再采取按類型持續查找。假如沒有指定name屬性,
• 當注解標注在字段上,即默許取字段的稱號作為bean稱號尋覓依附對象
• 當注解標注在屬性的setter辦法上,即默許取屬性名作為bean稱號尋覓依附對象。
• 留意:假如沒有指定name屬性,而且依照默許的稱號找不到依附對象時, @Resource注解會回退到按類型拆卸。但一旦指定了name屬性,就只能按稱號拆卸了。
•2. @Autowired
@Autowired 默許按類型拆卸,@Resource默許按稱號拆卸,當找不到與稱號婚配的bean才會按類型拆卸。 解是按類型拆卸依附對象,默許情形下它請求依附對象必需存在,假如許可null值,可以設置它required屬性為false。
•3、 @Qualifier
假如我們想應用按稱號拆卸,可以聯合@Qualifier注解一路應用。
1、應用注解,須要在設置裝備擺設文件中增長定名空間和束縛文件步調:
引入context定名空間
<beans xmlns="http://www.springframework.org/schema/beans"
xmlns:xsi="http://www.w3.org/2001/XMLSchema-instance"
xmlns:context="http://www.springframework.org/schema/context"
...
http://www.springframework.org/schema/context/spring-context-2.5.xsd">
2、 在設置裝備擺設文件中參加context:annotation-config標簽
<context:annotation-config></context:annotation-config>
實例演示:
編寫一個Person類,個中有一個student屬性,和一個say()辦法,代碼以下
package com.itheima10.spring.di.annotation;

import javax.annotation.Resource;

import org.springframework.beans.factory.annotation.Autowired;
import org.springframework.beans.factory.annotation.Qualifier;

/**
 * @Autowired//依照類型停止婚配
 *
 * @Autowired//依照類型停止婚配
 @Qualifier("student")
 *
 */
public class Person {
 @Resource(name="student")
 private Student student;

 public void say(){
  this.student.say();
 }
}
Student類代碼以下
package com.itheima10.spring.di.annotation;

public class Student {
 public void say(){
  System.out.println("student");
 }
}
設置裝備擺設applicationContext.xml文件
<?xml version="1.0" encoding="UTF-8"?>
<beans xmlns="http://www.springframework.org/schema/beans"
  xmlns:context="http://www.springframework.org/schema/context"
  xmlns:xsi="http://www.w3.org/2001/XMLSchema-instance"
  xsi:schemaLocation="http://www.springframework.org/schema/beans
   http://www.springframework.org/schema/beans/spring-beans-2.5.xsd
   http://www.springframework.org/schema/context
   http://www.springframework.org/schema/context/spring-context-2.5.xsd">
 <!--
  把person和student放入到spring容器中
  -->
 <bean id="person" class="com.itheima10.spring.di.annotation.Person"></bean>
 <bean id="student" class="com.itheima10.spring.di.annotation.Student"></bean>
 <!--
  引入context定名空間
   xmlns:context="http://www.springframework.org/schema/context"
   http://www.springframework.org/schema/context
   http://www.springframework.org/schema/context/spring-context-2.5.xsd"
  -->
  <!--
  啟動了以來注入的注解解析器
  -->
  <context:annotation-config></context:annotation-config>
</beans>
編寫測試類AnnotationTest
package com.itheima10.spring.di.annotation;

import org.junit.Test;
import org.springframework.context.ApplicationContext;
import org.springframework.context.support.ClassPathXmlApplicationContext;

/**
 * 道理:
 * 1、啟動spring容器
 * 2、把person和student兩個bean實例化
 * 3、當spring容器解析到
 *   <context:annotation-config></context:annotation-config>
 *  就會啟動依附注入的注解解析器
 * 4、spring容器會在歸入spring治理的bean的規模外調找,看這些類的哪些屬性上加有@Resource注解
 * 5、假如某一個屬性上加有@Resource注解
 *   會檢查該注解的name屬性的值能否為""
 *    假如為"",則會把該注解地點的屬性的稱號和spring容器中的id的值作婚配,假如婚配勝利,則賦值
 *     假如婚配不勝利,則依照類型停止婚配,婚配勝利則賦值
 *       假如再婚配不勝利,則報錯
 *    假如不為"",則把該注解的name屬性的值和spring容器中id的值作婚配,假如婚配勝利,則賦值
 *     假如婚配不勝利,則直接報錯
 *
  解釋:
   注解只能感化於援用類型
   xml與注解的比較
    xml的效力比擬高,書寫比擬費事
     注解的書寫比擬簡略,效力比擬低
 *
 */
public class AnnotationTest {
 @Test
 public void testAnnotation(){
  ApplicationContext context =
     new ClassPathXmlApplicationContext("applicationContext.xml");
  Person person = (Person)context.getBean("person");
  person.say();
 }
}
假如應用注解,就不須要在設置裝備擺設文件中裝載person和student了,如許便可以簡化設置裝備擺設文件的編寫。
3、 掃描
後面的例子我們都是應用XML的bean界說來設置裝備擺設組件。在一個稍年夜的項目中,平日會有上百個組件,假如這些組件采取xml的bean界說來設置裝備擺設,明顯會增長設置裝備擺設文件的體積,查找及保護起來也不太便利。spring2.5為我們引入了組件主動掃描機制,它可以在類途徑底下尋覓標注了@Component、@Service、@Controller、@Repository注解的類,並把這些類歸入進spring容器中治理。它的感化和在xml文件中應用bean節點設置裝備擺設組件是一樣的。要應用主動掃描機制,我們須要翻開以下設置裝備擺設信息:
1、引入context定名空間
在xml設置裝備擺設文件中添加context:component-scan標簽
個中base-package為須要掃描的包(含子包)。
實例:
將上述實例用掃描的方法書寫以下
@Component
public class Person {
 @Resource(name="student")
 private Student student;

 public void say(){
  this.student.say();
 }
}

@Component
public class Student {
 public void say(){
  System.out.println("student");
 }
}
applicationContext.xml只需設置裝備擺設一句話
 <!--
  component 組件
   把一個類放入到spring容器中,該類就稱為組件
   在base-package指定的包及子包下掃描
  -->
  <context:component-scan base-package="com.itheima10.spring.scan"></context:component-scan>
編寫測試類AnnotationTest
/**
 * 道理
 * 1、啟動spring容器
 * 2、spring容器解析
 *  <context:component-scan base-package="com.itheima10.spring.scan">
   </context:component-scan>
  3、在base-package指定的包及子包中掃描,看哪些類下面能否含有@Component注解
  4、假如有該注解
  @Component
  public class Person {
  }
  ==等價於
  <bean id="person" class="..Person">
  @Component("aa")
  public class Person {
  }
  ==等價於
  <bean id="aa" class="..Person">
  5、依照@Resource的解析步調履行
 解釋:
   全部進程掃描兩次,效力愈來愈低,書寫愈來愈簡略
 *
 *
 */
public class AnnotationTest {
 @Test
 public void testAnnotation(){
  ApplicationContext context =
     new ClassPathXmlApplicationContext("applicationContext.xml");
  Person person = (Person)context.getBean("person");
  person.say();
 }
}
實例再現
我們將Item51中最初的文檔治理體系用注解的方法改一下,Document接口不變,有read和write辦法,完成類分離以下ExcelDocument ,PDFDocument ,WordDocument 。
@Component("excelDocument")
public class ExcelDocument implements Document{

 public void read() {
  System.out.println("excel read");
 }
 public void write() {
  System.out.println("excel write");
 }

}

@Component("pdfDocument")
public class PDFDocument implements Document{

 public void read() {
  System.out.println("pdf read");
 }
 public void write() {
  System.out.println("pdf write");
 }

}

@Component("wordDocument")
public class WordDocument implements Document{

 public void read() {
  System.out.println("word read");
 }
 public void write() {
  System.out.println("word write");
 }

}
DocumentManager
@Component("documentManager")
public class DocumentManager {
 @Resource(name="excelDocument")
 private Document document;

 public void read(){
  this.document.read();
 }

 public void write(){
  this.document.write();
 }
}
設置裝備擺設文件
<context:component-scan base-package="com.itheima10.spring.iocdi.document">
</context:component-scan>
編寫測試類DocumentTest
public class DocumentTest {
 @Test
 public void testDocument(){
  ApplicationContext context = new ClassPathXmlApplicationContext("applicationContext.xml");
  DocumentManager documentManager = (DocumentManager)context.getBean("documentManager");
  documentManager.read();
  documentManager.write();
 }
}
2、其他注解功效引見
@Service用於標注營業層組件、辦事層注解
@Controller用於標注掌握層組件(如struts中的action)、掌握層注解
@Repository用於標注數據拜訪組件,即DAO組件。耐久層注解
而@Component泛指組件,當組件欠好歸類的時刻,我們可使用這個注解停止標注。
實例重現–MVC案例
我們再次回想Item51中的MVC案例,分離將PersonDaoImpl ,PersonAction ,PersonServiceImpl 的Dao,Service,Action層加上注解有
@Repository("personDao")
public class PersonDaoImpl implements PersonDao {
 @Override
 public void savePerson() {
  System.out.println(" save person");
 }
}

@Service("personService")
public class PersonServiceImpl implements PersonService{
 @Resource(name="personDao")
 private PersonDao personDao;

 public void setPersonDao(PersonDao personDao) {
  this.personDao = personDao;
 }
 @Override
 public void savePerson() {
  this.personDao.savePerson();

 }

}

@Controller("personAction")
public class PersonAction {
 @Resource(name="personService")
 private PersonService personService;

 public void setPersonService(PersonService personService) {
  this.personService = personService;
 }

 public void savePerson(){
  this.personService.savePerson();
 }
}
編寫測試MVCTest
public class MVCTest {
 @Test
 public void testMVC(){
  ApplicationContext context =
     new ClassPathXmlApplicationContext("applicationContext.xml");
  PersonAction personAction = (PersonAction)context.getBean("personAction");
  personAction.savePerson();
 }
}
4. spring中的繼續
Spring支撐繼續,可以分為類繼續和屬性繼續
1. 類繼續
Spring屬性:
(1)abstract: 假如設置為true,表現界說的bean是籠統的,告知spring不要實例化這個bean;
成績:必需是籠統類麼?可以不是籠統類麼?
(2)parent: 指明bean的id,對bean的感化,相當於extends關於java類的感化;
場景:有三個Bean:
 <bean id = "bean1" class = "……TestBean">
  <property name="sex" value="male"/>
 </bean>
 <bean id = "bean2" class = "……TestBean">
  <property name="sex" value="male"/>
 </bean>
 <bean id = "bean3" class = "……TestBean">
  <property name="sex" value="female"/>
 </bean>
修正:界說spring 父bean
 <bean id ="BaseBean" class ="……TestBean">
  <property name="sex" value="male"/>
 </bean>
界說子Bean
 <bean id ="bean1" parent = "BaseBean"/>  繼續父Bean的屬性
 <bean id ="bean2" parent = "BaseBean"/>
 <bean id ="bean3" parent = "BaseBean">  籠罩父Bean的屬性
  <property name="sex" value="female"/>
 </bean>
子bean可以繼續父Bean的屬性,也能夠籠罩父Bean的屬性
2. 屬性繼續
幾個分歧Bean之間存在雷同的屬性,可以抽離出來
場景:
<bean id = "bean1" class = "……ATestBean">
 <property name="sex" value="male"/>
 <property name="task" ref="task"/>
</bean>
<bean id = "bean2" class = "……BTestBean">
 <property name="sex" value="male"/>
</bean>
修正:(1) 抽取公共屬性
 <bean id = "baseSex" abstract="true">
  <property name="sex" value="male"/>
 </bean>
(2)bean修正
 <bean id = "bean1" class = "……ATestBean" parent="baseSex">
  <property name="task" ref="task"/>
 </bean>
 <bean id = "bean2" class = "……BTestBean" parent="baseSex"/>
這裡bean同時有parent和class屬性,個中parent指向的baseSex,就是為了讓分歧Bean之間同享雷同的屬性值;在TransactionProxyFactoryBean聲明營業時,Bean屬性繼續可以或許顯著的削減冗余的xml設置裝備擺設。
基於注解的繼續無須要parent屬性。
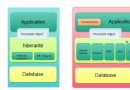
最初上一張小小的總結圖吧
以上就是本文的全體內容,願望對年夜家的進修有所贊助,也願望年夜家多多支撐。