This tutorial shows how to configure the IDE to work with existing Java™ 2, Micro Edition Platform (J2ME™ Platform) MIDP projects and, specifically, how to use the NetBeans™ IDE's built-in solution to the device fragmentation problem. Following this tutorial from start to finish will illustrate the following:
How to port an existing fragmented MIDP project to NetBeans
How to use the IDE's built-in device fragmentation solution
The example program this tutorial uses is the popular J2ME game "Marv The Miner," which was released under GPL and written to run on several different mobile platforms.
This tutorial should take approximately two hours to complete and covers the following topics:
Import sources from an existing MIDP project.
Create and customize project configurations for each distribution Jar.
Mark pIEces of source code as being specific to each configuration.
Build several distribution Jars for the project.
Use external emulators from within the IDE.
To follow this tutorial you need the MarvTheMiner_120_all.zip file, which contains the original source files of the program. Click here and download "Marv the Miner v1.2.0 (including level editor)" to obtain the source files.
Setting Up Your Environment
Obtaining and Installing the Required Software
Starting the IDE
Obtaining the Required Source Files
Developing the Marv The Miner Application in NetBeans
Import Existing Sources
Creating Project Configurations
Customize Project Settings for Configurations
Create Custom Code Blocks for each Configuration
Building and Executing the Marv the Miner Application
Exploring Configurations Further
Using Non-UEI compliant Emulator Platforms
Setting Up Your Environment
This section describes how to set up your system before starting the tutorial.
Obtaining and Installing the Required Software
The following software is required for the example:
The NetBeans™ Integrated Development Environment (IDE) with the NetBeans Mobility Pack 4.0 Beta 2 or FCS.
You can obtain this software from the NetBeans download site: http://www.Netbeans.info/downloads/index.PHP
Java™ 2 Software Development Kit, Standard Edition (J2SE™ SDK), v. 1.4.2 or higher
You can obtain the J2SE SDK from http://Java.sun.com/J2SE/downloads.Html
J2ME™ Wireless Toolkit 2.0 or higher
The J2ME Wireless Toolkit is installed with the NetBeans Mobility Pack. You also can obtain the Wireless Toolkit from http://Java.sun.com/products/J2MEwtooklit/index.Html.
Nokia SerIEs 60 SDKs for SymBian OS
The SDK can be obtained at http://www.forum.nokia.com/main/0,6566,034-483,00.Html
SDK for one or more of the following: Nokia Series 40, Nokia Series 80, Nokia SerIEs 90, Motorola SDK4.1 for J2ME GA, Vodafone
You can obtain Motorola SDK4.1 for J2ME GA from http://www.motocoder.com/motorola/pcsHome.JSP?node_name=SDK (registration required)
You can obtain Nokia SDKs from http://www.forum.nokia.com/main/1,6566,030,00.Html. Select Java in the "VIEw tools by technology area" drop down box.
The Vodafone SDK is available only to Global Partners, and can not be obtained via simple online registration.
Use the instructions provided at the download sites to install the software.
Starting the IDE
To start the NetBeans IDE:
On Microsoft Windows
Choose Start > Programs > NetBeans version > NetBeans IDE.
On UNIX, or Linux environments
In a terminal window, type sh IDE-install-path/bin/runide.sh
The IDE-install-path variable stands for the path to the IDE's home directory.
Obtaining the Required Source Files
The MarvTheMiner_120_all.zip file contains the source files of the original Marv The Miner application. The zip includes a MarvTheMiner directory, which contains the src and res subdirectorIEs that you will use in this tutorial.
To unzip the MarvTheMiner_120_all.zip file:
In your file system, create a temporary location for the contents of MarvTheMiner_120_all.zip.
For example, this tutorial refers to this directory as the C:temp directory.
Use an application that unzips files to unzip the MarvTheMiner_120_all.zip file to the temp directory.
The temp directory now has a MarvTheMiner directory, which contains the following files and subdirectorIEs:
File or Subdirectory Description src The source files which make up the Marv The Miner program. res Contains the resource files used by the program. This includes graphics as well as .map files which are used to define the game level's layouts. MarvEditor A level editor (outside the scope of this tutorial). Nokia.full A Nokia build of the game. MIDP.full A generic MIDP build of the game.
Move the res directory to C:/temp/MarvTheMiner_120_all/src/. This is a small work-around to make sure the resource files maintain the correct relative pathoncewecreate a new NetBeans project.
Developing the Marv The Miner Application in NetBeans IDE
In this section, you set up and work with the existing project sources within the NetBeans IDE.
Import existing sources
Creating the Project
The first step is to create a new project in the NetBeans IDE.
Choose File > New Project from the main menu.
The New Project wizard is displayed.
In the CategorIEs list select Mobile. Then select Mobile Project from Existing MIDP Sources and click Next.
If you did not install NetBeans using the installer, you are shown a panel here instructing you to install a mobile platform. Follow the instructions and install some version of the Wireless Toolkit. Then click next.
For the Imported Sources Location, click the Browse button and navigate to C:/temp/MarvTheMiner_120_all/src directory that you created when you unzipped the MarvTheMiner_120_all.zip file. Select the src directory, and click Open. Click Next.
Enter a name for your New Project. For example, name it MarvTheMiner.
Now select a directory where the new project directory should reside. Make sure the Set as Main Project check box is enabled, and click Finish.
A new project, MarvTheMiner, is created and displayed in the IDE's Projects tab.
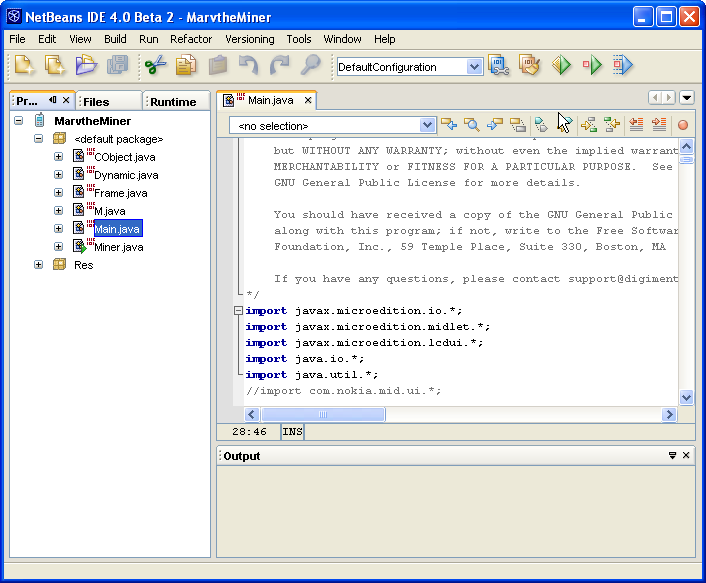
Expand the MarvTheMiner root project node to see the project's sources and resources. Expand the <default package> node and then double click on Main.Java to open that file in the editor.

Creating Project Configurations
The NetBeans device fragmentation solution is based on the use of project configurations. A project should have one project configuration for each distribution Jar/Jad you would like created for that project.
If you examine the file Main.Java, you will see that the the authors support multiple platforms with a combination of comments (for Nokia's FullCanvas) and Class.forname(). They also define a variable vendor that is used to track on which phone the application is running. Based on this information, you can see that they are supporting five different groups of phones:
Nokia SerIEs 60
Other Nokia
Motorola
Vodafone
Other
As such, you will create four configurations to handle differences between these distributions.
Creating a Configuration
Right-click on the MarvTheMiner project node and select PropertIEs.
This opens the Project PropertIEs page that is used to control most ASPects of the project.
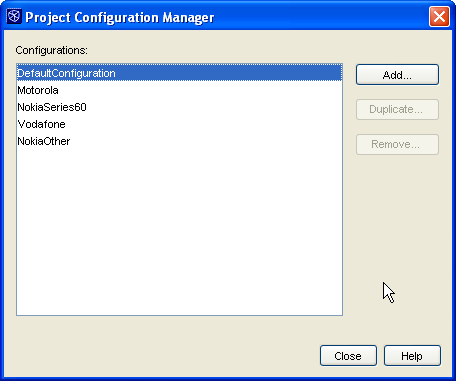
Click the Manage Configurations button at the top of the page. This opens the Manage Configurations dialog.
Click Add and then type NokiaSerIEs60 and press OK.
Repeat the previous step for Motorola, Vodafone, and NokiaOther. Click Close to close the Manage Configuration dialog.

The Project Configuration combo box at the top of the Project PropertIEs page should now contain five configurations. We will use these configurations in a moment, but for now lets add some emulators into the IDE.
Adding Emulators to the IDE
To run the project using the emulator platforms you have installed on your computer, you must first register them with the IDE.
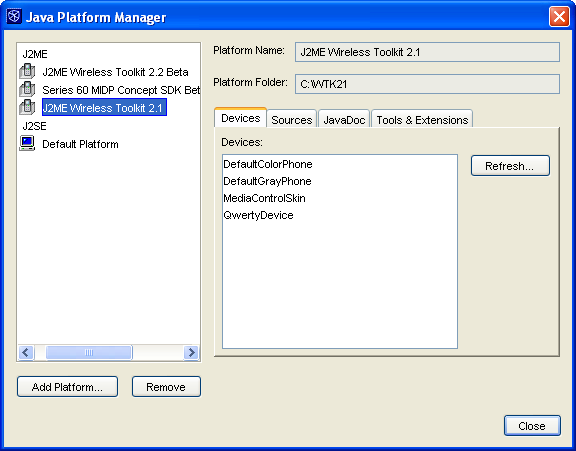
Select DefaultConfiguration in the Project Configuration combo, and then select the Platform node. Click the Manage Emulators button. The Platform Manager dialog appears.
Note that this dialog can also be Accessed from the main menu at Toeols>Java Platform Manager.
Click Add Platform and navigate to the directory where you installed your Nokia SerIEs 60 emulator. Click Next.
Ensure that the emulator settings were detected correctly, and then click Next.
Here you can point to the source and Javadoc files for the emulator if you want. Otherwise just hit Finish to complete the installation of the platform.
Repeat these steps for each emulator platform you have installed on your Machine and that you want to use from within the IDE.

Note that only emulators that comply with UEI standards will be detectable by the IDE. Unfortunately, this means that the Motorola 7.5 emulator that the developers used for Marv The Miner can not be detected. A later section in the tutorial will explain a work-around for using non-UEI emulators from within the IDE.
Customizing Project Settings for Configurations
Each panel in the Project PropertIEs page can be customized separately for each project configuration. By default, configurations will use the settings defined in the default configuration.
Open the Project PropertIEs page and select the Platform panel. Make sure DefaultConfiguration is selected in the Project Configuration combo box.
Select J2ME Wireless Toolkit 2.x in the Emulator Platform combo box. Toggle the radio buttons to CLDC-1.0 and MIDP-2.0.
By default, all configurations will use this emulator for building and executing the project. This isn't what we want, however, as the code references several platform-specific librarIEs.
Select the NokiaSerIEs60 configuration from the Project Configuration combo.
The Platform panel is now entirely grayed out. This is because we are currently using the values from DefaultConfiguration for this panel.
Uncheck the Use Values from "DefaultConfiguration" check box at the top of the panel.
All elements in the panel should now be enabled. Select the SerIEs 60 MIDP Concept SKD Beta 0.3.1 Nokia platform from the Emulator Platform combo box.
If you toggle between the each configuration, you'll see that all are now using the value specified in DefaultConfiguration except for the NokiaSeries60 configuration. If you change any of the configuration settings in the DefaultConfiguration Platform panel, the changes will propagate to all configurations except NokiaSerIEs60.
Select the NokiaOther configuration in the Project Configuration combo box. Uncheck the Use Values from "Default Configuration" checkbox and select one of the other Nokia platforms you installed.
Repeat these steps for the Vodafone platform as well.
As mentioned above, the Motorola 7.5 emulator is not UEI-compliant and could therefore not be installed into the IDE. However, we can still point to its APIs for compilation purposes. Activate the Motorla configuration and select the LibrarIEs & Resources panel.
Uncheck the Use Values from "DefaultConfiguration" checkbox.
Click Add Jar/Zip and navigate to {motorola install directory}Emulator7.5lib. Select each .zip file (using ctl+mouse) and click Open.
Click OK to exit the project propertIEs. You are done creating projects configurations for now.
Creating Custom Code Blocks for each Configuration
The second part of the device fragmentation solution is the ability to specify certain blocks of code in your source files as being specific to one or more configurations. This is accomplished by using actions in the right-click context menu of the editor, or from the Edit > Preprocessor Blocks menu.
Open Main.Java, and examine the initStaticData() method. Here, the method is determining at runtime which device-specific APIs are available, and then behaving accordingly. This is a very clever solution to some parts of the device fragmentation problem. Unfortunately, it also has the problem of being increasing the size of the distribution Jar, impacting runtime performance, adding complexity to the sources, and does not solve all fragmentation problems (as you will see later).
Here is the pertinent part of initStaticData():
  vendor = 0;
  try
  {
    // Nokia
    Class.forName("com.nokia.mid.sound.Sound");
    vendor = 1;
    try
    {
      Class.forName("com.nokia.mid.ui.DeviceControl");
      com.nokia.mid.ui.DeviceControl.setLights(0,100);
      vendor = 2;
    }
    catch(Exception ex2){}
  }
  catch(Exception ex){}
  try
  {
    // Vodafone
    Class.forName("com.vodafone.v10.system.device.DeviceControl");
    com.vodafone.v10.system.device.DeviceControl.getDefaultDeviceControl().
      setDeviceActive(com.vodafone.v10.system.device.DeviceControl.BACK_LIGHT,
      true);
    vendor = 3;
  }
  catch(Exception ex){}
  try
  {
    // Motorola
    Class.forName("com.motorola.multimedia.Vibrator");
    Class.forName("com.motorola.multimedia.Lighting");
    com.motorola.multimedia.Lighting.backlightOn();
    vendor = 4;
  }
  catch(Exception ex){}
Remove all of the functionality that is only dealing with determining which device the program is running on, so the code you are left looks like following:// Nokia
com.nokia.mid.ui.DeviceControl.setLights(0,100);
// Vodafone
com.vodafone.v10.system.device.DeviceControl.
getDefaultDeviceControl().
setDeviceActive(com.vodafone.v10.system.device.DeviceControl.BACK_LIGHT,
true);
// Motorola
com.motorola.multimedia.Lighting.backlightOn();
You now have three blocks of code that should be associated with your different configurations.
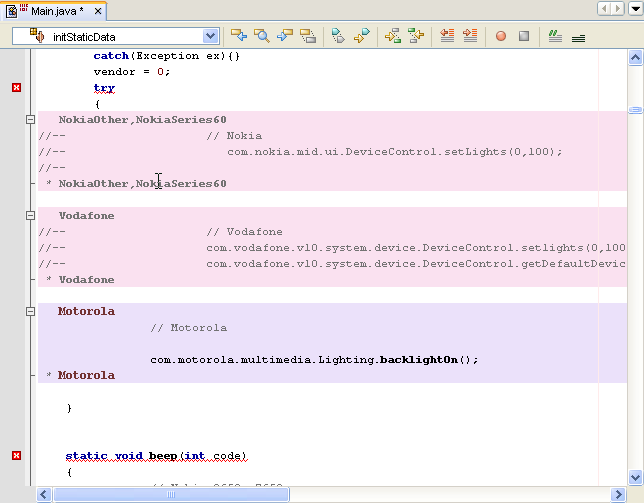
Highlight the Motorola-specific lines, then right-click on the editor and select Preprocessor Blocks>Motorola.
Repeat this step for the Vodafone block (Preprocessor Blocks > Vodafone).
For the Nokia code, select Preprocessor Blocks>Manage Preprocessor Block.
This opens the Manage Preprocessor Block dialog.
Select the options for both NokiaOther and NokiaSerIEs60 and click OK.
These code blocks are now associated with the configurations listed in the headers and footers of the preprocessor blocks. Changing the project's active configuration will trigger a preprocessor that will comment in and out blocks based on if the active configuration is a part of the preprocessor block's header and footer.

Change the project's active configuration by using the combo box in the main toolbar.
You can also do this by right-clicking on the project node>Set Active Project Configuration>select configuration from the same menu in the main Build menu, or by toggling the Configuration combo in the main toolbar (if your project is currently the main project).
Notice that the code block highlighting switches colors to identify which blocks are active or inactive. The active configuration name is also highlighted a different color in the header/footer of the code blocks.
Remove all the instances of class.forName() from the beep() method. If you also condense the if blocks, you are left with the following code:if (midlet.muteSound == 0)
{
// Nokia 3650, 7650
com.nokia.mid.sound.Sound sound = new com.nokia.mid.sound.Sound(1000,100);
sound.play(1);
// All other Nokias
com.nokia.mid.sound.Sound sound = new com.nokia.mid.sound.Sound(1000,100);
sound.play(1);
}
if (midlet.useVibra == 1)
{
// Nokia
com.nokia.mid.ui.DeviceControl.startVibra(50,500);
// Vodafone SDK
com.vodafone.v10.system.device.DeviceControl.
getDefaultDeviceControl().
setDeviceActive(
com.vodafone.v10.system.device.DeviceControl.VIBRATION,
true);
vibra_delay = 10;
// Motorola 7.5
com.motorola.multimedia.Vibrator.
setVibrateTone(
com.motorola.multimedia.Vibrator.VIBRATE_LONG);
com.motorola.multimedia.Vibrator.vibrateFor(500);
}
You should be able to associate each block with the correct configuration. Remember to associate the Nokia vibration control call with both Nokia configurations.
The run() method also contains a Vodafone-specific call. Remove the try/catch blocks and associate the two lines with the Vodafone configuration.
We're almost done. The final step is to somehow handle Nokia's FullCanvas.
Activate the NokiaSerIEs60 configuration.
Right click on the FullCanvas declaration and select Create If/Else Block (NokiaSerIEs60).
Right click on the first block and add NokiaOther.
Right click on the second block and add NokiaOther.
The second block is an Inverted block. Change the inverted block class definition to extend Canvas.
When you are done, your class definition should appear like so:
