Elasticsearch之client源碼簡要分析,elasticsearchclient
問題
讓我們帶著問題去學習,效率會更高
1 es集群只配置一個節點,client是否能夠自動發現集群中的所有節點?是如何發現的?
2 es client如何做到負載均衡?
3 一個es node掛掉之後,es client如何摘掉該節點?
4 es client node檢測分為兩種模式(SimpleNodeSampler和SniffNodesSampler),有什麼不同?
核心類
- TransportClient es client對外API類
- TransportClientNodesService 維護node節點的類
- ScheduledNodeSampler 定期維護正常節點類
- NettyTransport 進行數據傳輸
- NodeSampler 節點嗅探器
Client初始化過程
初始化代碼
1  Settings.Builder builder = Settings.settingsBuilder()
                                   .put("cluster.name", clusterName)
                                   .put("client.transport.sniff", true);
Settings settings = builder.build();
2  TransportClient client = TransportClient.builder().settings(settings).build();
3  for (TransportAddress transportAddress : transportAddresses) {
    client.addTransportAddress(transportAddress);
}
1 ES 通過builder模式構造了基礎的配置參數;
2 通過build構造了client,這個時候包括構造client、初始化ThreadPool、構造TransportClientNodesService、啟動定時任務、定制化嗅探類型;
3 添加集群可用地址,比如我只配了集群中的一個節點;
構建client
調用build API

其中,關於依賴注入的簡單說明:Guice 是 Google 用於 Java™ 開發的開放源碼依賴項注入框架(感興趣的可以了解下,這裡不做重點講解),具體可參考下邊鏈接:
初始化TransportClientNodesService
在上一幅圖的 modules.createInjector對TransportClientNodesService進行實例化,在TransportClient進行注入,可以看到TransportClient裡邊的絕大部分API都是通過TransportClientNodesService進行代理的
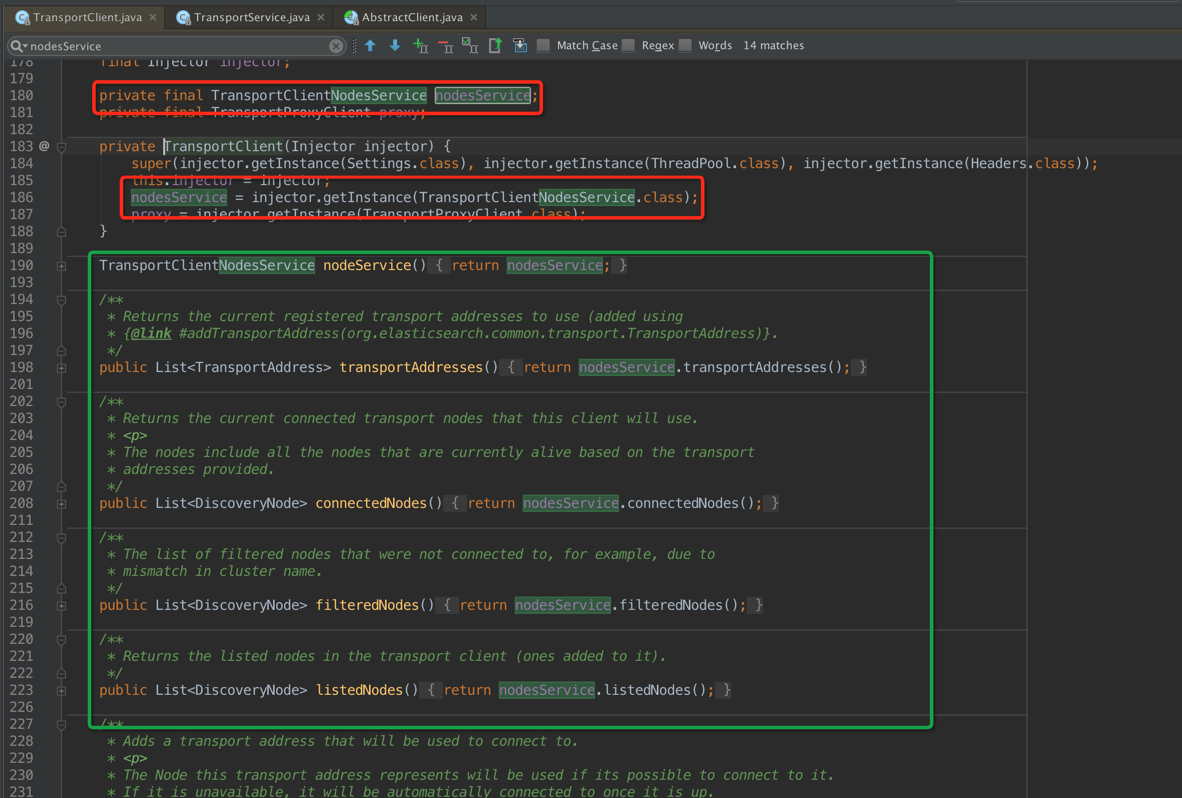
Guice通過注解進行注入
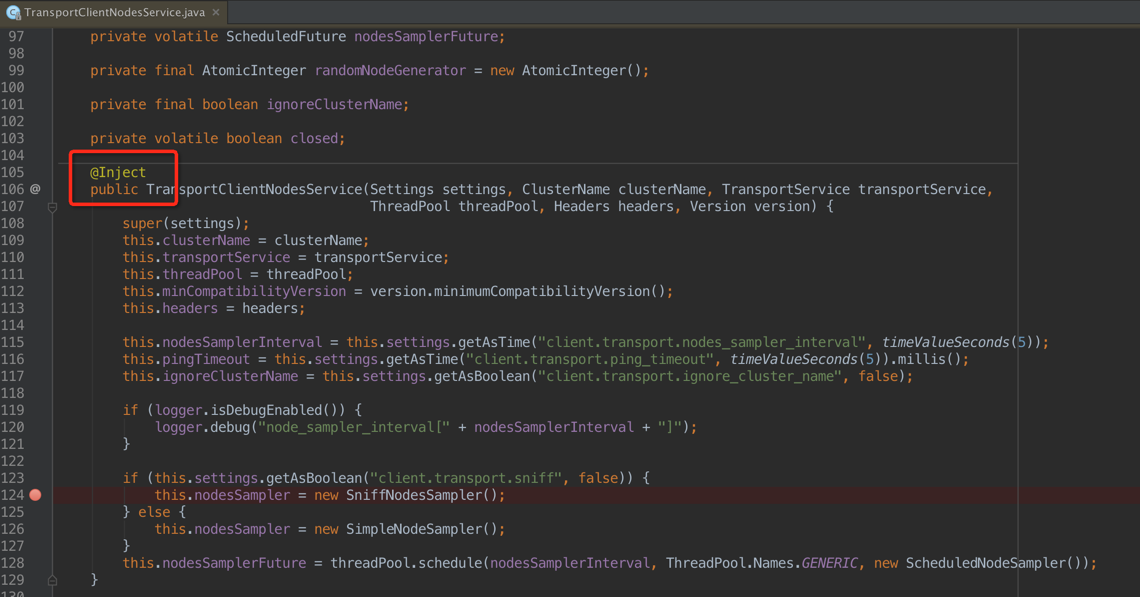
在上圖中:注入了集群名稱、線程池等,重點是如下代碼:該段代碼選擇了節點嗅探器的類型 嗅探同一集群中的所有節點(SniffNodesSampler)或者是只關注配置文件配置的節點(SimpleNodeSampler)
if (this.settings.getAsBoolean("client.transport.sniff", false)) {
    this.nodesSampler = new SniffNodesSampler();
} else {
    this.nodesSampler = new SimpleNodeSampler();
}
特點:
SniffNodesSampler:client會主動發現集群裡的其他節點,會創建fully connect(什麼叫fully connect?後邊說)
SimpleNodeSampler:ping listedNodes中的所有node,區別在於這裡創建的都是light connect;
其中TransportClientNodesService維護了三個節點存儲數據結構:
// nodes that are added to be discovered
1 private volatile List<DiscoveryNode> listedNodes = Collections.emptyList();
2 private volatile List<DiscoveryNode> nodes = Collections.emptyList();
3 private volatile List<DiscoveryNode> filteredNodes = Collections.emptyList();
1 代表配置文件中主動加入的節點;
2 代表參與請求的節點;
3 過濾掉的不能進行請求處理的節點;
Client如何做到負載均衡
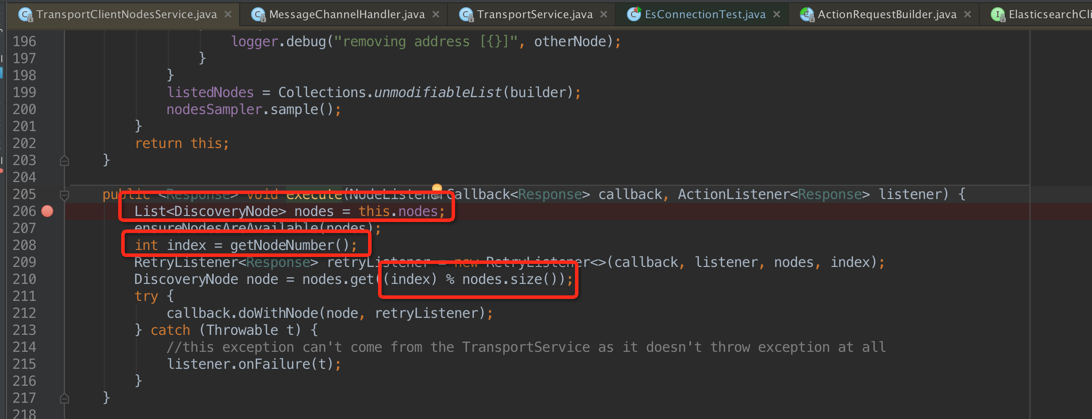
如上圖,我們發現每次 execute 的時候,是從 nodes 這個數據結構中獲取節點,然後通過簡單的 rouund-robbin 獲取節點服務器;核心代碼如下:
private final AtomicInteger randomNodeGenerator = new AtomicInteger();
......
private int getNodeNumber() {
    int index = randomNodeGenerator.incrementAndGet();
    if (index < 0) {
        index = 0;
        randomNodeGenerator.set(0);
    }
    return index;
}
然後通過netty的channel將數據寫入,核心代碼如下:

![]()
public void sendRequest(final DiscoveryNode node, final long requestId, final String action, final TransportRequest request, TransportRequestOptions options) throws IOException, TransportException {
1 Channel targetChannel = nodeChannel(node, options);
if (compress) {
options = TransportRequestOptions.builder(options).withCompress(true).build();
}
byte status = 0;
status = TransportStatus.setRequest(status);
ReleasableBytesStreamOutput bStream = new ReleasableBytesStreamOutput(bigArrays);
boolean addedReleaseListener = false;
try {
bStream.skip(NettyHeader.HEADER_SIZE);
StreamOutput stream = bStream;
// only compress if asked, and, the request is not bytes, since then only
// the header part is compressed, and the "body" can't be extracted as compressed
if (options.compress() && (!(request instanceof BytesTransportRequest))) {
status = TransportStatus.setCompress(status);
stream = CompressorFactory.defaultCompressor().streamOutput(stream);
}
// we pick the smallest of the 2, to support both backward and forward compatibility
// note, this is the only place we need to do this, since from here on, we use the serialized version
// as the version to use also when the node receiving this request will send the response with
Version version = Version.smallest(this.version, node.version());
stream.setVersion(version);
stream.writeString(action);
ReleasablePagedBytesReference bytes;
ChannelBuffer buffer;
// it might be nice to somehow generalize this optimization, maybe a smart "paged" bytes output
// that create paged channel buffers, but its tricky to know when to do it (where this option is
// more explicit).
if (request instanceof BytesTransportRequest) {
BytesTransportRequest bRequest = (BytesTransportRequest) request;
assert node.version().equals(bRequest.version());
bRequest.writeThin(stream);
stream.close();
bytes = bStream.bytes();
ChannelBuffer headerBuffer = bytes.toChannelBuffer();
ChannelBuffer contentBuffer = bRequest.bytes().toChannelBuffer();
buffer = ChannelBuffers.wrappedBuffer(NettyUtils.DEFAULT_GATHERING, headerBuffer, contentBuffer);
} else {
request.writeTo(stream);
stream.close();
bytes = bStream.bytes();
buffer = bytes.toChannelBuffer();
}
NettyHeader.writeHeader(buffer, requestId, status, version);
2 ChannelFuture future = targetChannel.write(buffer);
ReleaseChannelFutureListener listener = new ReleaseChannelFutureListener(bytes);
future.addListener(listener);
addedReleaseListener = true;
transportServiceAdapter.onRequestSent(node, requestId, action, request, options);
} finally {
if (!addedReleaseListener) {
Releasables.close(bStream.bytes());
}
}
}
View Code
其中最重要的就是1和2,中間一段是處理數據和進行一些必要的步驟
1代表拿到一個連接;
2代表通過拿到的連接寫數據;
這時候就會有新的問題
1 nodes的數據是何時寫入的?
2 連接是什麼時候創建的?
Nodes數據何時寫入
核心是調用doSampler,代碼如下:
![]()
protected void doSample() {
// the nodes we are going to ping include the core listed nodes that were added
// and the last round of discovered nodes
Set<DiscoveryNode> nodesToPing = Sets.newHashSet();
for (DiscoveryNode node : listedNodes) {
nodesToPing.add(node);
}
for (DiscoveryNode node : nodes) {
nodesToPing.add(node);
}
final CountDownLatch latch = new CountDownLatch(nodesToPing.size());
final ConcurrentMap<DiscoveryNode, ClusterStateResponse> clusterStateResponses = ConcurrentCollections.newConcurrentMap();
for (final DiscoveryNode listedNode : nodesToPing) {
threadPool.executor(ThreadPool.Names.MANAGEMENT).execute(new Runnable() {
@Override
public void run() {
try {
if (!transportService.nodeConnected(listedNode)) {
try {
// if its one of the actual nodes we will talk to, not to listed nodes, fully connect
if (nodes.contains(listedNode)) {
logger.trace("connecting to cluster node [{}]", listedNode);
transportService.connectToNode(listedNode);
} else {
// its a listed node, light connect to it...
logger.trace("connecting to listed node (light) [{}]", listedNode);
transportService.connectToNodeLight(listedNode);
}
} catch (Exception e) {
logger.debug("failed to connect to node [{}], ignoring...", e, listedNode);
latch.countDown();
return;
}
}
//核心是在這裡,剛剛開始初始化的時候,可能只有配置的一個節點,這個時候會通過這個地址發送一個state狀態監測
//"cluster:monitor/state"
transportService.sendRequest(listedNode, ClusterStateAction.NAME,
headers.applyTo(Requests.clusterStateRequest().clear().nodes(true).local(true)),
TransportRequestOptions.builder().withType(TransportRequestOptions.Type.STATE).withTimeout(pingTimeout).build(),
new BaseTransportResponseHandler<ClusterStateResponse>() {
@Override
public ClusterStateResponse newInstance() {
return new ClusterStateResponse();
}
@Override
public String executor() {
return ThreadPool.Names.SAME;
}
@Override
public void handleResponse(ClusterStateResponse response) {
/*通過回調,會在這個地方返回集群中類似下邊所有節點的信息
{
"version" : 27,
"state_uuid" : "YSI9d_HiQJ-FFAtGFCVOlw",
"master_node" : "TXHHx-XRQaiXAxtP1EzXMw",
"blocks" : { },
"nodes" : {
"7" : {
"name" : "es03",
"transport_address" : "1.1.1.1:9300",
"attributes" : {
"data" : "false",
"master" : "true"
}
},
"6" : {
"name" : "common02",
"transport_address" : "1.1.1.2:9300",
"attributes" : {
"master" : "false"
}
},
"5" : {
"name" : "es02",
"transport_address" : "1.1.1.3:9300",
"attributes" : {
"data" : "false",
"master" : "true"
}
},
"4" : {
"name" : "common01",
"transport_address" : "1.1.1.4:9300",
"attributes" : {
"master" : "false"
}
},
"3" : {
"name" : "common03",
"transport_address" : "1.1.1.5:9300",
"attributes" : {
"master" : "false"
}
},
"2" : {
"name" : "es01",
"transport_address" : "1.1.1.6:9300",
"attributes" : {
"data" : "false",
"master" : "true"
}
},
"1" : {
"name" : "common04",
"transport_address" : "1.1.1.7:9300",
"attributes" : {
"master" : "false"
}
}
},
"metadata" : {
"cluster_uuid" : "_na1x_",
"templates" : { },
"indices" : { }
},
"routing_table" : {
"indices" : { }
},
"routing_nodes" : {
"unassigned" : [ ],
}
}
*/
clusterStateResponses.put(listedNode, response);
latch.countDown();
}
@Override
public void handleException(TransportException e) {
logger.info("failed to get local cluster state for {}, disconnecting...", e, listedNode);
transportService.disconnectFromNode(listedNode);
latch.countDown();
}
});
} catch (Throwable e) {
logger.info("failed to get local cluster state info for {}, disconnecting...", e, listedNode);
transportService.disconnectFromNode(listedNode);
latch.countDown();
}
}
});
}
try {
latch.await();
} catch (InterruptedException e) {
return;
}
HashSet<DiscoveryNode> newNodes = new HashSet<>();
HashSet<DiscoveryNode> newFilteredNodes = new HashSet<>();
for (Map.Entry<DiscoveryNode, ClusterStateResponse> entry : clusterStateResponses.entrySet()) {
if (!ignoreClusterName && !clusterName.equals(entry.getValue().getClusterName())) {
logger.warn("node {} not part of the cluster {}, ignoring...", entry.getValue().getState().nodes().localNode(), clusterName);
newFilteredNodes.add(entry.getKey());
continue;
}
//接下來在這個地方拿到所有的data nodes 寫入到nodes節點裡邊
for (ObjectCursor<DiscoveryNode> cursor : entry.getValue().getState().nodes().dataNodes().values()) {
newNodes.add(cursor.value);
}
}
nodes = validateNewNodes(newNodes);
filteredNodes = Collections.unmodifiableList(new ArrayList<>(newFilteredNodes));
}
View Code
其中調用時機分為兩部分:
1 client.addTransportAddress(transportAddress);
2 ScheduledNodeSampler,默認每隔5s會進行一次對各個節點的請求操作;
連接是何時創建的呢
也是在doSampler調用,最終由NettryTransport創建
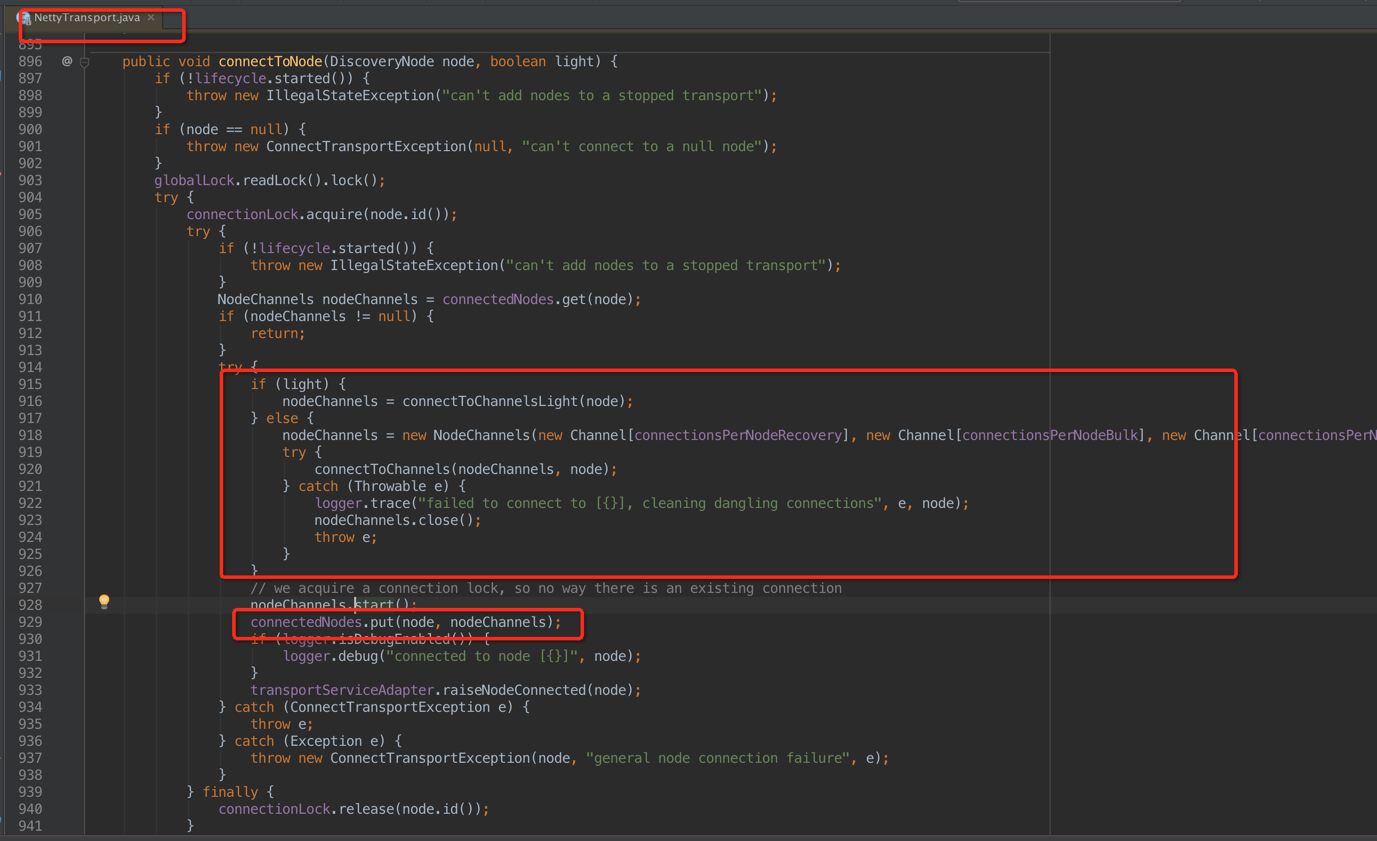
這個時候發現,如果是light則創建輕連接,也就是,否則創建fully connect,其中包括
- recovery:做數據恢復recovery,默認個數2個;
- bulk:用於bulk請求,默認個數3個;
- med/reg:典型的搜索和單doc索引,默認個數6個;
- high:如集群state的發送等,默認個數1個;
- ping:就是node之間的ping咯。默認個數1個;
對應的代碼為:
public void start() {
    List<Channel> newAllChannels = new ArrayList<>();
    newAllChannels.addAll(Arrays.asList(recovery));
    newAllChannels.addAll(Arrays.asList(bulk));
    newAllChannels.addAll(Arrays.asList(reg));
    newAllChannels.addAll(Arrays.asList(state));
    newAllChannels.addAll(Arrays.asList(ping));
    this.allChannels = Collections.unmodifiableList(newAllChannels);
}